
Looking for a yarn?


Comments / Questions (6)
![]() Iwona wrote:
Iwona wrote:
Nie bardzo rozumiem opis 1 okrążenia kciuka. Jest 9 oczek zamkniętych, w które przerabiamy 9 słupków (pierwszy z 3 o łańcuszka). Jak przerobić okrążenie do końca, od 6 sł w o ponad kciukiem, aby otrzymać finalnie 12 słupków?
29.10.2022 - 13:24DROPS Design answered:
Witaj Iwono, W oczko łańcuszka ponad kciukiem przerabiać następująco: *przerobić 2 słupki razem następująco: 1 słupek wokół oczka łańcuszka, ale nie wykonywać ostatniego narzutu, przerobić jeszcze 1 słupek wokół tego samego oczka łąńcuszka w taki sam sposób, wykonać 1 narzut i przeciągnąć nitkę przez wszystkie pętelki na szydełku.* Powtórzyć od *-* w to samo oczko łańcuszka (ponad kciukiem) jeszcze 2 razy. Otrzymamy 3 słupki (9+3=12) Pozdrawiamy!
01.11.2022 - 17:03
![]() Laura wrote:
Laura wrote:
Salve, sono una principiante. Ho iniziato questo progetto e sono riuscita a fare senza problemi la prima muffola, quella sinistra. Ora però non riesco a capire come fare la destra. Come si fanno gli aumenti? Come si fa a fare il pollice dall’altra parte? Grazie in anticipo per la risposta.
18.01.2021 - 00:10DROPS Design answered:
Buonasera Laura, per la prima muffola si aumenta per il pollice a ogni lato della 1° maglia, per la seconda muffola a ogni lato dell'ultima maglia. Buon lavoro!
18.01.2021 - 18:58
![]() Leonie wrote:
Leonie wrote:
"Je 1 Kett-M in die 9-11 ersten Stb häkeln (= Daumen-M), 3 Lm (= 1 Stb), dann 1 Stb in jedes Stb und A.1 wie zuvor, enden mit 1 Lm und 1 Kett-M in die 3. Lm des Rd-Beginns = 18-21 Stb, A.1 und 1 Lm in der Rd." Sollten es nicht eigentlich 19 Stb bei Größe S/M sein? In der nächsten Runde wird es ja auch nur eine Masche mehr, da man am Ende 3 Stb zusammenhäkelt (=20 Stb). Bei Größe L/XL sind es ja auch zuerst 21 Stb und dann in der nächsten Runde 22.
29.10.2020 - 14:29
![]() Gosia wrote:
Gosia wrote:
Nie za bardzo rozumiem gdzie mam dodawać słupki w tych okrążeniach: "Na wys. 9-10 cm od dołu robótki dodać na kciuk 1 sł z każdej strony 1-szego sł w okr. (= 2 dodane sł) - dodać 1 sł przerabiając 2 sł w ten sam sł." Gdzie jest każda strona 1-szego sł w okr.? Bardzo bym prosiła o dokładniejsze wyjaśnienie.
21.11.2016 - 15:37DROPS Design answered:
Witam, w 1-szy sł w okrążeniu należy przer. 3 sł, wtedy zostaną dodane 2 sł z każdej strony 1-szego sł w okrążeniu. POWODZENIA!
21.11.2016 - 20:46Orphia Patterson wrote:
I am a crocheter and I really do love your pieces and the fact that you have allowed anyone to reproduce them. I would love to get some of your yarns though. In fact, I love everything. Thank you DROPS DESIGN.
23.11.2015 - 23:08DROPS Design answered:
Dear Mrs Patterson, thank you for your feedback. You will find here a list of our retailers - choose your country or contact this store for worldwide shipping. Happy crocheting!
24.11.2015 - 09:37
![]() Ursula wrote:
Ursula wrote:
Ist das nicht der falsche Text? Beschreibung ist genau das gleiche wie bei den Hausschuhen Nr. 166-33. Bitte um die richtige Anleitung für die Handschuhe Nr. 166-31.
06.08.2015 - 22:48DROPS Design answered:
Ja, Sie haben Recht, da ist etwas durcheinander geraten. Der Fehler wurde behoben, nun finden Sie die passende Anleitung für die Fäustlinge. Viel Spaß beim Häkeln!
07.08.2015 - 08:29
|
|||||||||||||
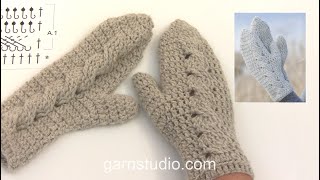
Snowdrift Gloves#snowdriftgloves |
|||||||||||||
|
|
|||||||||||||
Crochet DROPS mittens with cable in ”Nepal”.
DROPS 166-31 |
|||||||||||||
|
PATTERN: See diagram A.1. CROCHET INFO: At beg of every dc round, replace first dc with 3 ch and finish round with 1 sl st in first 3rd ch from beg of round. RELIEF: When working 1 relief dc or 1 relief dtr it is to work around 1 st from previous round (do not work in loops but around the dc from the front). 6 DTR CABLE: Skip 5 dc, 1 RELIEF - see explanation above - dtr around next dc, 1 relief dtr around 5th st skipped, 1 relief dtr around 4th st skipped, 1 relief dtr around first st skipped, 1 relief dtr around 2nd st skipped and 1 relief dtr around the 3rd st skipped. DECREASE TIP: Dec 1 dc by working 2 dc tog as follows: Work 1 dc in next dc but wait with last pull through, work 1 dc in next dc the same way, make 1 YO and pull yarn through all 3 sts on hook. 3 DC TOG: Work 3 dc tog as follows: Work 1 dc around ch but wait with last pull through, work 2 dc around same ch the same way, make 1 YO and pull yarn through all sts on hook. WORKING 2 SC TOG: Dec 1 sc by working 2 sc tog as follows: * Insert hook in next st, get yarn *, repeat from *-* one more time, make a YO and pull yarn through all 3 sts on hook. ---------------------------------------------------------- MITTEN: Work 32-37 ch on hook size 4.5 mm/US 7 with Nepal and form 1 ring with 1 sl st in first ch. Work 3 ch – READ CROCHET INFO, work 1 dc in first ch in ch-ring (= 2 dc), * 1 dc in each of the next ch 5, skip 1 ch *, repeat from *-* until 1-0 ch remain, 1 dc in last 1-0 ch, finish with 1 sl st in 3rd ch = 28-32 dc. Work 1 round with 1 dc in back loop of every dc AT THE SAME TIME dec 0-2 dc evenly - READ DECREASE TIP = 28-30 dc. REMEMBER THE CROCHET GAUGE! Then work as follows: Work 4 dc, work pattern according to diagram A.1 over the next 8 dc, 1 dc in each of the last 16-18 dc AT THE SAME TIME dec 1-0 sts = 19-22 dc + A.1. Continue with 1 dc in every dc and A.1. When piece measures 9-10 cm / 4", inc 1 dc for thumb on each side of the first dc on round (= 2 dc inc) - inc 1 dc by working 2 dc in same dc. Repeat inc on each side of this st every round 4-5 times in total = 27-32 dc + A.1 on round (thumb sts = 9-11 dc). Work 1 sl st in each of the first 9-11 dc (= thumb sts) at beg of round, 3 ch (= 1 dc), then work 1 dc in every dc and A.1 as before, finish with 1 ch and 1 sl st in 3rd ch at beg of round = 18-21 dc, A.1 and 1 ch on round. On next round, work 1 dc in every dc, A.1 as before and around ch at the end of round work 3 dc TOG - see explanation above = 20-22 dc and A.1. Continue with 1 dc in every dc and A.1 until mitten measures 20-22 cm / 8 3/4" (try on the mitten, approx. 4 cm / 1½" remains until finished measurements). Adjust so that next round is 2nd round in A.1. Continue to work as follows: ROUND 1: Work 1 dc in every dc AT THE SAME TIME dec 10 dc evenly (work approx. every 2nd and 3rd dc tog) = 18-20 dc. ROUND 2: Work 1 round with 1 dc in every dc. ROUND 3: Work dc tog 2 by 2 = 9-10 dc. ROUND 4: Work dc tog 2 by 2. Cut the yarn, baste it up and down through sts at the top of mitten, pull yarn to tighten and fasten tightly. THUMB: ROUND 1: Work 1 sl st in the first of the 9-11 thumb sts, 3 ch (= 1 dc), then work 1 dc in each of the 8-10 dc, then work 6 dc in st behind thumb AT THE SAME TIME work these 6 dc tog 2 by 2 = 12-14 dc. ROUNDS 2- 3: Work 1 dc in every dc = 12-14 dc. Try the mitten on, approx. 1 cm / 3/8" remains until finished thumb measurements. Work 1 more round with 1 dc in every dc if needed. ROUND 4: Work 1 dc in every dc AT THE SAME TIME work 2 and 2 dc tog = 6-7 dc. ROUND 5: Work 1 sc in every dc AT THE SAME TIME work 2 and 2 sc tog - READ WORKING 2 SC TOG. Cut the yarn, baste it up and down through sts at the top of thumb, pull yarn to tighten and fasten tightly. Work another mitten but inc on each side of last st on round. |
|||||||||||||
Diagram explanations |
|||||||||||||
|
|||||||||||||
 |
|||||||||||||
Have you finished this pattern?Tag your pictures with #dropspattern #snowdriftgloves or submit them to the #dropsfan gallery. Do you need help with this pattern?You'll find 10 tutorial videos, a Comments/Questions area and more by visiting the pattern on garnstudio.com. © 1982-2025 DROPS Design A/S. We reserve all rights. This document, including all its sub-sections, has copyrights. Read more about what you can do with our patterns at the bottom of each pattern on our site. |
|||||||||||||


With over 40 years in knitting and crochet design, DROPS Design offers one of the most extensive collections of free patterns on the internet - translated to 17 languages. As of today we count 319 catalogs and 12042 patterns - 12032 of which are translated into English (US/in).
We work hard to bring you the best knitting and crochet have to offer, inspiration and advice as well as great quality yarns at incredible prices! Would you like to use our patterns for other than personal use? You can read what you are allowed to do in the Copyright text at the bottom of all our patterns. Happy crafting!
Post a comment to pattern DROPS 166-31
We would love to hear what you have to say about this pattern!
If you want to leave a question, please make sure you select the correct category in the form below, to speed up the answering process. Required fields are marked *.