DROPS Nepal
DROPS Nepal
65% Wool, 35% Alpaca
from 3.30 $ /50g
Get the yarn to make this pattern from 26.40$.

The yarn cost is calculated from the pattern’s smallest size and the yarn’s cheapest product type. Looking for an even better price? You might find it on the DROPS Deals!

DROPS Super Sale

Snowdrift

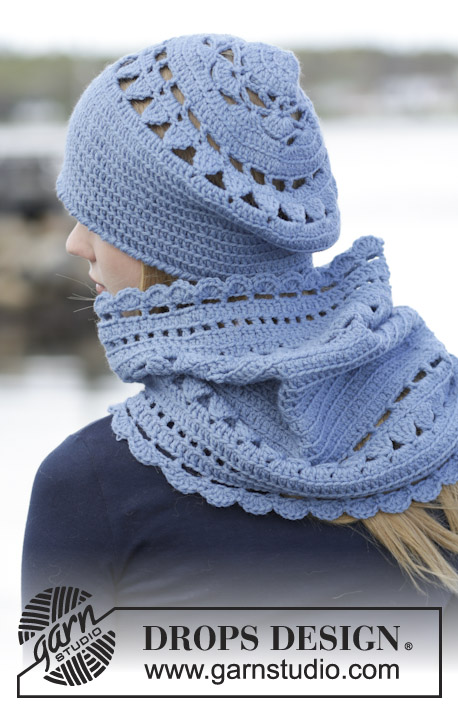
Set consists of: Crochet DROPS hat and neck warmer with cables in ”Nepal”. DROPS design: Pattern no ne-191

DROPS 166-32
Yarn group C or A + A
----------------------------------------------------------
HAT:
Size: One-size
Head circumference: approx. 54-58 cm / 21"-22 3/4"
Materials:
DROPS NEPAL from Garnstudio
150 g color no 0500, light gray

DROPS CROCHET Hook size 4.5 mm/US 7 – or size needed to get 16 dc x 9 rows = 4'' x 4'' (10 x 10 cm).

NECK WARMER:
Size: S/M – L/XL
Measurements: Circumference at the top: 57-64 cm / 22½"-25 1/4" Circumference at the bottom: 84-93 cm / 33"-36½" Height: 25-26 cm / 9 3/4"-10 1/4"
Materials:
DROPS NEPAL from Garnstudio
250 g for both sizes in color no 0500, light gray

DROPS CROCHET Hook size 5 mm / H/8 – or size needed to get 14 dc x 8.5 rows = 4'' x 4'' (10 x 10 cm).

-------------------------------------------------------

Alternative Yarn – See how to change yarns here
Yarn Groups A to F – Use the same pattern and change the yarn here
Yarn usage using an alternative yarn – Use our yarn converter here

-------------------------------------------------------

DROPS Nepal
DROPS Nepal
65% Wool, 35% Alpaca
from 3.30 $ /50g
Get the yarn to make this pattern from 26.40$.

The yarn cost is calculated from the pattern’s smallest size and the yarn’s cheapest product type. Looking for an even better price? You might find it on the DROPS Deals!

DROPS Super Sale

SAVE 30% on 6 cotton favorites!
Valid until 04.12.2024

Pattern instructions

NOTE: This pattern is written in American English. All measurements in charts are in cm. For conversion from inches to cm - click here. There are different terms for crocheting in American and British English. If this pattern includes crochet, click for "crochet terms" here. For this pattern in British English, please click here.
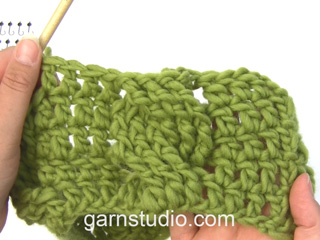
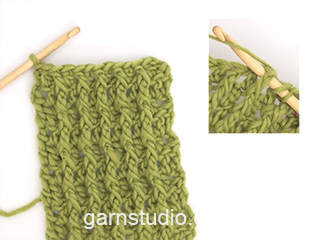
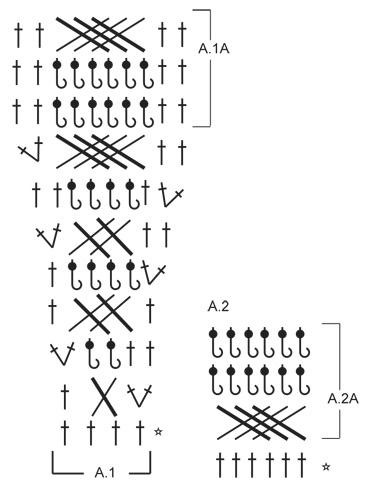
PATTERN:
See diagrams A.1-A.2.

CROCHET INFO:
At beg of every dc round, replace first dc with 3 ch and finish round with 1 sl st in first 3rd ch from beg of round.

RELIEF:
When working 1 relief dc, 1 relief tr or 1 relief dtr it is to work around 1 st from previous round (do not work in loops but around the dc from front).

2 TR CABLE:
Skip 1 dc, 1 relief tr around next dc, 1 relief tr around dc skipped.

4 TR CABLE:
Skip 3 dc, 1 relief tr around next dc, 1 relief tr around 3rd st skipped, 1 relief tr around first st skipped, 1 relief tr around 2nd st skipped.

6 DTR CABLE:
Skip 5 dc, 1 relief dtr around next dc, 1 relief dtr around 5th st skipped, 1 relief dtr around 4th st skipped, 1 relief dtr around first st skipped, 1 relief dtr around 2nd st skipped and 1 relief dtr around 3rd st skipped.

INCREASE TIP:
Work 2 dc in same dc

REVERSE CROCHET:
Work as sc but backwards. I.e. crochet around from left to right
----------------------------------------------------------

HAT:
The piece is worked top down. Crochet 4 ch on hook size 4.5 mm/US 7 with Nepal and form a ring with 1 sl st in first ch.
ROUND 1: Work 18 dc in ring – read CROCHET INFO.
ROUND 2: Work 2 dc in every dc = 36 dc.

Then work A.1 as follows:
A.1 is repeated 9 times in total on round. REMEMBER THE CROCHET GAUGE!
ROUND 1: Work * 2 dc in first/next dc, 2 TR CABLE - see explanation above, over the next 2 dc, 1 dc in next dc *, repeat from *-* the entire round = 45 sts.
ROUND 2: Work * 1 dc in each of the first/next 2 dc, 1 RELIEF dc – see explanation above – around each of the next 2 tr (= cable), 2 dc in next dc *, repeat from *-* the entire round = 54 dc.
ROUND 3: Work * 1 dc in first/next dc, 4 TR CABLE - see explanation above, over the next 4 dc, 1 dc in next dc *, repeat from *-* the entire round.
ROUND 4: Work * 2 dc in first/next dc, 1 relief dc around each of the next 4 tr, 1 dc in next dc *, repeat from *-* the entire round = 63 dc.
ROUND 5: Work * 1 dc in each of the first/next 2 dc, 4 tr cable over the next 4 dc, 2 dc in next dc *, repeat from *-* the entire round = 72 dc.
ROUND 6: Work * 2 dc in first dc, 1 dc in next dc, 1 relief dc around each of the next 4 tr, 1 dc in each of the next 2 dc *, repeat from *-* the entire round = 81 dc.
ROUND 7: Work * 1 dc in each of the first/next 2 dc, 6 Dtr CABLE over the next 6 dc, 2 dc in next dc *, repeat from *-* the entire round = 90 dc.
ROUND 8: Work * 1 dc in each of the first/next 2 dc, 1 relief dc around each of the next 6 dtr, 1 dc in each of the next 2 dc *, repeat from *-* the entire round.
ROUND 9: Work as 8th round.
ROUND 10: Work * 1 dc in each of the first/next 2 dc, 6 dtr cable around each of the next 6 dc, 1 dc in each of the next 2 dc *, repeat from *-* the entire round.
There are now 4 dc between each cable. Repeat 8th-10th round (= A.1A) until piece measures 21 cm / 8 1/4'', adjust to finish with first round in A.1A (= 8th round). Work 1 sc in every dc AT THE SAME TIME dec 10 sts evenly (i.e. work every 8th and 9th st tog) = 80 sc. Work 2 rounds with 1 sc in every sc. Work 1 round with REVERSE CROCHET - see explanation above. Fasten off.
----------------------------------------------------------

NECK WARMER:
The piece is worked top down. Crochet 94-106 ch on hook size 5 mm / H/8 with Nepal and form a ring with 1 sl st in first ch. Work ch 3, 1 dc in first ch in ch-ring (= 2 dc), * 1 dc in each of the next ch 5, skip 1 ch *, repeat from *-* until 3 ch remain, 1 dc in last 3 ch - READ CROCHET INFO = 80-90 dc. Work 1 dc in every dc AT THE SAME TIME inc 10 dc evenly (i.e. inc 1 dc every 8th-9th dc) – READ INCREASE TIP = 90-100 dc. Then work as follows: * 1 dc in each of the first/next 4 dc, work 6 DTR CABLE - see explanation above (= A.2), over the next 6 dc *, repeat from *-* the entire round (= 9-10 times). Repeat A.2A vertically. REMEMBER THE CROCHET GAUGE! Continue pattern like this until piece measures 10-11 cm / 4"-4½". Work next round as follows: * 1 dc in each of the first 3 dc, 2 dc in next dc, A.2A over the next 6 sts as before *, repeat from *-* the entire round (= 9-10 times) = 99-110 dc on round (includes cable dc). Repeat this inc every 4 cm / 1½'' alternately before and after A.2A, 2 more times = 117-130 dc (includes cable dc). Then work * 1 dc in each of the first/next 7 dc, A.2A over the next 6 sts as before *, repeat from *-* until piece measures 23-24 cm / 9"-9½". Adjust to finish with next to last round in A.2A. Work 2 rounds with 1 dc in every dc.

EDGE:
Work 1 edge with REVERSE CROCHET - see explanation above, with 2 strands Nepal. Fasten off. Work the same way in opposite side of piece.

Diagram

All measurements in charts are in cm.

symbols = dc
symbols = 1 relief dc - see explanation in pattern
symbols = 2 tr cable - see explanation in pattern
symbols = 4 tr cable - see explanation in pattern
symbols = 6 dtr cable - see explanation in pattern
symbols = first round is explained in pattern
diagram
Do you have a question? See a list of frequently asked questions (FAQ)

Knitting tension is what determines the final measurements of your work, and is usually measured per 10 x 10 cm. It is provided like so: number of stitches in width x number of rows in height - eg: 19 stitches x 26 rows = 10 x 10 cm.

The knitting tension is very individual; some people knit/crochet loosely while others work tightly. You adjust the knitting tension with the needle size, which is why the suggested needle size only serve as a guide! You need to adjust this (up or down) to ensure that YOUR knitting tension matches the knitting tension provided in the pattern. If you work with a different knitting tension than provided you will have a different yarn consumption, and your work will have different measurements than what the pattern suggests.

The knitting tension also determines which yarns can replace each other. As long as you achieve the same knitting tension you can replace one yarn with another.

See DROPS lesson: How to measure your tension/gauge

See DROPS video: How to make a gauge tension swatch

The required amount of yarn is provided in grams, eg: 450 g. To calculate how many balls you’ll need you first need to know how many grams are in 1 ball (25g, 50g or 100g). This information is available if you click on the individual yarn quality on our pages. Divide the amount required with the amount of each ball. For example, if each ball is 50g (the most common amount), the calculation will be as follows: 450 / 50 = 9 balls.

The important thing when changing from one yarn to another is that the knitting/crochet tension remains the same. This is so that the measurements of the finished piece will be the same as on the sketch provided. It is easier to achieve the same knitting tension using yarns from the same yarn group. It is also possible to work with multiple strands of a thinner yarn to achieve the knitting tension of a thicker one. Please try our yarn converter. We recommend you to always work a test swatch.

Please NOTE: when changing yarn the garment might have a different look and feel to the garment in the photo, due to individual properties and qualities of each yarn.

See DROPS lesson: Can I use a different yarn than the one mentioned in the pattern?

All our yarns are categorised into yarn groups (from A to F) according to thickness and knitting tension – group A contains the thinnest yarns and group F the thickest. This makes it easier for you to find alternative yarns to our patterns, should you wish to switch yarn. All yarns within the same group have a similar knitting tension and can easily replace each other. However, different yarn qualities have different structures and properties which will give the finished work a unique look and feel.

Click here for an overview of the yarns in each yarn group

At the top of all our patterns you’ll find a link to our yarn converter, which is a helpful tool should you wish to use a different yarn than suggested. By filling in the yarn quality you wish to replace, the amount (in your size) and number of strands, the converter will present good alternative yarns with the same knitting tension. Additionally it will tell you how much you’ll require in the new qualities and whether you’ll need to work with multiple strands. Most skeins are 50g (some are 25g or 100g).

If the pattern is worked with multiple colours, every colour will have to be converted separately. Similarly, if the pattern is worked with several strands of different yarns (for example 1 strand Alpaca and 1 strand Kid-Silk) you will have to find alternatives for each, individually.

Click here to see our yarn converter

Since different yarns have different qualities and textures we have chosen to keep the original yarn in our patterns. However, you can easily find options among our available qualities by using our yarn converter, or simply pick a yarn from the same yarn group.

It is possible that some retailers still have discontinued yarns in stock, or that someone has a few skeins at home that they would like to find patterns for.

The yarn converter will provide both alternative yarn as well as required amount in the new quality.

If you think it's hard to decide what size to make, it can be a good idea to measure a garment you own already and like the size of. Then you can pick the size by comparing those measures with the ones available in the pattern's size chart.

You'll find the size chart at the bottom of the pattern.

See DROPS lesson: How to read size chart

The needle size provided in the pattern serves only as a guide, the important thing is to follow the knitting tension. And since knitting tension is very individual, you will have to adjust the needle size to ensure that YOUR tension is the same as in the pattern – maybe you’ll have to adjust 1, or even 2 needle sizes, up or down to achieve the correct tension. For this, we recommend that you work test swatches.

Should you work with a different knitting tension than the one provided, the measurements of the finished garment might deviate from the measurement sketch.

See DROPS lesson: How to measure your tension/gauge

See DROPS video: How to make a gauge tension swatch

Working a garment top-down provides more flexibility and room for personal adjustment. For example it is easier to try the garment on while working, as well as making adjustments to length of yoke and shoulder caps.

The instructions are carefully explaining every step, in the correct order. Diagrams are adjusted to the knitting direction and are worked as usual.

The diagram depicts all rows/rounds, and every stitch seen from the right side. It is read from bottom to top, from right to left. 1 square = 1 stitch.

When working back and forth, every other row is worked from the right side and every other row is worked from the wrong side. When working from the wrong side, the diagram will have to be worked reversed: from left to right, knit stitches are purled, purl stitches are knit etc.

When working in the round every round is worked from the right side and the diagram are worked from right to left on all rounds.

See DROPS lesson: How to read knitting diagrams

The diagram depicts all rows/rounds, and every stitch seen from the right side. It is worked from bottom to top, from right to left.

When working back and forth every other row is worked from the right side: from right to left and every other row is worked from the wrong side: from left to right.

When working in the round, every row in the diagram are worked from the right side, from right to left.

When working a circular diagram you start in the middle and work your way outwards, counter clockwise, row by row.

The rows usually start with a given number of chain stitches (equivalent to the height of the following stitch), this will either be depicted in the diagram or explained in the pattern.

See DROPS lesson: How to read crochet diagrams

Instructions for working several diagrams after each other on the same row/round, will often be written like so: “work A.1, A.2, A.3 a total of 0-0-2-3-4 times". This means you work A.1 once, then A.2 is worked once, and A.3 is repeated (in width) the number of times provided for your size – in this case like so: S = 0 times, M = 0 times, L=2 times, XL= 3 times and XXL = 4 times.

The diagrams are worked as usual: begin with the first row in A.1, then work the first row in A.2 etc.

See DROPS lesson: How to read knitting diagrams

See DROPS lesson: How to read crochet diagrams

The total width of the garment (from wrist-to-wrist) will be larger in the larger sizes, despite the actual sleeves being shorter. The larger sizes have longer sleeve caps and wider shoulders, so there will be a good fit in all sizes.

The measurement sketch/schematic drawing provides information regarding the full length of the garment. If it’s a jumper or a jacket the length is measured from the highest point on the shoulder (usually closest to the neckline), and straight down to the bottom of the garment. It is NOT measured from the tip of shoulder. Similarly, the length of yoke is measured from the highest point on the shoulder and down to where yoke is split into body and sleeves.

See DROPS lesson: How to read a schematic drawing

Diagrams are often repeated on the round or in height. 1 repeat is the diagram the way it appears in the pattern. If it says to work 5 repeats of A.1 in the round, then you work A.1 a total of 5 times after/next to each other in the round. If it says to work 2 repeats of A.1 vertically/in height you work the entire diagram once, then begin again at the start and work the entire diagram one more time.

Chain stitches are slightly narrower than other stitches and to avoid working the cast-on edge too tight, we simply chain more stitches to begin with. The stitch count will be adjusted on the following row to fit the pattern and measurement sketch.

The rib edge is more elastic and will contract slightly compared to, for example, stocking stitch. By increasing before the rib edge, you avoid a visible difference in width between the rib edge and the rest of the body.

It’s very easy to cast off too tightly, and by making yarn overs while casting off (and simultaneously casting these off) you avoid a too tight cast off edge.

See DROPS video: How to bind off with yarn overs (yo)

To achieve an even increase (or decrease) you can increase on, for example: every 3rd and 4th row alternately, like so: work 2 rows and increase on the 3rd row, work 3 rows and increase on the 4th. Repeat this until the increase is complete.

See DROPS lesson: Increase or decrease 1 st on every 3rd and 4th row alternately

Should you prefer to work in the round instead of back and forth, you may of course adjust the pattern. You’ll need to add steeks mid-front (usually 5 stitches), and follow the instructions. When you would normally turn and work from the wrong side, simply work across the steek and continue in the round. At the end you’ll cut the piece open, pick up stitches to work bands, and cover the cut edges.

See DROPS video: How to knit steeks and cut open

Should you prefer to work back and forth instead of in the round, you may of course adjust the pattern so you work the pieces separately and then assemble them at the end. Divide the stitches for the body in 2, add 1 edge stitch in each side (for sewing) and work the front and back pieces separately.

See DROPS lesson: Can I adapt a pattern for circular needles into straight needles?

Pattern repeats can vary slightly in the different sizes, in order to get the correct proportions. If you’re not working the exact same size as the garment in the photo, yours might deviate slightly. This has been carefully developed and adjusted so that the complete impression of the garment is the same in all sizes.

Make sure to follow instructions and diagrams for your size!

If you have found a pattern you like which is available in women’s size it’s not very difficult to convert it to men’s size. The biggest difference will be the length of sleeves and body. Start working on the women size that you think would fit across the chest. The additional length will be worked right before you cast off for the armhole/sleeve cap. If the pattern is worked top-down you can add the length right after the armhole or before the first decrease on sleeve.

Regarding additional yarn amount, this will depend on how much length you add, but it is better with a skein too many than too few.

All yarns will have excess fibres (from production) that might come off as lint or shedding. Brushed yarns (ie hairier yarns) have more of these loose, excess fibres, causing more shedding.

Shedding also depends on what is worn under or over the garment, and whether this pulls at the yarn fibres. It’s therefore not possible to guarantee that there will be no shedding

Below are some tips on how to get the best result when working with hairier yarns:

1. When the garment is finished (before you wash it) shake it vigorously so the looser hairs come off. NOTE: do NOT use a lint roller, brush or any method that pulls at the yarn.

2. Place the garment in a plastic bag and put it in your freezer - the temperature will cause the fibres to become less attached to each other, and excess fibres will come off easier.

3. Leave in the freezer for a few hours before taking it out and shaking it again.

4. Wash the garment according to the instructions on the yarn label.

Pilling is a natural process that happens to even the most exclusive of fibers. It's a natural sign of wear and tear that is hard to avoid, and that is most visible in high friction areas of your garment like a sweater's arms and cuffs.

You can make your garment look as new by removing the pilling, using a fabric comb or a pill/lint remover.

Still can't find the answer you need? Then scroll down and leave your question so one of our experts can try to help you. This will be done normally within 5 to 10 working days.
In the meantime, you can read the questions and answers that others have left to this pattern or join the DROPS Workshop on Facebook to get help from fellow knitters/crocheters!

You might also like...

Post a comment to pattern DROPS 166-32

We would love to hear what you have to say about this pattern!

If you want to leave a question, please make sure you select the correct category in the form below, to speed up the answering process. Required fields are marked *.

Comments / Questions (12)

country flag Lo wrote:

Très joli ! Diagramme très clair, agréable à crocheter, répétitif mais points variés.

08.03.2024 - 13:24

country flag Cath wrote:

Très beaux modèles.....le diagramme est plus clair que les explications. Rapide à crocheter.

22.01.2021 - 15:12

Claudia wrote:

Good morning, I discovered crochet some months ago I am since hooked ! This site is great and the tutorials really help, thank you ! I have made this beautiful hat for my daughter and she loves it. But It seems that the written explanation doesn't match the chart in the UK version. I have done my own version with what I understood from the pattern and my daughter is happy with it.

24.02.2017 - 05:54

DROPS Design answered:

Dear Claudia, you will find all explanation to each cable under written pattern and at the very bottom of the page you will find videos showing how to work the cables. Happy crocheting!

24.02.2017 - 09:56

country flag Mari wrote:

Love it!

20.07.2016 - 13:49

country flag NYC wrote:

Beautiful! I love the variety of your patterns. I hope to be able to do both crochet and knit.

20.07.2016 - 09:35

country flag Maria wrote:

Avrei bisogno del vostro aiuto perché non riesco ad interpretare le spiegazioni date per i vari giri del diagramma A.1 Cosa significa: 1 m.a. in ognuna delle prime 2 m.a./delle 2 m.a. successive ecc. ecc. Non capisco quello che viene detto dopo il tratto verticale, cioè / e dato che questa parte di spiegazione si ripete per quasi tutti i giri, non riesco a capirla, soprattutto se la confronto con il disegno grafico del diagramma. non so se mi sono spiegata. Grazie mille. Maria

29.01.2016 - 20:19

DROPS Design answered:

Buongiorno Maria. La prima volta che lavora le indicazioni tra gli * *, lavora, p.es. 1 m.a nella prime 2 m del giro (quindi vale l'indicazione che precede la /); le volte successive, sempre sullo stesso giro, lavora 1 m.a nelle 2 m successive a quella dove si trova con l'uncinetto (quindi vale l'indicazione dopo la /). Così ogni volta che incontra questo tipo di istruzione. Buon lavoro!

30.01.2016 - 08:08

country flag Manon Plante wrote:

Après avoir tricoté 9 fois A.1 pour le bonnet, le tour 1 la phrase 1 torsade de 2 db au dessus des 2 B suivantes que veut-on dire par au-dessus.... =45m.merci.....

13.11.2015 - 15:51

DROPS Design answered:

Bonjour Mme Plante, on répète 9 fois A.1 en largeur (en rond) - la vidéo ci-dessous montre comment crocheter la torsade de 2 DB au 2ème tour de A.1 - cf onglet "vidéos" à droite de la photo pour les vidéos des autres torsades. Bon crochet!

13.11.2015 - 16:34

Rebecca Gibbs wrote:

I just finished this hat for my friend with cancer. ( She has become very stylish at the clinic with the other patterns I have done from your site). I love this hat with its' texture it is very beautiful and fun for the eye. The edging frames it all in with an extra touch of texture. Wonderful !!!! The cabled pattern was a joy to crochet and I can only imagine will be full of the warmth my friend needs this time of year. thank you.

21.09.2015 - 09:46

country flag Rebecca Gibbs wrote:

Another wonderful hat. just a pointer for those who help others a friend has cancer and picked this wed sight for their hats due to the baldness. I told her how fashionable they were. she loves them and can't wait for this pattern and for all the summer sun hats. happy crocheting

28.05.2015 - 21:40

country flag France wrote:

Félicitation pour cet ensemble! J'aime beaucoup!

27.05.2015 - 21:04