
Looking for a yarn?


Comments / Questions (23)
![]() Marjolein wrote:
Marjolein wrote:
Kunt u zeggen waarom expliciet gekozen is voor een kantsteek in ribbelsteek? Bedankt alvast.
14.01.2025 - 22:26DROPS Design answered:
Dag Marjolein,
In het geval van deze omslagdoek is dat waarschijnlijk een ontwerpkeuze geweest.
15.01.2025 - 19:53
![]() Maria Stjärnljus wrote:
Maria Stjärnljus wrote:
Om mittmaskan alltid ska vara rät hur ska man göra denna ökningen...? Sticka 5 maskor i en maska så här: Sticka omslaget och maskan räta tillsammans, men släpp inte omslaget av vänster sticka. * Gör 1 omslag om stickan, sticka omslaget och maskan räta tillsammans igen *, sticka *-* totalt 2 gånger, och släpp sedan maskan och omslaget av vänster sticka (= 4 maskor ökade).
25.11.2024 - 12:49DROPS Design answered:
Hej Maria, se videoen som viser hvordan man gør. Klik på Videoer øverst i mønsteret og klik på: Hur ökar man maskor i helpatent.... :)
28.11.2024 - 14:21
![]() Maria wrote:
Maria wrote:
När man ska göra första biten patentstickning, ska det vara 35 maskor inklusive eller exklusive kantmaskorna? Det blir bara ojämnt här hur jag än gör
25.11.2024 - 10:31DROPS Design answered:
Hej Maria, du har 35 masker den yderste i hver side strikkes ret og de andre strikkes i patent ifølge opskriften. Prøv med en lille strikkeprøve først, så du ser systemet i patentstrik :)
28.11.2024 - 14:12
![]() Irmgard Rother wrote:
Irmgard Rother wrote:
Ich verstehe die Anleitung nicht richtig - bin Anfängerin - haben Sie ein Erklär-Video? Danke und viele Grüße aus Mannheim
21.10.2024 - 12:09DROPS Design answered:
Liebe Frau Rohter, unter Tab "Videos" oben finden Sie einige Videos, die Ihnen helfen können, sonnst können Sie gerne Ihre Frage hier stellen. Viel Spaß beim Stricken!
21.10.2024 - 15:44
![]() Momo Vaut wrote:
Momo Vaut wrote:
Bonjour, un peu compliqué a comprendre je trouve, augmentations sur les côtes anglaises moi je ne m y retrouve pas au rang suivant, donc j ai arrêté ce modèle et démonté mon travail. Je vais chercher un modèle moins fastidieux. Je trouve depuis un certain temps vos modèles compliqués, voilà 😏
19.03.2024 - 21:30
![]() Susanne wrote:
Susanne wrote:
Sind diese Anleitungen nur für privat oder dürfte man fertige Strickwerke auch verkaufen?
21.02.2024 - 06:48DROPS Design answered:
Liebe Susanne, alle Hinweisen finden Sie im Abschnitt "Copyright" am Ende jeder Anleitungsseite. Viel Spaß beim stricken!
21.02.2024 - 08:25
![]() Henriette Vorup Erecius wrote:
Henriette Vorup Erecius wrote:
Hej - jeg er meget i tvivl og har forsøgt mange gange efterhånden - midter masken, strikkes den ret eller indgår den i hel patent?
12.01.2024 - 09:44DROPS Design answered:
Hej Henriette, du tager 2 masker ud på hver side af den midterste maske, det vil sige at de 2 masker på hver side bliver til patent, men den midterste maske vil altid være en retmaske :)
16.01.2024 - 11:47
![]() Pura Villar wrote:
Pura Villar wrote:
HILERA 2 (lado revés): Tejer 1 punto de orillo en punto musgo, * 1 lazada, deslizar 1 punto como de revés, tejer juntos de derecho la lazada y el punto deslizado * Me es imposible tejer los dos puntos juntos, no se cómo ! Hay algún vídeo que me pueda orientar? Gracias y enhorabuena por vuestro trabajo!
23.10.2023 - 16:34DROPS Design answered:
Hola Pura, puedes ver cómo trabajar el punto inglés en el siguiente video: https://www.garnstudio.com/video.php?id=37&lang=es.
29.10.2023 - 19:21
![]() Riedner wrote:
Riedner wrote:
Hallo, ich habe eine Frage zu den \\\"Streifen im Vollpatent\\\":\\r\\nIn den Reihen 5 und 11 sollen Maschen zugenommen werden. Wenn man die erforderlichen Zunahmen in einer Zunahmereihe zusammenzählt, dann sind es insgesamt 6 Zunahmemaschen: 2 Maschen an den Rändern und 4 in der Mitte. In der Anleitung sind aber 8 zugenommene Maschen angegeben. Ich bitte um Auflösung. Vielen Dank!
10.10.2023 - 23:15DROPS Design answered:
Liebe Frau Riedner, am Anfang der Reihe nehmen Sie 2 Maschen zu, dann in der Mitte nehmen Sie 4 Maschen zu und am Ende der Reihe nehmen Sie 2 Maschen zu = 2+4+2= 8 Maschen werden bei diesen 5. bzw 11. Reihe zugenommen. Viel Spaß beim stricken!
11.10.2023 - 08:37
![]() Marie wrote:
Marie wrote:
Bonjour Voilà deux fois que je recommence ce châle, mais à chaque fois je ne tombe pas juste après la première série de côtes anglaises. Vous annoncez 51 mailles, j'en ai 76... Y a t-il quelque chose que je fais mal ? Merci par avance pour votre réponse.
18.09.2023 - 08:20DROPS Design answered:
Bonjour Marie, quand vous tricotez la rayure en côtes anglaises, vous tricotez sur 35 mailles aux rangs 1 à 4, augmentez 8 mailles au rang 5 (2 m de chaque côté + 4 m au milieu = 43 m), tricotez les 43 m en côtes anglaises comme avant aux rangs 6 à 10. Et, au rang 11, vous augmentez à nouveau 8 mailles comme au rang 5 = vous avez maintenant 51 mailles. Bon tricot!
18.09.2023 - 16:06
|
|
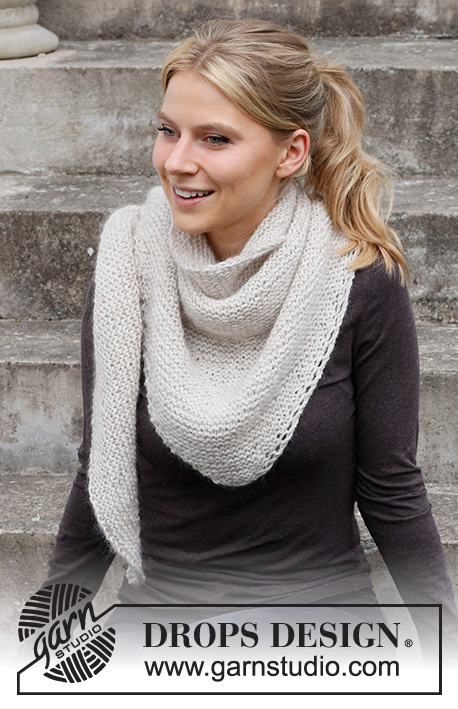
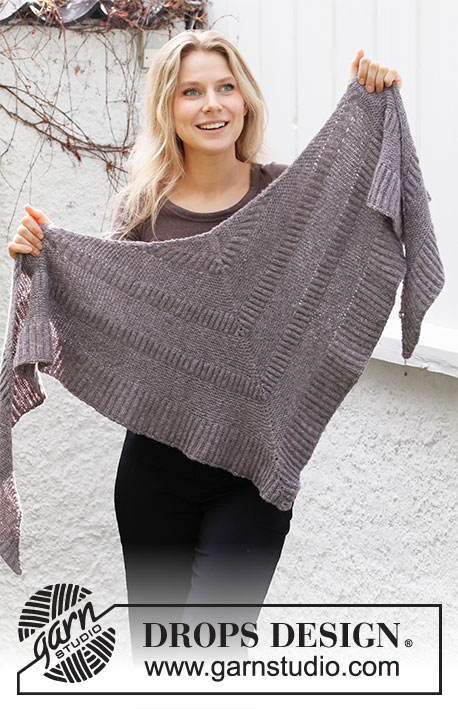
Scotch Mist#scotchmistwrap |
|
 |
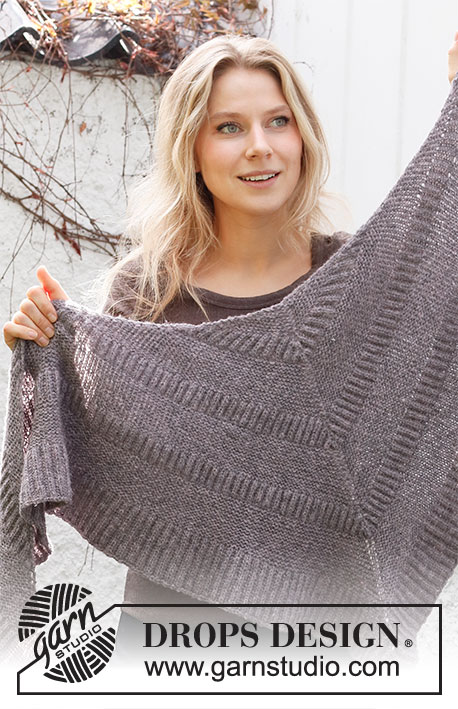 |
Knitted shawl in DROPS Sky. The piece is worked with garter stitch and English rib.
DROPS 214-14 |
|
|
------------------------------------------------------- EXPLANATIONS FOR THE PIECE: ------------------------------------------------------- RIDGE/GARTER STITCH (worked back and forth): Knit all rows. 1 ridge in height = Knit 2 rows. INCREASE TIP: All increases are worked from the right side! Increase 2 stitches in the outermost knitted stitch on each side working 3 stitches in 1 stitch as follows: Knit together the yarn over and stitch, but do not slip them from the left needle, make 1 yarn over and knit together the yarn over and stitch again, slip them from the left needle (= 2 stitches increased). On the next row work the increased stitches without yarn overs as the yarn overs have not yet been made. Increase 4 stitches in the mid-stitch working 5 stitches in 1 stitch as follows: Knit together the yarn over and stitch, but do not slip them from the left needle. * Make 1 yarn over, knit together the yarn over and stitch again *, work from *-* a total of 2 times and then slip the stitch and yarn over from the left needle (= 4 stitches increased). On the next row work the increased stitches without yarn overs as the yarn overs have not yet been made. ------------------------------------------------------- START THE PIECE HERE: ------------------------------------------------------- SHAWL – SHORT OVERVIEW OF THE PIECE: The piece is worked back and forth with circular needle, allowing room for all the stitches. The piece is worked in stripes of garter stitch and English rib. SHAWL: Cast on 5 stitches with circular needle size 4.5 mm = US 7 and Sky. Knit 1 row from the wrong side then work as follows from the right side: Knit 2, 1 yarn over, knit 1, 1 yarn over and knit to end of row = 7 stitches. Knit 1 row; the yarn overs are knitted twisted to avoid holes. Knit 1, 1 yarn over, knit 2, 1 yarn over, knit 1, 1 yarn over, knit 2, 1 yarn over and knit 1 = 11 stitches. Knit 1 row; yarn overs knitted twisted. Insert 1 marker in the middle stitch on the row and allow it to follow your work onwards (= mid-stitch). Continue increasing 4 stitches every 2nd row like this (inside both edge stitches and on each side of the mid-stitch) until there are 35 stitches on the needle – yarn overs always worked twisted. REMEMBER THE KNITTING GAUGE! Now work as follows: STRIPE WITH ENGLISH RIB: ROW 1 (= right side): Work 1 edge stitch in garter stitch, * knit 1, 1 yarn over, slip 1 stitch as if to purl *, work from *-* until there are 2 stitches left and finish with knit 1 and 1 edge stitch in garter stitch. ROW 2 (wrong side): Work 1 edge stitch in garter stitch, * 1 yarn over, slip 1 stitch as if to purl, knit together the yarn over and the slipped stitch *, work from *-* until there are 2 stitches left, finish with 1 yarn over, slip 1 stitch as if to purl and 1 stitch in garter stitch. ROW 3: Work 1 edge stitch in garter stitch, * knit together the yarn over and the slipped stitch, 1 yarn over, slip 1 stitch as if to purl *, work from *-* until there are 2 stitches left, knit together the yarn over and the slipped stitch and 1 stitch in garter stitch. Repeat rows 2 and 3 onwards until you have worked a total of 16 rows of English rib, AT THE SAME TIME on rows 5 and 11 increase 2 stitches on each side of the shawl and 4 stitches in the middle - read INCREASE TIP (= 8 stitches increased on each increase-row = 51 stitches. When row 16 has been completed, work the next row from the right side as follows. STRIPE WITH GARTER STITCH: ROW 1: Work 1 edge stitch in garter stitch, * knit 1 in the yarn over which belongs to the knitted stitch, knit 1 in the knitted stitch, knit 1 in the purled stitch *, work from *-* a total of 10 times (10 stitches increased over the outermost 21 stitches). Knit until there are 21 stitches left on the row, ** knit 1 in the purled stitch, knit 1 in the yarn over which belongs to the knitted stitch and knit 1 in the knitted stitch **, work from **-** a total of 10 times and knit the edge stitch (10 stitches increased over the outermost 21 stitches) = 71 stitches. ROW 2 (= wrong side): Knit 1, 1 yarn over, knit until there is 1 stitch left, 1 yarn over and knit 1 = 2 increased stitches. ROW 3 (right side): Knit 1, 1 yarn over, knit to the mid-stitch, 1 yarn over, knit 1 (= mid-stitch), 1 yarn over, knit until there is 1 stitch left, 1 yarn over and knit 1 = 4 increased stitches. Repeat rows 2 and 3 a total of 12 times = 143 stitches. Turn and knit the whole row (without increasing). The garter stitch section should measure approx. 6 cm = 2⅜". Continue repeating alternately a stripe with English rib and a stripe with garter stitch 2 more times (= a total of 3 times) as follows: Work stripe 2 with English rib in the same way as before. When the 16 rows have been worked there are 159 stitches on the needle. Work stripe 2 with garter stitch in the same way as before. When rows 2 and 3 have been repeated 12 times there are 251 stitches on the needle. Work stripe 3 with English rib in the same way as before. When the 16 rows have been worked there are 267 stitches on the needle. Work stripe 3 with garter stitch in the same way as before. When rows 2 and 3 have been repeated 12 times there are 359 stitches on the needle. Work stripe 4 with English rib in the same way as before. Continue like this, increasing every 6th row, a total of 5 times = 399 stitches. Continue with English rib until the stripe measures 8 cm = 3⅛". Bind off with knit. To avoid the edge being tight, the yarn overs are bind off as normal stitches. Cut and fasten the strand. The shawl measures approx. 43 cm = 17" measured down the middle. |
|
Have you finished this pattern?Tag your pictures with #dropspattern #scotchmistwrap or submit them to the #dropsfan gallery. Do you need help with this pattern?You'll find 17 tutorial videos, a Comments/Questions area and more by visiting the pattern on garnstudio.com. © 1982-2025 DROPS Design A/S. We reserve all rights. This document, including all its sub-sections, has copyrights. Read more about what you can do with our patterns at the bottom of each pattern on our site. |
|


With over 40 years in knitting and crochet design, DROPS Design offers one of the most extensive collections of free patterns on the internet - translated to 17 languages. As of today we count 314 catalogs and 11821 patterns - 11811 of which are translated into English (US/in).
We work hard to bring you the best knitting and crochet have to offer, inspiration and advice as well as great quality yarns at incredible prices! Would you like to use our patterns for other than personal use? You can read what you are allowed to do in the Copyright text at the bottom of all our patterns. Happy crafting!
Post a comment to pattern DROPS 214-14
We would love to hear what you have to say about this pattern!
If you want to leave a question, please make sure you select the correct category in the form below, to speed up the answering process. Required fields are marked *.