
Popular categories
Looking for a yarn?


Comments / Questions (10)
![]() Debbie wrote:
Debbie wrote:
Can someone please write out the instructions for every row instead of the chart? I find the instructions confusing.
18.06.2024 - 12:51DROPS Design answered:
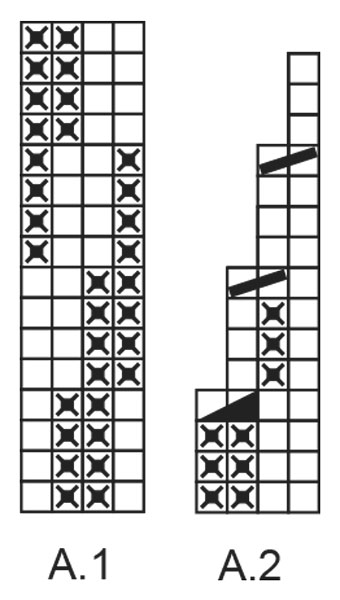
Dear Debbie, we only have diagrams to this pattern, but this lesson should help you to understand how to read them: from bottom up and every round from right towards the left. Happy knitting!
18.06.2024 - 15:22
![]() Sarah Kelly wrote:
Sarah Kelly wrote:
Hello, I have completed diagram A1 plus an additional 4 rows and the piece now measures 18 cms as per the pattern. After completing A2 an additional 15 rows of decreasing the hat will not be very deep. Should the A1 depth be 18cms excluding the 12 cms of rib? Thank you in advance for your help.
03.10.2023 - 18:17DROPS Design answered:
Dear Sarah Kelly, the hat is approx 23 cm in total, if you like a longer hat, you can work A.1 longer and start A.2 when you are ready for the last 15 rounds. Happy knitting!
04.10.2023 - 07:52
![]() Inger wrote:
Inger wrote:
Hei. Jeg har problemer med å forstå hvordan jeg skal starte på A2. "... strikkes det frem til de første 2 maskene vrang på omgangen. Strikk 1 maske vrang og sett et merke her." Kan dere forklare nærmere?
15.02.2022 - 20:52DROPS Design answered:
Hej Inger, du sørger bare for at vrangmaskerne i A.2 bliver forskudt over vrangmaskerne i A.1 (som du har gjort tidligere ifølge diagrammet), og så tager du ind ifølge diagram A.2. God fornøjelse!
16.02.2022 - 15:54
![]() Francesca wrote:
Francesca wrote:
Buongiorno, vorrei provare a fare questo modello ma non ho capito cosa vuol dire lavorare in verticale il diagramma A1. ☺️
08.01.2022 - 10:48DROPS Design answered:
Buongiorno Francesca, deve semplicemente continuare a lavorare il diagramma A.1: i diagrammi si leggono dal basso verso l'alto e da sinistra a destra per tutti i giri lavorando in tondo. Buon lavoro!
08.01.2022 - 13:04
![]() Ruth Hebler wrote:
Ruth Hebler wrote:
Aufgrund der beschreibung kann ich mir das Stricken noch nicht vorstellen.
07.01.2022 - 20:48
![]() Diana wrote:
Diana wrote:
Después de trabajar A1, qué quiere decir repetir en vertical.? Significa que empiezo la vuelta y trabajo 4 p al derecho y 8 puntos revés y 8 derecho y así repito hasta completar las 4 vueltas del diagrama tumbado?\r\nMuchísimas gracias
22.03.2020 - 17:43DROPS Design answered:
Hola Diana. El diagrama A.1 tiene 16 filas. Después de completar las 16 filas, vuelves a la fila 1 para seguir trabajando el diagrama hacia arriba .
22.03.2020 - 23:27
![]() Roberta wrote:
Roberta wrote:
Buongiorno,per creare la spirale devo spostare di una maglia il motivo, come sempre?Grazie.
15.01.2020 - 07:10DROPS Design answered:
Buongiorno Roberta. E' sufficiente che ripeta il diagramma in A.1 in verticale, coì come si presenta. Buon lavoro!
15.01.2020 - 09:18
![]() Nicole Perrault wrote:
Nicole Perrault wrote:
Pourquoi le lien 2 mailles ens à l'end. dont le carré est blanc avec oblique n'apparaît pas dans le a1 et le a2
03.01.2020 - 15:54DROPS Design answered:
Bonjour Mme Perrault, on ne diminue pas dans A.1, raison pour laquelle il n'y a pas de diminutions; on retrouve ces "2 mailles ensemble à l'endroit" aux rangs 8 et 12 de A.2. Bon tricot!
03.01.2020 - 16:07
![]() Magdalena Singh wrote:
Magdalena Singh wrote:
Dzien dobry! Moim zdanie ta czapka jest z jakiejs innej cienkiej wloczki, a nie z Karizmy, ktora jest stosunkowo masywna. Juz kilkakrotnie widzialam, ze na zdjeciu jest co innego, a napisane jest co innego.
11.12.2019 - 13:41
![]() Valeria Rossi wrote:
Valeria Rossi wrote:
Buongiorno, mi sono innamorata di questo berretto e vorrei realizzarlo quanto prima, però fatico a lavorare con i ferri circolari, è possibile farlo aperto con i ferri dritti e poi cucirlo? Grazie per gli eventuali suggerimenti. Valeria
06.12.2019 - 14:38DROPS Design answered:
Buongiorno Valeria. Per lavorare il berretto con i ferri dritti, aggiunga al numero di maglie indicate 1 maglia vivagno per parte, per la cucitura. Nel diag. A1, i quadrati bianchi corrispondono a maglia rasata diritto, quelli con la croce a maglia rasata rovescia. Nel diagramma A2, verifichi di lavorare le diminuzioni sul diritto del lavoro. Buon lavoro!
16.12.2019 - 15:13
|
|||||||||||||
Cannery Row#canneryrowhat |
|||||||||||||
 |
 |
||||||||||||
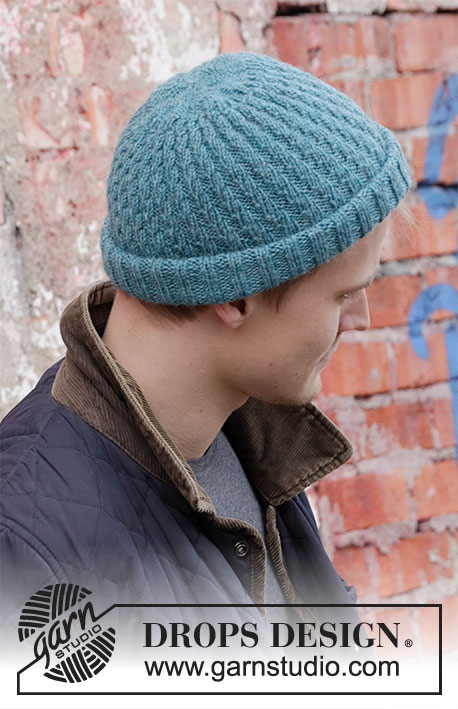
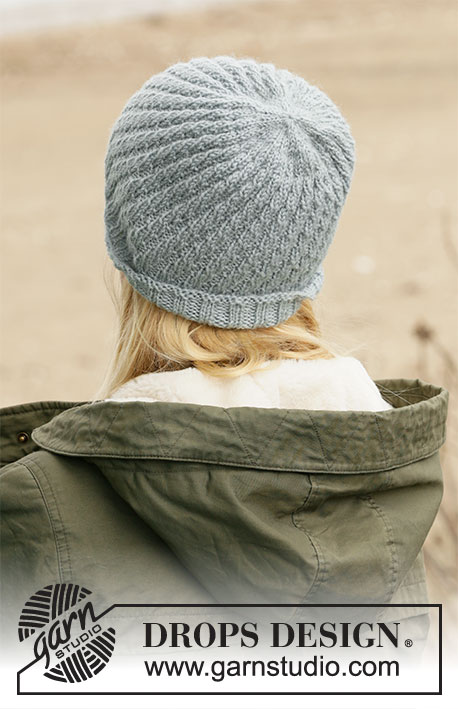
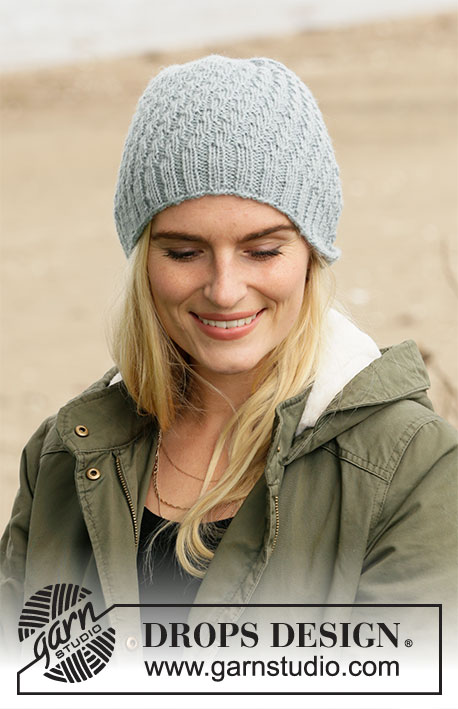
Knitted hat in DROPS Karisma. Piece is knitted with rib and spiral pattern.
DROPS 204-35 |
|||||||||||||
|
---------------------------------------------------------- EXPLANATION FOR THE PATTERN: ---------------------------------------------------------- PATTERN: See diagrams A.1 and A.2. ---------------------------------------------------------- START THE PIECE HERE: ---------------------------------------------------------- HAT - SHORT OVERVIEW OF THE PIECE: Worked in the round on circular needle. Switch to double pointed needles when needed. HAT: Cast on 120-128 stitches on circular needle size 3 mm = US 2,5 with Karisma. Knit 1 round. Then work rib (= knit 2/purl 2) for 4 cm = 1½". Now work pattern A.1 (= 4 stitches) 30-32 times in the round on round. When entire diagram has been worked, repeat it vertically so that pattern is displaced in a spiral. REMEMBER THE KNITTING GAUGE! When piece measures 18-20 cm = 7"-8" – adjust to finish after 4th, 8th, 12th or 16th row in A.1, work until the first 2 purl stitches on round. Purl 1 and insert a marker here. This is now the beginning of round. Work A.2 in the round. When A.2 has been worked vertically, there are 30-32 stitches on round. Knit stitches together 2 by 2 = 15-16 stitches. Cut the yarn and pull it through the remaining stitches, tighten together and fasten. Hat measures approx. 23-25 cm = 9"-9¾". |
|||||||||||||
Diagram explanations |
|||||||||||||
|
|||||||||||||
|
|||||||||||||
Have you finished this pattern?Tag your pictures with #dropspattern #canneryrowhat or submit them to the #dropsfan gallery. Do you need help with this pattern?You'll find 12 tutorial videos, a Comments/Questions area and more by visiting the pattern on garnstudio.com. © 1982-2025 DROPS Design A/S. We reserve all rights. This document, including all its sub-sections, has copyrights. Read more about what you can do with our patterns at the bottom of each pattern on our site. |
|||||||||||||


With over 40 years in knitting and crochet design, DROPS Design offers one of the most extensive collections of free patterns on the internet - translated to 17 languages. As of today we count 314 catalogs and 11822 patterns - 11812 of which are translated into English (US/in).
We work hard to bring you the best knitting and crochet have to offer, inspiration and advice as well as great quality yarns at incredible prices! Would you like to use our patterns for other than personal use? You can read what you are allowed to do in the Copyright text at the bottom of all our patterns. Happy crafting!
Post a comment to pattern DROPS 204-35
We would love to hear what you have to say about this pattern!
If you want to leave a question, please make sure you select the correct category in the form below, to speed up the answering process. Required fields are marked *.