
Looking for a yarn?


Comments / Questions (19)
![]() Alison Round wrote:
Alison Round wrote:
Hi, I've found an error. Size L/XL A3b Rather than 4 trebles, it should be all 3 trebles into each chain space, apart from 1 ch 3 at the start and 1 treble and 2 trebles at the end. That keeps the stitch count at 166. Is this Ai generated?
22.09.2024 - 21:49DROPS Design answered:
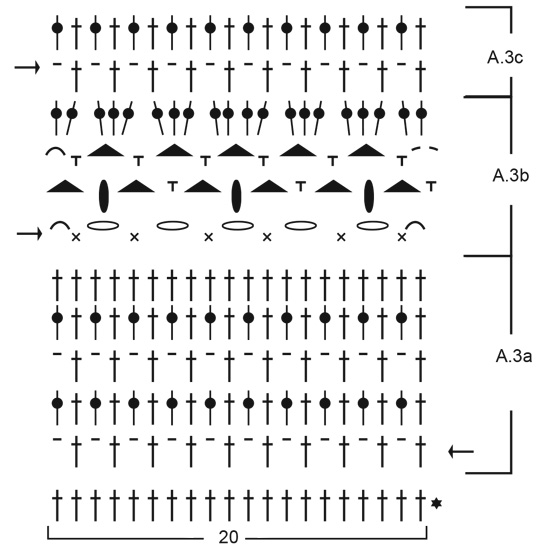
Dear Mrs Round, there should be 20 sts in A.3b: 2 +3+3+4+3+3+2=20 sts, so you repeat these 20 sts a total of 8 times 160 sts + A.1 (= 3 sts) + A.1 (3 sts) = 166 sts. Happy crocheting!
23.09.2024 - 09:01
![]() Alison Round wrote:
Alison Round wrote:
I have just started the jumper, middle size and have found an error. You have stated there are 166 trebles, but it's actually 166 stitches, including chains and trebles.
19.09.2024 - 01:12DROPS Design answered:
Dear Mrs Round, thanks for noticing. I'll forward your feedback to our design team. Happy crocheting!
19.09.2024 - 09:33
![]() Hannie Vermeer wrote:
Hannie Vermeer wrote:
Hoi. Ik ben met het achterpand begonnen. Maar in de toer dat je de twee helften aan elkaar moet zetten , kom ik met geen mogelijkheid op 168 stokjes . Als ik op alle steken stokjes maak. Heb ik er te veel en als ik om de steek een stokje haak heb ik er te weinig. Hopelijk kan je me helpen
08.06.2021 - 22:16DROPS Design answered:
Dag Hannie,
Zo te zien moeten 186 steken zijn in plaats van 186 stokjes. Ik heb het doorgegeven aan de ontwerpafdeling ter correctie.
13.06.2021 - 09:51
![]() Vic wrote:
Vic wrote:
Hi, I think there is a typo in the SLEEVE instruction. 3rd sentence should read: Work as follows (first row from right side): Work A.1 over the first stitch, repeat A.3a until 1 stitch remains... So it should be A.3a instead of A.3b.
24.05.2021 - 20:04DROPS Design answered:
Dear Vic, thanks for your feedback, English pattern will be edited asap. Happy crocheting!
25.05.2021 - 09:37
![]() Desiree wrote:
Desiree wrote:
Oh, I see it. The 10 ch sts for the neck is indicated in one of the charts. Could be a little clearer. :)
14.05.2021 - 14:01
![]() Desiree wrote:
Desiree wrote:
Is there an error in this pattern? For the FRONT BODY, it reads, "Work A.1 over the first 3 stitches, repeat A.3a until 3 stitches remain (= 7-8-9 times in width) - work 1 double crochet in each of the next 10 chain stitches in the neck, finish with A.1 over the last 3 stitches = 146-166-186 double crochets. " However, there is no direction in the pattern about when or where to add those 10 chain sts for the neck. Can someone on the DROPS team clarify? Thanks.
14.05.2021 - 13:53DROPS Design answered:
Dear Desiree, there is no mistake. Those chain stitches are shown in the pattern diagram. I hope this helps. Happy Crocheting!
15.05.2021 - 23:59
![]() Alessandra Chaves wrote:
Alessandra Chaves wrote:
Gosto dos padrões mas, muitas vezes a tradução parece muito confuso e preciso buscar o padrão em inglês, e traduzir para poder fazer.
13.05.2021 - 03:00
![]() Crickx Lauranne wrote:
Crickx Lauranne wrote:
J'ai trouvé la vidéo pour la nope. Par contre je tenais à vous dire que le transcription écrite n'est pas totalement correcte : il faudrait préciser que les mc ce sont des mc NON FINIES (comme les double brides) car ça change tout ; à savoir le nombre de fils sur le crochet avant le dernier jeté pour couler toutes les mailles.
10.03.2021 - 18:25
![]() Crickx Lauranne wrote:
Crickx Lauranne wrote:
Bonjour, Est ce qu'il existe une vidéo pour la nope ? Car malgré l'écrit je ne visualise pas vraiment votre méthode. Vous dites 1mc dans l'arceau ,4Dbr non finies, 1mc (??), un jeté et écouler les 7 boucles. Mais la mc après les 4 Dbr je ne comprends pas... Elle va où ? Elle sert à quoi ?
10.03.2021 - 14:31DROPS Design answered:
Bonjour Mme Crickx, procédez ainsi: piquez le crochet dans l'arceau comme pour faire 1 maille coulée, mais ne terminez pas la maille (ne l'écoulez pas dans celle sur le crochet) = vous avez maintenant 2 boucles sur le crochet, faites maintenant 4 double-brides sans faire le dernier jeté, crochetez maintenant 1 maille coulée comme la 1ère: piquez le crochet sous l'arceau et ramenez le fil, sans l'écouler = vous avez maintenant 7 boucles sur le crochet, faites 1 jeté et écoulez ces 7 boucles sur le crochet. Bon crochet!
10.03.2021 - 15:24
![]() María Zarzalejo wrote:
María Zarzalejo wrote:
Hola por favor donde puedo ubicar los esquemas? He tratado de tejer varias proyectos DROPS y no logro encontrar patrones completos para poder iniciar😪 ya me siento frustrada de amar los modelos y no poderlos tener
25.02.2021 - 00:12DROPS Design answered:
Hola Maria, los esquemas estan al final de los instrucciones. Cómo leer los diagramas de ganchillo esta AQUI. Buen trabajo!
25.02.2021 - 16:58
|
||||||||||||||||||||||||||||||||||||||||
Blue Annabelle#blueannabellesweater |
||||||||||||||||||||||||||||||||||||||||
 |
 |
|||||||||||||||||||||||||||||||||||||||
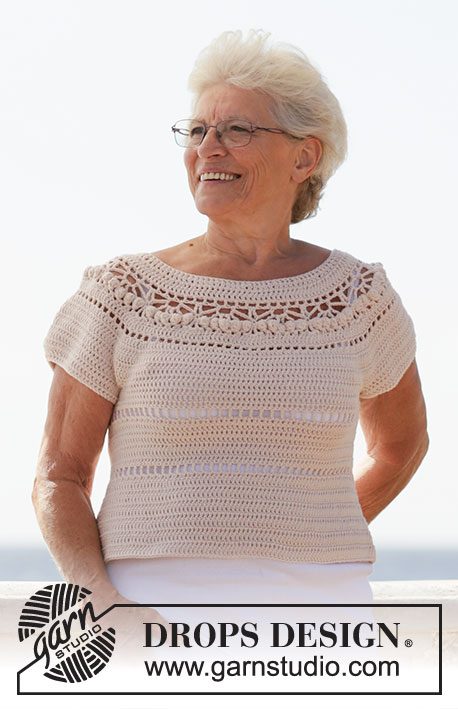
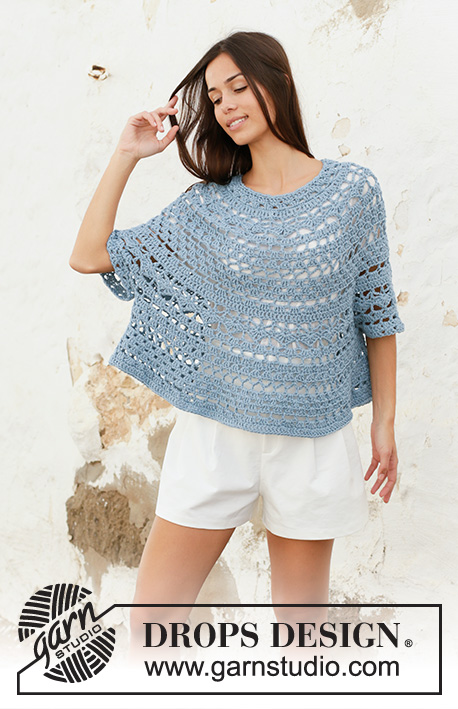
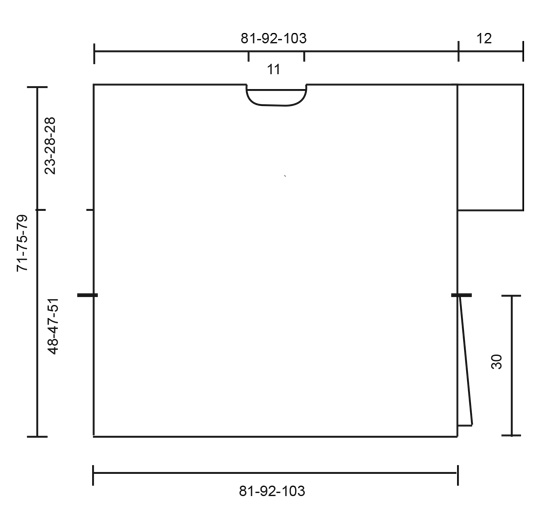
Crocheted long sweater in DROPS Cotton Merino. Piece is crocheted top down with lace pattern, bobbles and vent in the side. Size: S - XXXL
DROPS 199-34 |
||||||||||||||||||||||||||||||||||||||||
|
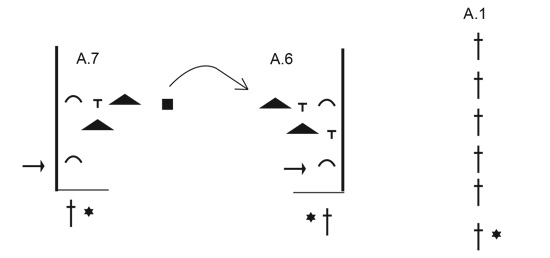
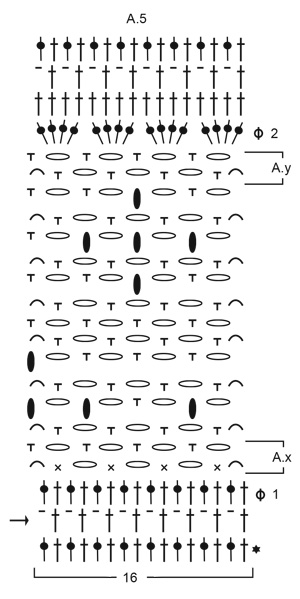
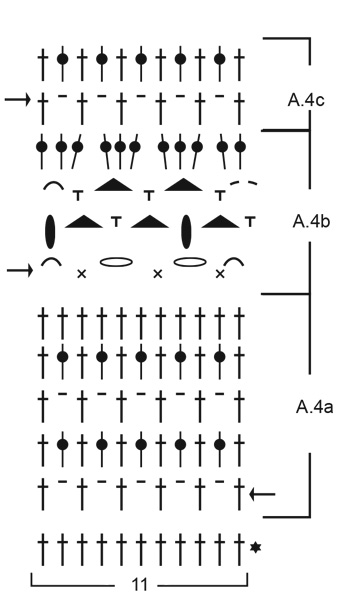
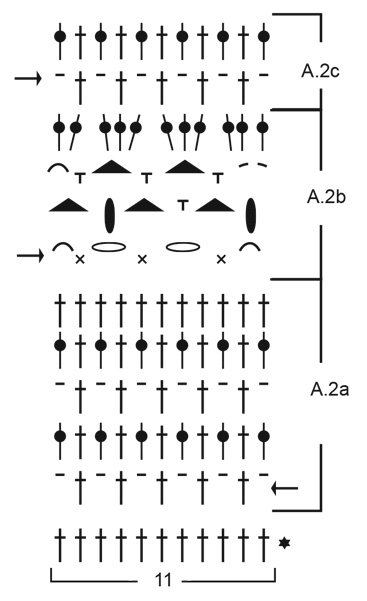
---------------------------------------------------------- EXPLANATION FOR THE PATTERN: ---------------------------------------------------------- PATTERN: See diagrams A.1 to A.7. CROCHET INFORMATION: At the beginning of every row replace first double crochet with 3 chain stitches. INCREASE/DECREASE TIP: Increase 1 stitch by working 2 double crochets in same stitch. Decrease 1 stitch by working 2 double crochets together as follows: * Make 1 yarn over, insert hook in next stitch, get yarn, make 1 yarn over and pull yarn through the 2 first loops on hook *, repeat from *-* 1 more time, make 1 yarn over and pull yarn through all 3 loops on hook. ---------------------------------------------------------- START THE PIECE HERE: ---------------------------------------------------------- SWEATER - SHORT OVERVIEW OF THE PIECE: Work piece back and forth in parts, top down and sewn together when finished. Work the sleeves back and forth, top down and sew together when finished. BACK PIECE: RIGHT SHOULDER: Work 78-91-102 chain stitches (including 3 chain stitches to turn with) on hook size 4 mm with Cotton Merino. Turn and work 1 double crochet in 4th chain stitch from hook (= 2 double crochets), 1 double crochet in each of the next 2-3-2 chain stitches, * skip 1 chain stitch, 1 double crochet in each of the next 5 chain stitches *, work from *-* the entire row = 64-75-84 double crochets. Cut and fasten the yarn. LEFT SHOULDER: Work 78-91-102 chain stitches (including 3 chain stitches to turn with) on hook size 4 mm = US 6 with Cotton Merino. Turn and work 1 double crochet in 4th chain stitch from hook (= 2 double crochets), 1 double crochet in each of the next 2-3-2 chain stitches, * skip 1 chain stitch, 1 double crochet in each of the next 5 chain stitches *, work from *-* the entire row = 64-75-84 double crochets. Now work left shoulder together with right shoulder, i.e. work next row as follows (= from right side): Work A.1 over the first 3 stitches – read CROCHET INFO, repeat A.3a until 1-12-1 stitch remains on left shoulder (= 3-3-4 times in width), work A.4a (= 11 stitches) 0-1-0 times, work A.1 over last stitch, work 18-16-18 loose chain stitches for neck, continue over right shoulder by working A.1 over first stitch, work A.2a (= 11 stitches) 0-1-0 times in total, repeat A.3a until 3 stitches remain (= 3-3-4 times in width), and finish by working A.1 over the last 3 stitches = 146-166-186 stitches. BODY: Continue on A.3a (repeat A.1 vertically until finished measurements), i.e. work as follows from wrong side: Work A.1 over the first 3 stitches, repeat A.3a until 3 stitches remain (= 7-8-9 times in width) - work 1 double crochet in each of the next 18-16-18 chain stitches in the neck, finish with A.1 over the last 3 stitches = 146-166-186 double crochets. REMEMBER THE CROCHET GAUGE! When A.3a has been worked, continue A.3b and then on A.3c (repeat A.1 vertically until finished measurements). When entire A.3 has been worked, continue as follows (begin first row from wrong side): Work A.1 over the first 3 stitches, repeat A.5 until 3 stitches remain (= 9-10-11 times in width), finish with A.1 over the last 3 stitches – AT THE SAME TIME adjust number of stitches by increasing/decreasing evenly to 150-166-182 stitches on row marked with Ø-1 – read INCREASE/DECREASE TIP. When A.x has been worked vertically, repeat A.x 0-0-1 more times vertically. When A.y has been worked vertically, repeat A.y 0-0-1 more times vertically. On row marked with Ø-2 adjust number of stitches by increasing/decreasing evenly to 146-166-186 stitches. When entire A.5 has been worked, continue as follows (begin first row from wrong side): Work A.1 over the first 3 stitches, repeat A.3b until 3 stitches remain (= 7-8-9 times in width), finish with A.1 over the last 3 stitches. When entire A.3b has been worked, continue as follows (begin first row from wrong side): Work A.1 over the first 3 stitches, repeat A.5 until 3 stitches remain (= 9-10-11 times in width), finish with A.1 over the last 3 stitches – AT THE SAME TIME adjust number of stitches by increasing/decreasing evenly to 150-166-182 stitches on row marked with Ø-1. When A.x has been worked vertically, repeat A.x 0-1-1 more times vertically. When A.y has been worked vertically, repeat A.y 0-1-1 more times vertically. On row marked with Ø-2 adjust number of stitches by increasing/decreasing evenly to 146-166-186 stitches. When entire A.5 are done vertically, fasten off. Piece measures approx. 71-75-79 cm = 28"-29½"-31" from shoulder and down. FRONT PIECE: RIGHT SHOULDER: Work 78-91-102 chain stitches (including 3 chain stitches to turn with) on hook size 4 mm = US 6 with Cotton Merino. Turn and work 1 double crochet in 4th chain stitch from hook (= 2 double crochets), 1 double crochet in each of the next 2-3-2 chain stitches, * skip 1 chain stitch, 1 double crochet in each of the next 5 chain stitches *, work from *-* the entire row = 64-75-84 double crochets. Work A.1 over the first 3 stitches – read CROCHET INFORMATION, repeat A.3a until 1-12-1 stitch remains (= 3-3-4 times in width), work A.4a (= 11 stitches) 0-1-0 times in total and finish by working A.1 over the last stitch. When A.3a and A.4a have been worked, continue as follows (begin first row from wrong side): Work A.1 and A.6 over the first stitch, work A.4b (= over 11 stitches) 0-1-0 times in total, repeat A.3b until 3 stitches remain (= 3-3-4 times in width), finish with A.1 over the last 3 stitches. Continue until A.6 has been worked vertically (1 row remains in A.3b). Cut and fasten the yarn. LEFT SHOULDER: Work 78-91-102 chain stitches (including 3 chain stitches to turn with) on hook size 4 mm = US 6 with Cotton Merino. Turn and work 1 double crochet in 4th chain stitch from hook (= 2 double crochets), 1 double crochet in each of the next 2-3-2 chain stitches, * skip 1 chain stitch, 1 double crochet in each of the next 5 chain stitches *, work from *-* the entire row = 64-75-84 double crochets. Work A.1 over the first stitch - remember CROCHET INFORMATION, work A.2b (= 11 stitches) 0-1-0 times in total, repeat A.3a until 3 stitches remain (= 3-3-4 times in width), finish by working A.1 over the last 3 stitches. When A.2a and A.3a have been worked, continue as follows (begin first row from wrong side): Work A.1 over the first 3 stitches, repeat A.3b until 1-12-1 stitch remains (= 3-3-4 times in width), work A.4b (= over 11 stitches) 0-1-0 times in total and finish with A.7 and A.1 over the last stitch. Continue until A.7 has been worked vertically (1 row remains in A.3b). Now right and left shoulder hang together. Cut and fasten the yarn. BODY: Begin from right side and work last row in A,3b (repeat A.1 vertically until finished measurements) i.e. work as follows: Work A.1 over the first 3 stitches, repeat A.3a until 3 stitches remain (= 7-8-9 times in width) - work 1 double crochet in each of the next 10 chain stitches in the neck, finish with A.1 over the last 3 stitches = 146-166-186 double crochets. When A.3b has been worked vertically, continue with A.3c. When entire A.3 has been worked vertically, work the same way as on back piece, i.e. from and with after A.3 has been worked vertically for the first time (now continue on A.1 and A.5). SLEEVE: Work 99-123-123 chain stitches on hook size 4 mm = US 6 with Cotton Merino. Turn and work 1 double crochet in 4th chain stitch from hook (= 2 double crochets), 1 double crochet in each of the next 5-3-3 chain stitches, * skip 1 chain stitch, 1 double crochet in each of the next 5 chain stitches *, work from *-* the entire row = 82-102-102 double crochets. Work as follows (first row from right side): Work A.1 over the first stitch, repeat A.3a until 1 stitch remains (= 4-5-5 times in width), finish with A.1 over the last stitch. When A.3a has been worked, continue A.3b and then on A.3c, repeat A.1 vertically until finished measurements. When entire A.3 are done vertically, fasten off. Work the other sleeve the same way. ASSEMBLY: Sew the shoulder seams. Begin approx. 23-28-28 cm = 9"-11"-11" down from should and sew side seams, leave approx. 30 cm = 11¾" at the bottom for vent. Sew underarm seams and sew in sleeves. |
||||||||||||||||||||||||||||||||||||||||
Diagram explanations |
||||||||||||||||||||||||||||||||||||||||
|
||||||||||||||||||||||||||||||||||||||||
|
||||||||||||||||||||||||||||||||||||||||
|
||||||||||||||||||||||||||||||||||||||||
|
||||||||||||||||||||||||||||||||||||||||
|
||||||||||||||||||||||||||||||||||||||||
|
||||||||||||||||||||||||||||||||||||||||
|
||||||||||||||||||||||||||||||||||||||||
Have you finished this pattern?Tag your pictures with #dropspattern #blueannabellesweater or submit them to the #dropsfan gallery. Do you need help with this pattern?You'll find 10 tutorial videos, a Comments/Questions area and more by visiting the pattern on garnstudio.com. © 1982-2025 DROPS Design A/S. We reserve all rights. This document, including all its sub-sections, has copyrights. Read more about what you can do with our patterns at the bottom of each pattern on our site. |
||||||||||||||||||||||||||||||||||||||||


With over 40 years in knitting and crochet design, DROPS Design offers one of the most extensive collections of free patterns on the internet - translated to 17 languages. As of today we count 314 catalogs and 11822 patterns - 11812 of which are translated into English (US/in).
We work hard to bring you the best knitting and crochet have to offer, inspiration and advice as well as great quality yarns at incredible prices! Would you like to use our patterns for other than personal use? You can read what you are allowed to do in the Copyright text at the bottom of all our patterns. Happy crafting!
Post a comment to pattern DROPS 199-34
We would love to hear what you have to say about this pattern!
If you want to leave a question, please make sure you select the correct category in the form below, to speed up the answering process. Required fields are marked *.