


Komentáře / Otázky (13)
![]() Silvia napsala:
Silvia napsala:
Ciao, sono Silvia, questo modello mi piace tantissimo,come fare lo scollo a V? È possibile? Se gentilmente mi date le istruzioni vi ringrazio anticipatamente
17.04.2024 - 12:19Odpověď DROPS Design :
Buongiorno Silvia, in questa sede non ci è possibile adattare il modello a tutte le esigenze, ma per un'assistenza più personalizzata può rivolgersi al suo rivenditore DROPS di fiducia. Buon lavoro!
17.04.2024 - 16:56
![]() Gumby100 napsala:
Gumby100 napsala:
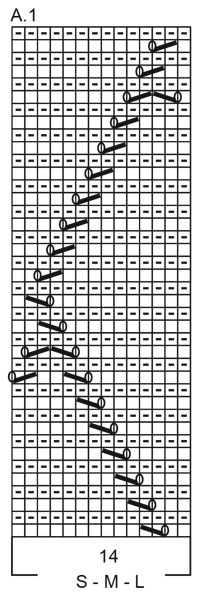
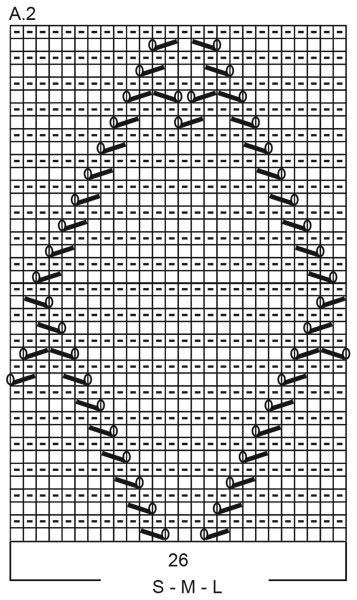
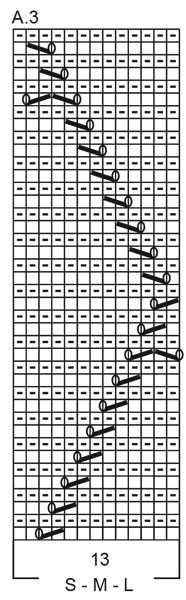
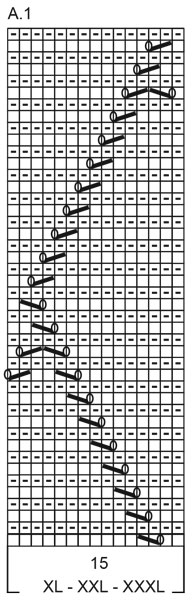
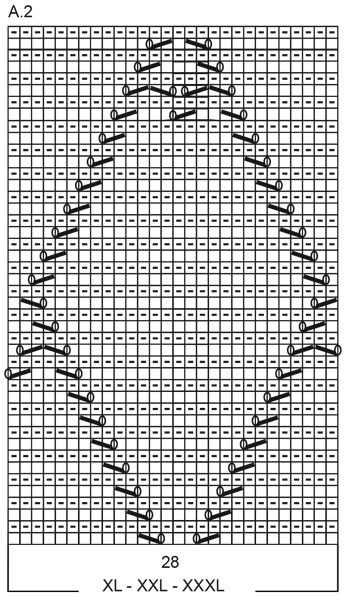
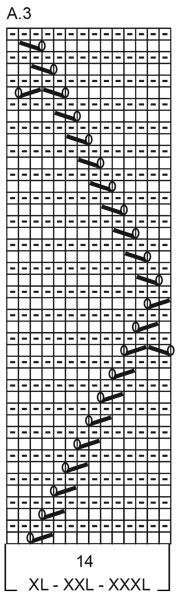
The description says to knit A1 then A2 then A3, but to achieve the diamonds in the image, shouldn't it be knit in the order of A.3 then A.2 then A.1?
05.02.2021 - 06:09Odpověď DROPS Design :
Dear Gymby100, in order to get the diamonds working you have to start row from RS with A.1, then repeat A.2 and finish with A.3 - from wrong side work A.3, repeat A.2 and finish with A.1 (reading now from the left towards the right). Happy knitting!
05.02.2021 - 08:59
![]() Pirjo Björk napsala:
Pirjo Björk napsala:
Står i beskrivningen vid avmaskning för ärmhål ( Bakstycket) för storlek M, att man ska maska av 5 maskor i början av de nästa två varven till ärmhål. Enligt minskningstipset görs alla minskningar från rätsidan. Minskar man genom att sticka två maskor räta tillsammans gånger fem i början på arbetet ? Gör man likadant på slutet av samma varv? Tycker det står så dumt !!!!!
24.08.2020 - 14:39
![]() Bruna Guareschi napsala:
Bruna Guareschi napsala:
Buongiorno non riesco a capire i diagrammi forse devo metterli in ordine 3-2-1 anziché 1-2-3? Grazie
17.04.2020 - 12:42Odpověď DROPS Design :
Buongiorno Bruna. I diagrammi sono disposti nell'ordine corretto e vanno eseguiti dal basso verso l'alto e da destra verso sinistra (sui ferri di andata), da sinistra verso destra sui ferri di ritorno. Segua il diagramma corretto per la taglia che sta lavorando. Buon lavoro!
17.04.2020 - 13:08
![]() Chiara napsala:
Chiara napsala:
Sono confusa. Nele spiegazioni dite di lavorare a punto legaccio prima dei motivi e infatti la foto mostra che tra i rombi del disegno i punti sono legaccio però poi negli schemi dei 3 motivi fate lavorare a maglia rasata.... potete essermi più precisi ? Grazie
19.03.2020 - 19:23Odpověď DROPS Design :
Buongiorno Chiara. Le indicazioni dello schema sono di lavorare a diritto sia sui ferri di andata che su quelli di ritorno così da ottenere il punto legaccio tra i rombi. Buon lavoro!
19.03.2020 - 23:18
![]() Chiara napsala:
Chiara napsala:
Ma perchè dite di lavorare coni ferri circolari se poi spiegate il diritto e il rovscio e di cucire insieme le due parti??? grazie
16.03.2020 - 15:10Odpověď DROPS Design :
Buongiorno Chiara. Quando si lavora avanti e indietro, può sostituire i ferri circolari con i ferri dritti. L'uso dei ferri circolari è molto diffuso soprattutto nel nord dell'Europa, ma in modelli come questo può usare i ferri con cui si trova più a suo agio. Buon lavoro!
16.03.2020 - 15:34
![]() Mary napsala:
Mary napsala:
What does a knit from wrong side mean? How do I do it?
20.07.2019 - 12:53Odpověď DROPS Design :
Dear Mary, when you knit in rowe back and forth you have one side of piece right (front) and the second side wrong (inside of the future top). This top we knit in garter stitch, thats mean both sides (right and wrong as well) are knit. Happy knitting!
20.07.2019 - 17:36
![]() Mariadomenica napsala:
Mariadomenica napsala:
Non riesco a capire scusa la mia cocciutaggine (ho iniziato con 126 maglie e per 4 cm a maglia legaccio) ma non riesco ad andare avanti se gentilmente mi puoi mettere il.numero esatto di maglie solo per il primo ferro .la mia taglia è XXXL.scusami e ti ringrazio
31.05.2019 - 21:48Odpověď DROPS Design :
Buonasera Mariadomenica, dopo i 4 cm a legaccio deve lavorare 34 maglie a legaccio, 15 maglie con il diagramma A.1, 28 maglie con il diagramma A.2, 14 maglie con il diagramma A.3 e 35 maglie a legaccio. I diagrammi si leggono dal basso verso l'alto, da destra verso sinistra. Buon lavoro!
31.05.2019 - 22:10
![]() Mariadomenica napsala:
Mariadomenica napsala:
Gentilmente mi potete rispondere il più presto possibile sono impaziente grazie
31.05.2019 - 21:28Odpověď DROPS Design :
Buonasera Mariadomenica, cerchiamo di rispondere il prima possibile. Buon lavoro!
31.05.2019 - 21:41
![]() Mariadomenica napsala:
Mariadomenica napsala:
Non riesco a capire il numero di maglie del primo ferro( taglia XXXL)che bisogna fare.gentilmente mi puoi scrivere esattamente come bisogna fare solo il primo mi faccio il conto ma non mi trovo.graxie
31.05.2019 - 21:26Odpověď DROPS Design :
Buonasera Mariadomenica, per la taglia XXXL deve avviare 126 maglie e lavorare a maglia legaccio per 4 cm. Poi deve lavorare come segue seguendo il diagramma della sua taglia: 34 maglie a legaccio, diagramma A.1 su 15 maglie, diagramma A.2 su 28 maglie, diagramma A.3 su 14 maglie, 35 maglie a legaccio. Buon lavoro!
31.05.2019 - 21:39
|
||||||||||||||||
Sunny Island#sunnyislandtop |
||||||||||||||||
 |
 |
|||||||||||||||
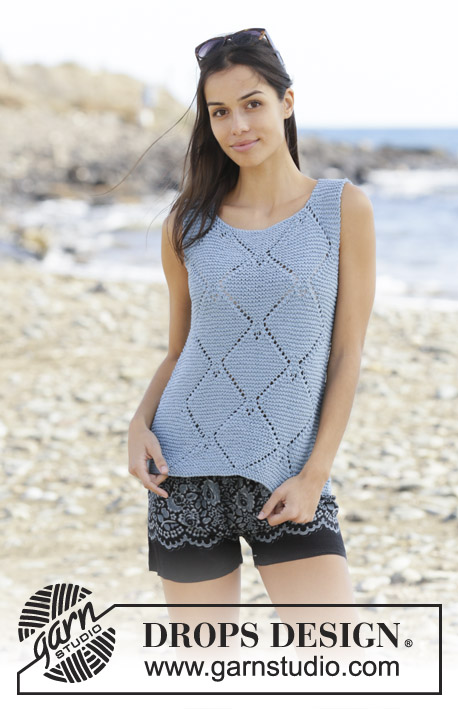
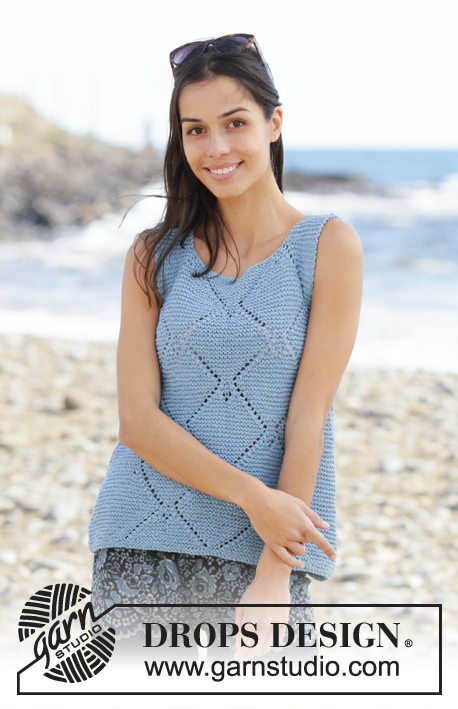
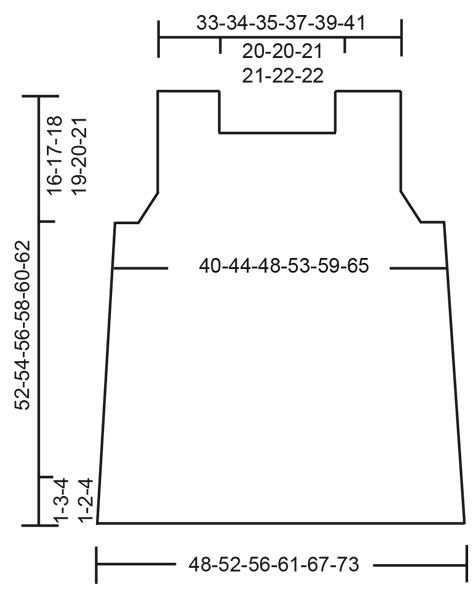
Tílko - top bez rukávů s vroubkovým a ažurovým vzorem pletené z příze DROPS Paris. Velikost S - XXXL.
DROPS 199-51 |
||||||||||||||||
|
------------------------------------------------------- VYSVĚTLIVKY: ------------------------------------------------------- VROUBKOVÝ VZOR: 1 vroubek = 2 řady hladce; pleteme stále hladce, lícové i rubové řady. VZOR: Viz schémata A.1 až A.3. Zvolte si schéma pro požadovanou velikost. Zobrazeny jsou všechny řady vzoru nahlížené z lícové strany. TIP – UJÍMÁNÍ 1 (boky): Vedle 1 krajového oka vroubkovým vzorem na začátku řady splétáme 2 oka hladce. Vedle 1 krajového oka vroubkovým vzorem na konci řady ujímáme přetažením, tj. 1 oko sejmeme hladce, 1 upleteme hladce a sejmuté přes ně přetáhneme. TIP – UJÍMÁNÍ 2 (průramky): Ujímáme vždy v lícových řadách! Na začátku lícové řady ujímáme takto (= levý průramek): upleteme 2 oka vroubkovým vzorem, 2 oka spleteme hladce (= ujmuli jsme 1 oko). Na konci lícové řady ujímáme takto (= pravý průramek): pleteme po poslední 4 oka na jehlici, 2 oka spleteme hladce (= ujmuli jsme 1 oko), upleteme poslední 2 oka. TIP – UJÍMÁNÍ 3 (průkrčník): Ujímáme vždy v lícových řadách! V každé řadě před průkrčníkem ujímáme takto: pleteme po poslední 4 oka, 2 oka spleteme hladce (= ujmuli jsme 1 oko), upleteme poslední 2 oka před průkrčníkem. V každé řadě za průkrčníkem ujímáme takto: upleteme 2 oka vroubkovým vzorem, 2 oka spleteme hladce (= ujmuli jsme 1 oko). ---------------------------------------------------------- POPIS PRÁCE: ------------------------------------------------------- TOP - JAK BUDEME POSTUPOVAT: Pleteme v řadách na kruhové jehlici ve dvou dílech, které nakonec sešijeme. Postupujeme zdola nahoru a pleteme vroubkovým a ažurovým vzorem. PŘEDNÍ DÍL: Na kruhovou jehlici č.4,5 nahodíme přízí Paris 84-90-98-106-116-126 ok a pleteme VROUBKOVÝM VZOREM – viz výše. Ve výši 1-3-4-1-2-4 cm začneme plést ažurový vzor – zvolte si schéma pro požadovanou velikost – takto: 15-18-22-24-29-34 ok upleteme vroubkovým vzorem, 14-14-14-15-15-15 ok vzorem A.1, 26-26-26-28-28-28 ok vzorem A.2, 13-13-13-14-14-14 ok vzorem A.3, 16-19-23-25-30-35 ok vroubkovým vzorem. Ve výši 8-9-10-5-6-7 cm začneme na obou stranách dílu ujímat – viz TIP – UJÍMÁNÍ 1. Takto ujímáme vždy po 4-4-4-5-5-5 cm výšky, celkem 7x = 70-76-84-92-102-112 ok. Pokračujeme v pletení vzoru A.1 až A.3 – upleteme celkem 3 celé sekvence (na výšku). SOUČASNĚ ve výši 36-37-38-39-40-41 cm uzavřeme na začátku každé z následujících 2 řad 4-5-6-7-8-9 ok (= průramky). Pak dále ujímáme po 1 oku vedle 2 krajních ok vroubkovým vzorem na každé straně dílu - viz TIP – UJÍMÁNÍ 2 (průramky): ujímání opakujeme v každé lícové řadě, celkem 3-4-6-8-10-12x = 56-58-60-62-66-70 ok. Když upleteme celkem 3 celé sekvence vzoru A.1 až A.3 (na výšku), upleteme prvních 20-20-20-22-22-22 řad vzoru, pak 2 vroubky nad všemi oky. Pokračujeme takto: upleteme prvních 12-13-13-14-15-17 ok, následujících 32-32-34-34-36-36 ok uzavřeme (= průkrčník) a upleteme zbylých 12-13-13-14-15-17 ok. Obě náramenice pak dokončíme odděleně. Pleteme v řadách vroubkovým vzorem, jen v následující lícové řadě ujmeme na okraji průkrčníku ještě 1 oko (tj. 2 oka vedle 2 vroubkových ok na okraji průkrčníku spleteme hladce – viz TIP – UJÍMÁNÍ 3) = zbývá 11-12-12-13-14-16 ok každé náramenice. Ve výši 8-8-9-9-10-10 cm od uzavřených ok průkrčníku všechna zbylá oka uzavřeme. Díl měří asi 52-54-56-58-60-62 cm (od ramene). ZADNÍ DÍL: Nahodíme stejně jako u předního dílu a postupujeme stejně až do chvíle, kdy dokončíme vzory A.1 až A.3. Tj. upleteme 3 sekvence (na výšku) + prvních 20-20-20-22-22-22 řad vzoru (současně uzavřeme oka po průramky, stejně jako na předním dílu) = po dokončení průramků máme na jehlici 56-58-60-62-66-70 ok. Pak upleteme 2 vroubky nad všemi oky a začneme tvarovat průkrčník, takto: Upleteme prvních 17-18-18-19-20-22 ok, následujících 22-22-24-24-26-26 ok uzavřeme a upleteme zbylých 17-18-18-19-20-22 ok. Obě náramenice pak dokončíme odděleně. Pleteme v řadách vroubkovým vzorem, ale v každé lícové řadě ujmeme na okraji průkrčníku 2 oka – viz TIP – UJÍMÁNÍ 3. Toto ujímání opakujeme v každé lícové řadě, celkem 6x = zbývá 11-12-12-13-14-16 ok každé náramenice. Ve výši 8-8-9-9-10-10 cm od uzavřených ok průkrčníku (přizpůsobíme přednímu dílu) všechna zbylá oka uzavřeme. Díl měří asi 52-54-56-58-60-62 cm (od ramene). DOKONČENÍ: Sešijeme náramenice. Sešijeme postranní švy. |
||||||||||||||||
Vysvětlivky ke schématu |
||||||||||||||||
|
||||||||||||||||
|
||||||||||||||||
|
||||||||||||||||
|
||||||||||||||||
|
||||||||||||||||
|
||||||||||||||||
|
||||||||||||||||
|
||||||||||||||||
Dokončili jste tento model?Pak označte své fotky tagem #dropspattern #sunnyislandtop nebo je pošlete do galerie #dropsfan. Potřebujete s tímto návodem poradit?Otevřete-li si návod na stránce garnstudio.com, najdete tam 13 výukových video-ukázek, Komentáře/Dotazy a další užitečné informace. © 1982-2025 DROPS Design A/S. Vyhrazujeme si veškerá práva. Tento dokument, včetně všech jeho dílčích částí, podléhá autorským právům. Podrobnější komentář k možnostem užití našich návodů najdete dole pod každým návodem na našich stránkách. |
||||||||||||||||


V oblasti pletené a háčkované módy působí DROPS Design více než 40 let. Díky tomu vám můžeme nabídnout jednu z nejrozsáhlejších kolekcí modelů s bezplatnými návody dostupnými na internetu - navíc v 17 jazycích. K dnešnímu dni máme na 314 katalogů a 11822 návodů celkem - z nich je už 7048 dostupných v [češtině].
Přidejte komentář k návodu DROPS 199-51
Rádi bychom věděli, co si o tomto modelu myslíte!
Pokud se chcete na něco zeptat, dbejte prosím na to, abyste ve formuláři níže vybrali správnou kategorii - díky tomu se dříve dozvíte, co potřebujete vědět. Povinná pole jsou označena *.