
Popular categories
Looking for a yarn?


Comments / Questions (37)
![]() Sara wrote:
Sara wrote:
Bonjour. Merci pour les dernières explications je vais pouvoir me débrouiller maintenant que j'ai une meilleure visualisation des choses. Merci pour les beaux modèles expliqués on peut toujours trouver son bonheur à tricoter. Bonne journée
04.02.2026 - 09:49
![]() Sara wrote:
Sara wrote:
Bonsoir j'avais compris jusque là mais ensuite une fois cousu ça ne donne rien de ressemblant au modèle. Où se trouve l'encolure et les bas de l'ouvrage. Après couture ,à plat,j'obtiens un T après je suis perdue et ne vois pas la suite des opérations pourtant je ne suis pas novice en tricot. Avec encore tous mes remerciements
02.02.2026 - 18:51DROPS Design answered:
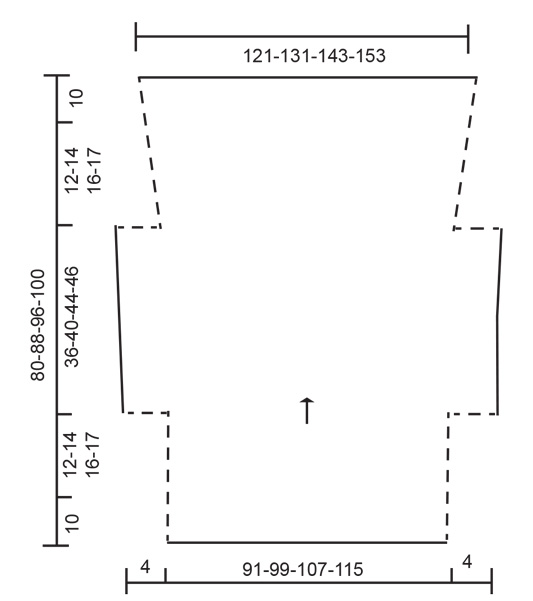
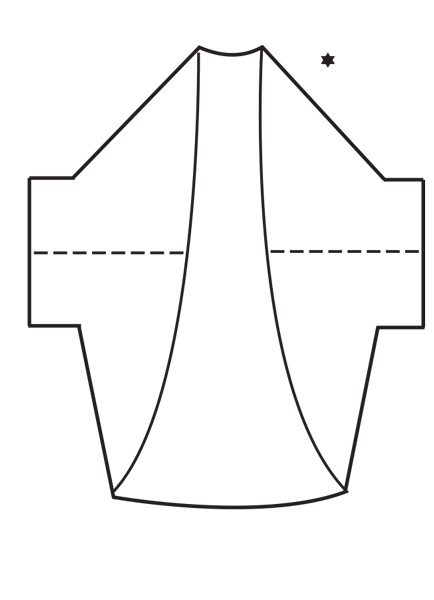
Bonjour Sara, les 10 cm point mousse tricotés au tout début et à la fin de l'ouvrage forment la bordure tout autour de l'ouverture de l'ouvrage (sur la 1ère photo, on voit la couture du côté gauche); les ouvertures de chaque côté = les 36-40-44-46 cm de chaque côté (après les 4 mailles montées jusqu'aux 4 mailles rabattues) forment le "trou" des manches; une fois que vous avez fait les coutures, si vous mettez l'ouvrage comme dans le schéma du bas, vous aurez la même chose: les coutures = lignes pointillés, les manches de chaque côté et les arrondis = devants/dos. Bon assemblage!
03.02.2026 - 17:25
![]() Sara wrote:
Sara wrote:
Merci pour la reponse
31.01.2026 - 19:40
![]() Sara wrote:
Sara wrote:
Pouvez m'expliquer plus clairement la façon de coudre cet ouvrage si on coud sur les pointillés des cotés et sur les 4 mailles des manches je n obtiens pas du tout le résultats de la photo il y a quelque chose qui m échappe merci de me répondre assez rapidement car je voudrais bien finir mon ouvrage
31.01.2026 - 18:52DROPS Design answered:
Bonjour Sara, posez votre ouvrage à plat comme dans le schéma des mesures, le rang de montage vers vous, les mailles rabattues en haut. La couture des manches se fait de chaque côté en 2 parties, commencez par ex par le côté droit et assemblez les 10+(14-17) cm du bas aux (12-17+10) cm du haut (côté) et continuez la couture en assemblant les 4 mailles montées aux 4 mailles rabattues = vous avez terminé la 1ère emmanchure. Répétez de l'autre côté de la même façon. Bon assemblage!
02.02.2026 - 08:38
![]() Sana wrote:
Sana wrote:
Hvor lang bliver den i de forskellige størrelser Jeg har strikket den i S/M Men kunne godt tænke mig en længere version og derfor vil jeg gå nogle størrelser op, men hvor mange er spørgsmålet Jeg ønsker mig et mål på den færdige længde i de forskellige størrelser På forhånd tak
12.12.2025 - 18:20DROPS Design answered:
Hei Sana. Målene til denne vesten finner du på målskissen nederst på oppskriften. Målene er tegnet inn på den målskissen der plagget ligger flatt. mvh DROPS Design
15.12.2025 - 13:26
![]() Berit Lindström wrote:
Berit Lindström wrote:
Jag undrar hur bred den är nedtill eftersom jag har ett tunnare garn? För jag har lagt upp dubbelt med maskor, men börjar undra om den blir alldeles för stor? Storlek S/M jag har ca 6x6 cm istället för 10x10?
01.07.2025 - 12:50DROPS Design answered:
Hej Berit, du finder måtten i måttskissen nederst i mønsteret :)
02.07.2025 - 12:20
![]() Ewa Waldhauser wrote:
Ewa Waldhauser wrote:
Efter 10 cm A1 De näste 10 m: är det fortf perlestrikk Alltså betyder den ofyllda rutan perlestrikk?
30.12.2024 - 10:04DROPS Design answered:
Hei Ewa. Du strikker kun 10 cm med perlestrikk (kanten på jakken), deretter strikker du etter diagram. Den blanke ruten betyr: rätmaska från rätsidan, avigmaska från avigsidan. mvh DROPS Design
07.01.2025 - 07:41
![]() Diane Juteau wrote:
Diane Juteau wrote:
Pour le graphique, on commence A1 par la droite? On fait A2apres toujours en comment par la droite et ensuite A3 à la droite aussi?
02.10.2024 - 23:49DROPS Design answered:
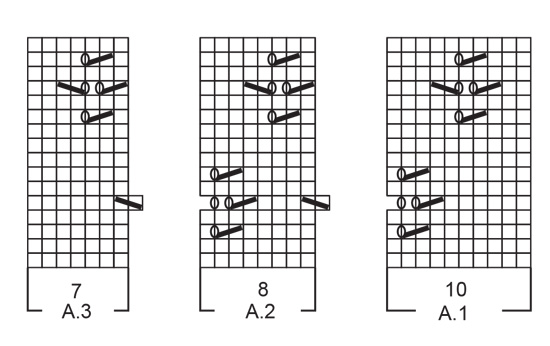
Bonjour Mme Juteau, on lit les diagramme de bas en haut et de droite à gauche sur l'endroit / de gauche à droite sur l'envers (ici les diagrammes se tricotent à l'envers sur l'envers). Bon tricot!
03.10.2024 - 09:46
![]() María Cristina wrote:
María Cristina wrote:
No puedo ver el diagrama en esta explicación en español, podrías ayudarme, gracias Te felicito por lo bien explicadas que están dadas las instrucciones del paso a paso en todos los modelos que he tejido
26.05.2023 - 23:24DROPS Design answered:
Hola María Cristina, los diagramas deberían estar visibles, en la parte inferior del patrón, después de las instrucciones escritas. A veces puede ser que, por alto tráfico de la página, no se carguen las imágenes de los diagramas; en ese caso recomendamos esperar y probar más tarde o probar con otro navegador.
28.05.2023 - 16:58
![]() Barbara Peterson wrote:
Barbara Peterson wrote:
Question: I do not see the yardage required listed for the size I want to make. That info does not appear on the pattern instructions. I already have the yarn I'd like to use for the project, just need to know if I have enough before beginning. Without that info, there is no point in my starting the project if I do not have enough yarn of the same dye-lot to complete it.
22.01.2023 - 22:33DROPS Design answered:
Dear Mrs Peterson, you will need the required amount of yarn in each size under the header, ie in size S/M for example you need 600 g DROPS Snow /50 g a ball = 12 balls. Read more about the yarn on its shadecard. Happy knitting!
23.01.2023 - 10:16
|
||||||||||||||||
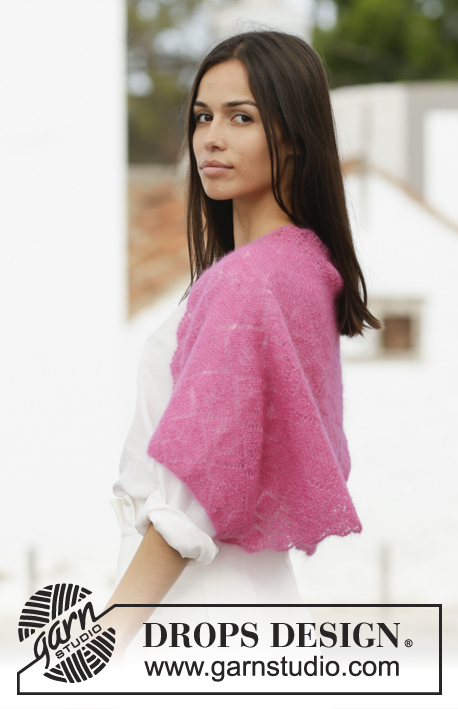
Summer Cocoon#summercocoonjacket |
||||||||||||||||
 |
 |
|||||||||||||||
Knitted vest in DROPS Snow. The piece is worked back and forth with lace pattern and moss stitch. Sizes S - XXXL.
DROPS 202-35 |
||||||||||||||||
|
------------------------------------------------------- EXPLANATIONS FOR THE PIECE: ------------------------------------------------------- RIDGE/GARTER STITCH (worked back and forth): 1 ridge = Knit 2 rows. PATTERN: See diagrams A.1 to A.3. The diagrams show all the rows in the pattern seen from the right side. MOSS STITCH: ROW 1: * Knit 1, purl 1 *, work from *-*, until there is 1 stitch left on row, knit 1. ROW 2: Purl over knit and knit over purl. Repeat row 2. INCREASE TIP-1: All increases are worked from the right side! Increase 1 stitch inside the 5 moss stitches in each side. Increase 1 stitch by making 1 yarn over. On the next row (wrong side) purl the yarn overs twisted to avoid holes. Then work the new stitches in stocking stitch – until there are enough stitches to work a complete repeat of the lace pattern on each side of the piece. NOTE: there should always be at least 2 stitches in stocking stitch inside the 1 edge stitch in garter stitch, before working another repeat of lace pattern, as shown on row 13 in patterns A.1 and A.3. INCREASE TIP-2 (evenly spaced): To work out how to increase evenly, count the total number of stitches on the needle (e.g. 111 stitches) minus 1 edge stitch in garter stitch on each side (= 2 stitches) and divide the remaining stitches by the number of increases to be made (e.g. 10) = 10.9. In this example, increase by making 1 yarn over after approx. each 11th stitch. On the next row work the yarn overs twisted to avoid holes. ------------------------------------------------------- START THE PIECE HERE: ------------------------------------------------------- VEST - SHORT OVERVIEW OF THE PIECE: The piece is worked back and forth with circular needle, top down and sewn together in the sides under the sleeves. VEST: Cast on 91-99-107-115 stitches with circular needle size 9 mm and Snow. Work MOSS STITCH - see description above, for 10 cm – adjust so that the next row is worked from the right side. Now work pattern as follows: 1 edge stitch in GARTER STITCH – read description above, A.1 over the next 10 stitches, A.2 until there are 8 stitches left on the row (= 9-10-11-12 repeats in width), A.3 over the next 7 stitches, 1 edge stitch in garter stitch. Continue this pattern back and forth. REMEMBER THE KNITTING TENSION! When the piece measures 21-23-25-26 cm cast on 4 new stitches at the end of the next 2 rows for sleeves = 99-107-115-123 stitches. Continue with pattern as follows: 5 stitches in moss stitch, pattern as before until there are 5 stitches left on row, 5 stitches in moss stitch. When the piece measures 52-60-66-70 cm increase 1 stitch inside the 5 stitches in moss stitch on each side - read INCREASE TIP-1. Increase like this every row from the right side a total of 10-10-11-11 times, AT THE SAME TIME when the piece measures 36-40-44-46 cm from where you cast on stitches for the sleeves, cast off the first 4 stitches on the next 2 rows (= 1 edge stitch in each side. This edge stitch is worked in garter stitch). Continue increases inside 1 edge stitch in garter stitch in each side. When all increases are finished there are 111-119-129-137 stitches on the row. Continue with pattern and 1 edge stitch in garter stitch on each side until the piece measures 11-13-15-16 cm from where stitches were cast off for sleeves – but adjust so that the pattern ends after a complete lace pattern in height (i.e. after row 8 or row 16 in the diagrams). If there is not room for a complete lace pattern in height, work stocking stitch for a few rows before continuing as follows: Knit 1 row from the right side where you increase 10-12-14-16 stitches evenly spaced – read INCREASE TIP-2 = 121-131-143-153 stitches. Now work moss stitch back and forth over all stitches for 10 cm. The piece measures approx. 80-88-96-100 cm. Cast off, but to avoid the cast-off edge being tight make 1 yarn over after approx. each 4th stitch (the yarn overs are cast off as normal stitches). ASSEMBLY: Sew the under-sleeve and side seams in one go – see broken line on sketch. Sew inside the 1 edge stitch in garter stitch on each side. Cut and fasten the strand. |
||||||||||||||||
Diagram explanations |
||||||||||||||||
|
||||||||||||||||
 |
||||||||||||||||
 |
||||||||||||||||
 |
||||||||||||||||
Have you finished this pattern?Tag your pictures with #dropspattern #summercocoonjacket or submit them to the #dropsfan gallery. Do you need help with this pattern?You'll find 21 tutorial videos, a Comments/Questions area and more by visiting the pattern on garnstudio.com. © 1982-2026 DROPS Design A/S. We reserve all rights. This document, including all its sub-sections, has copyrights. Read more about what you can do with our patterns at the bottom of each pattern on our site. |
||||||||||||||||


With over 40 years in knitting and crochet design, DROPS Design offers one of the most extensive collections of free patterns on the internet - translated to 17 languages. As of today we count 325 catalogues and 12298 patterns translated into English (UK/cm).
We work hard to bring you the best knitting and crochet have to offer, inspiration and advice as well as great quality yarns at incredible prices! Would you like to use our patterns for other than personal use? You can read what you are allowed to do in the Copyright text at the bottom of all our patterns. Happy crafting!
Post a comment to pattern DROPS 202-35
We would love to hear what you have to say about this pattern!
If you want to leave a question, please make sure you select the correct category in the form below, to speed up the answering process. Required fields are marked *.