
Popular categories
Looking for a yarn?


|
||||||||||||||||||||||||||||||||||||||||||||||||||||||||||
Green Envy |
||||||||||||||||||||||||||||||||||||||||||||||||||||||||||
 |
 |
|||||||||||||||||||||||||||||||||||||||||||||||||||||||||
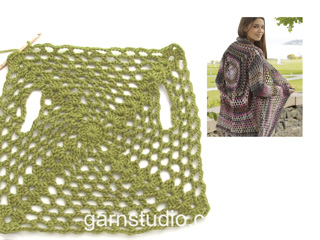
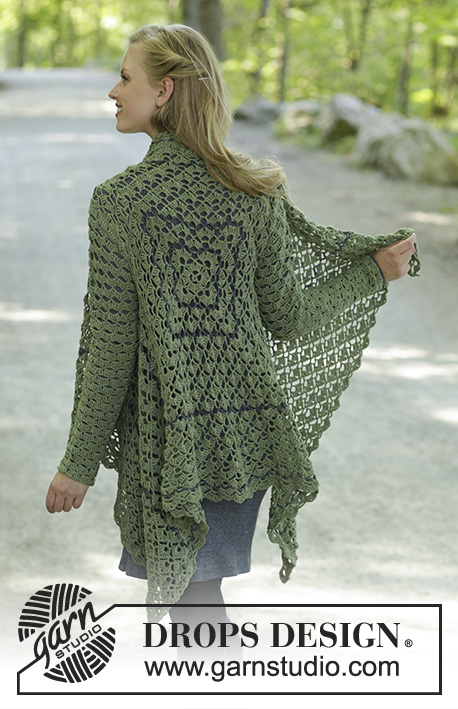
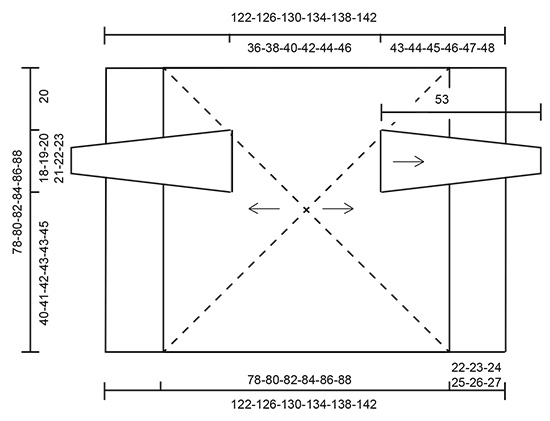
Crocheted jacket in DROPS BabyMerino. The piece is worked in a square with fans, lace pattern and stripes. Sizes S - XXXL.
DROPS 196-28 |
||||||||||||||||||||||||||||||||||||||||||||||||||||||||||
|
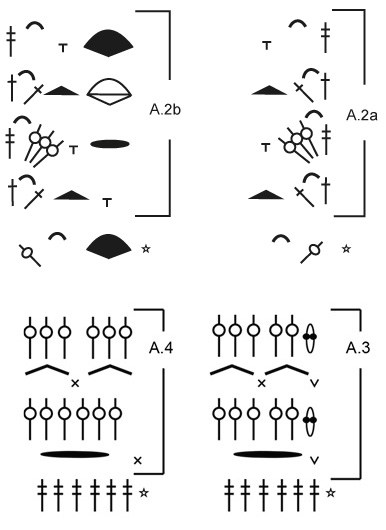
------------------------------------------------------- EXPLANATIONS FOR THE PATTERN: ------------------------------------------------------- PATTERN: See diagrams A.1 to A.4. CROCHET INFORMATION: On each round which begins with 1 treble crochet, start with 3 chain stitches (which replace the first treble crochet) and finish with 1 slip stitch in the 3rd chain stitch at the beginning of the round. On each round which begins with 1 double treble crochet, start with 4 chain stitches (which replace the first double treble crochet) and finish with 1 slip stitch in the 4th chain stitch at the beginning of the round. On each round which begins with 1 double crochet, start with 1 chain stitch (which replaces the first double crochet) and finish with 1 slip stitch in the first chain stitch at the beginning of the round. STRIPES: When the piece measures 5, 10, 20 and 36 cm from the middle (adjust so that the next round is a round without treble crochet groups) work the next round with dark grey. Cut and fasten the dark grey strand when the round is finished. Do not cut the olive strand, this is carried forwards on the wrong side, but make sure it is not tight. ------------------------------------------------------- START THE PIECE HERE: ------------------------------------------------------- JACKET - SHORT OVERVIEW OF THE PIECE: The back piece is worked first in the round from the middle outwards, in a square, then worked back and forth over each front piece. The sleeves are worked in the round top down and sewn onto the square. BACK PIECE: The piece is worked in STRIPES – read description above. Work A.1 with hook size 4 mm and olive. REMEMBER THE CROCHET TENSION! When A.1 has been worked 1 time, repeat the last 2 rounds onwards with increases as before. Continue until the square measures 36-38-40-42-44-46 cm (i.e. 18-19-20-21-22-23 cm from the middle), adjust so that next round is a round as last round in diagram A.1 (i.e. a round with 1 double crochet in the middle of each side, so it is easier to divide for armhole). Now work the armholes as follows: Work over the first side as before (up to and including the first corner), work 48-52-55-59-62-62 chain stitches, skip the first half of the next side for sleeve, work the second half to the corner, the next side as before as far as the corner, work the first half of the last side as before, work 48-52-55-59-62-62 chain stitches, skip the last half of the last side for sleeve and work the last corner as before. On the next round continue the pattern as before; around the chain stitches for the sleeves work pattern as before (i.e. you work the same number of repeats as you skipped, including the increase in the corner). Continue in the round until the piece measures a total of 78-80-82-84-86-88 cm, adjust so that you finish with 1 round of double treble crochet groups (i.e. 39-40-41-42-43-44 cm from middle of square). Cut the strand. RIGHT FRONT PIECE: Start in the middle of the first corner. The first row is worked from the wrong side as follows: Work A.2b (i.e. 1 treble crochet + 2 chain stitches + 1 treble crochet are worked in the 4 chain stitches which replaced the first double treble crochet at the beginning of the previous round, 4 chain stitches, skip over first chain space, 1 double crochet around next chain space) – read CROCHET INFORMATION, then work pattern as before until there are 2 chain stitches left before the next corner, work A.2a over the corner (i.e. 4 chain stitches, 1 treble crochet + 2 chain stitches + 1 treble crochet are worked in the double treble crochet in the corner). Continue this pattern back and forth (i.e. repeat the 4 rows in A.2). Work until the piece measures 61-63-65-67-69-71 cm from the middle of the square; adjust so that you finish with 1 row of double treble crochet groups. Cut and fasten the strand. LEFT FRONT PIECE: Work as for right front piece. SLEEVE: Work 97-104-111-118-125-125 chain stitches with hook size 4 mm and olive and form them into a ring with 1 slip stitch in the first chain stitch. Work 4 chain stitches (= 1 double treble crochet), skip 1 chain stitch, 1 double treble crochet in each of the next 5 chain stitches, * skip 1 chain stitch, work 1 double treble crochet in each of the next 6 chain stitches *, work from *-* and finish with 1 slip stitch in the 4th chain stitch at the beginning of the round = 84-90-96-102-108-108 double treble crochets. Then work pattern in the round as follows: Work A.3 (= 6 stitches) and repeat A.4 over the remaining stitches (= 13-14-15-16-17-17 times in width). Continue this pattern. When the sleeve measures 4 cm, adjust so that the next round is round 3 in A.3, decrease as follows: Work 1 chain stitch, skip the first 4 chain stitches (= replaced the first double treble crochet on the previous round) and 2 double treble crochets on the previous round, continue the pattern as before until there are 3 chain stitches and 1 slip stitch left, skip 3 double treble crochets on the previous round and finish with 1 slip stitch in the first chain stitch (= 3 treble crochets decreased in each side = a total of 6 treble crochets decreased). The next round is worked in the same way as round 2 (so that the chain-spaces continue and are displaced). Continue rounds 1 to 4 as before. Decrease like this every 10-8-8-7-7-7 cm a total of 5-6-6-7-7-7 times = 54-54-60-60-66-66 stitches (on 1 round of double treble crochets). When the sleeve measures approx. 53 cm (adjust so that you finish with 1 round of chain stitches and double crochets) cut and fasten the strand. Work 1 more sleeve in the same way. ASSEMBLY: Sew the sleeves to the square with olive, in the outermost loop of the outermost stitch. |
||||||||||||||||||||||||||||||||||||||||||||||||||||||||||
Diagram explanations |
||||||||||||||||||||||||||||||||||||||||||||||||||||||||||
|
||||||||||||||||||||||||||||||||||||||||||||||||||||||||||

|
||||||||||||||||||||||||||||||||||||||||||||||||||||||||||
|
||||||||||||||||||||||||||||||||||||||||||||||||||||||||||
|
||||||||||||||||||||||||||||||||||||||||||||||||||||||||||
|
Have you made this or any other of our designs? Tag your pictures in social media with #dropsdesign so we can see them! Do you need help with this pattern?You'll find tutorial videos, a Comments/Questions area and more by visiting the pattern on garnstudio.com. © 1982-2024 DROPS Design A/S. We reserve all rights. This document, including all its sub-sections, has copyrights. Read more about what you can do with our patterns at the bottom of each pattern on our site. |
||||||||||||||||||||||||||||||||||||||||||||||||||||||||||


With over 40 years in knitting and crochet design, DROPS Design offers one of the most extensive collections of free patterns on the internet - translated to 17 languages. As of today we count 304 catalogues and 11422 patterns - 11422 of which are translated into English (UK/cm).
We work hard to bring you the best knitting and crochet have to offer, inspiration and advice as well as great quality yarns at incredible prices! Would you like to use our patterns for other than personal use? You can read what you are allowed to do in the Copyright text at the bottom of all our patterns. Happy crafting!
Comments / Questions (45)
Bonjour, j'aimerais savoir comment débuter le 2ème rang des côtés. Après la db (4m) et les 2m, où dois-je placer le groupe des 3 db-2-3db , dans la "V" précédente ou dans l'arceau de 4 mailles en l'air juste après? Quand je fais comme les tour du carré, cela crée des augmentations et du coup, cela ne donne plus un carré, merci
06.03.2019 - 15:08DROPS Design answered:
Bonjour Nadège, en début de rang, on remplace la double-bride par 4 ml (= au-dessus de la bride du rang précédent dans A.2b/A.2a) et en fin de rang, on crochète la double-bride dans la bride du rang précédent (cf A.2a et b). Entre A.2a et A.2b vous crochetez comme avant, c'est-à-dire que vous ne devez plus augmenter, les côtés doivent être droits. Bon crochet!
06.03.2019 - 15:45I am having trouble starting the right front. Do you start exactly where your last slip stitch was? Do you start with 3 chain stitches? I don’t see how this all connect with pattern? Is there any visual help?
04.03.2019 - 15:22DROPS Design answered:
Dear Audrey, last round worked on square is a round like the next to last row in A.1. Start front piece from WS in the 4th chain from beg of the round and crochet A.2b in this stitch. Then continue as before and work A.2a over the next corner. Happy crocheting!
04.03.2019 - 16:10Salve, sono arrivata agli scaldi e la spiegazione non è molto chiara. Non ho capito se l angolo va lavorato tutto oppure le catenelle dello scalfo iniziano già nell angolo. E poi non è chiaro a quale punto preciso della metà fermare le catenella e come, cioè con che punto, maglia alta o bassa ecc, va fermato la catenella. Potete spiegare meglio, per favore? Grazie e complimenti per il sito
23.02.2019 - 20:58DROPS Design answered:
Buonasera Gilda. L’angolo deve essere lavorato tutto e la catenella dello scalfo viene fermata con 1 maglia bassa nell’arco di catenelle del gruppo di maglie alte doppie del giro precedente. Buon lavoro!
23.02.2019 - 21:26Bonjour, ce modèle me plait bien mais j'aimerais qu'il soit plus long (mi-mollet) est ce possible et si oui comment procéder, merci de votre réponse, cordialement
09.02.2019 - 07:35DROPS Design answered:
Bonjour Mme Bernard, vous pouvez probablement l'allonger en rajoutant des rangs supplémentaires en bas du gilet, nous ne sommes toutefois pas en mesure de pouvoir adapter chaque modèle à chaque demande, n'hésitez pas à contacter votre magasin DROPS - même par mail ou téléphone, on saura vous y aider et vous conseiller. Bon crochet!
11.02.2019 - 08:18Thank you for your swift response. I changed the setting to UK English and the stitch group I was referring to became a triple crochet group and the description is 3 double tribles + chain 2 + 3 double tribles . My question is: should the double crochet group on the US language setting actually be called a triple crochet group? That would make it more logical to me.
20.01.2019 - 18:28DROPS Design answered:
Dear Mrs Baker, you have here (9th symbol): 3 double treble (UK-English)/ treble crochets (US-English) + 2 chains + 3 double treble crochets (UK/English) / treble crochets (US-English), this make the "group". Happy crocheting!
21.01.2019 - 11:45Hello! I am making this pattern and am wondering if the stitches for the double crochet group are supposed to be treble stitches?
20.01.2019 - 02:44DROPS Design answered:
Dear Sheila, the stitch-groups are crocheted with trebes (UK). Please be aware of the difference between the US and the UK versions of the crochet paterns, and makesure you are reading the ones you need (the lg you learned the names of the stitches on). You can change the lg of the pattern by clicking on the roll-down menue just below the picture. Happy Crafting!
20.01.2019 - 09:09Bonjour, je suis entrain de faire ce modèle et je ne comprend comment faire les côté droit et gauche sans faire d'augmentation dans le coin ? Diagramme A.2a et A.2b pouvez vous m'aiguillez ? Ça fait plusieurs fois que je recommence et le résultat n'est pas la ! Merci
11.01.2019 - 18:11DROPS Design answered:
Bonjour Agathe, quand vous continuez chaque devant, vous crochetez le long d'un côté uniquement, soit dans les 4 ml du début du tour précédent (= 1 double-bride) crochetez: A.2b (= 1 b, 2 ml, 1b) dans ce coin, puis continuez comme avant (= crochetez le rang suivant comme pour le carré en commençant par 4 ml) et terminez par A.2b: 4 ml et 1 bride, 2 ml, 1 bride dans la double-bride du coin suivant = le long d'un seul côté. Tournez et crochetez: A.2b, comme avant, A.2 a et continuez ainsi/ Bon crochet!
14.01.2019 - 08:33Hallo, ich habe Probleme mit den Vorderteilen. Ich verstehe nicht, wie der Rand gehäkelt wird. Wenn ich im Muster weiter häkele, werden die Ränder spitz. Ansonsten tolles Muster, danke!
24.10.2018 - 20:03DROPS Design answered:
Liebe Nicole, beginnen Sie in der Ecke und häkeln Sie (Rückreihe) A.2b (= 1 Stb, 2 Lm, 1 Stb) in die 4. Lm vom Beg der vorrigen Runde, dann weiter im Muster häkeln (= wie bei der letzte Reihe in A.1) bis zur nächsten Ecke und die Reihe mit A.2a (1 Stb, 2 Lm, 1 Stb) enden, zwischen diese Stb-gruppe/Doppelstäbchen Gruppe (2. Reihe) häkeln Sie wie zuvor. Viel Spaß beim häkeln!
25.10.2018 - 08:28Bonjour je suis en train de confectionner ce modèle et je comprends pas "Au tour suivant, continuer comme avant; autour des chaînettes des emmanchures, crocheter comme avant (autrement dit, on crochète le même nombre de motifs que celui qui a été sauté, y compris l’augmentation du coin)" faut il refaire la dernière ligne du diagramme A1 ou l'avant dernière ? Par avance merci de votre aide Nathalie
01.10.2018 - 20:44DROPS Design answered:
Bonjour Nathalie, après le tour des emmanchures, continuez le diagramme comme avant (= rang suivant) et crochetez-le tout le tour: dans les mailles du rang précédent et dans les emmanchures, dans la chaînette des emmanchures, crochetez le même nombre de motifs que celui que vous avez sauté au tour précédent. Bon crochet!
02.10.2018 - 09:35Wenn A.1 1 x gehäkelt wurde, die 2 letzten Runden OHNE Zunahmen wie zuvor weiterhäkeln, bis das Viereck ein Maß von insgesamt 36-38-40-42-44-46 cm hat. Sollte es nicht heissen: MIT Zunahmen?
03.09.2018 - 10:36DROPS Design answered:
Liebe Daniela, stimmt, es soll mit Zunahmen heißen. Die deutsche Anleitung wird korrigiert, danke für den Hinweis. Viel Spaß beim häkeln!
03.09.2018 - 15:24