DROPS Baby Merino
DROPS Baby Merino
100% Wool
from 3.50 £ /50g
Get the yarn to make this pattern from 38.50£.

The yarn cost is calculated from the pattern’s smallest size and the yarn’s cheapest product type. Looking for an even better price? You might find it on the DROPS Deals!

DROPS SS24

Green Envy

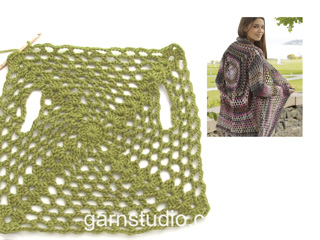
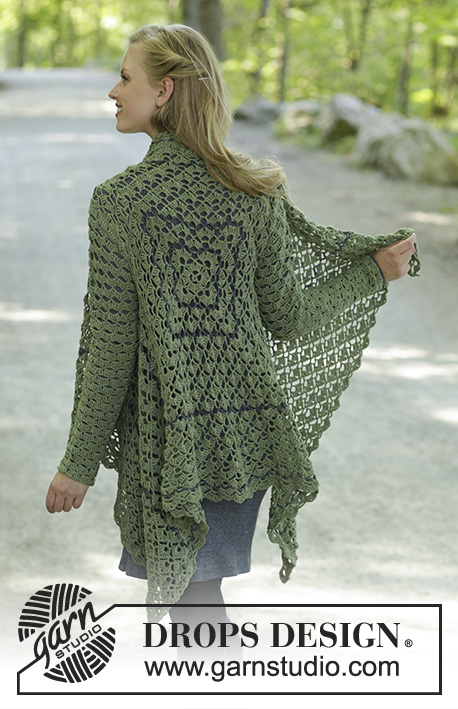
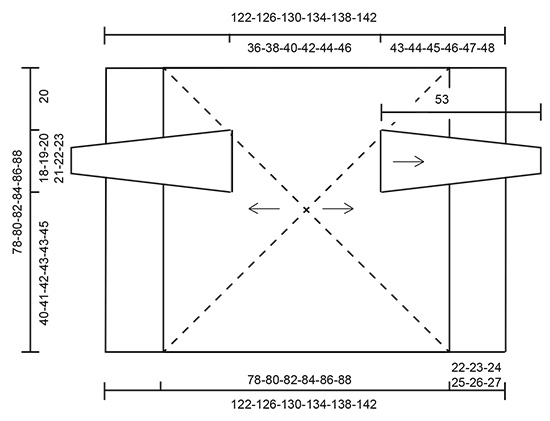
Crocheted jacket in DROPS BabyMerino. The piece is worked in a square with fans, lace pattern and stripes. Sizes S - XXXL.

DROPS 196-28
DROPS Design: Pattern no bm-055
Yarn group A
-------------------------------------------------------

Sizes: S - M - L - XL - XXL - XXXL
Materials:
DROPS BABYMERINO from Garnstudio (belongs to yarn group A)
50-100-100-100-100-100 g colour 20, dark grey
500-550-600-650-700-750 g colour 38, olive

-------------------------------------------------------
ACCESSORIES FOR THE PIECE:

CROCHET TENSION:
20 double treble crochets in width and 7.5 rows in height = 10 x 10 cm.
Diagram A.4 measures approx. 2½ cm in width.

CROCHET HOOK:
DROPS CROCHET HOOK SIZE 4 mm.
The hook size is only a guide. If you get too many stitches on 10 cm, change to a larger hook size. If you get too few stitches on 10 cm, change to a smaller hook size.

-------------------------------------------------------

Alternative Yarn – See how to change yarns here
Yarn Groups A to F – Use the same pattern and change the yarn here
Yarn usage using an alternative yarn – Use our yarn converter here

-------------------------------------------------------

DROPS Baby Merino
DROPS Baby Merino
100% Wool
from 3.50 £ /50g
Get the yarn to make this pattern from 38.50£.

The yarn cost is calculated from the pattern’s smallest size and the yarn’s cheapest product type. Looking for an even better price? You might find it on the DROPS Deals!

Pattern instructions

NOTE: This pattern is written in British English. All measurements in charts are in cm. For conversion from cm to inches - click here. There are different terms for crocheting in British and American English. If this pattern includes crochet, click for "crochet terms" here. For this pattern in American English, please click here.
-------------------------------------------------------

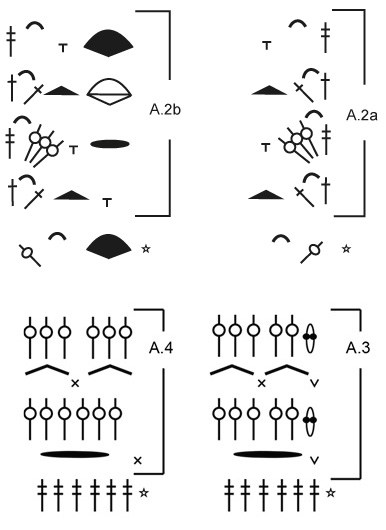
EXPLANATIONS FOR THE PATTERN:

-------------------------------------------------------

PATTERN:
See diagrams A.1 to A.4.

CROCHET INFORMATION:
On each round which begins with 1 treble crochet, start with 3 chain stitches (which replace the first treble crochet) and finish with 1 slip stitch in the 3rd chain stitch at the beginning of the round.
On each round which begins with 1 double treble crochet, start with 4 chain stitches (which replace the first double treble crochet) and finish with 1 slip stitch in the 4th chain stitch at the beginning of the round.
On each round which begins with 1 double crochet, start with 1 chain stitch (which replaces the first double crochet) and finish with 1 slip stitch in the first chain stitch at the beginning of the round.

STRIPES:
When the piece measures 5, 10, 20 and 36 cm from the middle (adjust so that the next round is a round without treble crochet groups) work the next round with dark grey. Cut and fasten the dark grey strand when the round is finished. Do not cut the olive strand, this is carried forwards on the wrong side, but make sure it is not tight.

-------------------------------------------------------

START THE PIECE HERE:

-------------------------------------------------------

JACKET - SHORT OVERVIEW OF THE PIECE:
The back piece is worked first in the round from the middle outwards, in a square, then worked back and forth over each front piece. The sleeves are worked in the round top down and sewn onto the square.

BACK PIECE:
The piece is worked in STRIPES – read description above.
Work A.1 with hook size 4 mm and olive. REMEMBER THE CROCHET TENSION!
When A.1 has been worked 1 time, repeat the last 2 rounds onwards with increases as before. Continue until the square measures 36-38-40-42-44-46 cm (i.e. 18-19-20-21-22-23 cm from the middle), adjust so that next round is a round as last round in diagram A.1 (i.e. a round with 1 double crochet in the middle of each side, so it is easier to divide for armhole).
Now work the armholes as follows: Work over the first side as before (up to and including the first corner), work 48-52-55-59-62-62 chain stitches, skip the first half of the next side for sleeve, work the second half to the corner, the next side as before as far as the corner, work the first half of the last side as before, work 48-52-55-59-62-62 chain stitches, skip the last half of the last side for sleeve and work the last corner as before.
On the next round continue the pattern as before; around the chain stitches for the sleeves work pattern as before (i.e. you work the same number of repeats as you skipped, including the increase in the corner).
Continue in the round until the piece measures a total of 78-80-82-84-86-88 cm, adjust so that you finish with 1 round of double treble crochet groups (i.e. 39-40-41-42-43-44 cm from middle of square). Cut the strand.

RIGHT FRONT PIECE:
Start in the middle of the first corner.
The first row is worked from the wrong side as follows: Work A.2b (i.e. 1 treble crochet + 2 chain stitches + 1 treble crochet are worked in the 4 chain stitches which replaced the first double treble crochet at the beginning of the previous round, 4 chain stitches, skip over first chain space, 1 double crochet around next chain space) – read CROCHET INFORMATION, then work pattern as before until there are 2 chain stitches left before the next corner, work A.2a over the corner (i.e. 4 chain stitches, 1 treble crochet + 2 chain stitches + 1 treble crochet are worked in the double treble crochet in the corner).
Continue this pattern back and forth (i.e. repeat the 4 rows in A.2). Work until the piece measures 61-63-65-67-69-71 cm from the middle of the square; adjust so that you finish with 1 row of double treble crochet groups. Cut and fasten the strand.

LEFT FRONT PIECE:
Work as for right front piece.

SLEEVE:
Work 97-104-111-118-125-125 chain stitches with hook size 4 mm and olive and form them into a ring with 1 slip stitch in the first chain stitch.
Work 4 chain stitches (= 1 double treble crochet), skip 1 chain stitch, 1 double treble crochet in each of the next 5 chain stitches, * skip 1 chain stitch, work 1 double treble crochet in each of the next 6 chain stitches *, work from *-* and finish with 1 slip stitch in the 4th chain stitch at the beginning of the round = 84-90-96-102-108-108 double treble crochets.
Then work pattern in the round as follows: Work A.3 (= 6 stitches) and repeat A.4 over the remaining stitches (= 13-14-15-16-17-17 times in width).
Continue this pattern.
When the sleeve measures 4 cm, adjust so that the next round is round 3 in A.3, decrease as follows:
Work 1 chain stitch, skip the first 4 chain stitches (= replaced the first double treble crochet on the previous round) and 2 double treble crochets on the previous round, continue the pattern as before until there are 3 chain stitches and 1 slip stitch left, skip 3 double treble crochets on the previous round and finish with 1 slip stitch in the first chain stitch (= 3 treble crochets decreased in each side = a total of 6 treble crochets decreased).
The next round is worked in the same way as round 2 (so that the chain-spaces continue and are displaced). Continue rounds 1 to 4 as before. Decrease like this every 10-8-8-7-7-7 cm a total of 5-6-6-7-7-7 times = 54-54-60-60-66-66 stitches (on 1 round of double treble crochets). When the sleeve measures approx. 53 cm (adjust so that you finish with 1 round of chain stitches and double crochets) cut and fasten the strand.
Work 1 more sleeve in the same way.

ASSEMBLY:
Sew the sleeves to the square with olive, in the outermost loop of the outermost stitch.

This pattern has been corrected.

Updated online: 12.11.2019
New text under BACK PIECE and RIGHT FRONT PIECE + new charts A.2a and A.2b.

Diagram

symbols = 2 chain stitches
symbols = 3 chain stitches
symbols = 4 chain stitches
symbols = 6 chain stitches
symbols = double crochet around chain-space
symbols = treble crochet around chain-stitch ring
symbols = double treble crochet in stitch
symbols = double treble crochet around chain-space
symbols = double treble crochet group: (3 double treble crochets + 2 chain stitches + 3 double treble crochets) around chain-space
symbols = (1 treble crochet + 6 chain stitches + 1 treble crochet) around chain-space/in double treble crochet
symbols = round begins with 3 chain stitches, then work 6 chain stitches + 1 treble crochet in 4th chain stitch at beginning of previous round. Round finishes with 1 slip stitch in 3rd chain stitch at beginning of round, then work slip stitches to middle of first chain-space
symbols = round begins with 3 chain stitches and finishes with 1 slip stitch in 3rd chain stitch at beginning of round
symbols = round begins with 4 chain stitches and finishes with 1 slip stitch in 4th chain stitch at beginning of round
symbols = crochet direction
symbols = work 5 chain stitches and form them into a ring with 1 slip stitch in first chain stitch - see point on circle; round starts and ends here
symbols = round already worked; this shows how the next round is worked between the stitches - Start on next round!
symbols = treble crochet in stitch
symbols = double crochet between 2 double treble crochets
symbols = round begins with 1 chain stitch (replaces first double crochet) and finishes with 1 slip stitch in first double crochet at beginning of round
diagram
diagram
diagram
Do you have a question? See a list of frequently asked questions (FAQ)

Knitting tension is what determines the final measurements of your work, and is usually measured per 10 x 10 cm. It is provided like so: number of stitches in width x number of rows in height - eg: 19 stitches x 26 rows = 10 x 10 cm.

The knitting tension is very individual; some people knit/crochet loosely while others work tightly. You adjust the knitting tension with the needle size, which is why the suggested needle size is only meant as a guide! You need to adjust this (up or down) to ensure that YOUR knitting tension matches the knitting tension provided in the pattern. If you work with a different knitting tension than provided you will have a different yarn consumption, and your work will have different measurements than what the pattern suggests.

The knitting tension also determines which yarns can replace each other. As long as you achieve the same knitting tension you can replace one yarn with another.

See DROPS lesson: How to measure your tension/gauge

See DROPS video: How to make a gauge tension swatch

The required amount of yarn is provided in grams, eg: 450 g. To calculate how many balls you’ll need you first need to know how many grams are in 1 ball (25g, 50g or 100g). This information is available if you click on the individual yarn quality on our pages. Divide the amount required with the amount of each ball. For example, if each ball is 50g (the most common amount), the calculation will be as follows: 450 / 50 = 9 balls.

The important thing when changing from one yarn to another is that the knitting/crochet tension remains the same. This is so that the measurements of the finished piece will be the same as on the sketch provided. It is easier to achieve the same knitting tension using yarns from the same yarn group. It is also possible to work with multiple strands of a thinner yarn to achieve the knitting tension of a thicker one. Please try our yarn converter. We recommend you to always work a test swatch.

Please NOTE: when changing yarn the garment might have a different look and feel to the garment in the photo, due to individual properties and qualities of each yarn.

See DROPS lesson: Can I use a different yarn than the one mentioned in the pattern?

All our yarns are categorised into yarn groups (from A to F) according to thickness and knitting tension – group A contains the thinnest yarns and group F the thickest. This makes it easier for you to find alternative yarns to our patterns, should you wish to switch yarn. All yarns within the same group have a similar knitting tension and can easily replace each other. However, different yarn qualities have different structures and properties which will give the finished work a unique look and feel.

Click here for an overview of the yarns in each yarn group

At the top of all our patterns you’ll find a link to our yarn calculator, which is a helpful tool should you wish to use a different yarn than suggested. By filling in the yarn quality you wish to replace, the amount (in your size) and number of strands, the calculator will present good alternative yarns with the same knitting tension. Additionally it will tell you how much you’ll require in the new qualities and whether you’ll need to work with multiple strands. Most skeins are 50g (some are 25g or 100g).

If the pattern is worked with multiple colours, every colour will have to be calculated separately. Similarly, if the pattern is worked with several strands of different yarns (for example 1 strand Alpaca and 1 strand Kid-Silk) you will have to find alternatives for each, individually.

Click here to see our yarn calculator

Since different yarns have different qualities and textures we have chosen to keep the original yarn in our patterns. However, you can easily find options among our available qualities by using our yarn calculator, or simply pick a yarn from the same yarn group.

It is possible that some retailers still have discontinued yarns in stock, or that someone has a few skeins at home that they would like to find patterns for.

The yarn calculator will provide both alternative yarn as well as required amount in the new quality.

If you think it's hard to decide what size to make, it can be a good idea to measure a garment you own already and like the size of. Then you can pick the size by comparing those measures with the ones available in the pattern's size chart.

You'll find the size chart at the bottom of the pattern.

See DROPS lesson: How to read size chart

The needle size provided in the pattern serves only as a guide, the important thing is to follow the knitting tension. And since knitting tension is very individual, you will have to adjust the needle size to ensure that YOUR tension is the same as in the pattern – maybe you’ll have to adjust 1, or even 2 needle sizes, up or down to achieve the correct tension. For this, we recommend that you work test swatches.

Should you work with a different knitting tension than the one provided, the measurements of the finished garment might deviate from the measurement sketch.

See DROPS lesson: How to measure your tension/gauge

See DROPS video: How to make a tension/gauge swatch

Working a garment top-down provides more flexibility and room for personal adjustment. For example it is easier to try the garment on while working, as well as making adjustments to length of yoke and shoulder caps.

The instructions are carefully explaining every step, in the correct order. Diagrams are adjusted to the knitting direction and are worked as usual.

The diagram depicts all rows/rounds, and every stitch seen from the right side. It is read from bottom to top, from right to left. 1 square = 1 stitch.

When working back and forth, every other row is worked from the right side and every other row is worked from the wrong side. When working from the wrong side, the diagram will have to be worked reversed: from left to right, knit stitches are purled, purl stitches are knit etc.

When working in the round every round is worked from the right side and the diagram are worked from right to left on all rounds.

See DROPS lesson: How to read knitting diagrams

The diagram depicts all rows/rounds, and every stitch seen from the right side. It is worked from bottom to top, from right to left.

When working back and forth every other row is worked from the right side: from right to left and every other row is worked from the wrong side: from left to right.

When working in the round, every row in the diagram are worked from the right side, from right to left.

When working a circular diagram you start in the middle and work your way outwards, counter clockwise, row by row.

The rows usually start with a given number of chain stitches (equivalent to the height of the following stitch), this will either be depicted in the diagram or explained in the pattern.

See DROPS lesson: How to read crochet diagrams

Instructions for working several diagrams after each other on the same row/round, will often be written like so: “work A.1, A.2, A.3 a total of 0-0-2-3-4 times". This means you work A.1 once, then A.2 is worked once, and A.3 is repeated (in width) the number of times provided for your size – in this case like so: S = 0 times, M = 0 times, L=2 times, XL= 3 times and XXL = 4 times.

The diagrams are worked as usual: begin with the first row in A.1, then work the first row in A.2 etc.

See DROPS lesson: How to read knitting diagrams

See DROPS lesson: How to read crochet diagrams

The total width of the garment (from wrist-to-wrist) will be larger in the larger sizes, despite the actual sleeves being shorter. The larger sizes have longer sleeve caps and wider shoulders, so there will be a good fit in all sizes.

The measurement sketch/schematic drawing provides information regarding the full length of the garment. If it’s a jumper or a jacket the length is measured from the highest point on the shoulder closest to the neckline, and straight down to the bottom of the garment. It is NOT measured from the tip of shoulder. Similarly, the length of yoke is measured from the highest point on the shoulder and down to where yoke is split into body and sleeves.

On a jacket measures are never taken along bands, unless specifically stated. Always measure inside band stitches when measuring the length.

See DROPS lesson: How to read a schematic drawing

Diagrams are often repeated on the round or in height. 1 repeat is the diagram the way it appears in the pattern. If it says to work 5 repeats of A.1 in the round, then you work A.1 a total of 5 times after/next to each other in the round. If it says to work 2 repeats of A.1 vertically/in height you work the entire diagram once, then begin again at the start and work the entire diagram one more time.

Chain stitches are slightly narrower than other stitches and to avoid working the cast-on edge too tight, we simply chain more stitches to begin with. The stitch count will be adjusted on the following row to fit the pattern and measurement sketch.

The rib edge is more elastic and will contract slightly compared to, for example, stocking stitch. By increasing before the rib edge, you avoid a visible difference in width between the rib edge and the rest of the body.

It’s very easy to cast off too tightly, and by making yarn overs while casting off (and simultaneously casting these off) you avoid a too tight cast off edge.

See DROPS video: How to bind off with yarn overs (yo)

To achieve an even increase (or decrease) you can increase on, for example: every 3rd and 4th row alternately, like so: work 2 rows and increase on the 3rd row, work 3 rows and increase on the 4th. Repeat this until the increase is complete.

See DROPS lesson: Increase or decrease 1 st on every 3rd and 4th row alternately

Should you prefer to work in the round instead of back and forth, you may of course adjust the pattern. You’ll need to add steeks mid-front (usually 5 stitches), and follow the instructions. When you would normally turn and work from the wrong side, simply work across the steek and continue in the round. At the end you’ll cut the piece open, pick up stitches to work bands, and cover the cut edges.

See DROPS video: How to knit steeks and cut open

Should you prefer to work back and forth instead of in the round, you may of course adjust the pattern so you work the pieces separately and then assemble them at the end. Divide the stitches for the body in 2, add 1 edge stitch in each side (for sewing) and work the front and back pieces separately.

See DROPS lesson: Can I adapt a pattern for circular needles into straight needles?

Pattern repeats can vary slightly in the different sizes, in order to get the correct proportions. If you’re not working the exact same size as the garment in the photo, yours might deviate slightly. This has been carefully developed and adjusted so that the complete impression of the garment is the same in all sizes.

Make sure to follow instructions and diagrams for your size!

If you have found a pattern you like which is available in women’s size it’s not very difficult to convert it to men’s size. The biggest difference will be the length of sleeves and body. Start working on the women size that you think would fit across the chest. The additional length will be worked right before you cast off for the armhole/sleeve cap. If the pattern is worked top-down you can add the length right after the armhole or before the first decrease on sleeve.

Regarding additional yarn amount, this will depend on how much length you add, but it is better with a skein too many than too few.

All yarns will have excess fibres (from production) that might come off as lint or shedding. Brushed yarns (ie hairier yarns) have more of these loose, excess fibres, causing more shedding.

Shedding also depends on what is worn under or over the garment, and whether this pulls at the yarn fibres. It’s therefore not possible to guarantee that there will be no shedding

Below are some tips on how to get the best result when working with hairier yarns:

1. When the garment is finished (before you wash it) shake it vigorously so the looser hairs come off. NOTE: do NOT use a lint roller, brush or any method that pulls at the yarn.

2. Place the garment in a plastic bag and put it in your freezer - the temperature will cause the fibres to become less attached to each other, and excess fibres will come off easier.

3. Leave in the freezer for a few hours before taking it out and shaking it again.

4. Wash the garment according to the instructions on the yarn label.

Pilling is a natural process that happens to even the most exclusive of fibers. It's a natural sign of wear and tear that is hard to avoid, and that is most visible in high friction areas of your garment like a sweater's arms and cuffs.

You can make your garment look as new by removing the pilling, using a fabric comb or a pill/lint remover.

Still can't find the answer you need? Then scroll down and leave your question so one of our experts can try to help you. This will be done normally within 5 to 10 working days.
In the meantime, you can read the questions and answers that others have left to this pattern or join the DROPS Workshop on Facebook to get help from fellow knitters/crocheters!

You might also like...

Post a comment to pattern DROPS 196-28

We would love to hear what you have to say about this pattern!

If you want to leave a question, please make sure you select the correct category in the form below, to speed up the answering process. Required fields are marked *.

Comments / Questions (45)

country flag Małgorzata wrote:

Nie umiem poradzić sobie ze schematem i opisem wykonania przodu (lewego lub prawego). Jak powtarzać schemat?

28.10.2020 - 08:35

DROPS Design answered:

Witaj Małgosiu! Przerabiasz 1-szy rząd na lewej stronie robótki następująco: schemat A.2b (tj. 1 słupek + 2 oczka łańcuszka + 1 słupek w 4-te oczko łańcuszka, które zastępuje pierwszy słupek podwójny na początku poprzedniego okrążenia, 4 oczka łańcuszka, ominąć pierwszy łuk, 1 oczko ścisłe wokół następnego łuku) – patrz WSKAZÓWKA, dalej przerabiasz jak wcześniej (jak na tyle), aż zostaje 2 oczka łańcuszka przed następnym rogiem, przerabiasz schemat A.2a ponad rogiem (tj. 4 oczka łańcuszka, 1 słupek + 2 oczka łańcuszka + 1 słupek w słupek podwójny w rogu). Dalej przerabiać tak samo w tę i z powrotem. Pozdrawiamy!

30.10.2020 - 09:45

country flag Zakia wrote:

Bonjour Je suis en train de crocheter ce modèle et j’ai un petit soucis : quand on réalise le corps nous avons entre 2 brides 6 m en l’air et pour la réalisation des côtes on réalise seulement 2 m en l’air ? Il est mentionné que le modèle est corrigé. Donc les diagrammes A2a et A2b sont les diagrammes corrigés

14.09.2020 - 16:34

DROPS Design answered:

Bonjour Zakia, quand on crochète en rond, on a effectivement 1 tour sur 2 un arceau de 6 mailles en l'air dans chaque coin, quand on continue les devants séparément, en rangs, on crochète d'un coin à l'autre avec A.2a et A.2b en début/fin de rang et comme avant entre les 2, mais on n'a plus d'arceau de 6 mailles en l'air, on crochète 1 bride, 2 mailles en l'air, 1 bride de chaque côté (rangs 1 et 3 de A.2a/A.2b). Bon crochet!

15.09.2020 - 09:26

country flag Monika Weissgram wrote:

Hallo, ich habe Probleme mit den Ärmeln, ich komme mit der Häkelschrift samt Erklärung nicht klar. Bitte um Verständliche Erklärung. GlG Monika

28.08.2020 - 20:16

DROPS Design answered:

Liebe Frau Weissgram, bei der Ärmel häkeln Sie zuerst 1 Runde mit nur Doppelstäbchen ( 84 bis 108 Doppelstb je nach der Größe), dann häkeln Sie die Diagramme wie folgt: A.3 am Anfang der Runde, dann A.4 13 bis 17 Mal (je nach der Größe) wiederholen. Viel Spaß beim häkeln!

31.08.2020 - 08:52

country flag Mihaela Simion wrote:

Hi, I like the pattern but I m having trouble on the 4 th row I really can t understand it at all.if someone can explain the row I would appreciate it.Thank you!

06.04.2020 - 19:16

DROPS Design answered:

Dear Mrs Simon, in UK-English, work 4th round as follows: 4 ch (= 1st dtr), *2 ch, 1 dtr group around next ch-space, 1 dc around next ch-space, 6 ch, 1 dc around next ch-space, 1 dtr group around next ch-space, 2 ch, (1 tr+6ch+1tr) in the dbtr at the corner*, repeat from *-* 2 more times (first 3 sides of squares are done), and finish with 2 ch, 1 dtr group around next ch-space, 1 dc around next ch-space, 6 ch, 1 dc around next ch-space, 1 dtr group around next ch-space, 2 ch, 1 slip st in4th ch from beg of round (= 4th side of square). Happy crocheting!

09.04.2020 - 14:33

country flag Erika Wickman wrote:

Jag kan inte få varv 3 att bli rätt. Finns det någon film eller annan tydlig beskrivning att se hur man gör. Det gäller DROPS Design: Modell bm-055 Green Envy. Vänligen Erika Wickman

26.02.2020 - 11:06

DROPS Design answered:

Hej Erika, när du har virkat smygmaskan i 4:e lm i början på varv 2, virkar du 9lm, 1 stolpe i samma 4:e lm från förra varvet, sedan 4 lm, 1 fm om lm-bågen (i mitten på dbl-stolpgruppen från förra varvet), 4lm osv. Lycka till :)

26.02.2020 - 12:10

country flag Sharon wrote:

Why have you not used the recognized standard crochet symbols in these charts? The end result makes the chart more difficult to follow. Will not be making this lovely jacket now.

29.01.2020 - 16:59

country flag Sara wrote:

En los diagrams A2a y A2 b el grupo de puntos va alrededor de los 4 puntos de cadeneta de la vuelta anterior o va en el arco de 2 cadenetas entre los dos puntos altos de la vuelta anterior?

29.10.2019 - 14:19

DROPS Design answered:

Hola Sara. Los grupos de puntos altos se trabajan en el arco de 2 puntos de cadeneta de la vuelta anterior.

30.11.2019 - 23:24

country flag Sara wrote:

Buenas tardes, he terminado ya con la parte de la espalda y estoy haciendo el frontal derecho, mi pregunta es si el tejido debe de seguir creciendo ? Porque estoy siguiendo el patrón A2a y A2b y en las esquinas va creciendo con lo que no me queda un rectángulo si no que va quedando el lateral en diagonal.

29.10.2019 - 14:19

country flag Nelleke wrote:

Op 6 juni stelde Mieke de volgende vraag: de 2de rij is dan dubbel stokje 2losse, het dubbelstokjesgroepje, v, 6l, v enz.... als dit de manier is, dan meerdert de rij, dit kan niet de bedoeling zijn, hoe wordt dit opgelost? Ik loop ook tegen het probleem aan dat ik op deze wijze meerder. Hoe voorkom ik dit? Met vriendelijke groeten, Nelleke

23.09.2019 - 20:51

DROPS Design answered:

Dag Nelleke,

Het heeft even geduurd, maar het patroon is nu aangepast met nieuwe telpatronen; er zat inderdaad een fout in.

15.11.2019 - 15:42

country flag Dagmar wrote:

Hallo, ich habe auch Probleme mit den Vorderteilen, die Häkelschruft ist etwas ungenau. Wird in der Hinreihe, also der mit den Stäbchengruppe, die erste Stäbchengruppe in eine 4er luftmaschenkette gehäkelt? Im Diagramm wird das ja in die 6er Luftmaschenkette gemacht. Das irritiert mich etwas. Ist es normal das dann die ersten 2 Stäbchengruppen dichter zusammen sitzen. Bitte erkläre. Lg Dagmar

17.09.2019 - 07:31

DROPS Design answered:

Liebe Dagmar, ich bin etwas unsicher mit Ihrer Frage, entschuldigung. Wenn Sie die Vorderteile häkeln (separat), beginnen Sie mit A.2A (= 1 Stb, 2 Lm, 1 Stb), dann häkeln Sie wie zuvor bis nächster Ecke und mit A.2b (1 Stb, 2 Lm, 1 Stb) , zwischen A.2a und A.2b häkeln Sie wie zuvor, Diagramme zeigen die nächste Maschen, dh entweder 4 Lm oder 1Stb-gruppe um zu wissen, wie die Reihe beginnt/endet. Hoffentlich hilft es. Viel Spaß beim häkeln!

17.09.2019 - 10:22