
Looking for a yarn?


Comments / Questions (34)
![]() Maddy wrote:
Maddy wrote:
I am trying to make this pattern in XXL but am stuck in A.3 part.. how do I continue after finishing the first 4 rows of A.3? Which rows do I repeat and how will the pattern be for the mid-space?
17.07.2025 - 14:33DROPS Design answered:
Hi Maddy, now you have to work A.4 - please note that the round marked with a star has already been worked, start on the next round. Happy crocheting!
17.07.2025 - 17:45
![]() Maria Jose wrote:
Maria Jose wrote:
Gracias por tu respuesta, pero no me queda claro como seria cada vuelta. Me podias describir la primera vuelta? Muchas gracias.
29.12.2023 - 19:31DROPS Design answered:
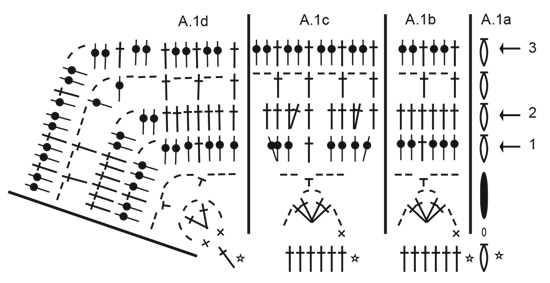
Hola Maria Jose, A.1a (= 1.p de cad), A.1b( = 1 p.b en el 1º p.a, 2 p.de cad, saltar 2 p.a, (2 p.a, 2 p.de cad, 2 p.a) en el siguiente p.a, 2 p.de cad, saltar 2 p.a), A.1c (= 1 p.b en el sig p.a, 2 p.de cad, saltar 2 p.a, (2 p.a, 2 p.de cad, 2 p.a) en el siguiente p.a, 2 p.de cad, saltar 2 p.a), repetir A.1b 3 veces, A.1d (trabajar en el p.a de la esquina: 1 p.b, 2 p.de cad, 1 p.a, 2 p.de cad, 1 p.a, 2 p.de cad, 1 p.b), repetir A.1b 3 veces, repetir A.1c 1 vez, repetir A.1b 2 veces, repetir A.1c 1 vez, repetir A.1b 3 veces, repetir A.1d 1 vez, repetir A.1b 3 veces, repetir A.1c 1 vez, repetir A.1b 1 vez.
07.01.2024 - 15:39
![]() MARIA JOSE GONZALEZ wrote:
MARIA JOSE GONZALEZ wrote:
Hola! No entiendo cómo realizar el patrón, si pone A1b, A1c, Ac1 tres veces en horizontal, hay que hacer primero la A1b tres veces y luego el c o se van alternando?? No lo tengo muy claro. Gracias
28.12.2023 - 21:20DROPS Design answered:
Hola Maria José, puedes ver la respuesta debajo.
29.12.2023 - 00:23
![]() María José wrote:
María José wrote:
Hola! He empezado el patrón del poncho pero no entiendo muy bien cómo interpretar el patrón. Pone que los esquemas A1b, A1c A1d tres veces en horizontal, pero no sé si el el A1b tres veces , después el c otras tres veces, o se van alternando! Estoy echa un lío!! Me podéis ayudar??
28.12.2023 - 21:13DROPS Design answered:
Hola María José, como están separados por comas, 3 veces en horizontal solo se aplica al último diagrama. Es decir, en la misma vuelta, trabajas A.1b 1 vez, A.1c 1 vez, A.1b 3 veces, A.1d 1 vez, A.1b 3 veces, A.1c, A.1b 2 veces, A.1c 1 vez, A.1b 3 veces, A.1d 1 vez, A.1b 3 veces, A.1c 1 vez, A.1b 1 vez.
29.12.2023 - 00:22
![]() Michaela L wrote:
Michaela L wrote:
Vielen Dank! Allerdings geht meine Frage zu der Reihe 2 des Diagramms. Reihe 1 = Stäbchen ergeben 122 Maschen, korrekt? Die Reihe 2 danach mit dem ersten Muster erfordert aber mehr Maschen. Könnten Sie bitte nochmal im Detail schreiben wie die Reihe 2 sich auf die 122 Maschen verteilt? Danke sehr!
09.03.2023 - 12:46DROPS Design answered:
Liebe Michaela, setzen Sie Markierungen nach jedem Diagram, so wird es viel einfacher, die Maschenanzahl zu prüfen (bei der 2. Reihe (vor dem 1. Pfeil) sind es 6 M in jedem A.1b/A.1c + in A.1D (3 lm, 1 fm, 4 lm, 1 fm, 2 Lm) - So können Sie bei der Reihe mit dem Pfeil-1 so prüfen daß Sie die richtige Maschenanzahl in jedem Diagram haben (5 Stb in jedem A.1b, 8 Stb in jedem A.1c und 7 Stb, 2 Lm, 6 Lm in A.1d). Viel Spaß beim häkeln!
09.03.2023 - 17:37
![]() Michaela L wrote:
Michaela L wrote:
Danke für die schnelle Antwort. Ich muss nur leider sagen dass ich es nicht ganz verstehe: wo bzw in welche Rd sehe ich denn die Zunahmen in 1d und 1c? ist das bereits in der Rd 2 des Diagramms der Fall, denn dort fehlen mir bereits die Maschen, wir oben beschrieben. Ich kann leider die jeweils 6 M in A1d pro Runde nicht entdecken.
08.03.2023 - 15:42DROPS Design answered:
Liebe Michaela, die Zunahmen in c und d sind in Diagram gezeichnet: A.1c wird über 6 Maschen gehäkelt aber am Ende sind es 12 Maschen = 6 Zunahmen in jedem A.1c und A.1c wird 4 Mal gehäkelt - A.1d wird über 1 M gehäkelt und am Ende A.1d sind es: 12 Stb, 2 Lm, 12 Stb = es wurde 23 M zugenommen (ohne die Lm). Kann das Ihnen helfen?
08.03.2023 - 15:46
![]() Michaela L wrote:
Michaela L wrote:
Ich häkele Grösse S. Zugenommen wird doch erst ab Reihe 4 des Diagramms, dh noch nicht in den ersten Stäbchen Runden, oder? Meine erste Muster-Runde (= Runde 2 des Diagramm) endet mit 1,5 x A 1b nach A1d, dh es fehlen mir ca 1,5x A1b , 1x A1c und am Ende 1x A1b, gemäss der Beschreibung zu A1.
08.03.2023 - 15:01DROPS Design answered:
Liebe Michaela, In S beginnen die Zunahmen bei den Pfeile, mit der 4. Reihe und dann wieder bei der letzten Reihe, aber die Maschenanzahl in jeder A.1d + in jeder A.1c wird auch zunehmen, so sind es: 122 M + (6 M in jedem A.1c x 4 Rapporter) + (23 M in jedem A.1d x 2 Rapporter) + 24 zusätzlichen Zunahmen = 216 Maschen insgesamt = 108 m beidseitig von den Luftmaschenbogen in A.1d. Viel Spaß beim häkeln!
08.03.2023 - 15:24
![]() Michaela L wrote:
Michaela L wrote:
Liebes Drops Team, in der ersten Reihe nach den jeweils 6 Stäbchen komme, also wenn die erste Runde mit Muster gehäkelt wird, komme ich mit der Anzahl der Stäbchen nicht aus. Obwohl ich die Stäbchen Reihe mit 122 Maschen korrekt abgeschlossen habe. Es fehlen aber für die erste Musterreihe etliche Maschen, um die erste Musterreihe komplett abzuschliessen. Wo ist mein Fehler? Danke!
08.03.2023 - 14:02DROPS Design answered:
Liebe Michaela, können Sie uns bitte sagen, welche Größe Sie häkeln? Danke im voraus!
08.03.2023 - 14:47
![]() Maarit wrote:
Maarit wrote:
Hei. En ymmärrä ohjeen lisäyskerroksia... Alussa Oli 122 pylvästä ja kolmen lisäyskerroksen jälkeen ( 6p/krs/osuus ) pylväitä onkin vain esim. 114! Missä vika?
04.07.2022 - 18:57DROPS Design answered:
Lisäysten jälkeen keskellä edessä ja keskellä takana olevien ketjusilmukkakaarien välissä on aina 114 pylvästä, työssä on siis yhteensä 228 pylvästä.
04.10.2022 - 17:03
![]() SONIA MARIA DOS SANTOS wrote:
SONIA MARIA DOS SANTOS wrote:
Vcs não poderiam me mandar um vídeo da peça,drops 191/11 , não consegui ler,ou mandar um gráfico mais específico, principalmente do início do trabalho, muito obrigada
28.07.2021 - 14:21DROPS Design answered:
Bom dia, No fim da receita do modelo, pode encontrar 15 vídeos que mostram alguns pontos e técnicas usados em este poncho. Pode clicar no link abaixo: https://www.garnstudio.com/video.php?patternid=8579&lang=pt Bons crochés!
30.07.2021 - 09:59
|
||||||||||||||||||||||||||||||||||||||||||||||
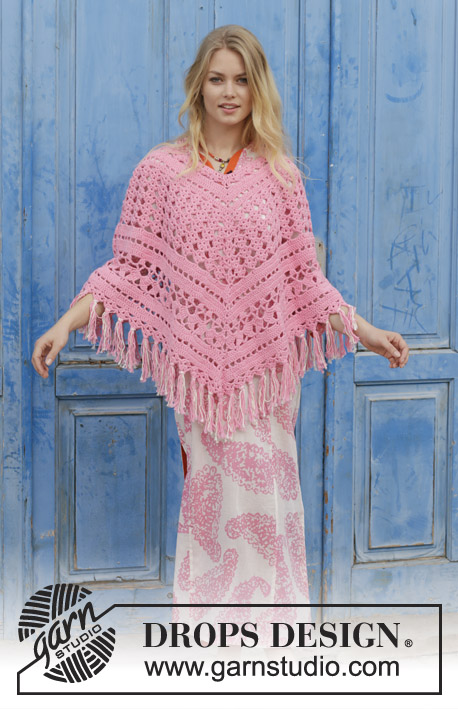
Mamma Mia#mammamiaponcho |
||||||||||||||||||||||||||||||||||||||||||||||
 |
 |
|||||||||||||||||||||||||||||||||||||||||||||
Crocheted poncho with lace pattern and fringes, worked top down. Sizes S - XXXL. The piece is worked in DROPS Paris.
DROPS 191-11 |
||||||||||||||||||||||||||||||||||||||||||||||
|
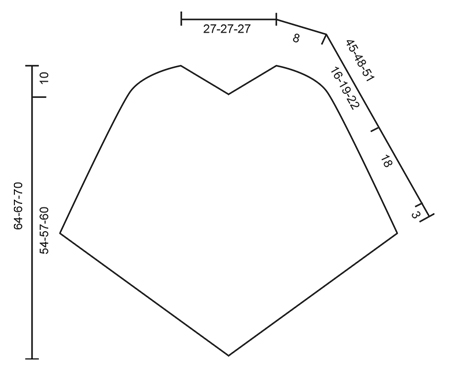
INFORMATION FOR THE PATTERN: PATTERN: See diagrams A.1 to A.7. CROCHET INFORMATION: A.1a, A.2a, A.3a, A.4a, A.5a, A.6a and A.7a show how the rounds begin and end. These stitches are worked in addition to the relevant diagram and are not counted in the number of stitches. INCREASE TIP: Work 2 double crochets in the same stitch. When increasing evenly, increase evenly along each long side i.e. from mid-space to mid-space. MEASURING TIP: All lengths are measured from the cast-on edge – measure vertically from the shoulder, not from the mid-space. DECREASE TIP: Work 1 double crochet, but wait with the last yarn over and pull through, work 1 double crochet in the next stitch and pull the last yarn over through all 3 loops on the hook. ---------------------------------------------------------- The piece is worked in the round, top down. Start by increasing on each side of the shoulders and mid front/back, then just increase mid front and back. PONCHO: Work 146-146-146 chain stitches with hook size 4 mm / G/6 and medium pink and form them into a ring with 1 slip stitch in the first chain stitch. Work 3 chain stitches, then work 1 double crochet in each of the first 2-2-2 chain stitches, * skip 1 chain stitch, work 1 double crochet in each of the next 5 chain stitches *, work from *-* a total of 24-24-24 times on the round, finish with 1 slip stitch in the 3rd chain stitch at the beginning of the round = 122-122-122 double crochets + 3 chain stitches on the round. Now work pattern in the round according to the diagrams – read CROCHET INFORMATION and REMEMBER THE CROCHET GAUGE, as follows: CROCHET A.1 AS FOLLOWS: Beginning of round = middle of shoulder. Work A.1b, A.1c, A.1b a total of 3 times in width, A.1d (= mid front), A.1b a total of 3 times in width, A.1c, A.1b a total of 2 times in width (shoulder is in the middle of these 2 repetitions), A.1c, A.1b a total of 3 times in width, A.1d (= mid back), A.1b a total of 3 times in width, A.1c, finish with A.1b -AT THE SAME TIME increase on each round marked with an arrow in the diagram – read INCREASE TIP, as follows: ARROW-1: Increase 0-6-12 double crochets evenly along each long side (= a total of 0-12-24 double crochets increased). ARROW -2: Increase 6-6-18 double crochets evenly along each long side (=a total of 12-12-36 double crochets increased). ARROW -3: Increase 6-6-12 double crochets evenly along each long side (=a total of 12-12-24 double crochets increased). When A.1 has been completed in height, there are 108-114-138 double crochets between the chain-spaces mid front and back (= a total of 216-228-276 double crochets on the round + 2 chain-spaces. The piece measures approx. 8 cm / 3⅛" – read MEASURING TIP. CROCHET A.2 AS FOLLOWS: Work A.2b a total of 9-10-12 times, A.2c over the mid-space, A.2b a total of 18-19-23 times, A.2c over the mid-space, A.2b a total of 9-9-11 times in width. When A.2 has been completed in height you have increased a total of 4 repeats on the round. CROCHET A.3 AS FOLLOWS: Work A.3b a total of 10-11-13 times, A.3c over the mid-space, A.3b a total of 20-21-25 times, A.3c over the mid-space, A.3b a total of 10-10-12 times in width. When A.3 has been completed in height you have increased a total of 4 repeats on the round. The piece measures approx. 24 cm. Continue according to A.3 for sizes L/XL and XXL/XXXL as follows: Work the last 2-4 rounds of A.3 as follows: Work A.3b a total of 12-14 times, A.3c over the mid-space, A.3b a total of 23-27 times, A.3c over the mid-space, A.3b a total of 11-13 times in width. When these 2-4 rounds have been completed in height you have increased a total of 4-4 repeats on the round. The piece measures approx. 27-30 cm / 10⅝"-11 ¾". ALL SIZES: WORK A.4 AS FOLLOWS: Work A.4b a total of 11-13-15 times, A.4c over mid-space, A.4b a total of 22-25-29 times, A.4c over mid-space, A.4b a total of 11-12-14 times in width. When A.4 has been completed in height, you have increased a total of 4 repeats on the round. There are now 144-162-186 double crochets between the chain-spaces mid front and back (= a total of 288-324-372 double crochets + 2 chain-spaces on the round). WORK A.5 AS FOLLOWS: Work A.5b a total of 12-14-16 times, A.5c over mid-space, A.5b a total of 24-27-31 times, A.5c over mid-space, A.5b a total of 12-13-15 times in width - AT THE SAME TIME decrease on the rounds marked with an arrow in the diagram – read DECREASE TIP, as follows: Decrease 0-6-6 double crochets evenly along each long side (= a total of 0-12-12 double crochets decreased). When A.5b has been completed in height, you have increased a total of 4-2-2 repeats (of 6 stitches) on the round. There are now 156-168-192 double crochets between the chain-spaces mid front and back (= a total of 312-336-384 double crochets + 2 chain-spaces on the round). WORK A.6 AS FOLLOWS: Work A.6b, A.6c a total of 6-7-8 times, A.6d over the mid-space, A.6c a total of 13-14-16 times in width, A.6d over the mid-space, A.6c a total of 6-6-7 times in width, A.6e. When A.6 has been completed in height, you have increased a total of 2 repeats (of 12 stitches) on the round. There are now 168-180-204 double crochets between the chain-spaces mid front and back (= a total of 336-360-408 double crochets + 2 chain-spaces on the round). The piece measures approx. 37-40-48 cm / 14 ½"-15 ¾"-18⅞". WORK A.7 AS FOLLOWS: In sizes L/XL and XXL/XXXL cut the strand, start the next round with 1 slip stitch in the 6th double crochet (= mid shoulder). Work A.7b a total of 14-15-17 times, A.7c over mid-space, A.7b a total of 28-30-34 times, A.7c over mid-space, A.7b a total of 14-15-17 times in width. When A.7 has been completed in height, you have increased 4 repeats (of 6 stitches) on the round. There are now 180-192-216 double crochets between the chain-spaces mid front and back (= a total of 360-384-432 double crochets + 2 chain-spaces on the round). The piece measures approx. 42-45-48 cm / 16 ½"-17⅝"-18⅞". WORK A.2 AS FOLLOWS: Work A.2b a total of 15-16-18 times, A.2c over mid-space, A.2b a total of 30-32-36 times, A.2c over mid-space, A.2b a total of 15-16-18 times in width. When A.2b has been completed in height, you have increased a total of 4 repeats (of 6 stitches) on the round. Cut and fasten the strand. The piece measures approx. 45-48-51 cm / 17⅝"-18⅞"-20" (approx. 54-57-60 cm / 21 ¼"-22⅜"-23⅝" along the mid-space). TASSELS: Cut 4 strands medium pink and 2 strands off white of 25 cm each. Fold then double, thread the loop from the right side into the chain-space of a double crochet group on the last round. Then thread the ends of the strands through the loop and tighten gently. Fasten a tassel to each chain-space in each double crochet group. To make sure the tassels hang neatly, they should be moistened, shaken and then dried. |
||||||||||||||||||||||||||||||||||||||||||||||
Diagram explanations |
||||||||||||||||||||||||||||||||||||||||||||||
|
||||||||||||||||||||||||||||||||||||||||||||||
|
||||||||||||||||||||||||||||||||||||||||||||||

|
||||||||||||||||||||||||||||||||||||||||||||||

|
||||||||||||||||||||||||||||||||||||||||||||||
|
||||||||||||||||||||||||||||||||||||||||||||||
Have you finished this pattern?Tag your pictures with #dropspattern #mammamiaponcho or submit them to the #dropsfan gallery. Do you need help with this pattern?You'll find 15 tutorial videos, a Comments/Questions area and more by visiting the pattern on garnstudio.com. © 1982-2025 DROPS Design A/S. We reserve all rights. This document, including all its sub-sections, has copyrights. Read more about what you can do with our patterns at the bottom of each pattern on our site. |
||||||||||||||||||||||||||||||||||||||||||||||


With over 40 years in knitting and crochet design, DROPS Design offers one of the most extensive collections of free patterns on the internet - translated to 17 languages. As of today we count 314 catalogs and 11821 patterns - 11811 of which are translated into English (US/in).
We work hard to bring you the best knitting and crochet have to offer, inspiration and advice as well as great quality yarns at incredible prices! Would you like to use our patterns for other than personal use? You can read what you are allowed to do in the Copyright text at the bottom of all our patterns. Happy crafting!
Post a comment to pattern DROPS 191-11
We would love to hear what you have to say about this pattern!
If you want to leave a question, please make sure you select the correct category in the form below, to speed up the answering process. Required fields are marked *.