
Popular categories
Looking for a yarn?


|
||||
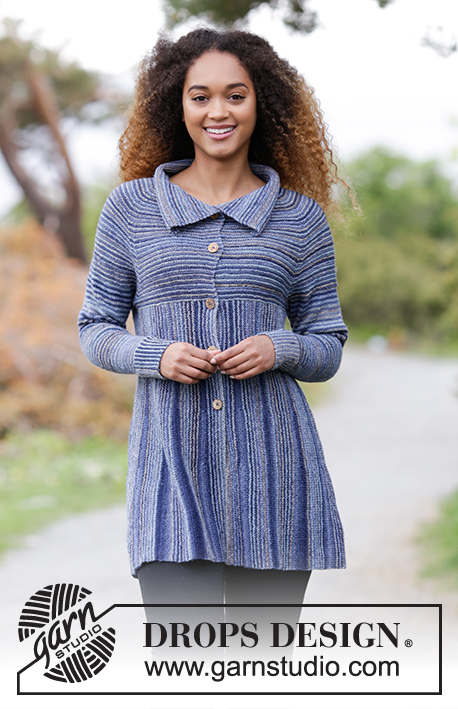
Swagger |
||||
 |
 |
|||
Knitted jacket with garter stitch, short rows and raglan, worked sideways. Sizes S - XXXL. The piece is worked in DROPS Fabel.
DROPS 181-27 |
||||
|
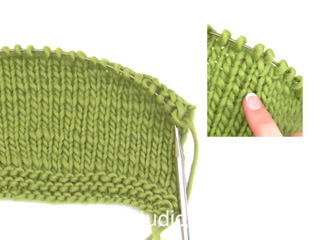
INFORMATION FOR THE PATTERN: RIDGE/GARTER STITCH (worked back and forth): 1 ridge = Knit 2 rows. STRIPES: *Work 1 ridge with ocean view, 1 ridge with deep ocean*, repeat from *-* STRIPES SLEEVE: *Work 2 rows with ocean view, 2 rows with deep ocean *, repeat from *-*. SHORT ROWS: The complete repeat with short rows is worked with deep ocean. Start from the right side: Work 1 row over all stitches. Work the first 88 stitches, turn and work back. Work over the first 66 stitches, turn and work back. Work the first 44 stitches, turn and work back. Work the first 22 stitches, turn and work back. Work 0-2-2-4-4-4 rows over all stitches. Work the first 44 stitches, turn and work back. Work the first 66 stitches, turn and work back. Work the first 88 stitches, turn and work back. Work 3 rows over all stitches (= 18-20-20-22-22-22 rows in the bottom edge and 4-6-6-8-8-8 rows in the top edge). INCREASE TIP: Increase 2 stitches as follows: start 1 stitch before the marker thread, make 1 yarn over, knit 2 stitches (marker thread sits between these stitches), make 1 yarn over. On the next round knit the yarn overs twisted to prevent holes. RAGLAN: Decrease 8 stitches on each decrease row. Decrease as follows: Start 3 stitches before the marker thread, knit 2 stitches together, knit 2 stitches (= the marker thread sits between these stitches), slip 1 stitch, knit 1 stitch, pass the slipped stitch over the knitted stitch. If the knitting tension is not right in height and the work is too tight, the decreases to raglan will be too short and the armhole too small. You can adjust this by working 1 extra row without decreases, evenly between the decrease rows. BUTTONHOLES: Decrease for the buttonholes on the right band. 1 BUTTONHOLE = knit the 3rd and 4th stitch from the edge together and make 1 yarn over. On the next row, knit the yarn over = hole. Decrease for buttonhole when the piece measures: S: 9 and 18 cm M: 10 and 20 cm L: 7, 15 and 22 cm XL: 8, 16 and 24 cm XXL: 9, 17 and 26 cm XXXL:10, 19 and 28 cm --------------------------------------------------------- JACKET: The jacket is worked in two directions. First, work the bottom part sideways from mid front, then knit up stitches along the top side and work the top part of the jacket upwards. BOTTOM PART: Cast on 110 stitches in all sizes with circular needle size 3 mm and ocean view. Work STRIPES – see description above. Work 4 RIDGES – see description above, on the next row, decrease to buttonhole as follows – from the right side: Work 3 stitches, * knit 2 stitches together, 1 yarn over, work 24 stitches *, work from *-* a total of 2 times, knit 2 stitches together, 1 yarn over, work to end of row. On the next row, knit the yarn overs, there will be holes. Continue until you have worked a total of 9 ridges (= 18 rows), change to deep ocean and work SHORT ROWS – see description above. * Work 11-11-13-13-15-17 ridges with stripes (start and finish with ocean view). Change to deep ocean and work SHORT ROWS*, repeat from *-* until you have worked a total of 17 repeats with short rows. REMEMBER THE KNITTING TENSION! The piece should now measure 82-92-104-110-122-134 cm. If the piece measures less than this, you can work an extra repeat of garter stitch and short rows (make sure the piece ends with short rows). Finally, work 9 ridges over all stitches with stripes (start and finish with ocean view). Then cast off. TOP PART: The rest of the jacket is now worked upwards. Knit up from the right side 1 stitch in each ridge in the top edge of the jacket with circular needle size 3 mm and ocean view. Knit the next row from the wrong side and adjust the number of stitches to 228-245-277-294-326-358 stitches. Continue with garter stitch and stripes. THE PIECE IS NOW MEASURED FROM HERE! Work garter stitch for 2 cm, then work the next row as follows – from the right side: Work the first 56-61-68-72-79-86 stitches (= front piece), cast off the next 10-10-12-12-14-16 stitches, work the next 96-103-117-126-140-154 stitches (= back piece), cast off the next 10-10-12-12-14-16 stitches and work the last 56-61-68-72-79-86 stitches (= front piece). Lay the piece to one side and work the sleeves. SLEEVES: CUFF: Cast on 20 stitches with circular needle size 3 mm and ocean view. Work stripes and garter stitch back and forth on the needle until you have worked 50-52-54-56-60-62 ridges. Cast off. Sew the cast-on edge and the cast-off edge together. Knit up 1 stitch in each ridge from one side of the cuff = 50-52-54-56-60-62 stitches. THE PIECE IS NOW MEASURED FROM HERE! Work stocking stitch and stripes – see description above. Insert 1 marker thread at the beginning of the round = mid under the sleeve. When the piece measures 4 cm increase 1 stitch on each side of the marker thread – see INCREASE TIP above. Increase every 2 ½-1½-1½-1-1-1 cm a total of 13-17-21-22-23-25 times = 76-86-96-100-106-112 stitches. When the sleeve measures 38-36-35-34-32-31 cm cast off 10-10-12-12-14-16 stitches mid under the sleeve (= 5-5-6-6-7-8 stitches on each side of the marker thread) = 66-76-84-88-92-96 stitches. Lay the piece to one side and work 1 more sleeve. YOKE: Place the sleeves on the same circular needle as the body, where you have cast off for the armholes = 340-377-421-446-482-518 stitches. Insert 1 marker thread in each transition from body to sleeves = 4 marker threads. READ BUTTONHOLE! Continue with garter stitch and stripes, AT THE SAME TIME decrease to raglan on each side of each marker thread – READ RAGLAN. Decrease to raglan on every 4th row 19-20-21-23-24-26 times and every 2nd row 6-9-12-12-14-16 times. After all the decreases to raglan there are 140-145-157-166-178-182 stitches on the needle. Knit 1 row from the right side where the stitches at the top of the sleeves are knitted together 2 and 2 and you decrease 8-7-15-18-26-26 stitches evenly on row as well = 116-120-124-132-136-144 stitches. Work 2 ridges, on the last row of the ridges, increase 20 stitches evenly on row = 136-140-144-152-156-164 stitches. Work garter stitch and stripes for 8-8-8-9-9-9 cm, then cast off. ASSEMBLY: Sew the openings under the sleeves and sew on the buttons to the left front piece. |
||||
Diagram explanations |
||||
|
||||

|
||||
|
Have you made this or any other of our designs? Tag your pictures in social media with #dropsdesign so we can see them! Do you need help with this pattern?You'll find tutorial videos, a Comments/Questions area and more by visiting the pattern on garnstudio.com. © 1982-2024 DROPS Design A/S. We reserve all rights. This document, including all its sub-sections, has copyrights. Read more about what you can do with our patterns at the bottom of each pattern on our site. |
||||


With over 40 years in knitting and crochet design, DROPS Design offers one of the most extensive collections of free patterns on the internet - translated to 17 languages. As of today we count 304 catalogues and 11422 patterns - 11422 of which are translated into English (UK/cm).
We work hard to bring you the best knitting and crochet have to offer, inspiration and advice as well as great quality yarns at incredible prices! Would you like to use our patterns for other than personal use? You can read what you are allowed to do in the Copyright text at the bottom of all our patterns. Happy crafting!
Comments / Questions (41)
Bei Abnahme der Rundpasse ergeben sich nur 4 Maschen Abnahme nach Ihrer Anleitung. Sie beschreiben jedoch 8 Maschen Abnahme. Es sind doch aber nur jeweils 2 Maschen vor und nach den Markierungsfäden zusammenzustricken bzw. Überzogen zusammen zu stricken.Das sind nach meinen Berechnungen 4 Maschen und nicht wie beschrieben 8 Maschen in jeder 4. Reihe. Bitte um Ihre Hilfe. Vielen Dank.
05.08.2019 - 00:24DROPS Design answered:
Liebe Frau Gerlach, es werden 8 Maschen für den Raglan abgenommen: stricken Sie bis 3 M vor dem Markierer übrig sind, dann 2 M re zusammen (= 1 Abnahme), 2 M re stricken (1 M vor + 1 M nach dem Markierer), und dann 1 Masche abheben, 1 Masche rechts, die abgehobene Masche über die gestrickte ziehen (= 1 Abnahme) = 2 Abnahmen bei jedem Markierungsfaden x 4 Markierungsfäden = 8 Abnahmen. Viel Spaß beim stricken!
07.08.2019 - 10:40Bonsoir :j'ai monté 110m avec aiguilles 3 mais je n'ai que 45cm au lieu de 48 :dois je tricoter avec des aiguilles 3/5 ::SVP
04.04.2019 - 20:23DROPS Design answered:
Bonjour Mme Josiane Llegou! La taille des aiguilles indiquée dans les explications n'est qu'une proposition. L'important est de bien avoir la bonne tension/le bon échantillon. Comme la tension est quelque chose de très personnel, il vous faudra ajuster la taille des aiguilles pour que VOTRE tension soit bien la même que dans le modèle - vous devrez peut-être utiliser une aiguille d'1 voir 2 tailles au-dessus ou au-dessous pour obtenir le bon échantillon. C'est pourquoi nous recommandons de tricoter des échantillons. Bon tricot!
05.04.2019 - 18:33Werden die armen nach der manchette hin und zurück gerstrickt oder in runden Wie meinen Sie glatt rechts Hin rechts Stricken und rück Reihe links Bei Streifen Ärmel steht Nichts beschrieben
23.09.2018 - 00:32DROPS Design answered:
Liebe Frau Müller, die Ärmel werden glatt rechts in der Runde gestrickt, dh alle Runde rechts stricken und gleichzeitig die Streifen folgen. Viel Spaß beim stricken!
24.09.2018 - 09:12Ik ben er niet helemaal uit wat betreft jullie maten. Bedoelen jullie met borstomtrek over de borsten gemeten, breedste gedeelte? Het blijft wat vaag, en om het breiwerk uit te halen is nou ook niet het leukste.Al mijn vesten zijn oversized, maar dit vest moet passen.
13.08.2018 - 12:08DROPS Design answered:
Dag Sonja, Ja, de borstomtrek (of bovenwijdte) is altijd gemeten over het breedste punt, dus over de buste en de schoudermaten. (De taille is gemeten over het smalste punt en de heup weer over het breedste punt). De afmetingen die op de tekening onder een patroon staan aangegeven zijn niet de omtrek, maar de breedte (dus de helft van de omtrek). In deze link vind je ook informatie over de maattekeningen
14.08.2018 - 10:17Ska ärmarna stickas i slätstickning??? Det ser ut som rätstickning på bilden. Mvh Maj-Britt
10.03.2018 - 11:03DROPS Design answered:
Hej Maj-Britt, manchetten strikkes i retstrik/riller og resten i glatstrik/slätstickning. God fornøjelse!
13.03.2018 - 16:16Na het breien van de manchetten, volgt de tekst: Neem 1 steek op in elke ribbel vanaf een kant van de manchet = 50-52-54-56-60-62 steken. HET WERK WORDT NU VANAF HIER GEMETEN! Brei tricotsteek en strepen Wordt hier bedoeld "ribbelsteken"????
06.03.2018 - 11:06DROPS Design answered:
Hallo Edith, Het staat inderdaad niet duidelijk aangegeven. Er wordt ribbelsteek mee bedoeld en omdat je in de rondte breit, betekent dat *1 naald recht, 1 naald averecht*. Herhaal van *-*.
09.03.2018 - 16:37Und die Streifen auch Kraus rechts oder glatt rechts oder wie entstehen die tollen Falten im unteren Teil
19.02.2018 - 13:33DROPS Design answered:
Liebe Frau Meyer, die Streifen beim unteren und oberen Teil werden kraus rechts gestrickt. Die Streifen bei den Ärmeln werden glatt rechts gestrickt. Viel Spaß beim stricken!
19.02.2018 - 15:41Wie wird die jacke gestrickt nur kraus rechts wie sind die verkürzten reihen gestrickt glatt oder kraus
18.02.2018 - 12:12DROPS Design answered:
Liebe Frau Meyer, die Jacke wird kraus rechts gestrickt, also das untere Teil mit verkürzten Reihen sowie das obere Teil, Ärmel werden nach den Manschette glatt rechts gestrickt und dann Passe wird krausrechts gestrickt. Viel Spaß beim stricken!
19.02.2018 - 09:58Hei! Hihan ohjeessa neuvotaan ottamaan silmukat kalvosimen reunasta ja neulomaan sileää neuletta kaarrokkeeseen asti. Kaarroke neulomaan aina oikein neuleella. Vaihtuuko siis sileä neule kesken hihan aina oikein neuleeksi?
07.11.2017 - 11:15DROPS Design answered:
Kyllä, hihassa neulotaan sekä ainaoikeaa että sileää neuletta.
08.11.2017 - 14:20Els Molenaar wrote:
Op welke hoogte maak ik de knoopsgaten in het bovenste deel?
02.10.2017 - 10:27DROPS Design answered:
Hallo Els, Dit staat voor elke maat aangegeven bovenaan in het patroon.
07.10.2017 - 16:57