
Popular categories
Looking for a yarn?


Comments / Questions (48)
![]() Kerstin wrote:
Kerstin wrote:
Ich verstehe es immer noch nicht, wenn ich die 3 Stäbchen mit den 5 Luftmaschen überspringe, hängen diese dann lose hinten runter, was nicht schön aussieht und auf den Bildern auch so nicht zu sehen ist. Wozu dann so viele Luftmaschen wenn ich sie überspringe?
26.07.2024 - 14:15DROPS Design answered:
Liebe Kerstin, die 5 Luftmaschen sind eine Art Picot, d.h. sie liegen tatsächlich etwas "geknickt". Warum es bei Ihnen lose nach hinten hängt, ist auf die Ferne leider nur schlecht herauszufinden. Haben Sie denn schon diese ganze Runde und die nachfolgende gehäkelt? Beachten Sie auch, dass es zwar drei Stäbchen sind, die Sie überspringen, aber nur zwei 5-Luftmaschen-Bögen.
26.07.2024 - 22:21
![]() Kerstin wrote:
Kerstin wrote:
Guten Tag, leider habe ich auf meine Frage von gestern noch keine Antwort, ich würde gern weiter häkeln. Mir erschließt sich nicht warum ich die 5. Runde in A2 in der Runde nach dem Ärmelausschnitt häkeln soll. Über die Luftmaschenkette für den Ärmelausschnitt ist mir das klar, aber warum bei den Fächern und Doppelstäbchen? Es ist völlig unklar, warum ich dies Runde häkeln soll wenn ich in der nächsten Luftmaschenketten und Doppelstäbchen überspringen soll? Vielen Dank
26.07.2024 - 11:31DROPS Design answered:
Liebe Kerstin, die 5. Runde von A.2 bildet quasi wieder die Grundlage, um mit dem Fächermuster neu zu starten. Sie häkeln ja nach der 5. Runde von A.2 die 2. Runde von A.4/A.5, die 1. in A.4/A.5 gezeigte Runde ist ja die 5. Runde von A.2. - Wenn Sie die Ärmel meinen: Hier werden nicht 5 Luftmaschen zwischen den Stäbchen, sondern nur 1 Luftmasche gehäkelt, damit der Ärmel etwas mehr Stabilität bekommt. Sie überspringen dann nicht 5 Luftmaschen, sondern nur diese eine.
26.07.2024 - 13:58
![]() Kerstin wrote:
Kerstin wrote:
Hallo, ich würde gern eine genauere Erklärung zu der Reihe nach der 5.Runde in A2 haben. Ich verstehe nicht warum ich 3 Stäbchen un 5 LM überspingen soll das sieht doch auf dem Bild nicht so aus. Oder muss ich sie zusammen häkeln? außerdem sind dann die Fächer an anderen Stellen was auch auf dem Bild anders aussieht. Oder ist die vorherige Runde falsch beschrieben? Vielen Dank
25.07.2024 - 19:07DROPS Design answered:
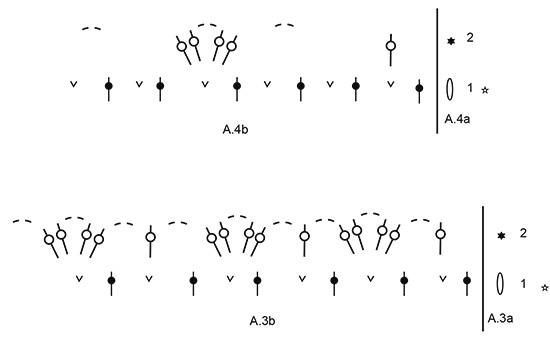
Liebe Kerstin, A.4 bildet ja die "Zwischenstreifen" zwischen Abschnitten mit Fächern, diese Zwischenstreifen sehen Sie gut auf den Gesamtaufnahmen der Jacke. Sie überspringen also in A.4 tatsächlich 3 Stäbchen und die dazwischenliegenden Luftmaschenbögen. Die Doppelstäbchengruppe in A.4 arbeiten Sie dann um einen Luftmaschenbogen zwischen zwei Stäbchen. Sie nehmen ja in dieser Runde auch zu, indem Sie A.5 häkeln, daher verschieben sich die Fächer in der Höhe und liegen nicht zwingend übereinander. Viel Spaß beim Weiterhäkeln!
26.07.2024 - 13:37
![]() Monika Stordeur wrote:
Monika Stordeur wrote:
Mit den Reihen in den man verschiedene Diagramme in einer Reihe häkel so.\\\\\\\\r\\\\\\\\nReise 3 1 x und dann weiter 4-5-6\\\\\\\\r\\\\\\\\nBitte ein Diagramm mit jeweiligen Übergängen mit der vorherigen Reihe \\\\\\\\r\\\\\\\\nIch habe schon viel gehäkelt. Dieses Diagramm verstehe ich nicht.
05.09.2023 - 07:42DROPS Design answered:
Liebe Frau Stordeur, am Anfang der Runde häkeln Sie die jeweiligen Diagramme mit -a gennant, dann wierdeholen Sie die Diagramme mit -B wie bei der schriftlichen Erklärung beschrieben; am Ende der Runde häkeln Sie wie bei dem Symbol von -a erklärt wird, siehe 7. und 8. Symbol. Viel Spaß beim häkeln!
05.09.2023 - 13:38
![]() Colleen Wiens wrote:
Colleen Wiens wrote:
The choose your language area is not holding the chosen language.
10.05.2023 - 19:24
![]() Kathy wrote:
Kathy wrote:
When working the sleeves does it mean the treble crochets are worked in the chain that was created for the armhole, loving the pattern first time using a chart. Just unsure about the sleeves.
07.05.2023 - 14:22DROPS Design answered:
Dear Kathy, yes, the treble crochets are worked in the chain created for the armhole. Happy crochetting!
07.05.2023 - 15:31
![]() Adrian D Canfield wrote:
Adrian D Canfield wrote:
Hi, I couldn't find an e-mail address to send you this question so I thought I'd drop it here in hopes that you might be able to answer. I have a YouTube channel and I was wondering if I could do a full video tutorial on this pattern since it is a free pattern. Would this be okay for me to do?
14.10.2022 - 01:56DROPS Design answered:
Dear Mrs Canfield, please write your request at media(at)garnstudio.com - Thank you!
14.10.2022 - 08:32
![]() Kinna wrote:
Kinna wrote:
Jag har väldigt svårt att utläsa mönstret när jag påbörjat virka ärmarna. Var fortsätter jag virka runt i cirkeln när jag avbrutit för ärmen? Det står virka från 2:a varvet flera ggr. Likaså 5:e varvet. Virka ärmar: Börja mitt under ärmen i den sidan det hoppades över sofjädrar, det förstår jag inte heller! Det är många som tycker DROPS mönster är svårbeskrivliga - kan det tänkas att göra de mer lättlästa? Mvh Kinna
23.08.2022 - 15:50DROPS Design answered:
Hei Kinna. Når du hekler etter ermhullene, er det nå spesifisert hvilken omgang du skal hekle, "typ hekle 5. omgang i A.2". Da må du se på 5. omgang i diagram A.2. Og sånn gjentar det seg i oppskriften. Sjekk hvilken omgang og hvilken diagram det skal hekles etter. Når du skal hekle ermene starter du midt under erme i den siden det ble hoppet over vifter (usikker hvor? Les under ÄRMHÅLEN hvor det ble hoppet over). God Fornøyelse!
29.08.2022 - 08:36
![]() Barbara Harries wrote:
Barbara Harries wrote:
I am excited to try this project, I was looking for a size chart but am having a hard time finding it. Would you be able to send me a link or direct me how to find it. I feel I'm overlooking it and just missing the link for it. Thank you
09.08.2022 - 18:19DROPS Design answered:
Dear Mrs Harries, you will find all finished measurements (in cm) in the measurement chart - read more how to read it and how to find your size here. Happy knitting!
10.08.2022 - 09:22
![]() Kathy wrote:
Kathy wrote:
Are the crochet stitches in uk or us terms please
24.06.2022 - 18:59DROPS Design answered:
Dear Kathy, you can choose the version you prefer by clicking on "choose language" below the photo: either the UK/CM or US/IN version, with their respective terms. Happy crocheting!
26.06.2022 - 13:15
|
|||||||||||||||||||||||||||||||
Fairy Glass#fairyglassjacket |
|||||||||||||||||||||||||||||||
 |
 |
||||||||||||||||||||||||||||||
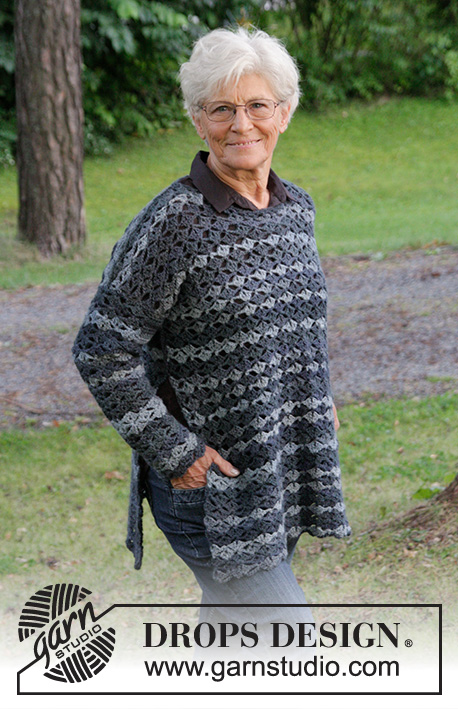
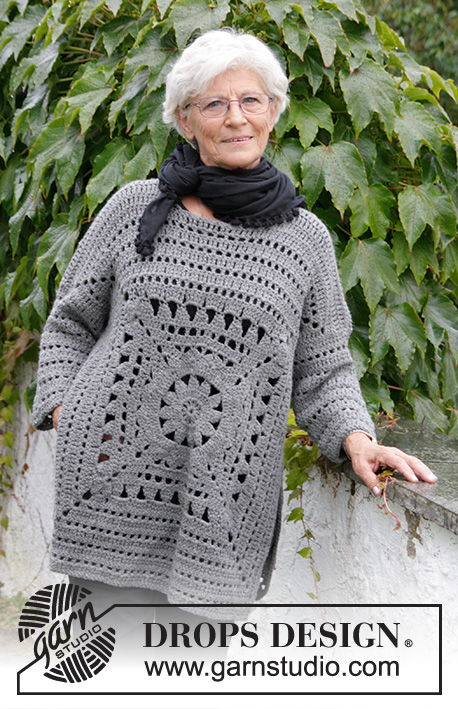
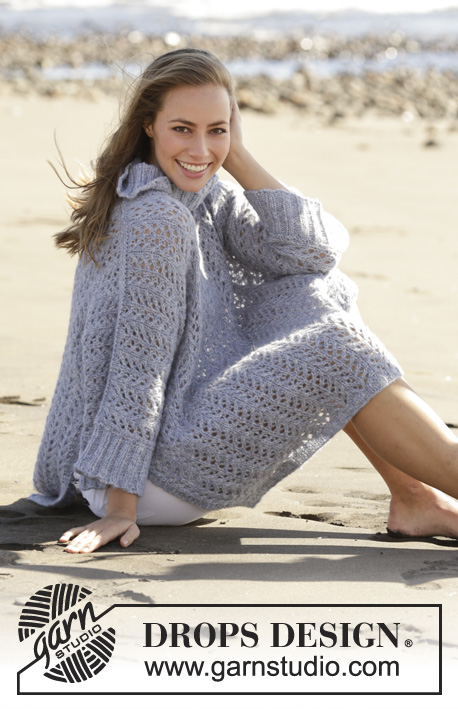
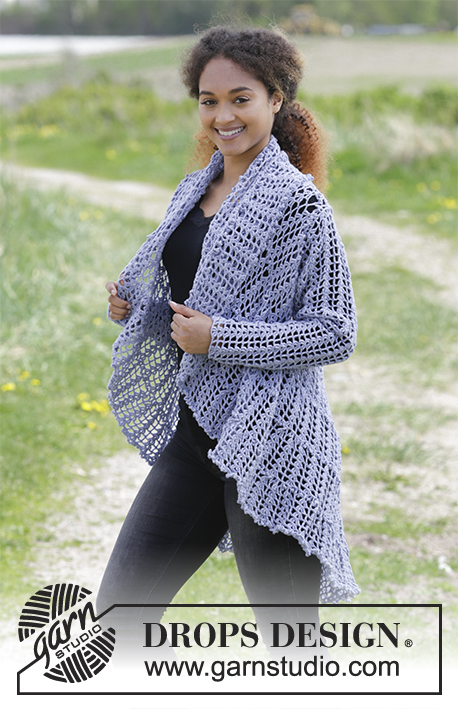
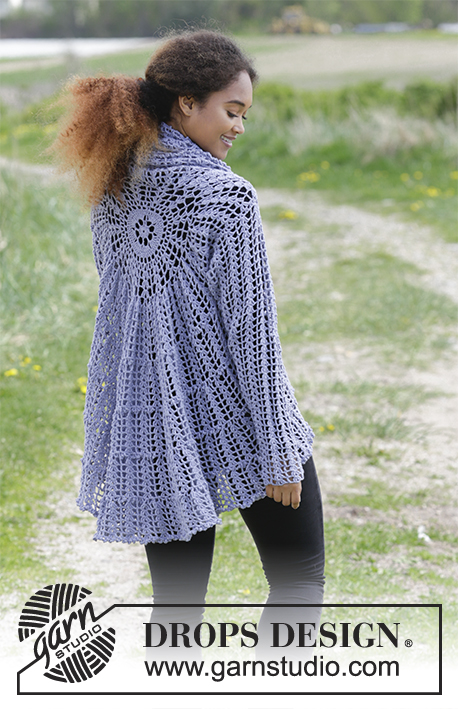
Crochet jacket worked in a circle with fan pattern. Size: S - XXXL Piece is crocheted in DROPS BabyMerino.
DROPS 181-26 |
|||||||||||||||||||||||||||||||
|
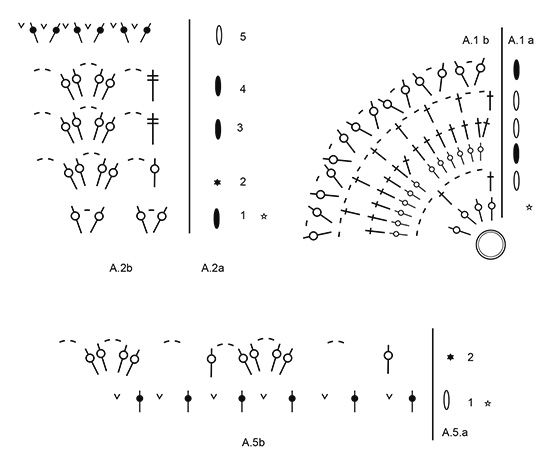
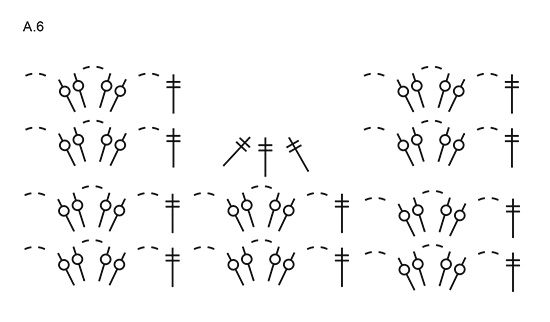
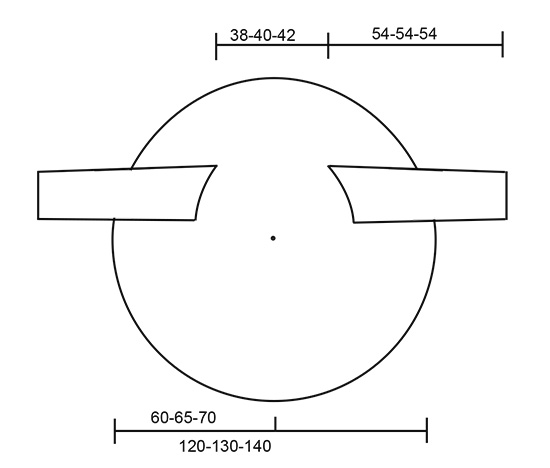
INFORMATION FOR PATTERN: MAGIC CIRCLE: To avoid hole in the middle beg with this technique: Hold yarn end in the left hand and make a loop around left index finger (from left to right). Hold the loop with left thumb and index finger. Insert hook through loop, get the yarn from ball, pull yarn through loop, make 1 yarn over and pull yarn over through stitch on hook = 1 double crochet, work 4 chain stitches (= 1 double treble crochet), then work 15 double treble crochets around loop, finish with 1 slip stitch in 3rd chain stitch = 16 double treble crochets. Pull yarn end tighten loop together so that the hole in the middle disappears. Then work as explained in pattern. PATTERN: See diagrams A.1 to A.6. FAN: 1 fan = 2 double treble crochets, 2 chain stitches and 2 double treble crochets worked into a chain space. CROCHET TOGETHER: See diagram A.6. Decrease 1 repetition as follows: Work 1 double treble crochet in first chain space but wait with last pull through. Work next double treble crochet in next chain space but wait with last yarn over and pull through. Work next double treble crochet in last chain space and pull last yarn over through all 4 loops on hook. On next round skip the double treble crochets worked together. ---------------------------------------------------------- JACKET WORKED IN A CIRCLE: Worked in the round from mid back on the back. Work the sleeves at the end. Work a MAGIC CIRCLE - see explanation above, on hook size 3.5 mm with Baby Merino. Then work according to A.1 - NOTE: First round in A.1 is explained below magic circle. Work 4 repetitions of A.1b in the round on every round. A.1a shows how round begins and ends. REMEMBER THE CROCHET TENSION! When A.1 has been worked, there are 28 groups of double treble crochets / 56 double treble crochets on round. Work from 2nd round in A.2 as follows: Work A.2a (shows how round begins and ends), continue with A.2b in the round (= 14 repetitions). Work A.2 1 time vertically = 84 treble crochets/chain spaces. Work from 2nd round in A.3 as follows: Work A.3a (shows how round begins and ends), continue with A.3b in the round (= 42 fans/double treble crochets). Work from A.2: 3rd round 1 time and 4th round 4-5-6 times (= 6-7-8 rounds in total with fans and double treble crochets). ARMHOLES: Work next round as 4th round in A.2 (fans and double treble crochets), at the same time work as follows: Work the first 5 repetitions as before (1 repetition = 1 double treble crochet, 1 chain space, 1 fan, 1 chain space ), work 1 double treble crochet in next double treble crochet, work 40-44-48 new chain stitches, skip next fan and the next 5-6-7 repetitions, (skip 6-7-8 fans and 5-6-7 double treble crochets in total = armhole), work as before in the next 20-18-16 repetitions, work 1 double treble crochet in next double treble crochet, work 40-44-48 new chain stitches, skip next fan and the next 5-6-7 repetitions, (skip 6-7-8 fans and 5-6-7 double treble crochets in total = armhole), work as before in the last 5 repetitions. Work next round as follows: Work 5th round in A.2, around chain spaces for armhole work 6-7-8 repetitions of A.2 (= 36-42-48 treble crochets with 5 chain stitches between each) = 42 repetitions in total of A.2 (= 252 treble crochets in total with 5 chain stitches between each). Work from 2nd round in A.4 as follows: Work A.4a, continue with A.4b, but 10 times evenly on round (= approx. every 4th repetition work A.5b instead of A.4b to increase) = 52 repetitions of A.4. Work from 2nd round in A.2 as follows: Work A.2a, continue with A.2b in the round = 52 repetitions of A.2. On next round continue from 3rd round in A.2a and A.2b. When 4th round has been worked vertically, repeat this round 3-4-5 more times (= 6-7-8 rounds with fans/double treble crochets in total). Work next round as follows: Work 5th round in A.2 (= 312 treble crochets with 5 chain stitches between each). Work from 2nd round in A.4 as follows: Work A.4a, continue with A.4b, but 10 times evenly on round (= approx. every 5th repetition work A.5b instead of A.4b to increase) = 62 repetitions of A.4. Work from 2nd round in A.2 as follows: Work A.2a, continue with A.2b in the round = 62 repetitions of A.2. On next round continue from 3rd round in A.2a and A.2b. When 4th round has been worked vertically, repeat this round 3-4-5 more times (= 6-7-8 rounds with fans/double treble crochets in total). Work next round as follows: Work 5th round in A.2 (= 372 treble crochets with 5 chain stitches between each). Work from 2nd round in A.4 as follows: Work A.4a, continue with A.4b, but 10 times evenly on round (= approx. every 6th repetition work A.5b instead of A.4b to increase) = 72 repetitions of A.4. Work from 2nd round in A.2 as follows: Work A.2a, continue with A.2b in the round = 72 repetitions of A.2. On next round continue from 3rd round in A.2a and A.2b. When 4th round has been worked vertically, repeat this round 3-4-5 more times (= 6-7-8 rounds with fans/double treble crochets in total). Work next round as follows: Work 5th round in A.2 (= 432 treble crochets with 5 chain stitches between each). Work from 2nd round in A.4 as follows: Work A.4a, continue with A.4 b, but 20 times evenly on round (= approx. every 3rd repetition work A.5b instead of A.4b to increase) = 92 repetitions of A.4. Work from 2nd round in A.2 as follows: Work A.2a, continue with A.2b in the round = 92 repetitions of A.2. On next round continue from 3rd round in A.2a and A.2b. When 4th round has been worked vertically, repeat this round 3-4-5 more times (= 6-7-8 rounds with fans/double treble crochets in total). Work next round as follows: Work last round in A.2 (= 552 treble crochets with 5 chain stitches between each). Fasten off. Piece measures approx. 120-130-140 cm in diameter. SLEEVES: Work in the round from armhole and down. Begin mid under sleeve: In the side where fans were skipped. Work as last round in A.2 BUT with only 1 chain stitch between treble crochets, then work 36-42-48 treble crochets with 1 chain stitch between each from the other side of armhole = 72-84-96 treble crochets/chain stitches. Work 2nd round in A.4 = 12-14-16 repetitions around armhole. Then work 2nd round in A.2. Continue with fans and double treble crochets as in 3rd and 4th round in A.2. When piece measures 3 cm from armhole, decrease 1 repetition under sleeve. See diagram A.6 and read CROCHET TOGETHER. Decrease alternately before and after mid under sleeve every 8 cm, 6 times in total = 6-7-8 repetitions remain on round. Fasten off when piece measures 54-54-54 cm. Work the other sleeve the same way, but start in the opposite side so that the round starts mid under sleeve. |
|||||||||||||||||||||||||||||||
Diagram explanations |
|||||||||||||||||||||||||||||||
|
|||||||||||||||||||||||||||||||
|
|||||||||||||||||||||||||||||||
|
|||||||||||||||||||||||||||||||
|
|||||||||||||||||||||||||||||||
|
|||||||||||||||||||||||||||||||
Have you finished this pattern?Tag your pictures with #dropspattern #fairyglassjacket or submit them to the #dropsfan gallery. Do you need help with this pattern?You'll find 9 tutorial videos, a Comments/Questions area and more by visiting the pattern on garnstudio.com. © 1982-2025 DROPS Design A/S. We reserve all rights. This document, including all its sub-sections, has copyrights. Read more about what you can do with our patterns at the bottom of each pattern on our site. |
|||||||||||||||||||||||||||||||


With over 40 years in knitting and crochet design, DROPS Design offers one of the most extensive collections of free patterns on the internet - translated to 17 languages. As of today we count 314 catalogues and 11822 patterns translated into English (UK/cm).
We work hard to bring you the best knitting and crochet have to offer, inspiration and advice as well as great quality yarns at incredible prices! Would you like to use our patterns for other than personal use? You can read what you are allowed to do in the Copyright text at the bottom of all our patterns. Happy crafting!
Post a comment to pattern DROPS 181-26
We would love to hear what you have to say about this pattern!
If you want to leave a question, please make sure you select the correct category in the form below, to speed up the answering process. Required fields are marked *.