
Popular categories
Looking for a yarn?


Comments / Questions (30)
![]() Sabrina wrote:
Sabrina wrote:
Ich würden den Rock gerne länger stricken. Soll ich dann einfach jede 3te statt 2te Runde zunehmen? Oder lieber einfach noch mehr Runden und dadurch wird er noch breiter unten? Lg
19.05.2024 - 20:46DROPS Design answered:
Liebe Sabrina, je nach der gewünschten Länge können beide Technike passen. Gerne kann Ihnen Ihr DROPS Händler damit (auch per Telefon oder per E-Mail) helfen, die Anleitung am besten anzupassen. Viel Spaß beim Stricken!
21.05.2024 - 13:09
![]() Haley Chahdoura wrote:
Haley Chahdoura wrote:
Haley Chahdoura bonjour, je voudrais m'assurer de la quantité de laine nécessaire pour 8 ans, est ce bien 150 grammes? Merci de votre aide.
19.05.2024 - 18:03DROPS Design answered:
Bonjour Mme Chahdoura, en taille 7/8 ans, il vous faudra bien 150 g DROPS Fabel ou DROPS Safran, au choix, soit 3 pelotes dans l'une ou l'autre des fils, en fonction de votre choix; si vous utilisez une autre laine, pensez à faire calculer la nouvelle quantité par le convertisseur. Bon tricot!
21.05.2024 - 13:00
![]() Tünde wrote:
Tünde wrote:
A szükséges kellékeknél 4-es és 5-ös kötőtűk vannak megnevezve, azonban a mintaleírásnál 3-as és 4-es... Melyik a helyes?
07.05.2024 - 14:09DROPS Design answered:
Kedves Tünde, javítottuk a mintát, 4 és 3 mm-es tűk. Ugyanakkor, a megadott tűméretek mindig csak ajánlások, minden esetben érdemes kötéspróbát készíteni, és azzal a tűvel kötni a darabot, amellyel a megadott kötéspróbát tartani tudjuk. Sikeres kézimunkázást!
07.05.2024 - 20:23
![]() Nina Holhjem Bugge wrote:
Nina Holhjem Bugge wrote:
Hei, i str. 3/4 år tror jeg det er feil i oppskriften. Med 10 merketråder i arbeidet blir det ikke 12 m mellom hver tråd, men 13! Hvis ikke går ikke regnestykket opp i 130 m totalt. Mvh, Nina
19.03.2024 - 08:26DROPS Design answered:
Hej Nina, mærketråden sættes i en maske og den skal ikke tælles med i de 12 masker imellem :)
19.03.2024 - 15:26
![]() Pélisson wrote:
Pélisson wrote:
Bonjour, Je souhaiterai tricoter ce modèle en taille 14 ans. Est-il possible de l'adapter pour cette taille ? Pourriez-vous me dire comment ? A la lecture du patron, j'aurais monté 184 mailles ? des marqueurs toutes les 17 mailles ? 74 fois pour les augmentations ? En vous remerciant pour votre aide, Cordialement, V. Pélisson
02.01.2024 - 17:15DROPS Design answered:
Bonjour Mme Pélisson, nous ne sommes malheureusement pas en mesure de pouvoir adapter chacun de nos modèles à chaque demande, en fonction des mesures de l'enfant, vous pouvez peut être vous inspirer d'un modèle de jupe femme en taille XS. Merci pour votre compréhension. Bon tricot!
03.01.2024 - 08:13
![]() Regina Hapka wrote:
Regina Hapka wrote:
Leider passiert mir beim glatt rechts stricken bzw. abketten, wie immer das Gleiche: die Abkettkante rollt sich. Und das leider auch noch nach außen. Habt ihr eine Trick dagegen?
18.05.2023 - 21:18DROPS Design answered:
Liebe Frau Hapka, Sie können den Rock mit Stecknadeln auf einer geeigneten Unterlage spannen, anfeuchten (z.B. mit einer Sprühflasche für Blumen) und trocknen lassen, danach entfernen Sie die Stecknadeln, dann sollte sich der Rand nicht mehr rollen. Viel Spaß beim stricken!
19.05.2023 - 08:30
![]() Giulia wrote:
Giulia wrote:
Buongiorno, mi chiedevo se è normale che alla fine del lavoro i buchi non restano belli aperti, ma mi si chiudono, nel senso che le magli ai lati dei buchi si avvicinano, non lasciando intravedere il buco
01.07.2022 - 17:16DROPS Design answered:
Buonasera Giulia, ha lavorato i gettati a diritto sul giro successivo? Ha bloccato il lavoro alla fine? Buon lavoro!
02.07.2022 - 19:11
![]() Anni Pedersen wrote:
Anni Pedersen wrote:
Jeg kan ikke finde ud ad at strikke tungekanten. Hvordan bliver det 6 gange total . Som jeg læser det vil den sidste maske i 1. Sektion blive der hele tiden og det bliver ikke tunger men en klump på samme sted.
19.10.2021 - 14:03
![]() Elena wrote:
Elena wrote:
Salve, sto seguendo questo modello per la taglia 3/4 ma mi trovo che i segnapunti devono essere 11 e non 10 e il numero delle maglie 132 e non 130. Come mai? Grazie
19.11.2020 - 18:21DROPS Design answered:
Buonasera Elena, i segnapunti vanno inseriti NELLE maglie, per cui ci sono 10 "motivi" di 12 maglie + 10 maglie con il segnapunti (compreso quello di inizio giro) = 130 maglie. Buon lavoro!
20.11.2020 - 20:59
![]() Annemarie wrote:
Annemarie wrote:
How do you print out your patterns
15.10.2020 - 12:49DROPS Design answered:
Dear Annemarie, click on "Print", choose "pattern/photo", a new window will open; in this new window click on "continue to print the pattern". Happy knitting!
15.10.2020 - 13:26
|
|
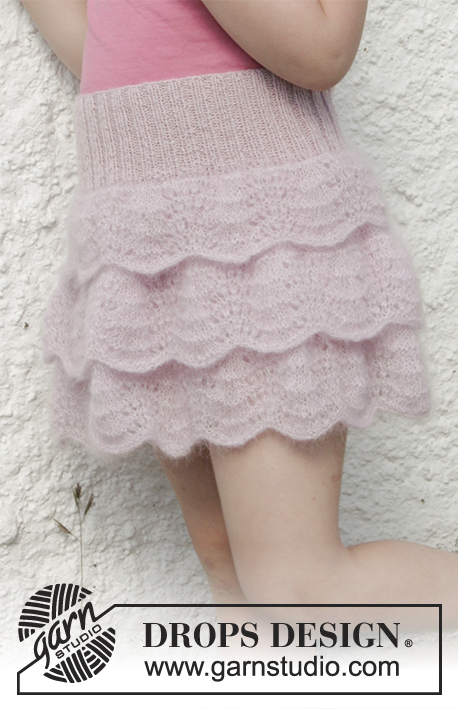
Sweet Curtsy#sweetcurtsyskirt |
|
|
|
|
Knitted skirt in DROPS Fabel or DROPS Safran. Size children 2 - 10 years.
DROPS Children 28-9 |
|
|
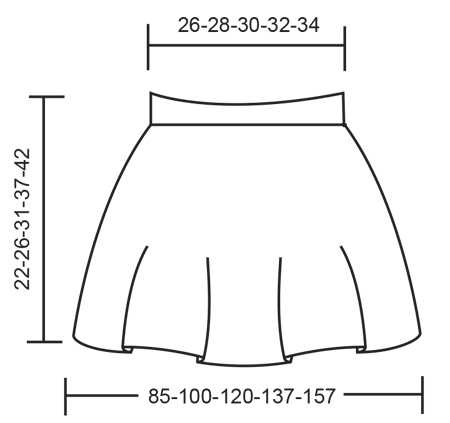
The piece is worked in the round, top down with circular needle. SKIRT: Cast on 124-134-144-154-164 stitches with circular needle size 3 mm / US 2.5 and Fabel / Safran. Work 6 cm / 2⅜" stockinette stitch. The next round is worked as follows: Fold the cast-on edge toward the back, so that the 6 cm / 2⅜" which have been worked lie double (with the right side outwards). Work 1 stitch from the needle, AT THE SAME TIME work this stitch together with 1 stitch from the cast-on edge, continue in this way until there are 4 stitches left, work 4 stitches without working the cast-on edge as well (= hole to thread the elastic through). Change to circular needle size 4 mm / US 6, knit 1 round where you decrease 4 stitches evenly along the round = 120-130-140-150-160 stitches. Insert 10 marker threads in the piece, with 11-12-13-14-15 stitches between each (insert the marker threads in one stitch). Continue working stockinette stitch, AT THE SAME TIME increase 1 stitch with a yarn over on the right side of each marker thread, increase every 2nd round, a total of 27-33-40-48-56 times = 390-460-540-630-720 stitches – the increased stitches are knitted on the next round so that they make holes. REMEMBER THE GAUGE! After the last increase (the piece measures approx. 22-26-31-37-42 cm / 8¾"-10¼"-12¼"-14½"-16½" loosely bind off in work as follows: Knit 1, ((** push the right-hand needle in between the first 2 stitches on the left needle (in other words, between the stitches on the needle, not through the stitches), make 1 yarn over the right needle, pull the yarn over out between the stitches and place it on the left needle **, repeat from **-** 2 more times (= 3 new stitches on the left needle). * Knit the first stitch on the left needle, pass the first stitch on the right needle over the last stitch knitted *)), repeat from *-* a total of 6 times and repeat from ((-)) along the whole skirt until there is 1 stitch remaining, cut the strand and pull it through the last stitch. Thread the trouser elastic into the fold and sew the opening closed. |
|
|
|
Have you finished this pattern?Tag your pictures with #dropspattern #sweetcurtsyskirt or submit them to the #dropsfan gallery. Do you need help with this pattern?You'll find 19 tutorial videos, a Comments/Questions area and more by visiting the pattern on garnstudio.com. © 1982-2025 DROPS Design A/S. We reserve all rights. This document, including all its sub-sections, has copyrights. Read more about what you can do with our patterns at the bottom of each pattern on our site. |


With over 40 years in knitting and crochet design, DROPS Design offers one of the most extensive collections of free patterns on the internet - translated to 17 languages. As of today we count 314 catalogs and 11822 patterns - 11812 of which are translated into English (US/in).
We work hard to bring you the best knitting and crochet have to offer, inspiration and advice as well as great quality yarns at incredible prices! Would you like to use our patterns for other than personal use? You can read what you are allowed to do in the Copyright text at the bottom of all our patterns. Happy crafting!
Post a comment to pattern DROPS Children 28-9
We would love to hear what you have to say about this pattern!
If you want to leave a question, please make sure you select the correct category in the form below, to speed up the answering process. Required fields are marked *.