
Looking for a yarn?


Comments / Questions (70)
![]() Susan wrote:
Susan wrote:
I’m very new to crochet, but am attempting this pattern. Can you explain the gauge sc/hdc? I know what they stand for, just unsure if I’m to do just 18sc? Or sc, hdc, sc, etc. thanks!
26.03.2025 - 21:56DROPS Design answered:
Dear Susan, your tension should be the same in width with single crochets as well as with half double crochets , ie in both cases you should have 18 stitches = 10 cm / 4" in width. Happy crocheting!
27.03.2025 - 09:01
![]() Miranda wrote:
Miranda wrote:
Graag gedaan Monique! Ik was blij met jouw opmerking, want ik kreeg ook een puntje, ben correcties gaan zoeken, zag jouw opmerking en wist toen dat dat niet meer goed ging komen. Dan maar liever gelijk uithalen & opnieuw beginnen :)
08.07.2024 - 23:07
![]() Monique wrote:
Monique wrote:
Dank je wel Miranda! Beetje laat antwoord van mij, maar zag het nu pas nu ik weer met een hoedje begonnen ben. Groetjes Monique
05.07.2024 - 23:11
![]() Miranda wrote:
Miranda wrote:
Om het rare puntje bovenop te voorkomen: sla de eerste twee vasten toeren over. Dus toer 1: 11 hstk., toer 2: 22 hstk., toer 3: 33 hstk., toer 4: 33 vasten, en hierna steeds elke even toer vasten.
30.04.2024 - 22:30
![]() Monique wrote:
Monique wrote:
Waarom houdt de hoed zo’n raar puntje bovenop? Rond de begin cirkel bedoel ik? Heb t draadje al losser gemaakt maar het blijft een raar puntje , ik vind dat jammer en de prachtige hoed . Heeft u een tip? Dank ,
04.03.2024 - 20:26DROPS Design answered:
Dag Monique,
Ik snap wat je bedoeld, dat is niet mooi. Je zou de bovenkant van de hoed kunnen persen met het strijkijzer en een natte theedoek ertussen. Omdat het een hoed is kun je deze niet plat op de strijkplank leggen, dus misschien kun je iets in de vorm van een bloempot vinden waar je weer een handdoek over legt, waar je de hoed overheen kunt doen.
06.03.2024 - 22:05
![]() Janet wrote:
Janet wrote:
Hello, I would like to clarify my understanding of the pattern. Rd 1: work 11 hdc Question: do I crochet 2 chain as first stitch and work 10 hdc? The crochet information says to replace the 1st stitch with 2 ch. Rd 3: Work 2 hdc in every sc = 22 hdc Question: In 1st stitch, I would crochet 2 ch and 1 hdc, 2 hdc in every stitch. Is this correct? Thank you in advance for the kind help!
19.11.2023 - 15:13DROPS Design answered:
Dear Janet, replace the first idc at the beg of each round with 2 chains - see CROCHET INFO at the beg of the pattern. This means on 2nd round, start with 2 ch (= 1st idc) and 1 hdc in the same stitch, then 2 hdc in each of the remaining 10 hdc on the round = 22 hdc. Happy crocheting!
20.11.2023 - 10:56
![]() Karen Anna Nilsen wrote:
Karen Anna Nilsen wrote:
Hva menes med halvstav i første/neste maske er det både foran og bak skråstrek det blir jo altfor mange masker pr.omgang. På forhånd takk for svar
14.07.2022 - 22:20DROPS Design answered:
Hei Karen, Nei, instruksen dekker flere gjentagelser (den første gang du strikker er det i 'første' masken, neste gang er det i 'neste' masken). Håper dette hjelper og god fornøyelse!
15.07.2022 - 06:54
![]() Nadine wrote:
Nadine wrote:
The start of this pattern is so confusing :(( It would have been much clearer if the crochet information was integrated into the "hat" pattern. Thanks for a beautiful hat though.
24.04.2022 - 14:50
![]() Åsa Voilås wrote:
Åsa Voilås wrote:
Kan hatten stives? I tilfelle hva anbefales?
12.04.2022 - 19:12DROPS Design answered:
Hei Åse, Ja hatten kan stives. Da anbefaler vi at du dypper hatten i sukkervann eller fargeløs brus, former hatten slik du ønsker den og lar den tørke. God fornøyelse!
13.04.2022 - 08:58
![]() Helen Goddard wrote:
Helen Goddard wrote:
I'm making sun hat 167-8. Maybe I'm being dim but on which rows do I change colour?
22.12.2021 - 20:16DROPS Design answered:
Hello Helen! Brown yarn is for plaited string. Hope it helps!
23.12.2021 - 23:27
|
||||||||||||||||||||||
My Girl#mygirlhat |
||||||||||||||||||||||
 |
 |
|||||||||||||||||||||
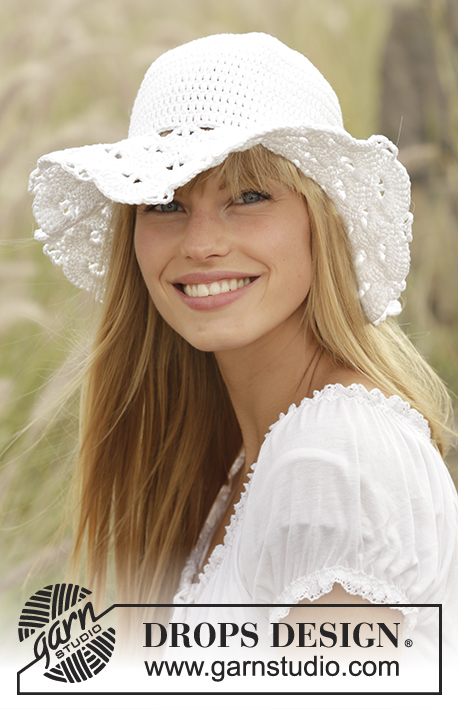
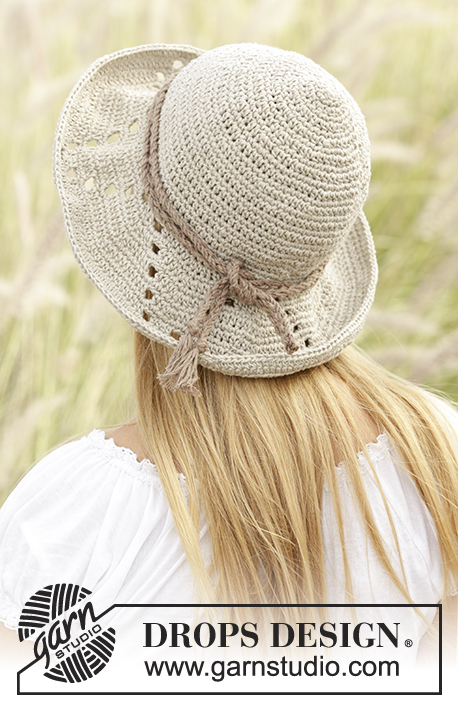
Crochet DROPS hat with lace pattern in "Bomull-Lin" or "Paris".
DROPS 167-8 |
||||||||||||||||||||||
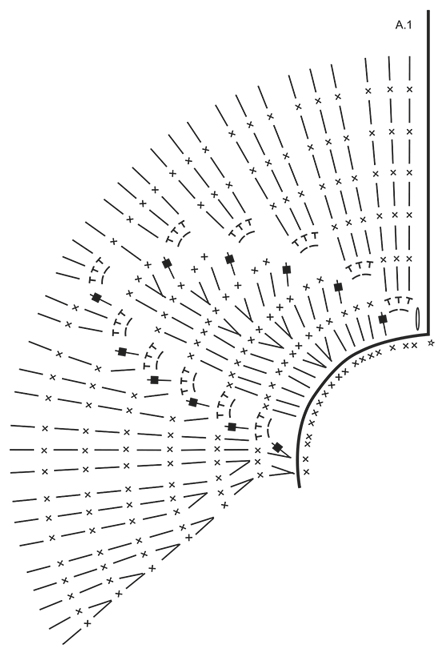
|
PATTERN: See diagram A.1. Work diagram 5 times in total on round. CROCHET INFO: Replace first hdc at beg of every hdc round with 2 ch. Finish round with 1 sl st in 2nd ch at beg of round. Replace first sc at beg of every sc round with 1 ch. Finish round with 1 sl st in 1st ch at beg of round. ---------------------------------------------------------- HAT: The piece is worked top down. Crochet 5 ch on hook size 3.5 mm/E/4 with beige/dark beige and form a ring with 1 sl st in first ch. ROUND 1: Work 11 hdc in ch-ring – READ CROCHET INFO! ROUND 2 (and then on every even numbered round): Work 1 sc in every hdc. ROUND 3: Work 2 hdc in every sc = 22 hdc. ROUND 5: Work * 2 hdc in first/next sc, 1 hdc in next sc *, repeat from *-* the entire round = 33 hdc. ROUND 7: Work * 2 hdc in first/next sc, 1 hdc in each of the next 2 sc *, repeat from *-* the entire round = 44 hdc. REMEMBER THE CROCHET GAUGE! ROUND 9: Work * 2 hdc in first/next sc, 1 hdc in each of the next 3 sc *, repeat from *-* the entire round = 55 hdc. ROUND 11: Work * 2 hdc in first/next sc, 1 hdc in each of the next 4 sc *, repeat from *-* the entire round = 66 hdc. ROUND 13: Work * 2 hdc in first/next sc, 1 hdc in each of the next 5 sc *, repeat from *-* the entire round = 77 hdc. ROUND 15: Work * 2 hdc in first/next sc, 1 hdc in each of the next 6 sc *, repeat from *-* the entire round = 88 hdc. ROUND 17: Work * 2 hdc in first/next sc, 1 hdc in each of the next 43 sc *, repeat from *-* the entire round = 90 hdc. Continue every other round with 1 sc in every hdc and 1 hdc in every sc. Continue like this until piece measures approx. 17 cm / 6 3/4'' from the top, adjust so that last round is with sc. Work brim. BRIM: Now work A.1 as follows (repeat A.1 5 times in total on round): ROUND 1: Remember CROCHET INFO! Work ch 2, * ch 2, skip 2 sc, 1 hdc in each of the next 5 sc, 2 hdc in each of the next 2 sc, 1 hdc in each of the next 5 sc, ch 2, skip 2 sc, 2 hdc in each of the next 2 sc*, repeat from *-* the entire round, finish round with 1 sl st in 2nd ch at beg of round = 90 hdc and 10 ch-spaces. ROUND 2: Work * 3 sc around first/next ch-space, skip 1 hdc, 1 sc in each of the next 13 hdc, 3 sc around next ch-space, 1 sc in each of the next 3 hdc *, repeat from *-* the entire round = 110 sc. ROUND 3: Work * 1 hdc in each of the first/next 3 sc, ch 2, skip 2 sc, 1 hdc in each of the next 4 sc, 2 hdc in each of the next 2 sc, 1 hdc in each of the next 4 sc, ch 2, skip 2 sc, 1 hdc in each of the next 3 sc, 2 hdc in each of the next 2 sc *, repeat from *-* the entire round = 110 hdc and 10 ch-spaces. ROUND 4: Work * 1 sc in each of the first/next 3 hdc, 3 sc around next ch-space, skip 1 hdc, 1 sc in each of the next 11 hdc, 3 sc around next ch-space, skip 1 hdc, 1 sc in each of the next 6 hdc *, repeat from *-* the entire round = 130 sc. ROUND 5: Work * 1 hdc in each of the first 6 sc, ch 2, skip 2 sc, 1 hdc in each of the next 3 sc, 2 hdc in each of the next 2 sc, 1 hdc in each of the next 3 sc, ch 2, skip 2 sc, 1 hdc in each of the next 6 sc, 2 hdc in each of the next 2 sc *, repeat from *-* the entire round = 130 hdc and 10 ch-spaces. ROUND 6: Work * 1 sc in each of the first/next 6 hdc, 3 sc around next ch-space, skip 1 hdc, 1 sc in each of the next 9 hdc, 3 sc around next ch-space, skip 1 hdc, 1 sc in each of the next 9 hdc *, repeat from *-* the entire round = 150 sc. ROUND 7: Work * 1 hdc in each of the first/next 9 sc, ch 2, skip 2 sc, 1 hdc in each of the next 2 sc, 2 hdc in next sc, 1 hdc in each of the next 3 sc, ch 2, skip 2 sc, 1 hdc in each of the next 10 sc, 2 hdc in next sc *, repeat from *-* the entire round = 140 hdc and 10 ch-spaces. ROUND 8: Work * 1 sc in each of the first 9 hdc, 3 sc around first/next ch-space, skip 1 hdc, 1 sc in each of the next 6 hdc, 3 sc around next ch-space, skip 1 hdc, 1 sc in each of the next 11 sc *, repeat from *-* the entire round = 160 sc. ROUND 9: Work * 1 hdc in each of the first 12 sc, ch 2, skip 2 sc, 1 hdc in next sc, 2 hdc in next sc, 1 hdc in next sc, ch 2, skip 2 sc, 1 hdc in each of the next 12 sc, 2 hdc in next sc *, repeat from *-* the entire round = 150 hdc and 10 ch-spaces. ROUND 10: Work * 1 sc in each of the first/next 12 hdc, 3 sc around first/next ch-space, skip 1 hdc, 1 sc in each of the next 3 hdc, 3 sc around next ch-space, skip 1 hdc, 1 sc in each of the next 13 hdc *, repeat from *-* the entire round = 170 sc. ROUND 11: Work * 1 hdc in each of the first/next 16 sc, ch 2, skip 2 sc, 1 hdc in each of the next 15 sc, 2 hdc in next sc *, repeat from *-* the entire round = 165 hdc and 5 ch-spaces. ROUND 12: Work * 1 sc in each of the first/next 16 hdc, 3 sc around first/next ch-space, skip 1 hdc, 1 sc in each of the next 16 hdc *, repeat from *-* the entire round = 175 sc. ROUND 13: Work 1 hdc in every sc = 175 hdc. Fasten off. PLAITED STRING: Make a plait with 3 twined strings. Make 1 twined string as follows: Cut 2 lengths brown yarn of 8 metres/8½ yds each. Twine the strands tog until they resist, fold the string double so that it twines again. Make a knot in each end of the string. Make another 2 strings the same way. Make 1 plait of the 3 twined strings. Tie a knot approx. 4 cm / 1½'' from each end. Twirl the plait 2 times around hat and tie a knot. |
||||||||||||||||||||||
Diagram explanations |
||||||||||||||||||||||
|
||||||||||||||||||||||
|
||||||||||||||||||||||
Have you finished this pattern?Tag your pictures with #dropspattern #mygirlhat or submit them to the #dropsfan gallery. Do you need help with this pattern?You'll find 8 tutorial videos, a Comments/Questions area and more by visiting the pattern on garnstudio.com. © 1982-2025 DROPS Design A/S. We reserve all rights. This document, including all its sub-sections, has copyrights. Read more about what you can do with our patterns at the bottom of each pattern on our site. |
||||||||||||||||||||||


With over 40 years in knitting and crochet design, DROPS Design offers one of the most extensive collections of free patterns on the internet - translated to 17 languages. As of today we count 314 catalogs and 11822 patterns - 11812 of which are translated into English (US/in).
We work hard to bring you the best knitting and crochet have to offer, inspiration and advice as well as great quality yarns at incredible prices! Would you like to use our patterns for other than personal use? You can read what you are allowed to do in the Copyright text at the bottom of all our patterns. Happy crafting!
Post a comment to pattern DROPS 167-8
We would love to hear what you have to say about this pattern!
If you want to leave a question, please make sure you select the correct category in the form below, to speed up the answering process. Required fields are marked *.