
Looking for a yarn?


Comments / Questions (10)
![]() Emma wrote:
Emma wrote:
Hej! Jag förstår inte början. Jag ska först göra en ring med 4 luftmaskor med dubbel tråd. Sen ska jag på något sätt virka fm så att 4 blir 6. Hur? Menar ni att man virkar 2 gånger fm i varannan? Eller menar ni att man ska sluta ha dubbel tråd efter att man slutit cirkeln och sen på något sätt virka 6 stycken fm? På videon ser det ut som att ni virkat botten men bara en tråd men det står aldrig att man ska ändra till enkel. Tacksam för svar.
02.10.2020 - 17:33DROPS Design answered:
Hei Emma. Du skal hekle med 2 tråder (i videoen hekler vi med en tykkere tråd, derfor bare 1 tråd). Du starter med 4 luftmasker og setter disse sammen til en ring med en kjedemaske i første luftmaske. Så hekler du 6 fastmasker om denne ringen slik at du har en sirkel på 6 fastmasker ,deretter hekler du 2 fastmasker i hver av disse 6 fastmaskene = 12 fastmasker. Deretter øker du slik det står i oppskriften. God Fornøyelse!
05.10.2020 - 11:24
![]() Paola wrote:
Paola wrote:
Bellissimo questo cestino ma non sarebbe meglio lavorarlo tutto a spirale invece che chiudere tutti i giri? Il disegno si apprezza ugualmente....
19.12.2018 - 14:28DROPS Design answered:
Buongiorno Paola. Può lavorare anche in spirale se preferisce. Buon lavoro!
20.12.2018 - 08:27Laura wrote:
I do agree with Sissy, one of my crochet students is working on this pattern and if the 3ch do not count as a dc, then the last one is an extra stitch.
22.04.2017 - 14:52
![]() Sissy wrote:
Sissy wrote:
The first round has the last stitch with an X in it. Your video shows the last stitch worked as the empty box color, the chart shows an X so technically you must stop before the end of the chart. That is fine when the first and last stitches are to be done in the same color. But for rows 4 & 6 the chain will not be the correct color. I have made the adjustments, but am writing to you for others who may not be able to make it work.
11.04.2017 - 22:21
![]() Sissy wrote:
Sissy wrote:
Yes, but then what happens when you come to the end of the chart on the last repeat? What is the last stitch?
10.04.2017 - 05:11DROPS Design answered:
Dear Sissy, after the last repeat, you close the round with a slip stitch, which you crochet into the top of the 3 treble, the round was started with. I hope this helps. Happy chrocheting!
10.04.2017 - 23:08
![]() Sissy wrote:
Sissy wrote:
Hi, in the notes section of the pattern it says the ch 3 that replaces the first dc of every round does not count in the number of dc for the round. I believe as the pattern is written and as the video shows, it is counted.
01.04.2017 - 19:42DROPS Design answered:
Dear Sissy, you can see in the first round in the video that the first 3 ch are worked extra to the first 2 sts worked in green (in the video / dark grey in the pattern). Happy crocheting!
03.04.2017 - 13:33Yasyas wrote:
Thank you so much for the pattern, I love the colours used for this basket.
13.10.2016 - 23:54
![]() Lauren McRoberts wrote:
Lauren McRoberts wrote:
Love this unique basket!
23.12.2015 - 17:53
![]() Sigi wrote:
Sigi wrote:
Würde ich gerne nach häkeln, ist auch ein schönes Geschenk.
18.12.2015 - 16:54
![]() Michelle Winther wrote:
Michelle Winther wrote:
Passar bra till inredningen.
13.12.2015 - 14:45
|
||||||||||
Quito#quitobasket |
||||||||||
|
|
||||||||||
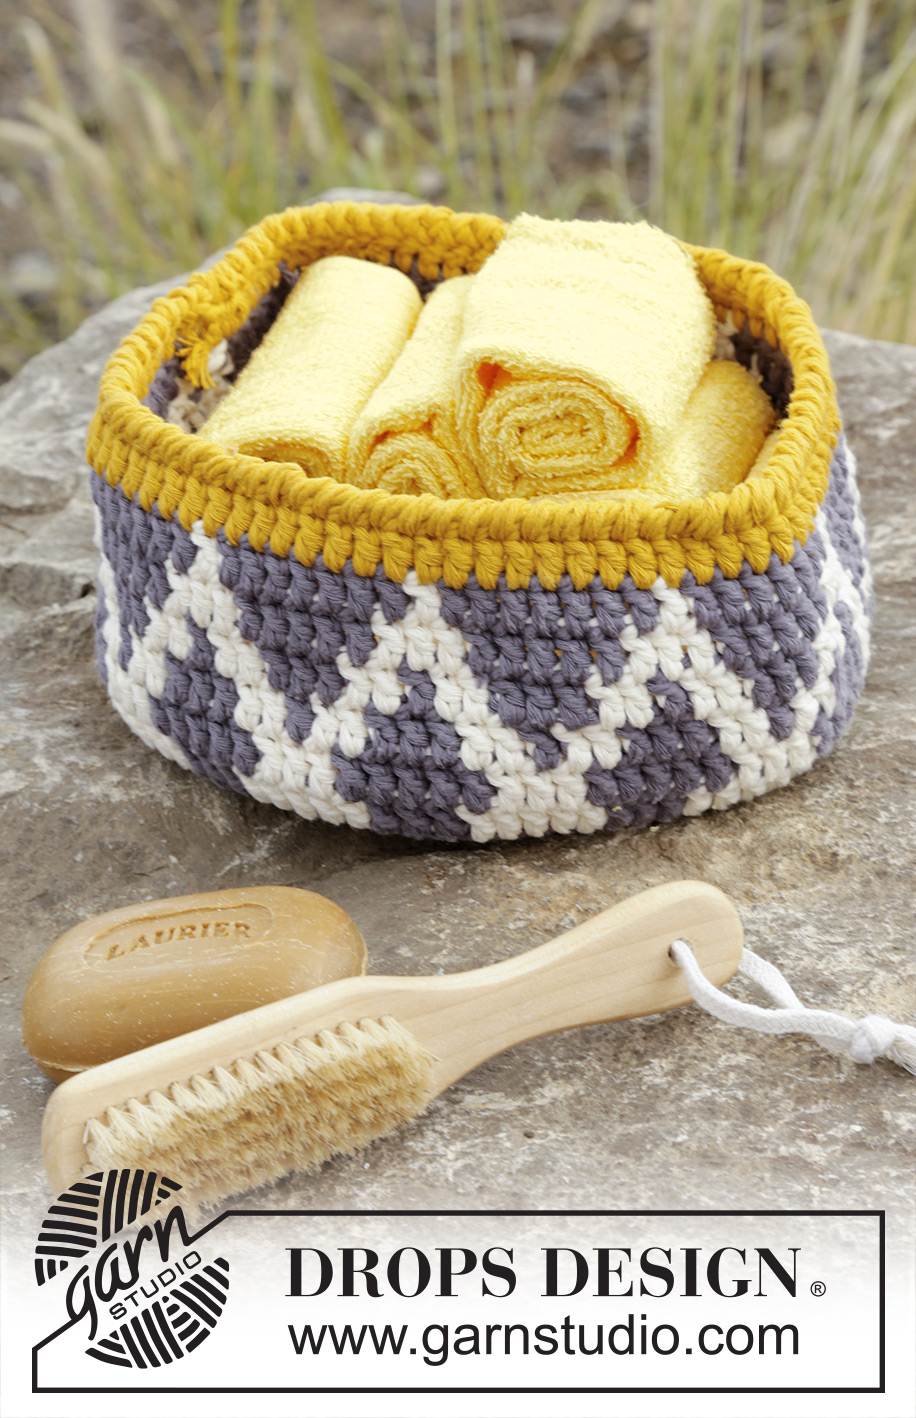
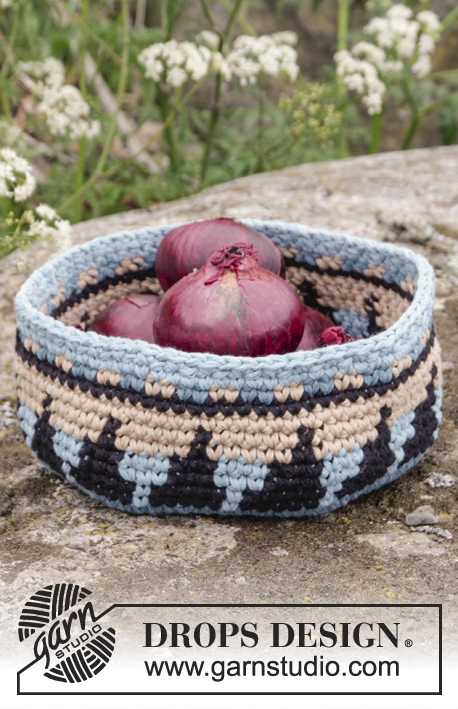
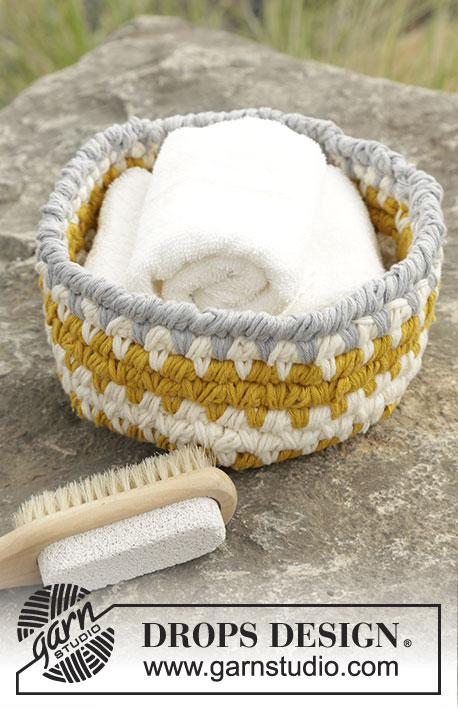
Crochet DROPS basket with color pattern in 2 strands "Paris".
DROPS 170-40 |
||||||||||
|
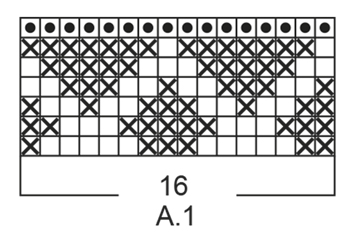
PATTERN: See diagram A.1. Work diagram in dc, i.e. 1 square in diagram = 1 dc with 2 strands. COLOR PATTERN (worked in the round): When changing colour work as follows: Work last tr with first colour but wait with last pull through, switch to next color and work last pull through, then work next tr. When working with two color place strands for the color not worked over sts from previous round, work around the strands so that they are hidden and follows in the round. CROCHET INFO: Beg every sc round with ch 1, finish with 1 sl st in first ch from beg of round (this ch is not count in no of sc). Beg every dc round with ch 3, finish with 1 sl st in 3rd ch from beg of round (these ch are not counted in no of dc). DOUBLE YARN TIP: Use yarn from both inside and outside of the ball. When switching to a new ball, try to avoid switching both strands at the same time - to avoid a thick yarn when fastening. REVERSE SC: Work as sc but backwards. I.e. work sc from left to right. ---------------------------------------------------------- BASKET: Work 4 ch on hook SIZE 5.5 mm/US 9 with 2 strands dark gray and form a ring with 1 sl st in first ch - READ DOUBLE YARN TIP. ROUND 1: READ CROCHET INFO! Work 6 sc in ch-ring. ROUND 2: Work 2 sc in every sc = 12 sc. ROUND 3: Work * 2 sc in first/next sc, 1 sc in next sc *, repeat from *-* the entire round = 18 sc. REMEMBER THE CROCHET GAUGE! ROUND 4: Work * 2 sc in first/next sc, 1 sc in each of the next 2 sc *, repeat from *-* the entire round = 24 sc. ROUND 5: Work * 2 sc in first/next sc, 1 sc in each of the next 3 sc *, repeat from *-* the entire round = 30 sc. ROUND 6: Work * 2 sc in first/next sc, 1 sc in each of the next 4 sc *, repeat from *-* the entire round = 36 sc. Continue to work like this until 12 rounds have been worked = 72 sc on last round. Work next round as follows: Work * 2 sc in first/next sc, 1 sc in each of the next 8 sc *, repeat from *-* the entire round = 80 sc. Piece measures approx. 20 cm / 8'' in diameter. NOW MEASURE PIECE FROM HERE! Work the edge. EDGE: Worked in pattern with 2 colors at a time. Work edge as follows: Remember CROCHET INFO! Work A.1 (= 16 dc) the entire round - READ COLOR PATTERN. When A.1 has been worked vertically, work 1 round with 2 strands mustard as follows: Work 1 REVERSE SC in every dc - see explanation above. Fasten off. |
||||||||||
Diagram explanations |
||||||||||
|
||||||||||
|
||||||||||
Have you finished this pattern?Tag your pictures with #dropspattern #quitobasket or submit them to the #dropsfan gallery. Do you need help with this pattern?You'll find 10 tutorial videos, a Comments/Questions area and more by visiting the pattern on garnstudio.com. © 1982-2025 DROPS Design A/S. We reserve all rights. This document, including all its sub-sections, has copyrights. Read more about what you can do with our patterns at the bottom of each pattern on our site. |
||||||||||


With over 40 years in knitting and crochet design, DROPS Design offers one of the most extensive collections of free patterns on the internet - translated to 17 languages. As of today we count 314 catalogs and 11822 patterns - 11812 of which are translated into English (US/in).
We work hard to bring you the best knitting and crochet have to offer, inspiration and advice as well as great quality yarns at incredible prices! Would you like to use our patterns for other than personal use? You can read what you are allowed to do in the Copyright text at the bottom of all our patterns. Happy crafting!
Post a comment to pattern DROPS 170-40
We would love to hear what you have to say about this pattern!
If you want to leave a question, please make sure you select the correct category in the form below, to speed up the answering process. Required fields are marked *.