
Looking for a yarn?


Comments / Questions (21)
![]() Saly Vanpee wrote:
Saly Vanpee wrote:
DROPS poncho met capuchon Haak 66-68-68-73-73-78 l (incl. 3 l om mee te keren) met haaknld 7 mm en Andes. Keer en haak 1 stk in 4e l vanaf haak (= 2 stk), 1 stk in elke van de volgende 2-4-4-4-4-4 l, * sla 1 l over, 1 stk in elke van de volgende 4 l *, herhaal van *-* = 52-54-54-58-58-62 stk (incl. 4 voorbies st aan elke kant). Is dit verkrijgbaar met symbolen wat ik weet niet hoe ik eraan moet beginnen. Bedankt voor U antwoord. Vanpee Saly
29.10.2024 - 15:49
![]() Peggy wrote:
Peggy wrote:
DROPS: Is this pattern the Fantail, or Open Fan? Your directions are a bit murky, so I am using the Crochet Stitch Dictionary for assistance. I need to know which Fan pattern to reference to finish this project. Thanks!
26.10.2024 - 01:08
![]() WPL wrote:
WPL wrote:
Guten Tag, mir ist leider nicht deutlich, wie ich ausrechnen kann um immer wieder gleichmässig zu zunehmen in den anfänglichen Reihen. Kann es wirklich so sein, dass ich erst alles selber aufschreiben muss, per Runde auf Papier aufzeichnen und dazwischen dann jeweils die Zunahmen selber hinzufügen und vorab auszählen? Es ist sehr zeitaufwendig und frustrierend, da es auch nicht immer auf Anhieb funktioniert. Gern erfahre ich, wie ich das am Besten machen kann. Mit freundlichen Grüssen WPL
10.06.2021 - 14:38DROPS Design answered:
Liebe Frau WPL, diese Lektion wird Ihnen helfen, zu kalkulieren, wie man regelmäßig verteilt zunimmt, so brauchen Sie nur jeweils so zu kalkulieren. Viel Spaß beim häkeln!
10.06.2021 - 16:40
![]() Agnieszka wrote:
Agnieszka wrote:
Witam. Mam problem z dodawaniem sł. po 12 z każdej strony z 69 na 93 oczka poniżenia we wskazówkę jest: Aby dodać 1 sł należy przer. 2 sł w ten sam sł. UWAGA: nie dodawać o. ponad 4 sł z każdej strony (= oczka obszyć przodów). Jak dodam w 4 słupki po 2 to wtedy bedzie 16 wiec mi brakuje 8 słupków. Proszę o pomoc.
13.02.2020 - 10:38DROPS Design answered:
Witaj Agnieszko, w 2 kolejnych rzędach musisz dodać po 12 sł. 1-szy rząd: masz 69 sł minus 8 sł brzegowych = 61 sł. Podziel to na 12 =5, tzn. że 1 słupek będziesz dodawać co 5 słupków. Przerób pierwszych 7 sł, a w siódmy dodaj 1 sł, następnie dodawaj 1 sł w 12-ty, 17-ty, 22-gi sł itd. aż dodasz w sumie 12 słupków w rzędzie. W 2-gim rzędzie rób podobnie, tylko słupki będziesz dodawać co 6-ty słupek. Powodzenia!
14.02.2020 - 07:48
![]() Agnieszka wrote:
Agnieszka wrote:
Witam. Mam problem z dodawaniem sł. po 12 z każdej strony z 69 na 93 oczka poniżenia we wskazówkę jest: Aby dodać 1 sł należy przer. 2 sł w ten sam sł. UWAGA: nie dodawać o. ponad 4 sł z każdej strony (= oczka obszyć przodów). Jak dodam w 4 słupki po 2 to wtedy bedzie 16 wiec mi brakuje 8 słupków. Proszę o pomoc.
13.02.2020 - 10:37
![]() Graciela wrote:
Graciela wrote:
¿Cada cuántos puntos altos se realiza el aumento? No me queda clara esta parte de la explicación: \"Trabajar 1 hilera con 1 p.a. en cada p.a. y, al mismo tiempo, aumentar – LEER TIP PARA AUMENTAR – 17-17-17-23-23-23 p.a. distribuidos equitativamente en la hilera = 69-71-71-81-81-85 p.a.
08.09.2019 - 04:53DROPS Design answered:
Hola Graciela. Para calcular cómo aumentar puntos repartidos, contar el número total de puntos en la aguja (p.e 52 puntos) y dividirlos entre el número de aumentos a trabajar (p.e 17) = 3. En este ejemplo, aumentar cada 3 puntos.
27.10.2019 - 22:35
![]() Kenzie wrote:
Kenzie wrote:
Sorry, letzte Angabe vertippt. Statt 4R 3 zun = 3R 8 zun.
12.08.2019 - 13:25
![]() Kenzie wrote:
Kenzie wrote:
Hallo. Ich habe mich auch an dieses Model gewagt und benutzt was ich hier habe. Vielleicht helfen ja meine Angaben Jemanden?! Ich bin sehr mollig und habe breite Schultern. Größe ca, 58/60 in 8/4 Garn mit Nadel 3.5 180LM 3R=4St,1Lm....bis Ende 2R 23 zun. 10R 12 zun. 4R 6 zun. 4R 3 zun. Je nach Breite der Schultern, muss man die Reihen auch noch anpassen. Am Besten immer mal wieder anlegen. Viel Spaß bei dieser tollen Anleitung!
12.08.2019 - 13:22
![]() Trish ODonnell wrote:
Trish ODonnell wrote:
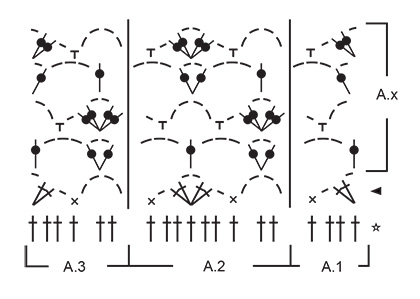
Can you give a written pattern for A2 andA3 to follow
08.03.2019 - 02:21DROPS Design answered:
Dear Mrs ODonnell, A.2 and A.3 are only diagrams, please find how to work a crochet diagram here. Happy crocheting!
08.03.2019 - 08:16Jennifer Miles wrote:
I'm sorry but I don't understand the statement place the hood double and sew on tog at top. I just can't visualise it.
05.10.2018 - 19:46DROPS Design answered:
Dear Jennifer, just fold the whole poncho in half, and continue to fold the hood in half. At the top the cast off edge should be folded in half as well. Sew these two sides together. Happy Crafting!
07.10.2018 - 23:12
|
|||||||||||||||||||||||||
Erendruid |
|||||||||||||||||||||||||
 |
 |
||||||||||||||||||||||||
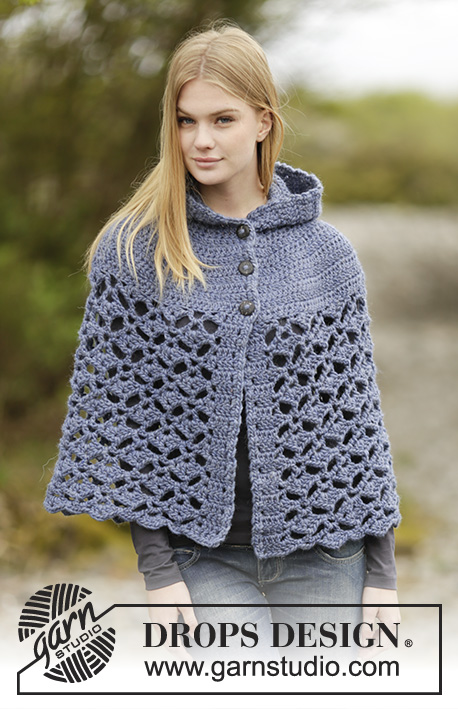
Crochet DROPS poncho with hood, fan pattern, worked top down in ”Andes”. Size: S - XXXL.
DROPS Extra 0-1166 |
|||||||||||||||||||||||||
|
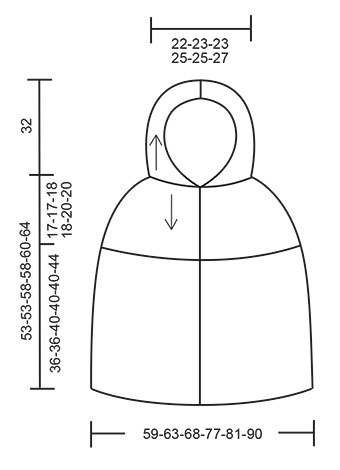
PATTERN: See diagrams A.1 to A.3. The diagrams show all rows in pattern seen from RS. CROCHET INFO: Replace first dc at beg of every dc row with 3 ch. INCREASE TIP: Inc 1 dc by working 2 dc in same dc. NOTE: Do not inc over the outermost 4 dc in each side (= band sts). BUTTONS: Measure from cast-on edge at the front and sew buttons on left band: SIZE S-M-L-XL: 2, 9 and 16 cm / 3/4",3½",6 1/4" SIZE XXL-XXXL: 2, 10 and 18 cm / 3/4",4",7" ---------------------------------------------------------- PONCHO: Work back and forth from neck and down. Then work the hood. Work 66-68-68-73-73-78 ch (includes 3 ch to turn with) on hook size 7 mm with Andes. Turn and work 1 dc in 4th ch from hook (= 2 dc), 1 dc in each of the next 2-4-4-4-4-4 ch, * skip ch 1, 1 dc in each of the next 4 ch *, repeat from *-* = 52-54-54-58-58-62 dc (includes 4 band sts in each side). Turn. READ CROCHET INFO! Work 1 row with 1 dc in every dc while inc - READ INCREASE TIP - 17-17-17-23-23-23 dc evenly on row = 69-71-71-81-81-85 dc. Turn. REMEMBER THE CROCHET GAUGE! Work rows with 1 dc in every dc while inc 12 dc evenly on every row 2-3-4-5-5-7 times in total = 93-107-119-141-141-169 dc. Turn. Work rows with 1 dc in every dc while inc 6 dc evenly on every row 5-4-4-3-4-2 times in total = 123-131-143-159-165-181 dc. Turn. Work 1 row with 1 dc in every dc while inc 3-4-1-3-6-8 dc evenly on row = 126-135-144-162-171-189 dc. Turn. Piece measures approx. 17-17-18-18-20-20 cm / 6 3/4"-6 3/4"-7"-7"-8"-8". NOW MEASURE PIECE FROM HERE! Continue to work pattern from RS as follows: 1 dc in each of the first 4 dc (= band sts), A.1 - see explanation above, A.2 12-13-14-16-17-19 times in total, A.3, 1 dc in each of the last 4 dc (= band sts). Then repeat A.x vertically. REMEMBER THE CROCHET GAUGE! Continue like this until piece measures approx. 36-36-40-40-40-44 cm / 14 1/4"-14 1/4"-15 3/4"-15 3/4"-15 3/4"-17 1/4", adjust after row from RS. Fasten off. HOOD: Work back and forth along cast-on edge: Work 1 dc in every ch with dc - remember CROCHET INFO = 52-54-54-58-58-62 dc. Then work 1 dc in every dc until hood measures approx. 32 cm / 12½'' vertically. Fasten off. Place the hood double and sew tog at the top- sew in outer loops of edge sts to make the seam flat. CROCHET EDGE: Then work an edge along the band and hood. Beg at the bottom on right band, and work as follows: Fasten strand with 1 sc around first dc-row, * ch 2, 1 sc around next dc-row *, repeat from *-* along right band, hood and left band. Fasten off. ASSEMBLY: Sew buttons on to the left band - see explanation above. Button through holes in crochet edge on right front piece. |
|||||||||||||||||||||||||
Diagram explanations |
|||||||||||||||||||||||||
|
|||||||||||||||||||||||||
|
|||||||||||||||||||||||||
|
|||||||||||||||||||||||||
Have you finished this pattern?Tag your pictures with #dropspattern or submit them to the #dropsfan gallery. Do you need help with this pattern?You'll find 7 tutorial videos, a Comments/Questions area and more by visiting the pattern on garnstudio.com. © 1982-2025 DROPS Design A/S. We reserve all rights. This document, including all its sub-sections, has copyrights. Read more about what you can do with our patterns at the bottom of each pattern on our site. |
|||||||||||||||||||||||||


With over 40 years in knitting and crochet design, DROPS Design offers one of the most extensive collections of free patterns on the internet - translated to 17 languages. As of today we count 314 catalogs and 11822 patterns - 11812 of which are translated into English (US/in).
We work hard to bring you the best knitting and crochet have to offer, inspiration and advice as well as great quality yarns at incredible prices! Would you like to use our patterns for other than personal use? You can read what you are allowed to do in the Copyright text at the bottom of all our patterns. Happy crafting!
Post a comment to pattern DROPS Extra 0-1166
We would love to hear what you have to say about this pattern!
If you want to leave a question, please make sure you select the correct category in the form below, to speed up the answering process. Required fields are marked *.