


Komentáře / Otázky (21)
![]() Saly Vanpee napsala:
Saly Vanpee napsala:
DROPS poncho met capuchon Haak 66-68-68-73-73-78 l (incl. 3 l om mee te keren) met haaknld 7 mm en Andes. Keer en haak 1 stk in 4e l vanaf haak (= 2 stk), 1 stk in elke van de volgende 2-4-4-4-4-4 l, * sla 1 l over, 1 stk in elke van de volgende 4 l *, herhaal van *-* = 52-54-54-58-58-62 stk (incl. 4 voorbies st aan elke kant). Is dit verkrijgbaar met symbolen wat ik weet niet hoe ik eraan moet beginnen. Bedankt voor U antwoord. Vanpee Saly
29.10.2024 - 15:49
![]() Peggy napsala:
Peggy napsala:
DROPS: Is this pattern the Fantail, or Open Fan? Your directions are a bit murky, so I am using the Crochet Stitch Dictionary for assistance. I need to know which Fan pattern to reference to finish this project. Thanks!
26.10.2024 - 01:08
![]() WPL napsala:
WPL napsala:
Guten Tag, mir ist leider nicht deutlich, wie ich ausrechnen kann um immer wieder gleichmässig zu zunehmen in den anfänglichen Reihen. Kann es wirklich so sein, dass ich erst alles selber aufschreiben muss, per Runde auf Papier aufzeichnen und dazwischen dann jeweils die Zunahmen selber hinzufügen und vorab auszählen? Es ist sehr zeitaufwendig und frustrierend, da es auch nicht immer auf Anhieb funktioniert. Gern erfahre ich, wie ich das am Besten machen kann. Mit freundlichen Grüssen WPL
10.06.2021 - 14:38Odpověď DROPS Design :
Liebe Frau WPL, diese Lektion wird Ihnen helfen, zu kalkulieren, wie man regelmäßig verteilt zunimmt, so brauchen Sie nur jeweils so zu kalkulieren. Viel Spaß beim häkeln!
10.06.2021 - 16:40
![]() Agnieszka napsala:
Agnieszka napsala:
Witam. Mam problem z dodawaniem sł. po 12 z każdej strony z 69 na 93 oczka poniżenia we wskazówkę jest: Aby dodać 1 sł należy przer. 2 sł w ten sam sł. UWAGA: nie dodawać o. ponad 4 sł z każdej strony (= oczka obszyć przodów). Jak dodam w 4 słupki po 2 to wtedy bedzie 16 wiec mi brakuje 8 słupków. Proszę o pomoc.
13.02.2020 - 10:38Odpověď DROPS Design :
Witaj Agnieszko, w 2 kolejnych rzędach musisz dodać po 12 sł. 1-szy rząd: masz 69 sł minus 8 sł brzegowych = 61 sł. Podziel to na 12 =5, tzn. że 1 słupek będziesz dodawać co 5 słupków. Przerób pierwszych 7 sł, a w siódmy dodaj 1 sł, następnie dodawaj 1 sł w 12-ty, 17-ty, 22-gi sł itd. aż dodasz w sumie 12 słupków w rzędzie. W 2-gim rzędzie rób podobnie, tylko słupki będziesz dodawać co 6-ty słupek. Powodzenia!
14.02.2020 - 07:48
![]() Agnieszka napsala:
Agnieszka napsala:
Witam. Mam problem z dodawaniem sł. po 12 z każdej strony z 69 na 93 oczka poniżenia we wskazówkę jest: Aby dodać 1 sł należy przer. 2 sł w ten sam sł. UWAGA: nie dodawać o. ponad 4 sł z każdej strony (= oczka obszyć przodów). Jak dodam w 4 słupki po 2 to wtedy bedzie 16 wiec mi brakuje 8 słupków. Proszę o pomoc.
13.02.2020 - 10:37
![]() Graciela napsala:
Graciela napsala:
¿Cada cuántos puntos altos se realiza el aumento? No me queda clara esta parte de la explicación: \"Trabajar 1 hilera con 1 p.a. en cada p.a. y, al mismo tiempo, aumentar – LEER TIP PARA AUMENTAR – 17-17-17-23-23-23 p.a. distribuidos equitativamente en la hilera = 69-71-71-81-81-85 p.a.
08.09.2019 - 04:53Odpověď DROPS Design :
Hola Graciela. Para calcular cómo aumentar puntos repartidos, contar el número total de puntos en la aguja (p.e 52 puntos) y dividirlos entre el número de aumentos a trabajar (p.e 17) = 3. En este ejemplo, aumentar cada 3 puntos.
27.10.2019 - 22:35
![]() Kenzie napsala:
Kenzie napsala:
Sorry, letzte Angabe vertippt. Statt 4R 3 zun = 3R 8 zun.
12.08.2019 - 13:25
![]() Kenzie napsala:
Kenzie napsala:
Hallo. Ich habe mich auch an dieses Model gewagt und benutzt was ich hier habe. Vielleicht helfen ja meine Angaben Jemanden?! Ich bin sehr mollig und habe breite Schultern. Größe ca, 58/60 in 8/4 Garn mit Nadel 3.5 180LM 3R=4St,1Lm....bis Ende 2R 23 zun. 10R 12 zun. 4R 6 zun. 4R 3 zun. Je nach Breite der Schultern, muss man die Reihen auch noch anpassen. Am Besten immer mal wieder anlegen. Viel Spaß bei dieser tollen Anleitung!
12.08.2019 - 13:22
![]() Trish ODonnell napsala:
Trish ODonnell napsala:
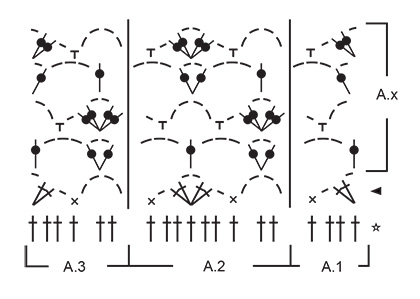
Can you give a written pattern for A2 andA3 to follow
08.03.2019 - 02:21Odpověď DROPS Design :
Dear Mrs ODonnell, A.2 and A.3 are only diagrams, please find how to work a crochet diagram here. Happy crocheting!
08.03.2019 - 08:16Jennifer Miles napsala:
I'm sorry but I don't understand the statement place the hood double and sew on tog at top. I just can't visualise it.
05.10.2018 - 19:46Odpověď DROPS Design :
Dear Jennifer, just fold the whole poncho in half, and continue to fold the hood in half. At the top the cast off edge should be folded in half as well. Sew these two sides together. Happy Crafting!
07.10.2018 - 23:12
|
|||||||||||||||||||||||||
Erendruid |
|||||||||||||||||||||||||
 |
 |
||||||||||||||||||||||||
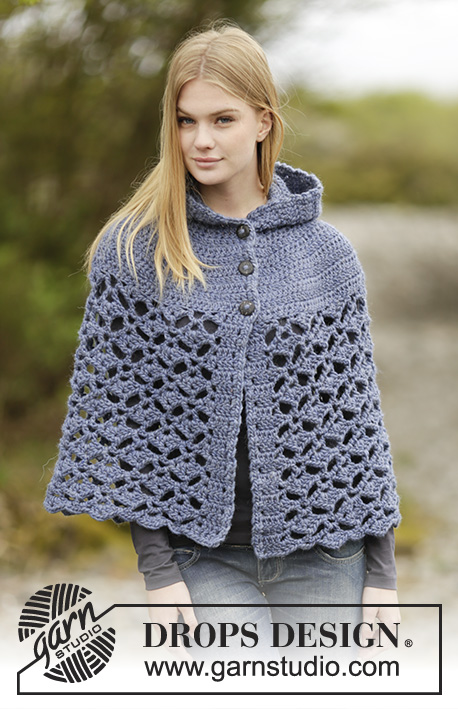
DROPS pončo s kapucí háčkované vějířkovým vzorem shora dolů z příze "Andes". Velikost: S-XXXL.
DROPS Extra 0-1166 |
|||||||||||||||||||||||||
|
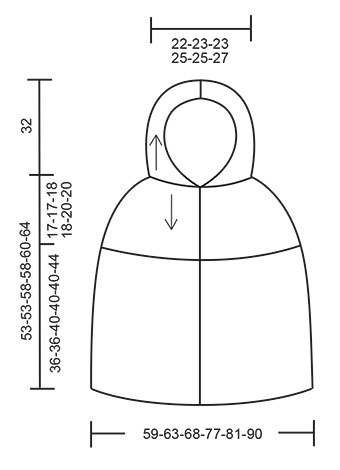
VZOR: Viz schémata A.1 až A.3. INFO: První DS na začátku každé řady DS nahrazujeme 3 řo. TIP - PŘIDÁVÁNÍ: 1 DS přidáme uháčkováním 2 DS do jednoho a téhož DS. POZN.: přidáváme mimo vnější (krajní) 4 DS na každé straně (= légy). KNOFLÍKY: Na levou légu přišijeme knoflíky v těchto rozestupech – měřeno od počáteční řady: Velikost S-M-L-XL: 2, 9 a 16 cm. Velikost XXL-XXXL: 2, 10 a 18 cm. ---------------------------------------------------------- PONČO: Háčkujeme v řadách shora dolů, tj. od průkrčníku k dolnímu okraji. Nakonec přiháčkujeme kapuci. Háčkem č.7 uháčkujeme přízí Andes 66-68-68-73-73-78 řo (včetně 3 řo na otočení). Práci otočíme a uháčkujeme 1 DS do 4. řo od háčku (= 2 DS), pak po 1 DS do každého z dalších 2-4-4-4-4-4 řo, *1 řo vynecháme, po 1 DS do každého z dalších 4 řo*, *-* opakujeme = 52-54-54-58-58-62 DS (včetně 4 ok légy na každé straně). Práci otočíme. Viz INFO! Háčkujeme 1 řadu DS a SOUČASNĚ přidáváme - viz TIP – PŘIDÁVÁNÍ: přidáme rovnoměrně 17-17-17-23-23-23 DS = 69-71-71-81-81-85 DS. Práci otočíme. Pokračujeme řadami DS a SOUČASNĚ přidáváme v každé řadě rovnoměrně 12 DS, a to celkem 2-3-4-5-5-7x = 93-107-119-141-141-169 DS. Práci otočíme. Pokračujeme řadami DS a SOUČASNĚ přidáváme v každé řadě rovnoměrně 6 DS, a to celkem 5-4-4-3-4-2x = 123-131-143-159-165-181 DS. Práci otočíme. Pokračujeme řadami DS a SOUČASNĚ přidáme rovnoměrně 3-4-1-3-6-8 DS v řadě = 126-135-144-162-171-189 DS. Práci otočíme. Díl měří asi 17-17-18-18-20-20 cm. NYNÍ MĚŘÍME DÍL OD TOHOTO MÍSTA! Pokračujeme v háčkování vzoru - začínáme lícovou řadou, takto: po 1 DS do každého z prvních 4 DS (= léga), vzor A.1 – viz výše, vzor A.2 – sekvenci vzoru opakujeme celkem 12-13-14-16-17-19x, vzor A.3, po 1 DS do každého z posledních 4 DS (= léga). Nyní opakujeme sekvenci vzoru A.x (na výšku). Takto pokračujeme až do výše asi 36-36-40-40-40-44 cm, končíme lícovou řadou. Práci ukončíme. KAPUCE: Háčkujeme v řadách do okraje průkrčníku (tj. podél počáteční řady): po 1 DS do každého řo s DS - viz INFO = 52-54-54-58-58-62 DS. Pokračujeme řadami DS, až je kapuce vysoká asi 32 cm. Práci ukončíme. Poté kapuci přeložíme napolovic a sešijeme vršek – šev vedeme vnější částí krajních ok, aby byl co nejjemnější. LEM: Nakonec obě légy i okraj kapuce obháčkujeme. Začínáme v dolním rohu pravé légy a postupujeme takto: přízi přichytíme pomocí 1 KS kolem první řady DS, *2 řo, 1 KS kolem následující řady DS*, *-* opakujeme podél pravé légy, kapuce i levé légy. Práci ukončíme. DOKONČENÍ: Na levou légu přišijeme knoflíky – viz výše. Knoflíky zapínáme do dírek ve vzoru pravé légy. |
|||||||||||||||||||||||||
Vysvětlivky ke schématu |
|||||||||||||||||||||||||
|
|||||||||||||||||||||||||
|
|||||||||||||||||||||||||
|
|||||||||||||||||||||||||
Dokončili jste tento model?Pak označte své fotky tagem #dropspattern nebo je pošlete do galerie #dropsfan. Potřebujete s tímto návodem poradit?Otevřete-li si návod na stránce garnstudio.com, najdete tam 7 výukových video-ukázek, Komentáře/Dotazy a další užitečné informace. © 1982-2025 DROPS Design A/S. Vyhrazujeme si veškerá práva. Tento dokument, včetně všech jeho dílčích částí, podléhá autorským právům. Podrobnější komentář k možnostem užití našich návodů najdete dole pod každým návodem na našich stránkách. |
|||||||||||||||||||||||||


V oblasti pletené a háčkované módy působí DROPS Design více než 40 let. Díky tomu vám můžeme nabídnout jednu z nejrozsáhlejších kolekcí modelů s bezplatnými návody dostupnými na internetu - navíc v 17 jazycích. K dnešnímu dni máme na 314 katalogů a 11822 návodů celkem - z nich je už 7048 dostupných v [češtině].
Přidejte komentář k návodu DROPS Extra 0-1166
Rádi bychom věděli, co si o tomto modelu myslíte!
Pokud se chcete na něco zeptat, dbejte prosím na to, abyste ve formuláři níže vybrali správnou kategorii - díky tomu se dříve dozvíte, co potřebujete vědět. Povinná pole jsou označena *.