
Looking for a yarn?


Comments / Questions (12)
![]() Martina wrote:
Martina wrote:
Hallo, ich würde an mein Tuch gerne diese Spitze anstricken. Die Wolle, mit der ich stricke, hat bei 50g eine LL von 145m. Wie viel Wolle (Knäuel) brauche ich etwa nur für die angestrickte Spitze… oder wie kann ich das berechnen?
10.03.2024 - 19:43DROPS Design answered:
Liebe Martina, wir haben aber nur die gesamte Garnmenge, die man für das ganze Tuch braucht, und nicht für nur die Spitze. Gerne kann Ihnen aber sicher Ihr Wollladen damit - auch per Telefon oder per E-Mail helfen. Viel Spaß beim Stricken!
11.03.2024 - 08:54
![]() Hildur Maria Herbertsdóttir wrote:
Hildur Maria Herbertsdóttir wrote:
Ég er stödd í miðju sjalinu. Þegar 2 umferðir eru eftir af A2 á að byrja að prjóna "styttar umferðir". Reyndar var ég komin lengra en rakti síðan upp því ekkert er sagt um hvernig best er að prjóna slíkar umferðir án þess að stór, ljót göt myndist. Eingöngu er sagt að maður eigi að snúa við og herða vel. Af hverju er ekki visað í einhverja aðferð og hvernig á ég að komast hjá götunum? Get ég fengið skýra útlistun á bestu aðferðinni?
25.04.2022 - 02:49
![]() Mummo wrote:
Mummo wrote:
Piirros A2, miten neulon nurjan puolen ensimmäisen kavennuksen ja lisäyksen, nurjin vai oikein silmukoin?
11.09.2019 - 16:10DROPS Design answered:
Kavennus tehdään neulomalla ylivetokavennus, eli nosta 1 silmukka oikein neulomatta, neulo 1 silmukka oikein ja vedä nostettu silmukka neulotun yli.
22.01.2020 - 18:04
![]() Maria wrote:
Maria wrote:
Dziękuję bardzo za odpowiedź. Ale ja mam problem nie z "bokami" trójkąta - z oczkami zamykanymi na końcu, tylko z brzegiem, który wychodzi z oczek brzegowych i powinien stanowić najdłuższy bok trójkąta, ta część, która w gotowej chuście jest na górze, pod szyją.
20.11.2018 - 16:59DROPS Design answered:
Witaj Mario! Na początku tak to wygląda. Wykonuj luźno oczka brzegowe, a po zakończeniu pracy nas szalem radzę go zblokować, tzn. namoczyć, delikatnie odcisnąć, rozłożyć na dywanie/materacu, delikatnie naciągając do właściwych wymiarów, przypinając brzegi szpilkami i w takiej pozycji suszyć. Powtarzać to samo po każdym praniu. Pozdrawiamy!
20.11.2018 - 18:58
![]() Maria Kowalska wrote:
Maria Kowalska wrote:
Zaczynam robić chustę, ale górny brzeg wychodzi zbyt ściągnięty, nie jest prosty, boki są "zadarte" do góry. Próbowałam robić luźniejsze oczka brzegowe, ale cały czas wychodzi mi litera v. Jak próbuję go naciągnąć, reszta dzianiny się fałduje. Coś źle robię? Pozdrawiam
20.11.2018 - 00:35DROPS Design answered:
Witaj Marysiu! Aby zamknąć oczka na końcu szala, w nowszych wzorach stosuje się 2 techniki, które mają zapobiec ściąganiu jego brzegu: 1) do zamykania oczek używamy większych drutów niż we wzorze, 2) co kilka oczek jest wykonywany narzut podczas zamykania (narzuty zamykamy jak zwykłe oczka). A czasami używamy obydwu tych technik jednocześnie. Powodzenia!
20.11.2018 - 15:32
![]() Riekje wrote:
Riekje wrote:
Ik loop vast na het stuk recht breien en meerderen ..er staat niets over afhechten ..en hoe moet ik dan verder met de rand ..kunt u mij helpen?
20.05.2016 - 14:09DROPS Design answered:
Hoi Riekje. Je moet hier ook niet afhechten. Na het breien van de ribbelsteken en meerderen ga je verder met de RAND. Bij de laatste deel van de rand kant je ook de st af.
20.05.2016 - 15:06
![]() Maggan wrote:
Maggan wrote:
Jag har 10 nystan á 50 gr, 110 m, Cotton Viscose. Räcker det till denna sjal?
22.09.2015 - 08:33DROPS Design answered:
Hej Maggan. Du kan regne det ud som fölger: DROPS Alpaca löber 167 m per 50 gr. Du skal bruge 200 gr = 4 nöster = 668 m. Du har 10 x 110 m = 1100 m, saa mere end rigeligt til dette sjal :-) Laes ogsaa her hvordan du omregner
22.09.2015 - 11:59
![]() Ellis wrote:
Ellis wrote:
Elegant and chique
08.06.2015 - 21:26Maju wrote:
Beautiful pattern
28.05.2015 - 18:16
![]() Yvonne Björkholm Norrbacka wrote:
Yvonne Björkholm Norrbacka wrote:
En vacker sjal med fin spets och en underbar skön lila färg
27.05.2015 - 23:05
|
|||||||||||||||||||||||||||||||
Lavendula#lavendulashawl |
|||||||||||||||||||||||||||||||
|
|
|||||||||||||||||||||||||||||||
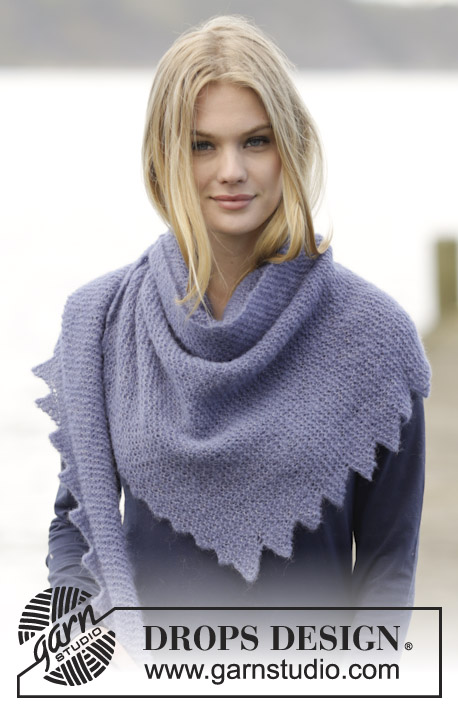
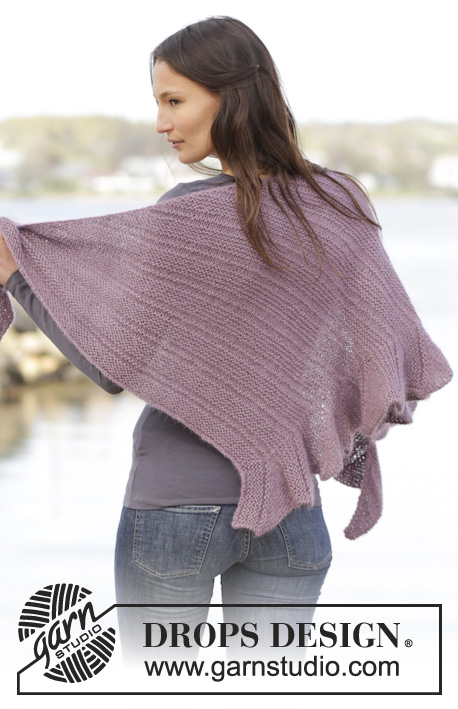
Knitted DROPS shawl in garter st with edge in lace pattern in ”Alpaca”.
DROPS 165-15 |
|||||||||||||||||||||||||||||||
|
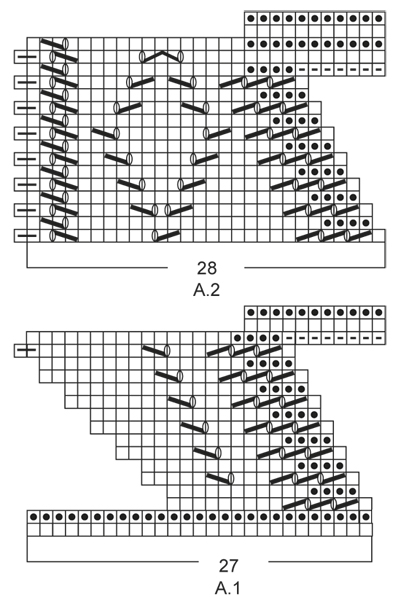
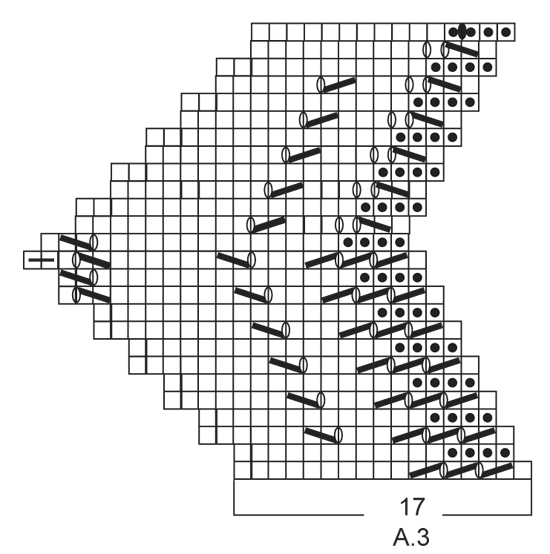
GARTER ST (back and forth): K all rows. 1 ridge = K2 rows. PATTERN: See diagrams A.1 to A.5. INCREASE TIP: Inc with YO, K YOs on next row to make holes. KNITTING TIP: If you want a bigger shawl, no of sts on each side of mid st must be divisible with 8 + 1. EDGE: Work the edge tog with shawl as follows: On every row from RS (when working over the last st from edge seen from RS) work the last st K tog with next st from shawl. On every row from WS (when working tog with shawl) slip first loosely as if to P (i.e. with yarn behind piece). ---------------------------------------------------------- SHAWL: First work a shawl in garter st. Then work an edge in stockinette st and lace pattern tog with shawl. Worked back and forth on circular needle to make room for all the sts. The shawl is worked from mid back and down. Cast on 7 sts on circular needle size 3 mm / US 2.5 with Alpaca. Insert a marker in the middle st. Then work in GARTER ST - see explanation above - AT THE SAME TIME inc both from RS and WS as follows: From RS: Inc 4 sts on every row from RS as follows - READ INCREASE TIP, i.e. inc 1 st inside 1 edge st in each side and 1 st on each side of mid st. From WS: Inc 2 sts on every row from WS, i.e. inc 1 st inside 1 edge st in each side of piece. REMEMBER THE KNITTING GAUGE Inc like this until there are 379 sts on needle (i.e. there are 189 sts on each side of mid st). Then inc as follows on the next 2 rows (first row = from RS): Inc 1 st inside 1 edge sts in each side and 1 st on each side of mid st (= 4 sts inc = 8 sts inc in total on 2 rows) = 387 sts (i.e. 193 sts on each side of mid st). Last row is from WS. Piece measures approx. 26 cm / 10 1/4'' measured in knitting direction - READ KNITTING TIP. Do not cut the yarn or turn piece, work edge. EDGE: Cast on 27 sts for edge at the end of row from WS, turn piece. Work A.1 over the 27 new edge sts (first row is from RS). After 2 rows in A.1 work over the first 16 edge sts, i.e. work 16 sts as shown in diagram, turn, tighten yarn and work 15 sts as shown in diagram. Then work over 2 sts more on every row from RS. On 15th row in A.1 work edge tog with shawl – READ EDGE. On the last 2 rows in A.1 work short rows over the first 11 edge sts seen from RS as shown in diagram. When A.1 has been worked 1 time vertically, there are 28 edge sts on needle. Then work A.2. On the last 2 rows in A.2 work short rows over the first 11 edge sts seen from RS as shown in diagram. Repeat A.2 until mid st on shawl (= 24 times in total). On next row from RS work A.3 over the first 17 edge sts as shown in diagram, turn, tighten yarn and work 16 sts as shown in diagram. Work diagram A.3 first over 2 sts more on every row from RS until all edge sts have been worked and mid st on shawl has been worked tog with edge. Then work A.3 over 2 sts less on every row from RS. Then work diagram A.4. On the first 2 rows in A.4 work short rows over the first 11 edge sts seen from RS as shown in diagram. Repeat A.4 until 1 st remains on shawl (= 24 times in total). On next row from RS work A.5. On the first 2 rows in A.5 work short rows over the first 11 edge sts seen from RS as shown in diagram. Then work over 2 sts less on every row from RS. When A.5 has been worked 1 time vertically, bind off with K from RS. |
|||||||||||||||||||||||||||||||
Diagram explanations |
|||||||||||||||||||||||||||||||
|
|||||||||||||||||||||||||||||||
|
|||||||||||||||||||||||||||||||

|
|||||||||||||||||||||||||||||||
|
|||||||||||||||||||||||||||||||
Have you finished this pattern?Tag your pictures with #dropspattern #lavendulashawl or submit them to the #dropsfan gallery. Do you need help with this pattern?You'll find 13 tutorial videos, a Comments/Questions area and more by visiting the pattern on garnstudio.com. © 1982-2025 DROPS Design A/S. We reserve all rights. This document, including all its sub-sections, has copyrights. Read more about what you can do with our patterns at the bottom of each pattern on our site. |
|||||||||||||||||||||||||||||||


With over 40 years in knitting and crochet design, DROPS Design offers one of the most extensive collections of free patterns on the internet - translated to 17 languages. As of today we count 314 catalogs and 11821 patterns - 11811 of which are translated into English (US/in).
We work hard to bring you the best knitting and crochet have to offer, inspiration and advice as well as great quality yarns at incredible prices! Would you like to use our patterns for other than personal use? You can read what you are allowed to do in the Copyright text at the bottom of all our patterns. Happy crafting!
Post a comment to pattern DROPS 165-15
We would love to hear what you have to say about this pattern!
If you want to leave a question, please make sure you select the correct category in the form below, to speed up the answering process. Required fields are marked *.