
Looking for a yarn?


Comments / Questions (77)
![]() Christine wrote:
Christine wrote:
Est il normal que les motifs ne soient pas en miroir autour de la maille centrale ? Merci d'avance pour la réponse. Cordialement.
08.02.2025 - 11:07DROPS Design answered:
Bonjour Christine, mis à par au rang ajouré de A.1 et A.3, les motifs seront symétriques de chaque côté de la maille centrale. Bon tricot!
10.02.2025 - 09:40
![]() Natalia wrote:
Natalia wrote:
Jeśli jest napisane, że w ostatnim rzędzie na prawej stronie robótki należy dodać równomiernie 12oczek to czy w te 12 oczek są wliczone narzuty przy oczkach brzegowych i oczku środkowym więc mamy dodać dodatkowo 8 oczek czy te 12 oczek jest liczonych bez tych narzutów przy oczkach brzegowych i oczku środkowym?
11.12.2023 - 09:31DROPS Design answered:
Witaj Natalio, te 12 oczek są dodawane dodatkowo, poza oczkami dodawanymi w schematach. Należy równomiernie dodać 6 oczek z każdej strony oczka środkowego. Pozdrawiamy!
12.12.2023 - 11:34
![]() Manon wrote:
Manon wrote:
Rebonjour, merci de votre réponse et de vos conseils fournis avec rapidité. Jai revu tout mes points et mes rangs, j'ai un décalage de mon point centrale. Merci beaucoup pour vos indications, je vais les suivre. Bonne journée
10.08.2023 - 14:51
![]() Manon wrote:
Manon wrote:
Bonjour, au 9ème rangs du diagramme A10-A11 et A12, j'ai 211 mailles pour commencer le motif. Mais en calculant mes mailles et celles nécessaires, il m'en manque 4 pour respecter le nombre de maille indiquées sur le diagramme. Je ne trouve pas où j'ai pu me tromper ou comment fonctionne le diagramme.... Pouvez vous m'aider svp ?
10.08.2023 - 10:52DROPS Design answered:
Bonjour Manon, c'est juste ainsi, tricotez ces 211 mailles ainsi: 2 m de bordure, 9 m de A.10, 84 m de A.11 (7 fois), 10 m de A.2, 1 m centrale, 9 m de A.10, 84 m de A. 11, 10 m de A.2, 2 m de bordure - pensez à ajouter des marqueurs entre chaque motif, ceci permet de pouvoir bien vérifier son nombre de mailles/son motif. Bon tricot!
10.08.2023 - 14:15
![]() Helle Andersen wrote:
Helle Andersen wrote:
Har 57 m på pinden. Forstår ikke mønstret A1-A3? Jeg får alt for mange m på pinden end de 91 når mønstret er strikket færdigt? Skal jeg forstå det sådan at der på P1 i mønstret skal strikkes omslag og 3r og på P3 skal strikkes omslag og 4r, så har jeg 97m på pinden????meget uklar opskrift, når jeg ser på billedet af sjalet er der 1 hulrække, men i følge mønstret vil der være hulrække på hveranden pind. Hvordan skal jeg forstå mønstret? HjÆLP
17.07.2023 - 13:14DROPS Design answered:
Hei Helle. Jo, du har 57 masker. Strikk 2 kantmasker + A.1, så strikker du A.2 til det gjenstår 1 maske før midtmasken (du har da strikket A.2 over 24 masker). Så strikker du A.3, strikk midtmasken, deretter A.1 og så strikkes A.2 til det gjenstår 3 masker (over 24 masker). Strikk A.3 og avslutt med 2 kantmasker. Du har nå strikket 1. rad og har økt med 4 masker = 61 masker. Neste rad fra retten økes det også 4 masker = 65 masker. 3. rad fra retten = 69 masker. 4.rad fra retten 73 og 5. rad økes det 6 masker (det økes 2 masker hver gang A.3 strikkes) = 79 masker. På siste pinne fra retten økes det med 12 masker jevnt fordelt = 79 + 12 = 91 masker. mvh DROPS Design
26.07.2023 - 09:52
![]() Linda Rodier wrote:
Linda Rodier wrote:
Chale 165-4 j’augmente tu chaque cote de la maille centrale du début et jusqu’à la fin de chale merci
22.01.2023 - 15:22DROPS Design answered:
Bonjour Mme Rodier, tout à fait, ces augmentations figurent dans les diagrammes. Bon tricot!
23.01.2023 - 09:47
![]() Mme Rodier wrote:
Mme Rodier wrote:
Bonjour spres la maille centrale je recommence tu avec le graphique a3 et je fini avec le A 1 merci
10.01.2023 - 17:14DROPS Design answered:
Bonjour Mme Rodier, tricotez bien les diagrammes dans l'ordre indiqué, autrement dit: 2 m point mousse, A.1, répétez A.2, tricotez A.3, 1 maille centrale, puis de nouveau: A.1, répétez A.2, A.3 et terminez par 2 m point mousse. Bon tricot!
11.01.2023 - 09:45
![]() Rodier wrote:
Rodier wrote:
Le A1au. rg9on n’a une jeté et le A3 on n’a deux jete est que c’´est correct.. Et chaque côté de la maille centrale sur rang endroit on augmente tu pour avoir 91 mailles merci
08.01.2023 - 02:16DROPS Design answered:
Bonjour Mme Rodier, c'est bien correct, vous augmentez 2 mailles dans A.3 avant la maille centrale + 2 m dans A.3 après la maille centrale, autrement dit vous augmenterez 2 m en plus soit 6 mailles au lieu de 4 = 79m au total quand les diagrammes sont finis + 12 m à intervalles réguliers (augmentez 6 m de chaque côté de la maille centrale) = 91 m. Bon tricot!
09.01.2023 - 09:39
![]() Ruth wrote:
Ruth wrote:
Ein großes Kompliment für die tolle Anleitung. Habe das Tuch mittlerweile zweimal gestrickt. Beim Stricken muss man sich nicht zu viel Stress machen, stimmt die Maschenzahl nicht kann man unauffällig korrigieren:-). Die fertigen Tücher lösen viel Bewunderung aus-Danke!
21.01.2022 - 06:18
![]() Lisianne RICHARD wrote:
Lisianne RICHARD wrote:
Donc au 11ème rang j'ai mes 135 mailles mais au 13 rang j'ai deux autres augmentations, ce qui me fait 137 mailles et je dois commencer A 7 A8 A 9 avec 135 mailles ce que je ne comprends pas. Merci
30.11.2021 - 12:38DROPS Design answered:
Bonjour Mme Richard, après le 10ème rang, vous avez 111 mailles, vous tricotez: 2 m point mousse, A.4 (= 8 m + 2), A.5 (= 36 m +6 ), A.6 (= 9 m + 2), 1 m centrale, A.4 (= 8 m + 2), A.5 (= 36 m +6 ), A.6 (= 9 m + 2), 2 m point mousse = 2+10+42+11+1+10+-42+11+2=131 mailles. Au 13ème rang, augmentez 1 maille dans A.4 et A.6 comme avant = 131+4=135 mailles. Bon tricot!
01.12.2021 - 07:59
|
|||||||||||||||||||
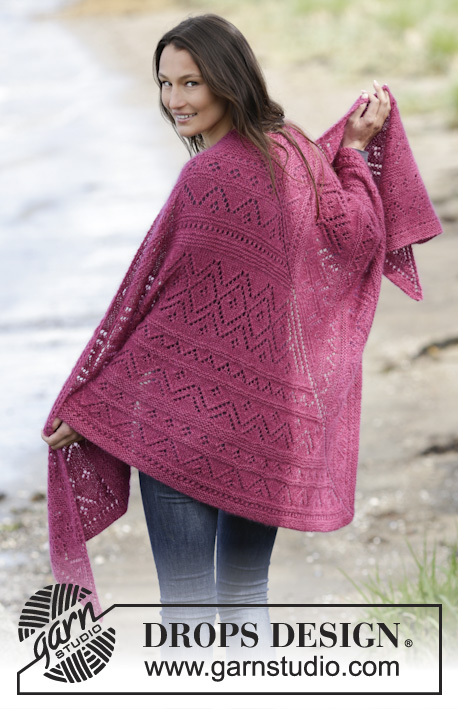
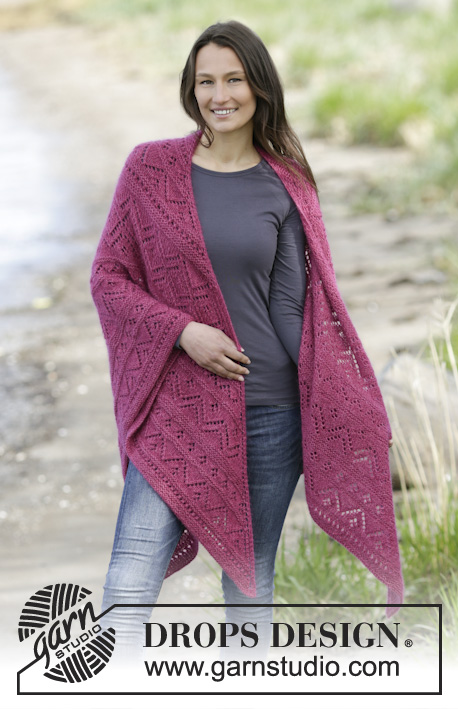
Raspberry Wrap#raspberrywrapshawl |
|||||||||||||||||||
 |
 |
||||||||||||||||||
Knitted DROPS shawl in garter st with lace pattern in ”Alpaca” and ”Kid-Silk”.
DROPS 165-4 |
|||||||||||||||||||
|
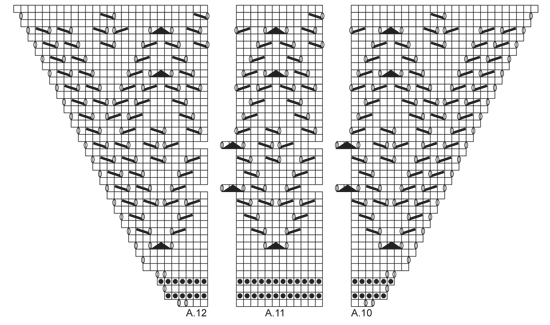
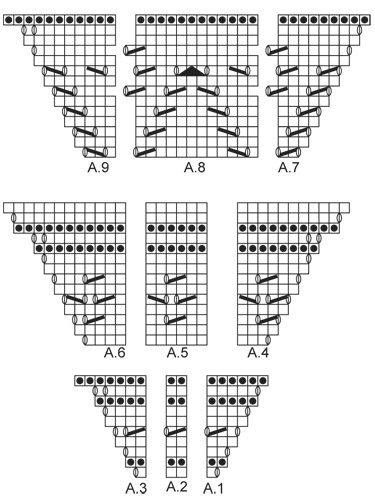
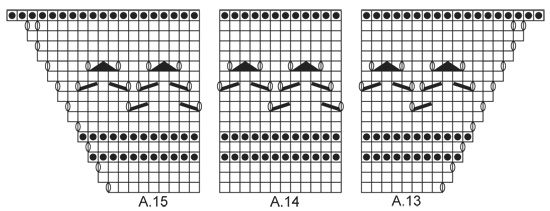
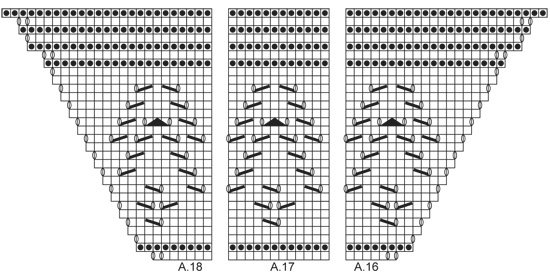
GARTER ST (back and forth): K all rows. 1 ridge = K2 rows. INCREASE TIP 1: Inc with YO, K YOs on next row to make holes. INCREASE TIP 2: Inc with YO, P YO twisted on next row to avoid holes. KNITTING TIP: Use two circular needles if there are too many sts on a circular needle. PATTERN: See diagrams A.1-A.18. The diagrams show all rows in pattern seen from RS. ---------------------------------------------------------- SHAWL: Worked back and forth on circular needle to make room for all the sts. The shawl is worked from mid back and down. Cast on 9 sts on circular needle size 5 mm / US 8 with 1 strand of each yarn (= 2 strands). Work 1 ridge in GARTER ST - see explanation above. Insert a marker in the middle st. Then work in garter st - AT THE SAME TIME inc 4 sts on every row from RS - READ INCREASE TIP 1 as follows: Inc 1 st inside 2 edge sts in each side of piece and 1 st on each side of mid st. Inc like this until there are 57 sts on needle (i.e. there are 28 sts on each side of mid st). REMEMBER THE KNITTING GAUGE Then work the 2 edge sts in each side in garter st and mid st in stockinette st. Work diagram A.1-A.3 as follows: 2 edge sts in garter st, A.1 over 1 st, repeat A.2 (= 2 sts) until 1 st remains before mid st, A.3 over 1 st, 1 st in stockinette st (= mid st), A.1 over 1 st, repeat A.2 until 3 sts remain, A.3 over 1 st and 2 edge sts in garter st. AT THE SAME TIME on last row from RS inc 12 sts evenly - READ INCREASE TIP 2. When A.1-A.3 have been worked 1 time vertically, there are 91 sts on needle. Work diagram A.4-A.6 as follows: 2 edge sts in garter st, A.4 over 3 sts, repeat A.5 (= 6 sts) until 4 sts remain before mid st, A.6 over 4 sts, 1 st in stockinette st (= mid st), A.4 over 3 sts, repeat A.5 until 6 sts remain, A.6 over 4 sts and 2 edge sts in garter st. AT THE SAME TIME on 11th row (= from RS) inc 12 sts evenly. When A.4-A.6 have been worked 1 time vertically, there are 135 sts on needle. Piece measures approx. 22 cm / 8 3/4'' measured along mid st. Work diagram A.7-A.9 as follows: 2 edge sts in garter st, A.7 over 2 sts, repeat A.8 (= 12 sts) until 3 sts remain before mid st, A.9 over 3 sts, 1 st in stockinette st (= mid st), A.7 over 2 sts, repeat A.8 until 5 sts remain, A.9 over 3 sts and 2 edge sts in garter st. When A.7-A.9 have been worked 1 time vertically, there are 165 sts on needle. Work diagram A.1-A.3 as follows: 2 edge sts in garter st, A.1 over 1 st, repeat A.2 until 1 st remains before mid st, A.3 over 1 st, 1 st in stockinette st (= mid st), A.1 over 1 st, repeat A.2 until 3 sts remain, A.3 over 1 st and 2 edge sts in garter st. When A.1-A.3 have been worked 1 time vertically, there are 187 sts on needle. Work diagram A.10-A.12 as follows: 2 edge sts in garter st, A.10 over 3 sts, repeat A.11 (= 12 sts) until 4 sts remains before mid st, A.12 over 4 sts, 1 st in stockinette st (= mid st), A.10 over 3 sts, repeat A.11 until 6 sts remain, A.12 over 4 sts and 2 edge sts in garter st. When A.10-A.12 have been worked 1 time vertically, there are 279 sts on needle. Piece measures approx. 57 cm / 22½'' measured along mid st. Work diagram A.13-A.15 as follows: 2 edge sts in garter st, A.13 over 8 sts, repeat A.14 until 9 sts remain before mid st, A.15 over 9 sts, 1 st in stockinette st (= mid st), A.13 over 8 sts, repeat A.14 until 11 sts remain, A.15 over 9 sts and 2 edge sts in garter st. When A.13-A.15 have been worked 1 time vertically, there are 319 sts on needle. Work diagram A.16-A.18 as follows: 2 edge sts in garter st, A.16 over 6 sts, repeat A.17 until 7 sts remain before mid st, A.18 over 7 sts, 1 st in stockinette st (= mid st), A.16 over 6 sts, repeat A.17 until 9 sts remain, A.18 over 7 sts and 2 edge sts in garter st. AT THE SAME TIME on last row from RS inc 12 sts evenly. When A.16-A.18 have been worked 1 time vertically, there are 403 sts on needle - READ KNITTING TIP. Piece measures approx. 81 cm / 32'' measured along mid st. Work diagram A.4-A.6 as follows: 2 edge sts in garter st, A.4 over 3 sts, repeat A.5 until 4 sts remain before mid st, A.6 over 4 sts, 1 st in stockinette st (= mid st), A.4 over 3 sts, repeat A.5 until 6 sts remain, A.6 over 4 sts and 2 edge sts in garter st. AT THE SAME TIME on 11th row (= from RS) inc 12 sts evenly. When A.4-A.6 have been worked 1 time vertically, there are 447 sts on needle. Work diagram A.7-A.9 as follows: 2 edge sts in garter st, A.7 over 2 sts, repeat A.8 until 3 sts remain before mid st, A.9 over 3 sts, 1 st in stockinette st (= mid st), A.7 over 2 sts, repeat A.8 until 5 sts remain, A.9 over 3 sts and 2 edge sts in garter st. When A.7-A.9 have been worked 1 time vertically, there are 477 sts on needle. Work diagram A.1-A.3 as follows: 2 edge sts in garter st, A.1 over 1 st, repeat A.2 until 1 st remains before mid st, A.3 over 1 st, 1 st in stockinette st (= mid st), A.1 over 1 st, repeat A.2 until 3 sts remain, A.3 over 1 st and 2 edge sts in garter st. When A.1-A.3 have been worked 1 time vertically, there are 499 sts on needle. Then work 2 ridges over all sts AT THE SAME TIME inc 2 sts inside 2 edge sts in each side of piece and 2 sts on each side of mid st on every row from RS (= 8 sts inc). Bind off. Piece measures approx. 100 cm / 40'' measured along mid st. |
|||||||||||||||||||
Diagram explanations |
|||||||||||||||||||
|
|||||||||||||||||||
|
|||||||||||||||||||
|
|||||||||||||||||||
|
|||||||||||||||||||
|
|||||||||||||||||||
Have you finished this pattern?Tag your pictures with #dropspattern #raspberrywrapshawl or submit them to the #dropsfan gallery. Do you need help with this pattern?You'll find 16 tutorial videos, a Comments/Questions area and more by visiting the pattern on garnstudio.com. © 1982-2025 DROPS Design A/S. We reserve all rights. This document, including all its sub-sections, has copyrights. Read more about what you can do with our patterns at the bottom of each pattern on our site. |
|||||||||||||||||||


With over 40 years in knitting and crochet design, DROPS Design offers one of the most extensive collections of free patterns on the internet - translated to 17 languages. As of today we count 314 catalogs and 11822 patterns - 11812 of which are translated into English (US/in).
We work hard to bring you the best knitting and crochet have to offer, inspiration and advice as well as great quality yarns at incredible prices! Would you like to use our patterns for other than personal use? You can read what you are allowed to do in the Copyright text at the bottom of all our patterns. Happy crafting!
Post a comment to pattern DROPS 165-4
We would love to hear what you have to say about this pattern!
If you want to leave a question, please make sure you select the correct category in the form below, to speed up the answering process. Required fields are marked *.