
Popular categories
Looking for a yarn?


|
|||||||||||||
Goofy Gavin |
|||||||||||||
 |
 |
||||||||||||
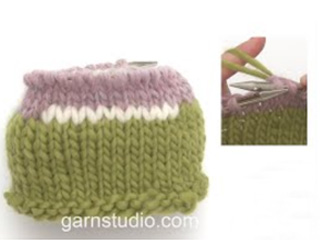
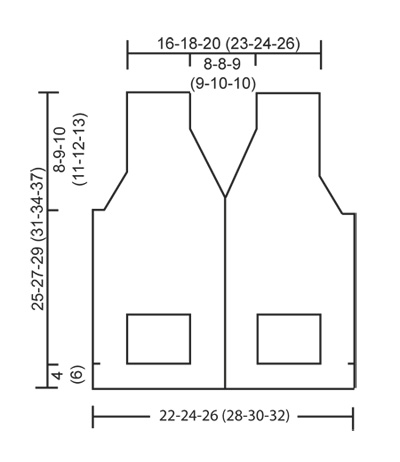
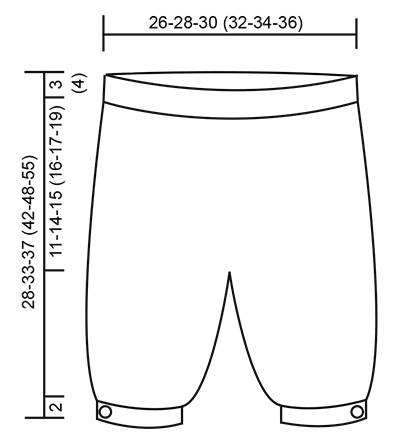
Set of knitted vest with pockets and v-neck and short pants in stocking st in DROPS BabyMerino, plus knitted hat and socks with Nordic pattern and bow in garter st in DROPS Fabel. For baby and children in size 1 month - 6 years.
DROPS Children 26-15 |
|||||||||||||
|
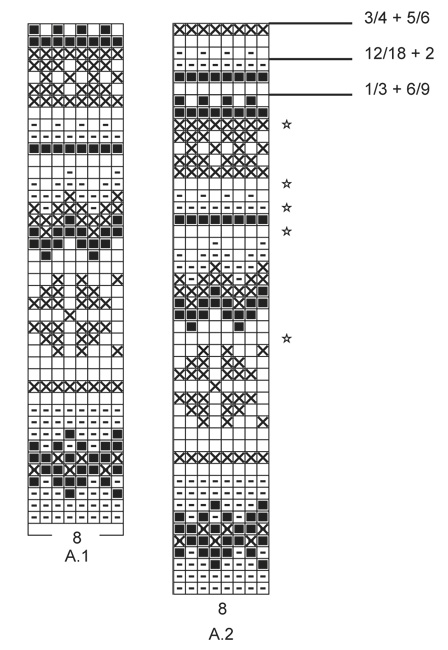
VEST: GARTER ST (back and forth): K all rows. 1 ridge = 2 rows K. BUTTONHOLES: Dec for buttonholes on left band. 1 buttonhole = work until 4 sts remain on needle (seen from RS), make 1 YO, P 2 tog and P the last 2 sts. Dec for buttonholes when piece measures: SIZE 1/3 MONTHS: 2, 7, 12 and 17 cm. SIZE 6/9 MONTHS: 2, 7, 12 and 18 cm. SIZE 12/18 MONTHS: 2, 8, 13 and 19 cm. SIZE 2 YEARS: 2, 8, 14 and 20 cm. SIZE 3/4 YEARS: 2, 9, 16 and 22 cm. SIZE 5/6 YEARS: 2, 9, 16 and 24 cm. DECREASE TIP (applies to armholes and V-neck): Dec 1 st for armhole and V-neck on inside of 4 edge sts in garter st. All dec are done from RS! Dec as follows after 4 edge sts in garter st: Slip 1 st as if to K, K 1, psso. Dec as follows before 4 edge sts in garter st: Beg 2 sts before the 4 edge sts and K 2 tog. KNITTING TIP: Because of ridges in garter st and weight of yarn the piece can become somewhat longer when worn. To avoid the armhole from becoming too long you can crochet an edge around the armhole at the end. ---------------------------------------------------------- VEST: Work piece in 3 parts, bottom up, up to after vent, then work body back and forth from mid front before dividing piece at the armhole and finish each part separately. RIGHT FRONT PIECE: Cast on 30-33-35 (38-40-42) sts (incl 4 band sts towards mid front) on circular needle size 3 mm with Baby Merino. Work in GARTER ST back and forth on needle - see explanation above but P the 4 edge sts towards mid front on every row (= band). When piece measures 4-4-4 (6-6-6) cm – adjust so that last row is from WS, put piece aside. LEFT FRONT PIECE: Cast on and work as right front piece but reversed. In addition dec for BUTTON HOLES on band - see explanation above! When left front piece is the same length as right front piece - adjust so that last row is from WS, put piece aside. BACK PIECE: Cast on 52-58-62 (68-72-76) sts on circular needle size 3 mm with Baby Merino. Work in garter st back and forth until back piece is the same length as both front pieces - adjust so that last row is from WS. BODY: Beg from RS and work sts from right front piece (remember to P band sts on every row until finished measurements), work sts from back piece and then sts from left front piece (remember to P band sts on every row until finished measurements) = 112-124-132 (144-152-160) sts on needle. Continue to work in garter st back and forth and P bands on every row. REMEMBER THE KNITTING TENSION and remember to dec for BUTTONHOLES on left band. When piece measures 17-18-19 (20-22-24) cm, work next row from RS as follows: Work 27-30-32 (35-37-39) sts as before (= right front piece), cast off 6 sts for armhole, work 46-52-56 (62-66-70) sts as before (= back piece), cast off 6 sts for armhole and work the remaining 27-30-32 (35-37-39) sts as before (= left front piece). Finish each part separately. BACK PIECE: = 46-52-56 (62-66-70) sts. Continue to work in garter st back and forth on needle. AT THE SAME TIME on first row from RS, dec 1 st in each side for armholes - Read DECREASE TIP! Repeat dec in each side every 4th row (i.e. every other row from RS) 4 times in total = 38-44-48 (54-58-62) sts. Continue in garter st. When piece measures 23-25-27 (29-32-35) cm, cast off the middle 16-16-18 (20-20-20) sts for neck and finish each shoulder separately. On next row from RS dec 1 st for neck - READ DECREASE TIP. K 1 row from WS and repeat dec on next row from neck = 9-12-13 (15-17-19) sts remain on shoulder. Cast off when piece measures 25-27-29 (31-34-37) cm. Repeat on the other shoulder. RIGHT FRONT PIECE: = 27-30-32 (35-37-39) sts. Continue back and forth as before while AT THE SAME TIME cast off for armhole in the side as on back piece. AT THE SAME TIME when piece measures 18-19-20 (21-23-25) cm, dec 1 st for V-neck towards mid front - READ DECREASE TIP. Repeat dec every other row 14 times in all sizes and then every 4th row 0-0-1 (2-2-2) times in total. After all dec for armhole and V-neck, 9-12-13 (15-17-19) sts remain on needle. Continue until piece measures 25-27-29 (31-34-37) cm and cast off. LEFT FRONT PIECE: = 27-30-32 (35-37-39) sts. Work as right front piece but reversed - NOTE: Beg dec for V-neck approx. 1 cm after last buttonhole on band. ASSEMBLY: Sew the shoulder seams. Sew on buttons (buttons on photo are sewn on with WS outwards). POCKET: Cast on 14-14-20 (20-24-24) sts on needle size 3 mm with Baby Merino. Continue in garter st until pocket measures 7-7-9 (9-12-12) cm, loosely cast off. Knit another pocket. Fold the upper 1-2 cm on each pocket out towards RS and fasten edge in each side on pocket. Sew 1 pocket on each front piece with grafting/kitchener stitches (place pockets approx. 4-6 cm from mid front and approx. 3-6 cm from the bottom edge). ---------------------------------------------------------- SHORT PANTS: GARTER ST (back and forth): K all rows. 1 ridge = 2 rows K. INCREASE TIP: Inc 1 st by making 1 YO. On next round K YO twisted to avoid holes. DECREASE TIP: Beg 2 sts before marker and work as follows: K 2 tog, slip 1 st as if to K, K 1, psso. ---------------------------------------------------------- SHORT PANTS: Worked in the round from the waist down. Cast on 104-112-128 (136-144-152) sts on circular needle size 2.5 mm with Baby Merino - beg of round = mid back. Work rib as follows: K 1, * P 2, K 2 *, repeat from *-* until 3 sts remain and finish with P 2 and K 1. When rib measures 2 cm, work an eyelet row as follows: K 1, * P 2 tog, 1 YO, K 2 *, repeat from *-* until 3 sts remain, finish with P 2 tog, 1 YO and K 1. Continue to work until rib measures 3-3-3 (4-4-4) cm. Switch to circular needle size 3 mm and K 1 round while AT THE SAME TIME inc 20-22-16 (18-20-20) sts evenly = 124-134-144 (154-164-172) sts. ELEVATION AT THE BACK: Now work the pants higher at the back. Work in stocking st back and forth as follows: Beg mid back and K 6-6-7 (7-8-8), turn piece (to avoid holes, slip 1st st on return and tighten yarn). P 12-12-14 (14-16-16), turn piece. K 18-18-21 (21-24-24), turn piece. P 24-24-28 (28-32-32), turn piece. Continue like this by working 6-6-7 (7-8-8) sts more on every turn 6 more times (= 10 short rows in total). Then continue in stocking st in the round over all sts. INCREASES: When piece measures 10-13-14 (15-16-18) cm from the waist (measured mid front), insert 1 marker at the beg of round and 1 marker after 62-67-72 (77-82-86) sts (marks mid front and mid back of pants). Then inc 1 st on each side of all these markers – READ INCREASE TIP (= 4 sts inc). Repeat inc on every 3rd round a total of 5 times = 144-154-164 (174-184-192) sts. After last inc piece measures approx. 14-17-18 (19-20-22) cm from the waist (measures mid front). LEG: Beg mid back, work the first 72-77-82 (87-92-96) sts and slip the other sts on 1 stitch holder. Switch to double pointed needles size 3 mm and work in stocking st in the round. Insert 1 marker at beg of round = inside of leg. When 1 cm has been worked from where piece was divided, dec 1 st on each side of marker – SEE DECREASE TIP (= 2 sts dec). Repeat dec every 5th.-6th.-8th. (9th.-11th.-13th.) round 7 times in total in all sizes = 58-63-68 (73-78-82) sts. When leg measures 12-14-17 (20-25-30) cm (last dec should be done), K 1 round while dec 8-9-8 (9-8-8) sts evenly = 50-54-60 (64-70-74) sts. Cut the yarn. EDGE IN GARTER ST: Beg from RS on the side on right leg (i.e. 25-27-30 (32-35-37) sts after inside of leg). Switch to circular needle size 2.5 mm, work in GARTER ST back and forth – see explanation above and cast on 6 new sts at the end of first row from WS = 56-60-66 (70-76-80) sts on needle. When edge in garter st measures 1 cm, dec for 1 buttonhole at beg of row (seen from RS, i.e. where new sts were cast on) as follows: K tog third and fourth from edge and make 1 YO. When edge in garter st measures 2 cm, loosely cast off. Work the other leg the same way but reversed. Pants measures approx. 28-33-37 (42-48-55) cm from waist and down (measured mid front). Sew 1 button on edge in garter st at the bottom of each leg - place button to desired leg width. TIES: Cut 3 lengths Baby Merino yarn of approx. 3 metres each. Twine the strands tog until they resist, fold the string double so that it twines again. Make a knot at each end. Beg mid front and thread tie up and down through eyelet row on rib in waist of pants. ---------------------------------------------------------- SOCK: PATTERN: See diagram A.1. DECREASE TIP: Dec as follows before marker: Beg 2 sts before marker and K 2 tog. Dec as follows after marker: Slip 1 st as if to K, K 1, psso. HEEL DECREASE: Row 1 (= from RS): Work until 6-6-6 (6-6-6) sts remain, slip next st as if to K, K 1, psso, turn piece. Row 2 (= from WS): Work until 6-6-6 (6-6-6) sts remain, slip next st as if to P, P 1, psso, turn piece. Row 3: Work until 5-5-5 (5-5-5) sts remain, slip next st as if to K, K 1, psso, turn piece. Row 4: Work until 5-5-5 (5-5-5) sts remain, slip next st as if to P, P 1, psso, turn piece. Continue dec like this with 1 st less before every dec until 8-10-10 (12-12-12) sts remain on needle. ---------------------------------------------------------- SOCK: Worked in the round on double pointed needles. Cast on 40-48-48 (56-56-56) sts on double pointed needles size 2.5 mm with red and work rib K 2/P 2 for 2-2-2 (3-3-3) cm. Insert 1 marker at beg of round (= mid back). Then continue pattern in the round according to diagram A.1. AT THE SAME TIME when piece measures 3-3-4 (5-6-8) cm, dec 2 sts mid back - SEE DECREASE TIP. Repeat dec every 3-2-2 (1½-1½-1½) cm 2-4-4 (5-5-5) times in total = 36-40-40 (46-46-46) sts – NOTE: When dec mid back, the pattern will not fit mid back, but make sure that pattern fits around the sock. Work until piece measures approx. 9-10-12 (13-16-19) cm, adjust after a whole border in pattern. Now keep the middle 18-20-20 (22-22-22) sts mid back on needle for heel and slip the middle 18-20-20 (24-24-24) sts on 1 stitch holder (= mid on top of foot). Work in stocking st back and forth over heel sts with red for 3-3½-4 (4½-5-5) cm. Insert 1 marker in middle of piece. Then work HEEL DECREASE - see explanation above! Then pick up 8-9-10 (12-13-13) sts on each side of heel and slip sts from stitch holder back on needle = 42-48-50 (60-62-62) sts on needle. Continue in the round with stocking st and A.1 as before - NOTE: Repeat A.1 vertically until toe dec. Pattern will not fit in repetition mid under foot and in the sides where the dec below is done as explained below but make sure that the pattern fits around the sock. AT THE SAME TIME dec on each side of the 18-20-20 (24-24-24) sts on top of foot as follows: K the last 2 sts before the 18-20-20 (24-24-24) sts tog and K the first 2 sts after the same sts twisted tog. Dec every other round 3-5-5 (10-10-10) times in total = 36-38-40 (40-42-42) sts. Continue to work until piece measures approx. 8-9-9½ (10½-11-13) cm from marker on heel (approx. 2-2-2½ (2½-4-4) cm remain until finished measurements). Insert 1 marker in each side so that there are 18-19-20 (20-21-21) sts on both upper foot and under foot. Switch to red and work in stocking st in the round AT THE SAME TIME dec for toes on each side of both markers - SEE DECREASE TIP! Repeat dec every other round 0-0-0 (0-5-5) times and then every round 7-7-8 (8-3-3) times in total = 8-10-8 (8-10-10) sts remain on needle. Cut the yarn and pull it through the remaining sts, tighten tog and fasten. Sock measures approx. 10-11-12 (13-15-17) cm. Knit another sock. ---------------------------------------------------------- HAT: PATTERN: See diagram A.2. ---------------------------------------------------------- HAT: Worked in the round on double pointed needles. Cast on 96-104-104 (112-120-120) sts on double pointed needles size 2.5 mm with off white. Work rib = K 2/P 2 for 3-4-4 (5-5-5) cm. Switch to double pointed needles size 3 mm and K 1 round with red while AT THE SAME TIME dec 8 sts evenly = 88-96-96 (104-112-112) sts. Then work according to diagram A.2. On every round with star dec 12 sts evenly (dec 5 times in total). Work until A.2 has been worked a time vertically - see arrow for your size = 28-36-36 (44-52-52) sts. K all sts tog 2 by 2 = 14-18-18 (22-26-26) sts. Pull a double yarn through the remaining sts and fasten tightly. Hat measures approx. 16-17-18 (19-20-20) cm. POMPOM: Make a pompom with an approx. diameter of 3 cm in off white. Fasten pompom at the top in the tip of hat. ---------------------------------------------------------- BOW: GARTER ST (back and forth): K all rows. 1 ridge = 2 rows K. ---------------------------------------------------------- BOW: Cast on 10-12 (14-16) sts on needle size 2.5 mm with Fabel. Work ridges in GARTER ST – see explanation above – back and forth until piece measures 7-8 (9-10) cm, cast off. MIDDLE BAND: Cast on 12-12 (14-14) sts on needle size 2.5 mm and work 4-4 (5-5) ridges. Cast off. Sew the short ends tog to form a ring. Pull the bow through the ring and fasten the two parts tog with a couple of stitches. Fasten a ribbon or an elastic through the ring on the back of the bow. |
|||||||||||||
Diagram explanations |
|||||||||||||
|
|||||||||||||
|
|||||||||||||
|
|||||||||||||
|
|||||||||||||
|
Have you made this or any other of our designs? Tag your pictures in social media with #dropsdesign so we can see them! Do you need help with this pattern?You'll find tutorial videos, a Comments/Questions area and more by visiting the pattern on garnstudio.com. © 1982-2024 DROPS Design A/S. We reserve all rights. This document, including all its sub-sections, has copyrights. Read more about what you can do with our patterns at the bottom of each pattern on our site. |
|||||||||||||


With over 40 years in knitting and crochet design, DROPS Design offers one of the most extensive collections of free patterns on the internet - translated to 17 languages. As of today we count 304 catalogues and 11422 patterns - 11422 of which are translated into English (UK/cm).
We work hard to bring you the best knitting and crochet have to offer, inspiration and advice as well as great quality yarns at incredible prices! Would you like to use our patterns for other than personal use? You can read what you are allowed to do in the Copyright text at the bottom of all our patterns. Happy crafting!
Comments / Questions (21)
Eine superschöne Anleitung. Ich habe die Weste, Hose, Schleife und Mütze gestrickt. Einfach wunderschöne Teile, für ein Fest genau das Richtige. Die Anleitung ist perfekt. Man sollte aber schon ein bisschen Erfahrung mitbringen.
04.01.2023 - 21:34Hej! Jag är total nybörjare på stickning. Vad innebär det att låta en del vila när man stickar västen? Jag stickar fram och tillbaka på rundsticka. Kan delarna vila på samma tråd medan jag stickar näta?
27.09.2021 - 09:09DROPS Design answered:
Hej Linn. Maskorna på de delar du inte stickar sätter du på en tråd eller på en annan sticka under tiden du stickar den aktuella delen. Du kan sätta de andra delarna på samma tråd om du vill det. Mvh DROPS Design
27.09.2021 - 09:29Hallo, bin Anfängerin und komme mit der Anleitung für die Hose nicht zurecht. Die verkürzten Reihen hinten werden doch vom Beginn der Reihe gestrickt - z.B. Hinreihe 7 M re/Rückreihe 14 li. Wenn ich in Reihen stricke, woher kommen die 7 Maschen zusätzlich? 7 hin und 14 zurück, da fehlen ja 7. Wo ist mein Denkfehler? Vielen Dank!
17.10.2020 - 23:24DROPS Design answered:
Liebe Gitta, bei der 1. verkürzten Reihe stricken Sie 7 M nach der hinteren Mitte, wenden und diese 7 M + 7 M nach der Markierung = 14 M stricken, wenden und diese 14 M + die 7 nächsten Maschen stricken, wenden und diese 21 M + die 7 nächsten Maschen stricken usw, dh immer 7 Maschen mehr bei jeder verkürzten Reihe stricken bis 10 Reihen gestrickt waren - Siehe auch dieses Video. Viel Spaß beim stricken!
19.10.2020 - 08:35Hei. Eg strikker Goofy Gavin kortbukse, men får ikkje mønsteret til å stemme. Skal eg felle av kilene i skrittet før eg starter på beina? Får ikkje maske antallet til å stemme. Mvh Elin
14.11.2019 - 09:00DROPS Design answered:
Hej Elin, Hvor er du i opskriften, hvad er det du ikke får til at stemme?
03.12.2019 - 14:40Hei igjen og takk for svar 😀 Lommene på vesten skal monteres med maskesting, men hvordan gjør jeg det på rillestrikk?
10.05.2019 - 09:22DROPS Design answered:
Hei Mette. Monter slik du ville gjort når du syr riller sammen vanligvis: Sy 1 sting gjennom hver "knute"/vrangmaske og så 1 sting i hvert mellomrom/rettmaske. Pass på at de rette og vrange omgangene treffer hverandre. Du kan se på denne videoen: . Her er det riller øverst på lommen, og glattstrikk på resten, men du vil få en ide av fremgangsmåte. Hvis du søker på "sy sammen rille" i søkefeltet for video vil du finne en video av hvordan å sy rillekant mot rillekant. God fornøyelse
13.05.2019 - 07:59Hei! Hvorfor strikke kantmaskene vrang på hver pinne? Hvorfor ikke bare strikke riller, som egentlig blir resultatet når du strikke vrang på hver pinne samtidig som du strikker fram og tilbake.....
09.05.2019 - 15:07DROPS Design answered:
Hei Mette. Det er for at rillene skal bli motsatt fra resten av plagget, slik at stolpene skiller seg ut. Om alt strikkes rett på alle pinner vil ikke stolpene syntes. God fornøyelse
10.05.2019 - 07:43Tack! :-)
07.12.2018 - 17:11DROPS Design answered:
Tack själv :)
10.12.2018 - 09:58Hej igen! Vore bra med svar på svenska. Norska går ganska bra att förstå, men olika termer är inte lika enkla som vardagsspråk.
07.12.2018 - 10:10DROPS Design answered:
Hej Birgitta, sticka tills det återstår 6 maskor, lyft nästa m, 1 rm, drag den lyfta m över, vänd, gör samma i andra sidan. Nästa gång skall det återstå 5 maskor innan du lyfter nästa m osv, även i andra sidan. Nästa gång skall det återstå 4 maskor innan du lyfter..... Sedan 3 maskor, så 2 och sist 1. När du har gjort det, har du 8-10-10-12-12-12 m kvar på stickan. Lycka till :)
07.12.2018 - 11:20Hej! Sockorna till Goofy Gavin: Kan ni skriva en vettig förklaring till följande mening i hälminskningen: "Fortsätt minskn på samma sätt, genom att sticka tills det återstår 1 m mindre innan 1 m lyfts tills det återstår 8–10–10 (12–12–12) m på st." Den är näst intill obergriplig!
06.12.2018 - 15:07DROPS Design answered:
Hei M Birgitta. 1 pinne fra retten: strikk til det gjenstår 6 m, tas 1 m løst av, strikk 1 m og trekk den løse m over (1 m felt) og snu. Strikk vrangpinnen på samme måte. 2 pinne fra retten strikkes likt som første pinne, men nå strikker du til det gjenstår 5 m (altså 1 mindre enn forrige gang) før du feller og snur. Så strikker du vrangpinnen på samme måte. 3 pinne fra retten strikkes likt, men det strikkes til det gjenstår 4 m (altså 1 m mindre enn forrige gang) før du feller og snur. Slik fortsetter du til du har felt alle 6 m i hver side, og det kun er de midterste 8-10-10 (12-12-12) m igjen på pinnen. God fornøyelse
07.12.2018 - 10:02Can I successfully use Fabel for the vest?
19.11.2018 - 03:04DROPS Design answered:
Dear Mrs Kaski, DROPS Fabel belons to yarn group A just as Baby Merino used here - so that you can use Fabel as an alternative - read more about alternatives here and use our yarn converter. Happy knitting!
19.11.2018 - 09:21