
Popular categories
Looking for a yarn?


|
|||||||||||||
Goofy Gavin |
|||||||||||||
 |
 |
||||||||||||
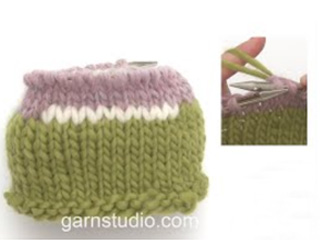
Set of knitted vest with pockets and v-neck and short pants in stocking st in DROPS BabyMerino, plus knitted hat and socks with Nordic pattern and bow in garter st in DROPS Fabel. For baby and children in size 1 month - 6 years.
DROPS Children 26-15 |
|||||||||||||
|
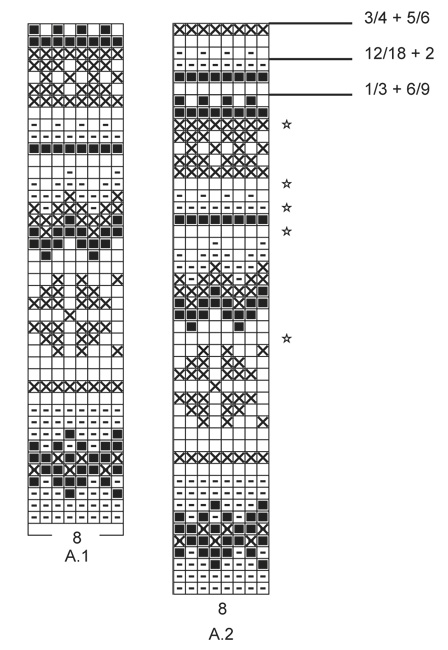
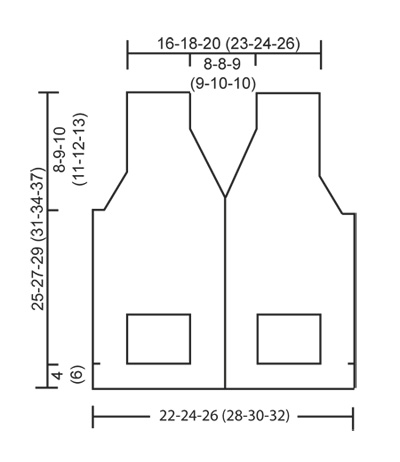
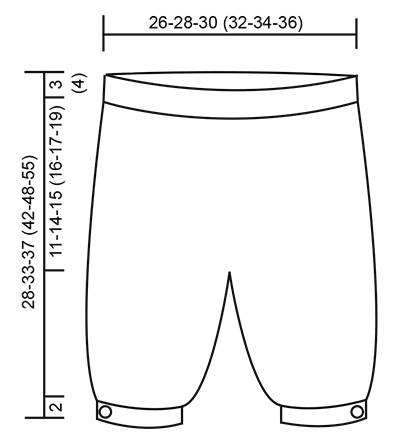
VEST: GARTER ST (back and forth): K all rows. 1 ridge = 2 rows K. BUTTONHOLES: Dec for buttonholes on left band. 1 buttonhole = work until 4 sts remain on needle (seen from RS), make 1 YO, P 2 tog and P the last 2 sts. Dec for buttonholes when piece measures: SIZE 1/3 MONTHS: 2, 7, 12 and 17 cm. SIZE 6/9 MONTHS: 2, 7, 12 and 18 cm. SIZE 12/18 MONTHS: 2, 8, 13 and 19 cm. SIZE 2 YEARS: 2, 8, 14 and 20 cm. SIZE 3/4 YEARS: 2, 9, 16 and 22 cm. SIZE 5/6 YEARS: 2, 9, 16 and 24 cm. DECREASE TIP (applies to armholes and V-neck): Dec 1 st for armhole and V-neck on inside of 4 edge sts in garter st. All dec are done from RS! Dec as follows after 4 edge sts in garter st: Slip 1 st as if to K, K 1, psso. Dec as follows before 4 edge sts in garter st: Beg 2 sts before the 4 edge sts and K 2 tog. KNITTING TIP: Because of ridges in garter st and weight of yarn the piece can become somewhat longer when worn. To avoid the armhole from becoming too long you can crochet an edge around the armhole at the end. ---------------------------------------------------------- VEST: Work piece in 3 parts, bottom up, up to after vent, then work body back and forth from mid front before dividing piece at the armhole and finish each part separately. RIGHT FRONT PIECE: Cast on 30-33-35 (38-40-42) sts (incl 4 band sts towards mid front) on circular needle size 3 mm with Baby Merino. Work in GARTER ST back and forth on needle - see explanation above but P the 4 edge sts towards mid front on every row (= band). When piece measures 4-4-4 (6-6-6) cm – adjust so that last row is from WS, put piece aside. LEFT FRONT PIECE: Cast on and work as right front piece but reversed. In addition dec for BUTTON HOLES on band - see explanation above! When left front piece is the same length as right front piece - adjust so that last row is from WS, put piece aside. BACK PIECE: Cast on 52-58-62 (68-72-76) sts on circular needle size 3 mm with Baby Merino. Work in garter st back and forth until back piece is the same length as both front pieces - adjust so that last row is from WS. BODY: Beg from RS and work sts from right front piece (remember to P band sts on every row until finished measurements), work sts from back piece and then sts from left front piece (remember to P band sts on every row until finished measurements) = 112-124-132 (144-152-160) sts on needle. Continue to work in garter st back and forth and P bands on every row. REMEMBER THE KNITTING TENSION and remember to dec for BUTTONHOLES on left band. When piece measures 17-18-19 (20-22-24) cm, work next row from RS as follows: Work 27-30-32 (35-37-39) sts as before (= right front piece), cast off 6 sts for armhole, work 46-52-56 (62-66-70) sts as before (= back piece), cast off 6 sts for armhole and work the remaining 27-30-32 (35-37-39) sts as before (= left front piece). Finish each part separately. BACK PIECE: = 46-52-56 (62-66-70) sts. Continue to work in garter st back and forth on needle. AT THE SAME TIME on first row from RS, dec 1 st in each side for armholes - Read DECREASE TIP! Repeat dec in each side every 4th row (i.e. every other row from RS) 4 times in total = 38-44-48 (54-58-62) sts. Continue in garter st. When piece measures 23-25-27 (29-32-35) cm, cast off the middle 16-16-18 (20-20-20) sts for neck and finish each shoulder separately. On next row from RS dec 1 st for neck - READ DECREASE TIP. K 1 row from WS and repeat dec on next row from neck = 9-12-13 (15-17-19) sts remain on shoulder. Cast off when piece measures 25-27-29 (31-34-37) cm. Repeat on the other shoulder. RIGHT FRONT PIECE: = 27-30-32 (35-37-39) sts. Continue back and forth as before while AT THE SAME TIME cast off for armhole in the side as on back piece. AT THE SAME TIME when piece measures 18-19-20 (21-23-25) cm, dec 1 st for V-neck towards mid front - READ DECREASE TIP. Repeat dec every other row 14 times in all sizes and then every 4th row 0-0-1 (2-2-2) times in total. After all dec for armhole and V-neck, 9-12-13 (15-17-19) sts remain on needle. Continue until piece measures 25-27-29 (31-34-37) cm and cast off. LEFT FRONT PIECE: = 27-30-32 (35-37-39) sts. Work as right front piece but reversed - NOTE: Beg dec for V-neck approx. 1 cm after last buttonhole on band. ASSEMBLY: Sew the shoulder seams. Sew on buttons (buttons on photo are sewn on with WS outwards). POCKET: Cast on 14-14-20 (20-24-24) sts on needle size 3 mm with Baby Merino. Continue in garter st until pocket measures 7-7-9 (9-12-12) cm, loosely cast off. Knit another pocket. Fold the upper 1-2 cm on each pocket out towards RS and fasten edge in each side on pocket. Sew 1 pocket on each front piece with grafting/kitchener stitches (place pockets approx. 4-6 cm from mid front and approx. 3-6 cm from the bottom edge). ---------------------------------------------------------- SHORT PANTS: GARTER ST (back and forth): K all rows. 1 ridge = 2 rows K. INCREASE TIP: Inc 1 st by making 1 YO. On next round K YO twisted to avoid holes. DECREASE TIP: Beg 2 sts before marker and work as follows: K 2 tog, slip 1 st as if to K, K 1, psso. ---------------------------------------------------------- SHORT PANTS: Worked in the round from the waist down. Cast on 104-112-128 (136-144-152) sts on circular needle size 2.5 mm with Baby Merino - beg of round = mid back. Work rib as follows: K 1, * P 2, K 2 *, repeat from *-* until 3 sts remain and finish with P 2 and K 1. When rib measures 2 cm, work an eyelet row as follows: K 1, * P 2 tog, 1 YO, K 2 *, repeat from *-* until 3 sts remain, finish with P 2 tog, 1 YO and K 1. Continue to work until rib measures 3-3-3 (4-4-4) cm. Switch to circular needle size 3 mm and K 1 round while AT THE SAME TIME inc 20-22-16 (18-20-20) sts evenly = 124-134-144 (154-164-172) sts. ELEVATION AT THE BACK: Now work the pants higher at the back. Work in stocking st back and forth as follows: Beg mid back and K 6-6-7 (7-8-8), turn piece (to avoid holes, slip 1st st on return and tighten yarn). P 12-12-14 (14-16-16), turn piece. K 18-18-21 (21-24-24), turn piece. P 24-24-28 (28-32-32), turn piece. Continue like this by working 6-6-7 (7-8-8) sts more on every turn 6 more times (= 10 short rows in total). Then continue in stocking st in the round over all sts. INCREASES: When piece measures 10-13-14 (15-16-18) cm from the waist (measured mid front), insert 1 marker at the beg of round and 1 marker after 62-67-72 (77-82-86) sts (marks mid front and mid back of pants). Then inc 1 st on each side of all these markers – READ INCREASE TIP (= 4 sts inc). Repeat inc on every 3rd round a total of 5 times = 144-154-164 (174-184-192) sts. After last inc piece measures approx. 14-17-18 (19-20-22) cm from the waist (measures mid front). LEG: Beg mid back, work the first 72-77-82 (87-92-96) sts and slip the other sts on 1 stitch holder. Switch to double pointed needles size 3 mm and work in stocking st in the round. Insert 1 marker at beg of round = inside of leg. When 1 cm has been worked from where piece was divided, dec 1 st on each side of marker – SEE DECREASE TIP (= 2 sts dec). Repeat dec every 5th.-6th.-8th. (9th.-11th.-13th.) round 7 times in total in all sizes = 58-63-68 (73-78-82) sts. When leg measures 12-14-17 (20-25-30) cm (last dec should be done), K 1 round while dec 8-9-8 (9-8-8) sts evenly = 50-54-60 (64-70-74) sts. Cut the yarn. EDGE IN GARTER ST: Beg from RS on the side on right leg (i.e. 25-27-30 (32-35-37) sts after inside of leg). Switch to circular needle size 2.5 mm, work in GARTER ST back and forth – see explanation above and cast on 6 new sts at the end of first row from WS = 56-60-66 (70-76-80) sts on needle. When edge in garter st measures 1 cm, dec for 1 buttonhole at beg of row (seen from RS, i.e. where new sts were cast on) as follows: K tog third and fourth from edge and make 1 YO. When edge in garter st measures 2 cm, loosely cast off. Work the other leg the same way but reversed. Pants measures approx. 28-33-37 (42-48-55) cm from waist and down (measured mid front). Sew 1 button on edge in garter st at the bottom of each leg - place button to desired leg width. TIES: Cut 3 lengths Baby Merino yarn of approx. 3 metres each. Twine the strands tog until they resist, fold the string double so that it twines again. Make a knot at each end. Beg mid front and thread tie up and down through eyelet row on rib in waist of pants. ---------------------------------------------------------- SOCK: PATTERN: See diagram A.1. DECREASE TIP: Dec as follows before marker: Beg 2 sts before marker and K 2 tog. Dec as follows after marker: Slip 1 st as if to K, K 1, psso. HEEL DECREASE: Row 1 (= from RS): Work until 6-6-6 (6-6-6) sts remain, slip next st as if to K, K 1, psso, turn piece. Row 2 (= from WS): Work until 6-6-6 (6-6-6) sts remain, slip next st as if to P, P 1, psso, turn piece. Row 3: Work until 5-5-5 (5-5-5) sts remain, slip next st as if to K, K 1, psso, turn piece. Row 4: Work until 5-5-5 (5-5-5) sts remain, slip next st as if to P, P 1, psso, turn piece. Continue dec like this with 1 st less before every dec until 8-10-10 (12-12-12) sts remain on needle. ---------------------------------------------------------- SOCK: Worked in the round on double pointed needles. Cast on 40-48-48 (56-56-56) sts on double pointed needles size 2.5 mm with red and work rib K 2/P 2 for 2-2-2 (3-3-3) cm. Insert 1 marker at beg of round (= mid back). Then continue pattern in the round according to diagram A.1. AT THE SAME TIME when piece measures 3-3-4 (5-6-8) cm, dec 2 sts mid back - SEE DECREASE TIP. Repeat dec every 3-2-2 (1½-1½-1½) cm 2-4-4 (5-5-5) times in total = 36-40-40 (46-46-46) sts – NOTE: When dec mid back, the pattern will not fit mid back, but make sure that pattern fits around the sock. Work until piece measures approx. 9-10-12 (13-16-19) cm, adjust after a whole border in pattern. Now keep the middle 18-20-20 (22-22-22) sts mid back on needle for heel and slip the middle 18-20-20 (24-24-24) sts on 1 stitch holder (= mid on top of foot). Work in stocking st back and forth over heel sts with red for 3-3½-4 (4½-5-5) cm. Insert 1 marker in middle of piece. Then work HEEL DECREASE - see explanation above! Then pick up 8-9-10 (12-13-13) sts on each side of heel and slip sts from stitch holder back on needle = 42-48-50 (60-62-62) sts on needle. Continue in the round with stocking st and A.1 as before - NOTE: Repeat A.1 vertically until toe dec. Pattern will not fit in repetition mid under foot and in the sides where the dec below is done as explained below but make sure that the pattern fits around the sock. AT THE SAME TIME dec on each side of the 18-20-20 (24-24-24) sts on top of foot as follows: K the last 2 sts before the 18-20-20 (24-24-24) sts tog and K the first 2 sts after the same sts twisted tog. Dec every other round 3-5-5 (10-10-10) times in total = 36-38-40 (40-42-42) sts. Continue to work until piece measures approx. 8-9-9½ (10½-11-13) cm from marker on heel (approx. 2-2-2½ (2½-4-4) cm remain until finished measurements). Insert 1 marker in each side so that there are 18-19-20 (20-21-21) sts on both upper foot and under foot. Switch to red and work in stocking st in the round AT THE SAME TIME dec for toes on each side of both markers - SEE DECREASE TIP! Repeat dec every other round 0-0-0 (0-5-5) times and then every round 7-7-8 (8-3-3) times in total = 8-10-8 (8-10-10) sts remain on needle. Cut the yarn and pull it through the remaining sts, tighten tog and fasten. Sock measures approx. 10-11-12 (13-15-17) cm. Knit another sock. ---------------------------------------------------------- HAT: PATTERN: See diagram A.2. ---------------------------------------------------------- HAT: Worked in the round on double pointed needles. Cast on 96-104-104 (112-120-120) sts on double pointed needles size 2.5 mm with off white. Work rib = K 2/P 2 for 3-4-4 (5-5-5) cm. Switch to double pointed needles size 3 mm and K 1 round with red while AT THE SAME TIME dec 8 sts evenly = 88-96-96 (104-112-112) sts. Then work according to diagram A.2. On every round with star dec 12 sts evenly (dec 5 times in total). Work until A.2 has been worked a time vertically - see arrow for your size = 28-36-36 (44-52-52) sts. K all sts tog 2 by 2 = 14-18-18 (22-26-26) sts. Pull a double yarn through the remaining sts and fasten tightly. Hat measures approx. 16-17-18 (19-20-20) cm. POMPOM: Make a pompom with an approx. diameter of 3 cm in off white. Fasten pompom at the top in the tip of hat. ---------------------------------------------------------- BOW: GARTER ST (back and forth): K all rows. 1 ridge = 2 rows K. ---------------------------------------------------------- BOW: Cast on 10-12 (14-16) sts on needle size 2.5 mm with Fabel. Work ridges in GARTER ST – see explanation above – back and forth until piece measures 7-8 (9-10) cm, cast off. MIDDLE BAND: Cast on 12-12 (14-14) sts on needle size 2.5 mm and work 4-4 (5-5) ridges. Cast off. Sew the short ends tog to form a ring. Pull the bow through the ring and fasten the two parts tog with a couple of stitches. Fasten a ribbon or an elastic through the ring on the back of the bow. |
|||||||||||||
Diagram explanations |
|||||||||||||
|
|||||||||||||
|
|||||||||||||
|
|||||||||||||
|
|||||||||||||
|
Have you made this or any other of our designs? Tag your pictures in social media with #dropsdesign so we can see them! Do you need help with this pattern?You'll find tutorial videos, a Comments/Questions area and more by visiting the pattern on garnstudio.com. © 1982-2024 DROPS Design A/S. We reserve all rights. This document, including all its sub-sections, has copyrights. Read more about what you can do with our patterns at the bottom of each pattern on our site. |
|||||||||||||


With over 40 years in knitting and crochet design, DROPS Design offers one of the most extensive collections of free patterns on the internet - translated to 17 languages. As of today we count 304 catalogues and 11422 patterns - 11422 of which are translated into English (UK/cm).
We work hard to bring you the best knitting and crochet have to offer, inspiration and advice as well as great quality yarns at incredible prices! Would you like to use our patterns for other than personal use? You can read what you are allowed to do in the Copyright text at the bottom of all our patterns. Happy crafting!
Comments / Questions (21)
Einen schönen guten Tag! Ist es richtig, dass die Blende an der Weste immer links gestrickt wird, so dass quasi kraus links dabei rauskommt? Bzw. Letztlich ja kraus rechts, nur um eine Reihe versetzt. Oder muss ich sie in der Rückrunde rechts stricken, so dass die Blende glatt links wird? Freundliche Grüße! Bianca Raehse
26.06.2017 - 18:09DROPS Design answered:
Liebe Frau Raehse, die Blendemaschen sind kraus links gestrickt, dh in jeder R links gestrickt. Die andere Maschen sind kraus rechts gestrickt (= in jeder R rechts gestrickt), so gibt es einen kleinen Unterschied zwischen die Krausrippe der Jacke und die der Blende. Viel Spaß beim stricken!
27.06.2017 - 08:47Hei. Jeg trenger hjelp for å få total garn magde og hvor jeg kan bestille garnet på nettet.
11.10.2016 - 22:56Donc c est du point mousse!Merciiiiii bcp et bne soirée et bnap!!:-*!
17.05.2016 - 19:46Excusez moi encore jai fais une faute de frappe c est 5 côtes mousse et pas 45 lol!:-*!!!!à bientot!!!
16.05.2016 - 11:11Bonjour je suis entrain de tricoter le noeud papillon et je me demander se que sa vouler dire exacrement fare 14 m et tricoter 45 côtés mousses est se du pt mousse et faire 4 rgs??c bien sa???excusez moi pour cette question qui peut vous paraître bete!!à bientot et merciii pr votre aide et bn lundi!!:-*! JL!!!
16.05.2016 - 11:07DROPS Design answered:
Bonjour JL, 1 côte mousse = 2 rangs endroit, pour le noeud papillon (bande centrale), on tricote 4 côtes mousse, soit 8 rangs endroit. Bon tricot!
17.05.2016 - 11:53Hej, Vil jeg kunne lave det her sæt i drops cotton viscose, og kunne det så egne sig til sommerbrug?
29.04.2016 - 13:53DROPS Design answered:
Hej Stine Ja du kan strikke det i DROPS Safran ren bomuld eller DROPS Cotton Viscose som jo er blank, men begge tilhører garngruppe A som Baby Merino. God fornøjelse!
02.05.2016 - 09:21Hello. Do you know the total yardage needed to make both the pants and vest out of the Baby Merino, and the total yardage needed to make both the socks and hat out of the Fabel? Thank you, Susanna
01.03.2016 - 14:10DROPS Design answered:
Dear Mrs Burger, we have only total amount for each piece, you can add both pieces you may probably need a bit less - you will find yardage to each quality under each own shadcard - see Baby Merino and Fabel. Happy knitting!
02.03.2016 - 08:42Thanks, that's great and very helpful. Have a nice day
19.01.2016 - 20:11Petra wrote:
I'm a beginner, bought baby merino wool and want to make this cap. Could you please tell me what's the best way how to dec sts evenly: "THE SAME TIME dec 8 sts evenly = 88-96-96"? Knit every 11th and 12th together when I have 88 sts? Thanks.
19.01.2016 - 10:04DROPS Design answered:
Dear Petra, please click here to learn how to dec sts evenly. Happy knitting!
19.01.2016 - 16:41Dobry den, jsem zacatecnik a budu plest cepicku z vasi baby merino - chci se zeptat, co presne znamena: SOUČASNĚ ujmeme rovnoměrně 8 ok = 112 ok. Mam vzdy nejaka oka splest hladce, nebo se k tomuto ujimani pouziva nejaky specialni typ ujimani? Dekuji za odpoved. Petra
01.01.2016 - 09:28DROPS Design answered:
Dobrý den, Petro, máte pravdu, že lze ujímat různými způsoby - u této čepičky stačí splétat 2 oka hladce. Jakmile tedy změníte přízi na červenou a pletete touto barvou 1. kruhovou řadu, ujmete v této kruhové řadě požadovaných 8 ok = podle počátečního počtu ok např. u nejmenší velikosti splétáte každé 11. a 12. oko (96:8=12). Podrobný návod na výpočet najdete také v sekci Tipy a rady - Lekce, viz: Jak rovnoměrně přidávat/ujímat Hodně zdaru! Hana
19.01.2016 - 16:47