
Looking for a yarn?


Comments / Questions (182)
![]() Annelie wrote:
Annelie wrote:
Hej! Jag har problem med virkfastheten. Jag vill virka stl. S. På måttskissen ser jag att axeln är 15cm, men 54 luftmaskor med 45dst på första varvet blir 21cm inte 15. Jag har virkat väldigt fast men det hjälper inte. Använder Muskat och virknål 3. Vill så gärna virka denna modell
01.04.2025 - 08:28DROPS Design answered:
Hei Annelie. Om du ikke greier å hekle strammere med nål nr. 3,0, kan du prøve str. 2,5, men det kan være noe vanskelig når det hekles med Muskat. mvh DROPS Design
07.04.2025 - 09:24
![]() Carin Boetzkes wrote:
Carin Boetzkes wrote:
Hallo team drops design, Mooi vestje😍! Ik ben eraan begonnen maar na de eerste toer met Dst. golft mijn haakwerk. Vervolgens haak ik verder vlgs. patroon en is het net of het middenvoor niet recht is. Ik vraag mij af hoe het kan. Ik brei en haak al meer dan 50 jaar en heb dit nog nooit meegemaakt. Wat doe ik fout ??
27.03.2025 - 20:42DROPS Design answered:
Dag Carin,
Nadat je alle panden hebt gemaakt en in elkaar hebt gezet, haak je een bies rondom de hals en voorpanden. Waarschijnlijk trekt het werk dan recht.
30.03.2025 - 10:13
![]() Karin Cortebeeck wrote:
Karin Cortebeeck wrote:
Beste, in het schema wordt een steek 'dstk' genoemd. Is dit een dubbel stokje? Hartelijk dank voor het antwoord.
22.01.2025 - 08:43DROPS Design answered:
Dag Karin,
Ja, klopt, een dstk is een dubbel stokje.
22.01.2025 - 21:38
![]() Jo Murphy wrote:
Jo Murphy wrote:
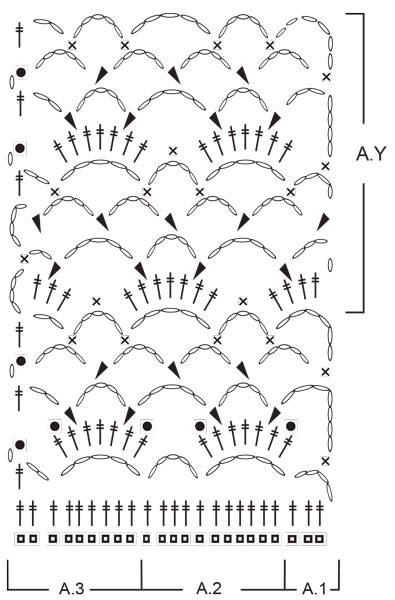
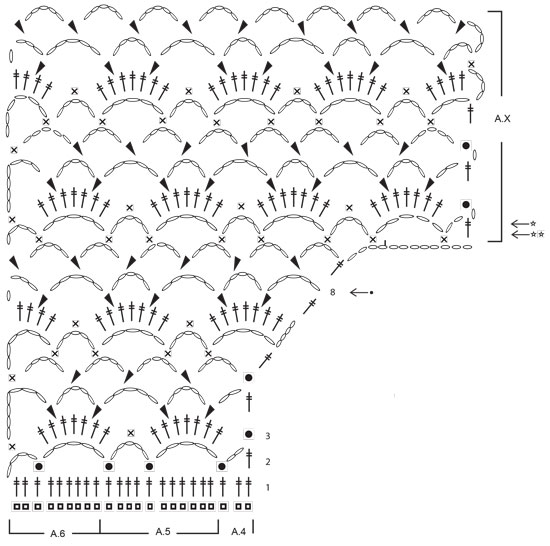
Nice pattern, but I can understand where some people may have a problem. Your diagrams for the front and back are different. In AX there are 4 dtr at each end of the row but in AY there is 3 at the beginning and 4 at the end. Also the number of turning chain for rows 12 and 14 is 8 in AX but for the back there are 7 on row 4, 6 on row 6 and then changes to 8 for row 12 and 7 for row 14 in AY. Is this correct?
15.02.2023 - 23:46DROPS Design answered:
Dear Mrs Murphy, diagrams have been edited, thanks for your feedback. Happy crocheting!
09.03.2023 - 15:38
![]() Linda wrote:
Linda wrote:
Beste, als ik het aantal steken van de beide voorpanden optel kom ik op 136 ( maat L) steken (op het breedste stuk). Bij het rugpand wordt er gesproken over 155 steken, waardoor het rugpand een stuk breder wordt. Klopt dit?
15.06.2022 - 15:21DROPS Design answered:
Dag Linda,
Na de eerste toer heb je op beide voorpanden 56 steken, maar daarna haak je verder in patroon en komen er steken bij aan de zijde van A.4.
16.06.2022 - 22:15
![]() Ve Adams wrote:
Ve Adams wrote:
Could someone explain to me in words how I go about rows 3 and 4 in the A4, A5 and A6 section. I keep looking and looking at it and just can't figure out how to even start. Thanks
18.02.2022 - 09:25DROPS Design answered:
Dear Mrs Adams, each stitch is represented by a symbol, when reading diagrams, refers first to the diagram key to know how to crochet, then work - from RS: A.4, then repeat A.5 and finish with A.6 and from WS: work A.6, repeat A.5 and finish with A.4 - reading from the left towards the right. This lesson explains how to crochet diagrams. Happy crocheting!
18.02.2022 - 14:18
![]() Ve Adams wrote:
Ve Adams wrote:
Row 2 of left front piece states to do A6 then A5 then A4. So why is row 3 A6, A5, A4? As I've turned so shouldn't it be A4, A5 then A6?
16.02.2022 - 18:47DROPS Design answered:
Hi Ve, You are quite right, when working back you reverse the pattern. Happy knitting!
17.02.2022 - 06:48
![]() Jo wrote:
Jo wrote:
I have crocheted one of your patterns before and found it difficult to follow and not clear instructions. A friend gave up on it because she found it too difficult to follow. Then I liked this one and find it too is not easy to follow. Sorry, but I’m giving up on this one.
21.09.2021 - 12:07
![]() Carol Anne Dashwood wrote:
Carol Anne Dashwood wrote:
I would love to make this blush top but it looks so difficult. What does A1 A2 A3 A5 etc. mean? Is this for advanced skill crochet as i am beginner intermediate but just love this design Carol
24.05.2021 - 19:06DROPS Design answered:
Dear Carol Anne, this is actually not that complicated piece, and intermediate crocheter can easily do it. A.1, A.2 etc are elements of the pattern, like A.1 is what you start with, A.2 is the part you repeat, A.3 is how you finish a row. A.4-A.5 shows how you shape the neckline. There are a few tutorial you can use, they are linked below the pattern, and you can always ask for help in the store you bought your DROPS yarn from. Happy Crafting!
24.05.2021 - 20:49
![]() Helle Nordal wrote:
Helle Nordal wrote:
Jeg er ved at hækle Summer Blush, men kan ikke få diagram A6, A5 og A4 til at passe med maskeantallet, da jeg skal gentage A6 og A5 6 gange, og det får jeg til at blive mere end 92 masker
11.03.2021 - 15:47DROPS Design answered:
Hej Helle, første række er forklaret i opskriften, når du har hæklet den har du 78 dbl-st. Nu starter du med A6, og gentager kun A5 6 gange og afslutter med A4. God fornøjelse!
12.03.2021 - 08:57
|
||||||||||||||||||||||||||||
Summer Blush#summerblushcardigan |
||||||||||||||||||||||||||||
|
|
||||||||||||||||||||||||||||
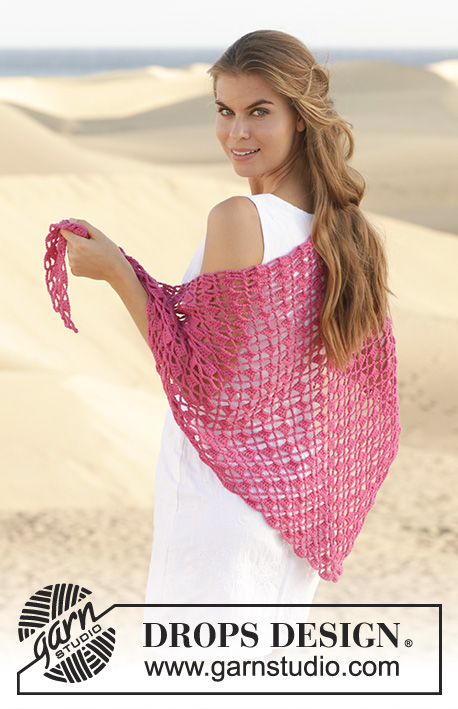
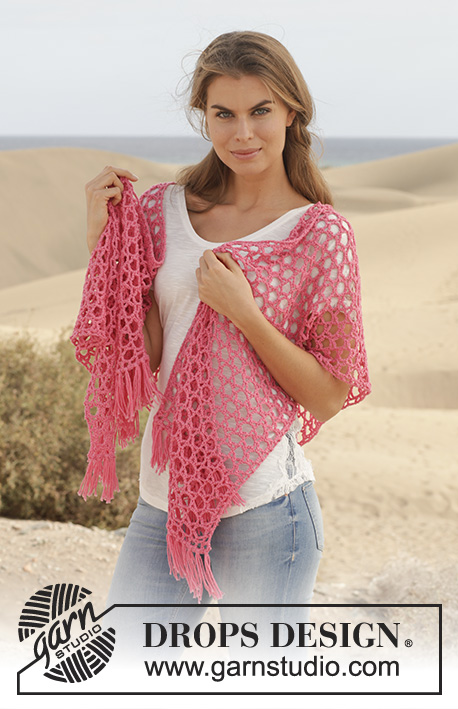
Crochet DROPS jacket with lace pattern in ”Cotton Merino”. Size S-XXXL.
DROPS 154-1 |
||||||||||||||||||||||||||||
|
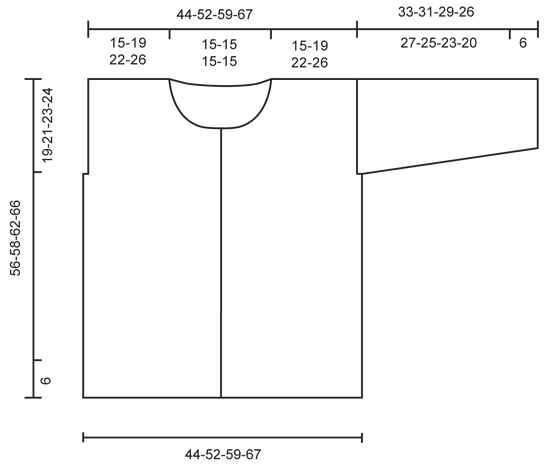
PATTERN: See diagrams A.1-A.8. CROCHET TIP: Ch-spaces will contract more than crochet pattern at the upper part of body. The jacket will thus be naturally rounded without dec in pattern. BUTTONHOLES: Measure from neck edge at the front and sew buttons on left band: SIZE S/M: 1, 7, 14, 21, 28, 35 and 41 cm / ⅜",2¾",5½",8¼",11",13¾",16⅛" SIZE L: 1, 7, 15, 22, 29, 36 and 43 cm / ⅜",2¾",6",8¾",11⅜",14¼",17" SIZE XL/XXL: 1, 8, 15, 21, 27, 33, 40 and 47 cm / ⅜",3⅛",6",8¼",10⅝",13",15¾",18½" SIZE XXXL: 1, 8, 15, 22, 29, 36, 43 and 50 cm / ⅜",3⅛",6",8¾",11⅜",14¼",17",19¾" --------------------------------------------------------- JACKET: Worked in parts, top down and worked tog when finished. LEFT FRONT PIECE: Work 54-66-79-92 ch with Cotton Merino on hook size 3 mm / C. Continue with 1 tr in 4th ch from hook = 2 tr. Continue to work as follows: 1 tr in each of the next 1-6-5-4 ch, * skip ch 1, 1 tr in each of the next 6 ch *, repeat from *-* 7-8-10-12 times in total = 45-56-67-78 tr. (= 1ST ROW in diagrams A.4, A.5 and A.6). Continue to work as follows: ROW 2 (= WS): Work A.6, then work A.5 3-4-5-6 times in total, and finish with A.4. Turn piece. ROW 3: Work A.6, then work A.5 3-4-5-6 times in total, and finish with A.4. Continue back and forth with this pattern, AT THE SAME TIME inc for neck in right side of piece (seen from RS) from 6th row in diagram. When 8th row in diagram has been worked from WS, cut the yarn. Then work 12 loose ch, before working as follows from RS (= 9th row): 1 tr in last tr on 8TH ROW. Continue with pattern according to diagram A.4, A.5 and A.6 as before. When piece measures 19-21-23-24 cm / 7½"-8¼"-9"-9½", insert a marker for armhole in the side, AT THE SAME TIME when A.4, A.5 and A.6 have been worked 1 time vertically, repeat A.x until piece measures approx. 27-29-31-33 cm / 10½"-11½"-12¼"-13". Adjust so that pattern is finished on a row with ch-spaces from WS. Then work ch-spaces with 5 ch in every space as follows from RS: Continue with 1ST ROW in A.Z. Repeat the 4 rows in A.Z until piece measures 51-55-57-61 cm / 10½"-11½"-12¼"-13" in total – Read CROCHET TIP! Work an edge as follows, beg from WS: Beg on 1st row in A.X. Work A.6, A.5 3-4-5-6 times in width, A.4. Continue back and forth until 2nd row in A.X with tr-groups has been worked (i.e. until 6th row in A.X has been worked). Piece measures approx. 56-58-62-66 cm / 22"-22¾"-24½"-26". Fasten off. Put piece aside and work right front piece. RIGHT FRONT PIECE: Beg and work as left front piece but reversed. Adjust according to left front piece. BACK PIECE: First work right shoulder as follows: Work 52-64-77-90 ch with Cotton Merino on hook size 3 mm / C. Cut the yarn and put piece aside. Then work left shoulder as follows: Work 54-66-79-92 ch with Cotton Merino on hook size 3 mm / C. Continue with 1 tr in 4th ch from hook = 2 tr. Continue to work as follows: 1 tr in each of the next 1-6-5-4 ch, * skip ch 1, 1 tr in each of the next 6 ch *, repeat from *-* 7-8-10-12 times in total = 45-56-67-78 tr for left shoulder. Then work 43 LOOSE ch before continuing over right shoulder (i.e. the ch-row): Continue with 1 tr in the first 2 ch on row = 2 tr. Continue to work as follows: 1 tr in each of the next 1-6-5-4 ch, * skip ch 1, 1 tr in each of the next 6 ch *, repeat from *-* 7-8-10-12 times in total = 45-56-67-78 tr for right shoulder. Turn piece (= WS), and work 1 tr in each of the 45-56-67-78 next tr, then work 1 tr in each of the next 43 ch, and finish with 1 tr in each of the next 45-56-67-78 tr = 133-155-177-199 tr. NOTE! This row is the 1st row in diagram A.1, A.2 and A.3. On next row work as follows (= RS): A.1, then work A.2 11-13-15-17 times in total, and finish with A.3. Continue as follows. When piece measures 19-21-23-24 cm / 7½"-8¼"-9"-9½", insert a marker each side to mark armholes, AT THE SAME TIME when A.1, A.2 and A.3 have been worked 1 time vertically, repeat A.Y until piece measures approx. 27-29-31-33 cm / 10½"-11½"-12¼"-13". Adjust pattern according to front pieces. Then work ch-spaces with 5 ch in every space as follows from RS: Continue with 1ST ROW in A.Z. Repeat the 4 rows in A.Z until piece measures 51-55-57-61 cm / 10½"-11½"-12¼"-13" in total – adjust according to front pieces. Work an edge at the bottom of body as on front pieces. Fasten off. Put piece aside. Piece measures approx. 56-58-62-66 cm / 22"-22¾"-24½"-26". Sew shoulder seams on front pieces and back piece tog. SLEEVE: Worked back and forth from body and outwards. ROW 1: Beg at one of the markers, and work ch-spaces along armhole as follows: * ch 5, skip approx. 1½ cm / ½", 1 sc *, repeat from *-* until there are 22-26-27-28 ch-spaces in total between the two markers. Continue with pattern from 2nd row in diagram A.Z, AT THE SAME TIME at beg of the next 2 rows dec 1 ch-space in the side – See diagram A.7 for left side of sleeve, and A.8 for right side of sleeve. 20-24-25-26 ch-spaces remain. Repeat the same dec at beg of the next 2-4-4-4 rows = 18-20-21-22 ch-spaces remain. Continue with ch-spaces as before, AT THE SAME TIME dec as follows: for S/M dec 1 ch-space in each side of sleeve when piece measures 15 cm / 6", and for sizes L - XL/XXL – XXXL dec 1 ch-space in each side of sleeve when piece measures 13-12-11 cm / 5"-4¾"-4½" and 1 ch-space in each side when piece measures 19-18-15 cm / 7½"-7"-6" = 16-16-17-18 ch-spaces remain. Continue until sleeve measures 27-25-23-20 cm / 10½"-9¾"-9"-8" (shorter measurements in the larger sizes because of wider shoulders), and adjust to finish on next to last row in A.Z (i.e. a row with whole ch-spaces in each side of piece). Then work an edge as follows: Beg on 1st row in A.X (= row with ch-spaces, and half ch-spaces in each side of piece) and work this pattern over all ch-spaces at the bottom of sleeve. Continue back and forth until 6th row in A.X has been worked (i.e. 2nd row in with tr-groups). Fasten off. ASSEMBLY: Work underarm seams and side seams in one as follows: 1 sc in front piece, ch 3, 1 sc in back piece, * ch 3, skip approx. 1 cm / ⅜", 1 sc in front piece, ch 3, skip 1 cm / ⅜", 1 sc in back piece *, repeat from *-* and continue the same way for sleeve. NECK EDGE AND BAND: Then work an edge along the band and neck. Beg at the bottom on right front piece, and work as follows: Fasten yarn with one sc, * ch 3, skip 1 cm / ⅜", 1 sc *, repeat from *-* along right band, neck and left band. Sew buttons on to the left band - see explanation above. Button through a hole in right front piece. |
||||||||||||||||||||||||||||
Diagram explanations |
||||||||||||||||||||||||||||
|
||||||||||||||||||||||||||||
|
||||||||||||||||||||||||||||
|
||||||||||||||||||||||||||||

|
||||||||||||||||||||||||||||
|
||||||||||||||||||||||||||||
Have you finished this pattern?Tag your pictures with #dropspattern #summerblushcardigan or submit them to the #dropsfan gallery. Do you need help with this pattern?You'll find 3 tutorial videos, a Comments/Questions area and more by visiting the pattern on garnstudio.com. © 1982-2025 DROPS Design A/S. We reserve all rights. This document, including all its sub-sections, has copyrights. Read more about what you can do with our patterns at the bottom of each pattern on our site. |
||||||||||||||||||||||||||||


With over 40 years in knitting and crochet design, DROPS Design offers one of the most extensive collections of free patterns on the internet - translated to 17 languages. As of today we count 314 catalogs and 11822 patterns - 11812 of which are translated into English (US/in).
We work hard to bring you the best knitting and crochet have to offer, inspiration and advice as well as great quality yarns at incredible prices! Would you like to use our patterns for other than personal use? You can read what you are allowed to do in the Copyright text at the bottom of all our patterns. Happy crafting!
Post a comment to pattern DROPS 154-1
We would love to hear what you have to say about this pattern!
If you want to leave a question, please make sure you select the correct category in the form below, to speed up the answering process. Required fields are marked *.