
Looking for a yarn?


Comments / Questions (72)
![]() Sytske wrote:
Sytske wrote:
Complimenten voor dit prachtig en supersnel te breien ontwerp
21.12.2024 - 21:42
![]() Maddy wrote:
Maddy wrote:
Je begint met 34 steken. Als je er 29 zou breien en dan keren en dan 23, dan zijn er 5 die nooit aan de beurt komen. Ook komen de verkorte toeren in de kabel. 34 min 12 voor de kabel dan moeten de verkorte toeren toch over 22 steken. Die zitten toch alleen in de ribbels.
11.12.2024 - 10:40
![]() Isabelle wrote:
Isabelle wrote:
Bonjour ! Je viens de terminer ce magnifique tour de cou en Snow. Ravissant, mais… il me gratte trop. J’aimerais le tricoter en mérinos que je supporte très bien. Puis-je utiliser 2 fils de Big mérinos avec les mêmes aiguilles pour avoir les mêmes dimensions ? Votre convertisseur n’a pas l’air d’accord. Quel est votre avis ? Dois-je adopter le nombre de rangs et mailles ? Comment ? (Je debute). Merci de votre aide et bravo pour vos vidéos !
06.11.2023 - 11:03DROPS Design answered:
Bonjour Isabelle, vous pouvez tout à fait utiliser 2 fils Big Merino pour remplacer 1 fil Snow, lorsque vous utilisez le convertisseur, indiquez "Snow", puis "200" pour le poids et cliquez sur "Trouvez des alternatives", vous aurez ainsi les alternatives possibles avec 1 fil (Andes, Wish par ex) ou 2 fils (Nepal, Alaska, Big Merino, etc...). Vous devez ensuite vérifier votre échantillon et adapter la taille des aiguilles si besoin et simplement suivre les explications telles quelles. Bon tricot!
06.11.2023 - 15:14
![]() Helena Maine wrote:
Helena Maine wrote:
Would it be possible please to write proper instructions on how many rows to knit short rows and how many rows to knit full rows? Also, after how many rows to do cables. You have great yarn and patterns, but some of the instructions in English are a muddle. Thank you
16.09.2022 - 16:51DROPS Design answered:
Dear Helena Maine! The pattern is worked until the piece measures approx. 52-54-56 cm (at the widest) (or until it is long enough to reach around your head). Full rows are knitted on every 3rd ridge (every 6th and 7th row). Happy knitting!
17.09.2022 - 11:20
![]() Angela Muñoz wrote:
Angela Muñoz wrote:
Hola, me gustaría hacer el gorro sin la punta en la coronilla, que quede totalmente pegado a la cabeza, para hacerlo así como debería hacer?
15.03.2021 - 18:43DROPS Design answered:
Hola Ángela, el gorro se trabaja en punto musgo, de lado a lado. Modelos similares a este son el 194-39 y el 192-15, que no tienen punta. A partir de ellos, podrías adaptar este modelo para que no tenga punta.
21.03.2021 - 20:03
![]() Angela Muñoz wrote:
Angela Muñoz wrote:
Hola, me gustaría hacer este diseño sin la punta en la coronilla de la cabeza, sino que sea pegado a la cabeza, como podría hacer esto? Gra ias
08.03.2021 - 00:07DROPS Design answered:
Hola Ángela, puedes ver la respuesta arriba.
21.03.2021 - 20:03
![]() Patricia Millán wrote:
Patricia Millán wrote:
Hola buenas tardes, quiero saber que número de palitos de tejer debo usar para lana de 3 hebras. Gracias
15.08.2020 - 21:43
![]() Patricia Millán wrote:
Patricia Millán wrote:
Hola buenas tardes, quiero saber que número de palitos de tejer debo usar para lana de 3 hebras. Gracias
15.08.2020 - 21:27
![]() Gourmpelen wrote:
Gourmpelen wrote:
Bonjour j ai reussi a faire mon premier rang en regardantla vidéo j ai donc 12 mailles pour la torsade et 26 mailles en point mousse j aimerai savoir ou et a quel moment je fais les rangs raccourcis sur ces 26 mailles je n ai jamais fait de rangs raccourci mais j ai visualise les vidéos et j ai bien compris le principe j ai acheté votre laine alors j aimerai bien reussir ce joli modele merci
11.10.2019 - 07:56DROPS Design answered:
Bonjour Mme Gourmelen, vous tricotez les rangs raccourcis dès le 1er rang du tour de cou, comme détaillé dans la réponse précédente. Pour que le tour de cou soit plus large en bas (côté torsade) qu'en haut (côté cou), on tricote tous les rangs les mailles de la torsade, mais on va ensuite tricoter plus ou moins de mailles au point mousse en plus. Bon tricot!
11.10.2019 - 09:29
![]() Gourmelen wrote:
Gourmelen wrote:
Bonjour j ai un petit souci pour demarrer mon tour de cou on a 38 mailles je fais 12 mailles au debut puis 1 maille pour rang raccourci je tourne je refais ensuite 12 mailles +1 maille raccourci je tourne et je fais 4 mailles puis la torsade merci de m aider car j ai reussi mon chauffe epaule grace à vos conseils merci d avance
09.10.2019 - 08:49DROPS Design answered:
Bonjour Mme Gourmelen, tricotez ainsi: *2 rangs sur les 12 premières mailles (= rangs 1 & 2 de M.1= 12 m), 2 rangs sur les 16 premières mailles (= rangs 3 & 4 de M.1 + 4 mailles point mousse= 16 m), 4 rangs sur toutes les mailles (= rangs 5 à 8 de M.1 + toutes les mailles restantes = 38 m). *, reprenez ensuite de *-* jusqu'à ce que l'ouvrage mesure 46 cm côté cou (le plus court). Bon tricot!
09.10.2019 - 09:05
|
||||||||||
Rosebud#rosebudset |
||||||||||
|
|
||||||||||
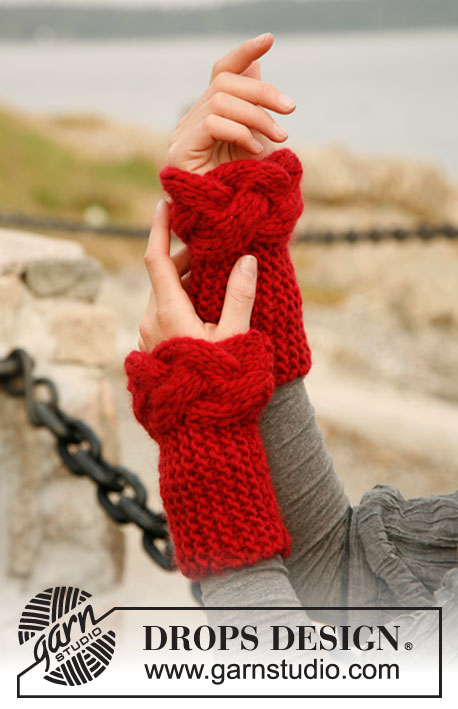
Knitted DROPS hat and neck warmer in garter st with cable in ”Snow”.
DROPS 131-47 |
||||||||||
|
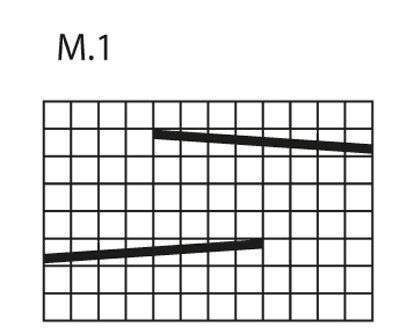
PATTERN: See diagram M.1. The diagram shows the pattern from RS. GARTER ST (back and forth on needle): K all rows. KNITTING TIP: Every time piece is turned in the middle of piece, slip first st as if to K, tighten the yarn and return, this is done to avoid holes where work is turned. -------------------------------------------------------- HAT: Worked back and forth on needle. Cast on 32-33-34 sts on needle size 8 mm / US 11 with Snow. 1st row (= from RS) begins at bottom edge of hat. Work diagram M.1 (= 12 sts), then work in GARTER ST -see explanation above - out towards the top of the hat. Continue like this while AT THE SAME TIME working short rows starting from RS - read KNITTING TIP: * Work back and forth over all sts. Work 29 sts, turn piece and work back. Work 23 sts, turn piece and work back *. Repeat from *-* until piece measures approx. 52-54-56 cm / 21¼"-22"-22¾" (at the widest). Bind off all sts. ASSEMBLY: Sew hat tog mid back. Sew edge to edge in outer loops of edge sts to avoid a chunky seam. Tighten tog sts at the top and fasten the yarn end tightly. NECK WARMER: The piece is worked back and forth on needle and sewn together afterwards. The whole piece is worked in diagram M.1 and garter st. Cast on 38 sts on needle size 8 mm / US 11 with Snow. Now work as follows - read KNITTING TIP: * Work diagram M.1 (= 12 sts), turn piece and work back in M.1. Work M.1, then work 4 sts in GARTER ST - see explanation above (= 16 sts in total), turn piece and work back in garter st and M.1. Work 4 rows over all sts while AT THE SAME TIME continuing first 12 sts in M.1 and remaining sts in garter st *. Repeat from *-* until piece measures approx. 46 cm / 18" at the top around neck, finish after one complete repetition of diagram. Bind off all sts. ASSEMBLY: Sew tog edge to edge in outer loops of edge sts to avoid a chunky and visible seam. Fold down the neck. |
||||||||||
Diagram explanations |
||||||||||
|
||||||||||
|
||||||||||
Have you finished this pattern?Tag your pictures with #dropspattern #rosebudset or submit them to the #dropsfan gallery. Do you need help with this pattern?You'll find 11 tutorial videos, a Comments/Questions area and more by visiting the pattern on garnstudio.com. © 1982-2025 DROPS Design A/S. We reserve all rights. This document, including all its sub-sections, has copyrights. Read more about what you can do with our patterns at the bottom of each pattern on our site. |
||||||||||


With over 40 years in knitting and crochet design, DROPS Design offers one of the most extensive collections of free patterns on the internet - translated to 17 languages. As of today we count 314 catalogs and 11821 patterns - 11811 of which are translated into English (US/in).
We work hard to bring you the best knitting and crochet have to offer, inspiration and advice as well as great quality yarns at incredible prices! Would you like to use our patterns for other than personal use? You can read what you are allowed to do in the Copyright text at the bottom of all our patterns. Happy crafting!
Post a comment to pattern DROPS 131-47
We would love to hear what you have to say about this pattern!
If you want to leave a question, please make sure you select the correct category in the form below, to speed up the answering process. Required fields are marked *.