
Looking for a yarn?


Comments / Questions (43)
![]() Bridget Lewis wrote:
Bridget Lewis wrote:
I’m confused about the neck shaping instructions. It says “work shortened rows mid back …work 69 stitches from mid front. Where do I start front or back
23.05.2024 - 13:30DROPS Design answered:
Dear Mrs Lewis, place piece flat on a table and mark mid front, then work to mid front and start short rows from mid front, turning after you have worked the number of stitches stated for your size, you work a tota of 4 short rows (2 from RS, 2 from WS), then turn and knit to mid front again, now knit in the round: knit 1 round, purl 1 round then work 4 rounds ribbing K2, P2, knit 3 rounds and cast off. Happy knitting!
23.05.2024 - 14:22
![]() Jozefien De Bruijn wrote:
Jozefien De Bruijn wrote:
Een trui met een duidelijke taille, heel mooi, maar als ik hem iets korter wil breien waar kan ik dan het best de aanpassing doen ? Sneller minderen voor de taille of met minder steken beginnen ?
17.02.2021 - 19:59DROPS Design answered:
Dag Josefien,
Helaas is het voor ons niet mogelijk om patronen naar eigen wens aan te passen. Een tip: Het minderen voor de taille begint bij een hoogte van 8 cm. Als je er meer dan 8 cm af wilt halen, moet je die mindering(en) er ook af halen bij het opzetten van de steken. Op die manier kun je uitrekenen hoeveel je op moet zetten en nog moet minderen voor de taille, zodat de taille wel op dezelfde plaats blijft zitten.
18.02.2021 - 09:32
![]() Jozefien wrote:
Jozefien wrote:
Een trui met een duidelijke taille, heel mooi, maar als ik hem iets korter wil breien waar kan ik dan het best de aanpassing doen ? Sneller minderen voor de taille of met minder steken beginnen ?
17.02.2021 - 19:58
![]() Marion wrote:
Marion wrote:
Bei der Rundpasse habe ich folgendes Problem.Meiner Rechnung laut M1 lautet am Ende 12 Maschen weniger, auf der Nade sollen aber laut Anleitung nur 120 MASCHEN sein.360 m -12=348 M Was stimmt da nicht .Herzliche Grüße Marion
09.01.2017 - 14:55DROPS Design answered:
Liebe Marion, Sie stricken M.1 (= 23 M bei der 1 Rd) x 20 in der Breite = 360 M. In jedem M.1 werden Sie abnehmen, am Ende gibt es nur 6 Maschen in jedem M.1 x 20 = 120 M. Viel Spaß beim stricken!
09.01.2017 - 15:24
![]() Anja Damsgaard wrote:
Anja Damsgaard wrote:
Hvis jeg gerne vil strikke den på pinde 3,5 - i str. L, hvor mange masker skal jeg så slå op?
30.09.2014 - 17:41DROPS Design answered:
Hej Anja. Du skal tjekke strikkefastheden (antal masker / pinde paa 10 x 10 cm), dvs, du strikker en pröve paa p 3.5, naar du har den kan du med hjaelp fra strikkefastheden du har paa pröven i sammenligning med den i mönstret beregne antal masker osv.
01.10.2014 - 16:48Jonna Nygaard wrote:
Hej, burde der ikke være en 3. farve med i opskriften? Billedet viser mørkgrå, lysgrå og hvid
19.02.2014 - 15:43DROPS Design answered:
Hej Jonna. Nej, der er kun to farver: hvid og mörkegraa. Det er vist lyset som giver nuancer.
19.02.2014 - 16:36
![]() Monika wrote:
Monika wrote:
Dobrý den, moc děkuju, průkrčník vyšel krásně. Ještě mám problém s tím, že se spodek velice kroutí, nevypadá tak pěkně jako na vzorové fotografii, mám to například přežehlit nebo namočit apod? Poradíte mi? Děkuji S pozdravem Monika Opočenská
25.01.2014 - 20:57
![]() Monika wrote:
Monika wrote:
Dobrý den, nerozumím přesně průkrčníku. Podle popisu mi vychází, že upletu na jedné straně více než na druhé. Prosím o vysvětlení. Pokud pletu od středu předního dílu tam a zpět, pak logicky vyjde na jedné straně náplet, který na opačné straně chybí. Velice děkuji. Mám teď rozpleteno a ráda bych to dokončila. S pozdravem Monika Opočenská
16.01.2014 - 15:51DROPS Design answered:
Milá Moniko, průkrčník je symetrický, náplet/zvýšení vznikne uprostřed zadního dílu. Viz údaje pro vel. S: obvod průkrčníku je 100 ok, od středu předního ke středu zadního dílu = 50. Začnete uprostřed předního - upletete 66 ok = 16 za střed zadního dílu. Otočíte a mezi jednotlivými obrátkami přidáte vždy 16 ok. Končíte ve středu před. dílu, ale z opačné strany značky. Hodně zdaru! Hana
22.01.2014 - 15:57
![]() Tina Van Der Burg wrote:
Tina Van Der Burg wrote:
Hvilken størrelse skal jeg vælge? Jeg bruger normalt 38/40 (m/l).
18.11.2013 - 20:43DROPS Design answered:
Hej Tina. Pröv at se nederst paa mönstret. Her er en maalskitse med maal i cm per störrelse. Du kan sammenligne disse med dine egne maal og vaelge störrelse.
19.11.2013 - 11:53
![]() Mari wrote:
Mari wrote:
Tips: Har strikket 2 stk av denne - på den andre brukte jeg tynnere pinner (3,5) på de 8 første omg. (tom rangborden) på både bole og ermer - og syntes at det ble mye finere!
09.01.2012 - 13:16
|
|||||||||||||||||||
Kristina |
|||||||||||||||||||
 |
 |
||||||||||||||||||
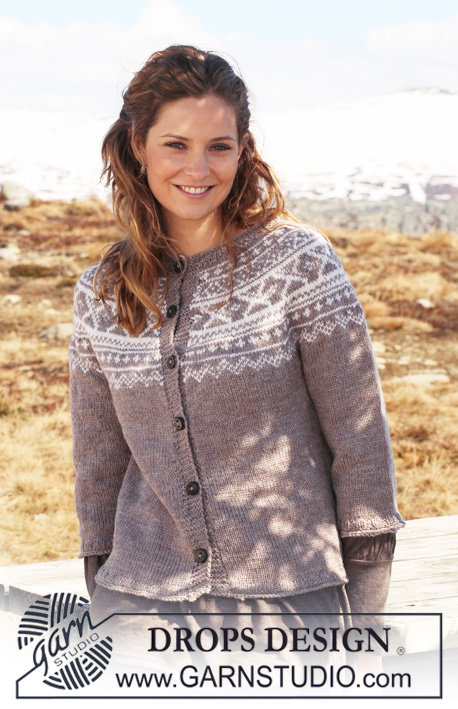
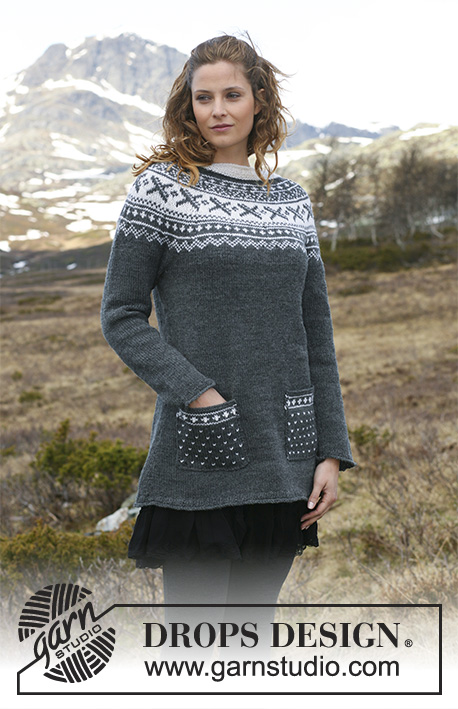
Knitted DROPS tunic with round yoke sleeves in ”Karisma”. Size S - XXXL.
DROPS 116-3 |
|||||||||||||||||||
|
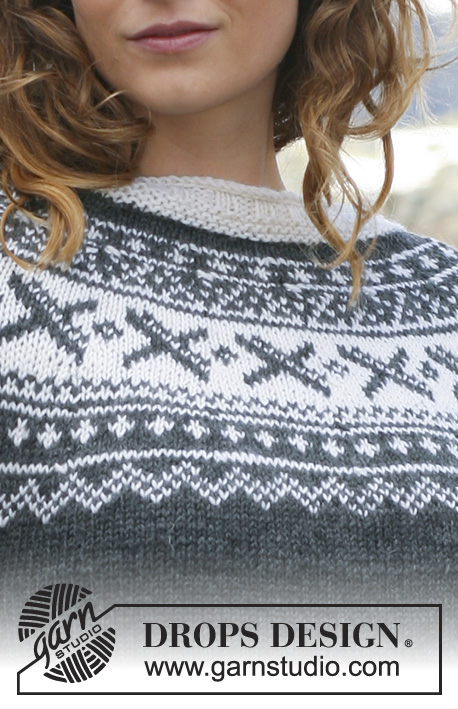
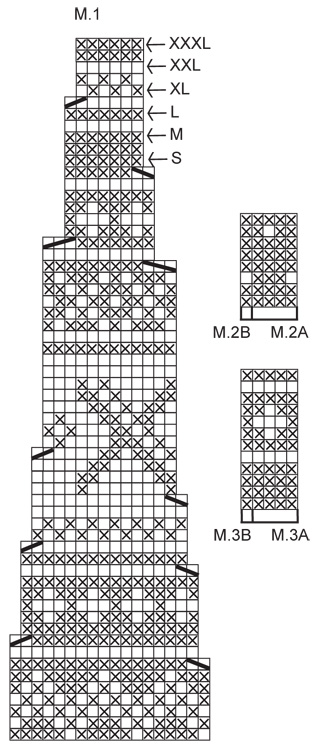
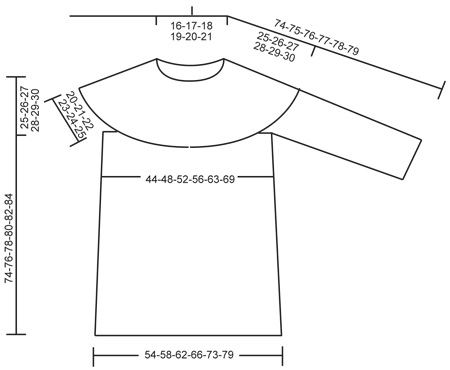
PATTERN: See diagram M.1 to M.3. Diagrams show the pattern from RS. The entire pattern is worked in stockinette st. -------------------------------------------------------- TUNIC: Worked in the round on circular needle. Cast on 216-232-248-264-292-316 sts on circular needle size 4.5 mm / US 7 with dark gray. Work 4 rounds stockinette st and then 4 rounds rib, K2/ P2. Insert 1 marker at beg of round and 1 marker after 108-116-124-132-146-158 sts (= the sides). Continue in stockinette st. REMEMBER THE GAUGE! When piece measures 8 cm / 3⅛" dec 1 st each side of both markers (= 4 dec), and repeat the dec on every 4 cm / 1½" a total of 10 times = 176-192-208-224-252-276 sts. Continue in stockinette st until piece measures 49-50-51-52-53-54 cm / 19¼"-19¾"-20"-20½"-21"-21¼". Now bind off 8 sts each side for armhole (= 4 sts each side of marker) = 160-176-192-208-236-260 sts. Put piece aside and knit the sleeves. SLEEVES: Worked in the round on double pointed needles. Cast on 48-48-52-52-56-56 sts on double pointed needles size 4.5 mm / US 7 with dark gray. Work 4 rounds stockinette st and then 4 rounds rib, K2/ P2. K 1 round dec 2-1-1-0-2-0 sts evenly = 46-47-51-52-54-56 sts. Insert a marker at beg of round. When piece measures 7 cm / 2¾" inc 1 st each side of marker, and repeat the inc on every 2.5-2.5-2-2-1.5-1.5 cm / ⅞"-⅞"-¾"-¾"-½"-½" a total of 13-13-16-16-17-19 times = 72-73-83-84-88-94 sts. When sleeve measures 41-41-40-40-39-39 cm / 16⅛"-16⅛"-15¾"-15¾"-15¼"-15¼" (less for the larger sizes because of longer sleeve cap and wider shoulder) bind off 8 sts mid under arm (= 4 sts each side of marker) = 64-65-75-76-80-86 sts. Put piece aside and knit the other sleeve. YOKE: Slip sleeves on same circular needle as body piece where bind off for armholes = 288-306-342-360-396-432 sts. Work dark gray stockinette st for 6-7-7-7-8-8 cm / 2⅜"-2¾"-2¾"-2¾"-3⅛"-3⅛" and now continue in M.1. After 1 vertical repeat of M.1 (finish repeat by arrow for your size) there are 112-119-133-120-132-144 sts left on needle. NECK: K 1 round with off-white AT THE SAME TIME dec 12-15-25-8-16-24 sts evenly = 100-104-108-112-116-120 sts. Now work shortened rows mid back with off-white in garter st back and forth on needle as follows: Work 66-69-72-75-78-81 sts from mid front, turn piece and work 32-34-36-38-40-42 sts on return row. Turn piece, work 48-51-53-56-59-62 sts, turn piece and work 64-68-72-76-80-84 sts on return row. Turn piece, work all sts to mid front. Continue in the round. K 1 round, P 1 round, and then work 4 rounds rib K2/ P2. K 3 rounds and bind off. POCKETS Cast on 33 sts on needle size 4.5 mm / US 7 with dark gray. Continue as follows – from RS: 2 garter sts, M.2A on the next 28 sts, finish with M.2B and 2 garter sts. Work 3 vertical repeats of M.2 and then continue as follows – from RS: 2 garter sts, M.3A on the next 28 sts, finish with M.3B and 2 garter sts. After 1 vertical repeat of M.3 work 4 rows garter st on all sts and bind off. Make 2 pockets. ASSEMBLY: Sew openings under sleeves. Sew pockets to front pieces approx 10 cm / 4" from bottom edge and approx 14 to 20 cm / 5½" to 8" from each other. |
|||||||||||||||||||
Diagram explanations |
|||||||||||||||||||
|
|||||||||||||||||||
|
|||||||||||||||||||
|
|||||||||||||||||||
Have you finished this pattern?Tag your pictures with #dropspattern or submit them to the #dropsfan gallery. Do you need help with this pattern?You'll find 22 tutorial videos, a Comments/Questions area and more by visiting the pattern on garnstudio.com. © 1982-2025 DROPS Design A/S. We reserve all rights. This document, including all its sub-sections, has copyrights. Read more about what you can do with our patterns at the bottom of each pattern on our site. |
|||||||||||||||||||


With over 40 years in knitting and crochet design, DROPS Design offers one of the most extensive collections of free patterns on the internet - translated to 17 languages. As of today we count 314 catalogs and 11822 patterns - 11812 of which are translated into English (US/in).
We work hard to bring you the best knitting and crochet have to offer, inspiration and advice as well as great quality yarns at incredible prices! Would you like to use our patterns for other than personal use? You can read what you are allowed to do in the Copyright text at the bottom of all our patterns. Happy crafting!
Post a comment to pattern DROPS 116-3
We would love to hear what you have to say about this pattern!
If you want to leave a question, please make sure you select the correct category in the form below, to speed up the answering process. Required fields are marked *.