
Looking for a yarn?


Comments / Questions (208)
![]() Krystyna wrote:
Krystyna wrote:
Dzien dobry mam pytanie odnośnie kocyka schemat A2 nie wychodzi mi wzór taki jak na kocyku jest po prostu chaos nie ma żadnego wzoru proszę o wyjaśnienie co źle robię na prawej stronie od dołu schematu nie nic nie pasuje prosze o pomoc
04.07.2025 - 19:05
![]() Maria Antonia wrote:
Maria Antonia wrote:
Es un patrón realmente bonito y fácil. Todos los bebés que nacen cerca de mi, tienen esta manta hecha a mano. A veces cambio el tipo de lana o lo hago con dos hilos juntos más finos, otras veces lo hago en algodón y también las hago a colores combinados según me inspiran los papas. En la familia ya es una tradición que me encanta. Gracias por vuestros patrones que siempre encuentro fáciles de seguir.
20.06.2025 - 20:05
![]() Renata wrote:
Renata wrote:
Nel modello 0-26by copertina schema A4 non è spiegato correttamente . Ho finito A1 e devo lavorare il ferro sul davanti al lavoro come mi devo comportare? Non si capisce dalla foto della copertina sembra che sia una costa
03.06.2025 - 09:37DROPS Design answered:
Buonasera Renata, se deve lavorare sul diritto del lavoro, deve iniziare con un ferro a diritto. Buon lavoro!
03.06.2025 - 19:52
![]() Chantal wrote:
Chantal wrote:
L’ouvrage de Melanie ( germany) est il réalise avec 2 laines ?? Drops mérinos extra fine et alpaga Silk ? Ou une seule laine ?
29.04.2025 - 06:46DROPS Design answered:
Bonjour Chantal, il a été réalisé en Lima + Brushed Alpaca Silk, retrouvez ces informations en cliquant sur la photo puis sur "voir l'ouvrage". Vous pourrez également la contacter via Ravelry si besoin. Bon tricot!
29.04.2025 - 09:14
![]() Catherine wrote:
Catherine wrote:
Bonjour, comment s\'appelle le point de A3?Merci beaucoup
08.03.2025 - 10:19
![]() Winkler wrote:
Winkler wrote:
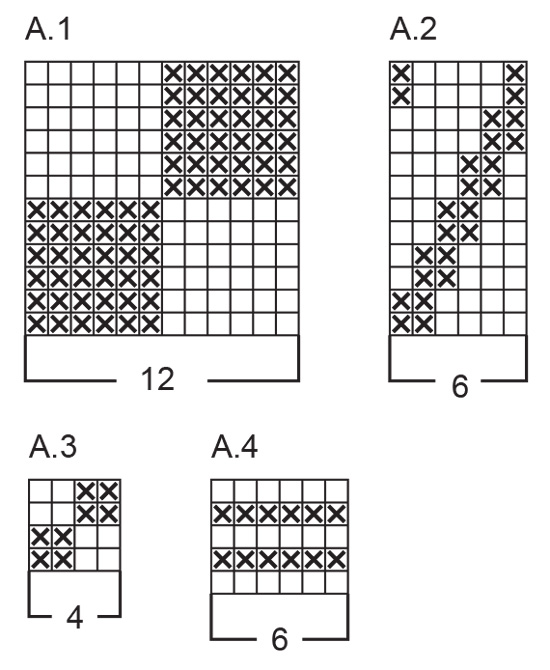
Können Sie mir bitte die Strickschrift \"A.4\" beschreiben! Ist es richtig, dass ich die Hinreihe rechts stricke und die Rückreihe links stricken.
05.03.2025 - 20:11DROPS Design answered:
Liebe Frau Winkler, wenn die 1. Reihe A.4 ist eine Hin-Reihe dann stricken Sie: (1 Hinreihe rechts, 1 Rückreihe rechts)x 2 Mal + 1 Hinreihe rechts; wenn die 1. Reihe A.4 eine Rückreihe ist, dann stricken Sie: (1 Rückreihe links, 1 Hinreihe links) x 2 + 1 Rückreihe links. Viel spaß beim Stricken!
06.03.2025 - 11:11
![]() Catherine wrote:
Catherine wrote:
Merci d'oublier mon commentaire precedent. Pour A2 si le rang 1 est sur l'envers, Le symbole de la croix sur l'envers est bien une maille a l'endroit. Donc je comprends "2 mailles endroit ( sur l'envers) et 4 mailles envers (sur l'envers) puis rang 2 " 4 mailles endroit et 2 mailles envers " car on est sur l'endroit.. Merci encore
09.02.2025 - 22:06DROPS Design answered:
Tout à fait :) Bonne continuation!
10.02.2025 - 11:34
![]() Catherine wrote:
Catherine wrote:
Bonsoir, désolée de revenir sur le sujet mais si le 1er rang de A2 est sur l'envers, est-ce que ça ne serait pas plutôt "2 mailles envers et 4 mailles endroit " le diagramme se lisant de gauche à droite. Puis rang 2 " 4 mailles endroit et 2 envers"? Merci pour votre reponse
09.02.2025 - 21:46DROPS Design answered:
Bonjour Catherine, les diagrammes montrent tous les rangs, vu sur l'endroit, autrement dit, pour que les 2 dernières mailles sur l'endroit soient des mailles envers, vu sur l'endroit, vous devrez les tricoter à l'endroit sur l'envers - cf légende des diagrammes, autrement dit, vous tricotez A.2 rang 1 sur l'envers ainsi: (2 mailles endroit, 4 mailles envers) et sur l'endroit vous aurez ainsi (4 mailles endroit, 2 mailles envers). Bon tricot!
10.02.2025 - 11:32
![]() Sabrina wrote:
Sabrina wrote:
Bonjour je suis en train de commencer le modèle Couverture bébé au tricot, en point structuré, en DROPS Merino Extra Fine. Thème: Couverture bébé mais je ne trouve pas le diagramme M1 à M4
27.01.2025 - 19:21DROPS Design answered:
Bonjour Sabrina, les diagrammes ont été renommés depuis en A.1 à A.4 (comme dans les explications), je viens de corriger le paragraphe POINT FANTAISIE en conséquence. Vous trouverez ces diagrammes en bas de page, après les explications écrites de la couverture. Bon tricot!
28.01.2025 - 09:11
![]() Catherine wrote:
Catherine wrote:
Bonjour, je dois commencer A2 sur l'envers. Est-ce que je lis le diagramme de gauche à droite, soit 2 mailles envers et 4 endroit? Et au rang 2 je lis de droite à gauche avec 4m endroit et 2 envers? La question a déjà été posée mais je n'ai pas compris la réponse. Merci de votre aide
26.01.2025 - 16:12DROPS Design answered:
Bonjour Catherine, sur l'envers, on lit effectivement les diagrammes de gauche à droite, le 1er rang de A.2 sur l'envers va donc se lire ainsi: (2 mailles envers, 4 mailles endroit). Sur l'endroit, le 2ème rang se tricotera: (4 mailles endroit, 2 mailles envers). Bon tricot!
27.01.2025 - 09:41
|
|||||||
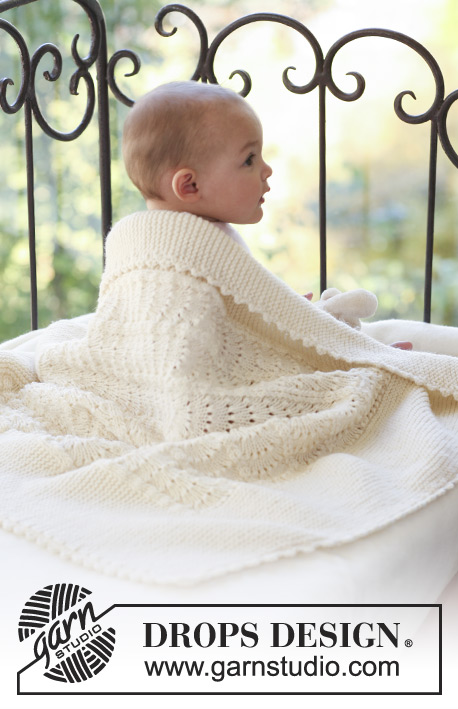
Petit Prince#petitprinceblanket |
|||||||
 |
 |
||||||
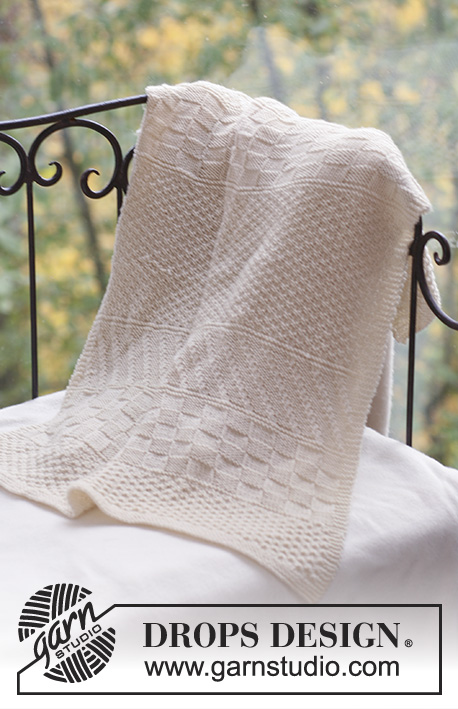
Knitted blanket for baby in DROPS Merino Extra Fine. Piece is worked in textured pattern. Theme: Baby blanket
DROPS Baby 18-16 |
|||||||
|
------------------------------------------------------- EXPLANATION FOR THE PATTERN: ------------------------------------------------------- GARTER STITCH (back and forth): Knit all rows. 1 ridge vertically = knit 2 rows. PATTERN: See diagrams A.1 to A.4. NOTE! If a diagram is finished from right side, start first row on next diagram from wrong side. Pay extra attention that the diagrams show the pattern seen from right side. ------------------------------------------------------- START THE PIECE HERE: ------------------------------------------------------- BLANKET: To fit in all stitches work blanket back and forth on circular needle. Cast on 128 stitches with Merino Extra Fine on circular needle size 4,5 mm = US 7. Work 3 ridges in garter stitch over all stitches. Continue with 4 stitches in garter stitch on each side and PATTERN – read explanation above, on the middle 120 stitches as follows: Work A.3 for approx. 8 cm = 3⅛" - adjust after a whole repeat or half a repeat. REMEMBER THE KNITTING GAUGE! Then work A.4 one time (= 5 rows) Work A.1 for approx. 11 cm = 4⅜" – adjust after a whole repeat or half a repeat. Then work A.4 one time (= 5 rows) Work A.2 for approx. 8 cm = 3⅛". Then work A.4 one time (= 5 rows) Work A.3 for approx. 16 cm = 6¼" - adjust after a whole repeat or half a repeat. Then work A.4 one time (= 5 rows) Work A.1 for approx. 11 cm = 4⅜" – adjust after a whole repeat or half a repeat. Then work A.4 one time (= 5 rows) Work A.2 for approx. 8 cm = 3⅛". Then work A.4 one time (= 5 rows) Work A.3 for approx. 8 cm = 3⅛" - adjust after a whole repeat or half a repeat. Then work 3 ridges in garter stitch over all stitches on row. Piece now measures approx. 82 cm = 32¼" – bind off. |
|||||||
Diagram explanations |
|||||||
|
|||||||
|
|||||||
Have you finished this pattern?Tag your pictures with #dropspattern #petitprinceblanket or submit them to the #dropsfan gallery. Do you need help with this pattern?You'll find 8 tutorial videos, a Comments/Questions area and more by visiting the pattern on garnstudio.com. © 1982-2025 DROPS Design A/S. We reserve all rights. This document, including all its sub-sections, has copyrights. Read more about what you can do with our patterns at the bottom of each pattern on our site. |
|||||||


With over 40 years in knitting and crochet design, DROPS Design offers one of the most extensive collections of free patterns on the internet - translated to 17 languages. As of today we count 314 catalogs and 11822 patterns - 11812 of which are translated into English (US/in).
We work hard to bring you the best knitting and crochet have to offer, inspiration and advice as well as great quality yarns at incredible prices! Would you like to use our patterns for other than personal use? You can read what you are allowed to do in the Copyright text at the bottom of all our patterns. Happy crafting!
Post a comment to pattern DROPS Baby 18-16
We would love to hear what you have to say about this pattern!
If you want to leave a question, please make sure you select the correct category in the form below, to speed up the answering process. Required fields are marked *.