Comments / Questions (11)
![]() Marie-Claude wrote:
Marie-Claude wrote:
Bonjour, Je ne comprends pas les explications portant sur le rabat des emmanchures: A 37-38-39-40-41 cm de hauteur totale, rabat pour les emmanchures de chaque côté tous les 2 rangs : 0-0-1-1-1 fois 3 m, 1-1-1-1-2 fois 2 m et 1-3-2-4-4 fois 1 m = 46-48-50-52-54 m. Merci de me donner des explications plus clairs. La taille que je fais est S/M.
25.11.2024 - 23:57DROPS Design answered:
Bonjour Marie-Claude, la taille S/M est la 2ème taille, vous suivez ainsi les indications en 2ème position et vous rabattez au début de chaque rang de chaque côté (= de chaque côté tous les 2 rangs): 1 fois 2 mailles et 3 fois 1 maille, vous aviez 58 mailles, vous avez rabattu (2+3) mailles de chaque côté, il vous reste 58-10=48 mailles. Bon tricot!
26.11.2024 - 09:52
![]() Phyllis M Gulliver wrote:
Phyllis M Gulliver wrote:
I am doing the White Bliss pattern. i don't understand why the instructions for the back is written like it is. i have knitted for many many years . usually when back and front are knitted seperate it gives full details if its different. on this pattern it says start out with pearl 3 to knit 1 . so do one just assume its exactly like the front or is it p3 k3 all the way across to k1. needs more explaination
24.11.2023 - 20:53DROPS Design answered:
Dear Phyllis, you just need to work the rib as explained in the upper part of the pattern, in rib, but not as the front piece. That is, you work k3, p3 and they just state whether you start purling or knitting, so as to match the stitches from the front piece. The front is explained in more detail because it includes the stitches for the cables, which aren't worked in the back piece. Happy knitting!
26.11.2023 - 19:21
![]() Diane wrote:
Diane wrote:
Bonjour dans le modele 80-23 pour la manche rabattre 1x4ms 2x2ms 0x1m puis 2m jusqu'à 54cm que veut dire le (puis 2m jusqu'a54cm. merci beaucoup.
20.08.2020 - 01:41DROPS Design answered:
Bonjour Diane, quand vous avez rabattu au début de chaque rang de chaque côté 1 fois 4 m et 2 fois 2 m (si pas de fois 1 m dans votre taille), rabattez maintenant au début de chaque rang de chaque côté 2 mailles jusqu'à ce que la manche mesure 54 cm de hauteur totale, veillez juste à bien rabattre 2 m autant de fois de chaque côté. Rabattez ensuite les mailles restantes au rang suivant sur l'endroit. Bon tricot!
20.08.2020 - 10:09
![]() Zabeth wrote:
Zabeth wrote:
La torsade se croise bien tous les 16 rangs? Le diagramme montre le motif sur l’endroit, c'est noté dans les explications. Si les rangs envers ne sont pas notés sur le diagramme, cela veut-il dire que la torsade se fait tous les 32 rangs?!
09.09.2018 - 17:17DROPS Design answered:
Bonjour Zabeth, les torsades de M.1 se croisent bien tous les 16 rangs, tous les rangs figurent dans le diagramme, ceux sur l'endroit aussi bien que ceux sur l'envers, tels qu'on les voit sur l'endroit. Bon tricot!
11.09.2018 - 08:34
![]() Zabeth wrote:
Zabeth wrote:
Bonjour, Est-il possible de le tricoter en rond? Apparemment il semblerait que oui. Mais que fait-on des mailles lisières? Faut-il les garder ou les supprimer? Dans l'attente de votre réponse, je vous remercie.
08.09.2018 - 17:07DROPS Design answered:
Bonjour Zabeth, vous pouvez tricoter le bas du dos et du devant en rond jusqu'aux emmanchures, montez le nombre de mailles indiqué moins les 2 m lis du dos et du devant (= -4 m au total), mais gardez ensuite les m lisières pour les coutures des manches (emmanchures). Bon tricot!
11.09.2018 - 08:11
![]() Sven wrote:
Sven wrote:
M3 finns under ärmen på diagrammet för tröjan.
09.08.2016 - 17:41
![]() Veronika Munkvold wrote:
Veronika Munkvold wrote:
Hei. Viser til oppskrift "Puter med fletter i Alaska", hvor det refereres til diag M.2 og M.3. Hvor finner jeg .3? Veronika
09.08.2016 - 17:00DROPS Design answered:
Hej. Du hittar M.3 längst till höger, vid sidan av målskissen. Lycka till!
11.08.2016 - 10:40
![]() Jennie wrote:
Jennie wrote:
Hej! Jag undrar om ni har en tydligare helhetsbild på kuddarna? Framförallt kudde med flätor. Skulle vilja se hur mönstret ser ut i sin helhet. Tacksam för svar
15.10.2013 - 21:57DROPS Design answered:
Det har vi tyvärr inte, du får klara dig med diagrammet. Lycka till!
17.10.2013 - 12:27France Joly wrote:
Confort au foyer. Voilà le nom que m'inspire ce chandail
29.09.2013 - 04:16
![]() Caroline wrote:
Caroline wrote:
Have just finished this, a very lovely jumper, very pleased with it
23.06.2013 - 18:27
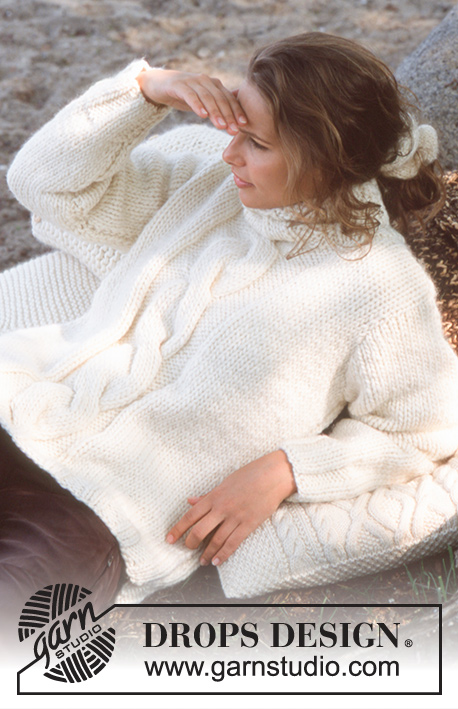
White Bliss |
|||||||||||||||||||||||||
 |
 |
||||||||||||||||||||||||
DROPS Pullover in Snow and 4 Pillows
DROPS 80-23 |
|||||||||||||||||||||||||
|
PULLOVER: Gauge: 10 sts x 14 rows on larger needles in stockinette st = 10 x 10 cm. Rib: * K 3, P 3 *, repeat from * - *. Pattern: See chart. The pattern is seen from the right side. Front: Cast on 49-55-61-67-73 sts on smaller needles. Knit rib as follows Row 1 (right side): Size XS: K 1 (edge st knit in garter st), * K 3, P 3 *, repeat from * - * 2 times, K 3, P 5, K 7, P 5, K 3, * P 3, K 3 *, repeat from * - * 2 times, K 1 (edge st knit in garter st). Size S/M: K 1 (edge st knit in garter st), * P 3, K 3 *, repeat from * - * 3 times, P 5, K 7, P 5, * K 3, P 3 *, repeat from * - * 3 times, K 1 (edge st knit in garter st). Size M/L: K 1 (edge st knit in garter st), * K 3, P 3 *, repeat from * - * 3 times, K 3, P 5, K 7, P 5, K 3, * P 3, K 3 *, repeat from * - * 3 times, K 1 (edge st knit in garter st). Size XL: K 1 (edge st knit in garter st), * P 3, K 3 *, repeat from * - * 4 times, P 5, K 7, P 5, * K 3, P 3 *, repeat from * - * 4 times, K 1 (edge st knit in garter st). Size XXL: K 1 (edge st knit in garter st), * K 3, P 3 *, repeat from * - * 4 times, K 3, P 5, K 7, P 5, K 3, * P 3, K 3 *, repeat from * - * 4 times, K 1 (edge st knit in garter st). Row 2 (wrong side): Size XS: K 1 (edge st knit in garter st), * P 3, K 3 *, repeat from * - * 2 times, P 3, K 5, P 7, K 5, P 3, * K 3, P 3 *, repeat from * - * 2 times, K 1 (edge st knit in garter st). Size S/M: K 1 (edge st knit in garter st), * K 3, P 3 *, repeat from * - * 3 times, K 5, P 7, K 5, * P 3, K 3 *, repeat from * - * 3 times, K 1 (edge st knit in garter st). Size M/L: K 1 (edge st knit in garter st), * P 3, K 3 *, repeat from * - * 3 times, P 3, K 5, P 7, K 5, P 3, * K 3, P 3 *, repeat from * - * 3 times, K 1 (edge st knit in garter st). Size XL: K 1 (edge st knit in garter st), * K 3, P 3 *, repeat from * - * 4 times, K 5, P 7, K 5, * P 3, K 3 *, repeat from * - * 4 times, K 1 (edge st knit in garter st). Size XXL: K 1 (edge st knit in garter st), * P 3, K 3 *, repeat from * - * 4 times, P 3, K 5, P 7, K 5, P 3, * K 3, P 3 *, repeat from * - * 4 times, K 1 (edge st knit in garter st). After 6 rows rib change to larger needles and establish pattern as follows: K 1 (edge st knit in garter st), 15-18-21-24-27 sts stockinette st, P 5, then inc 3 sts in the K 7 in the center – inc by pulling up a st from previous the row every other st and knit (= K 10), P 5, 15-18-21-24-27 sts stockinette st and K1 (edge st knit in garter st). There are now 52-58-64-70-76 sts. Continue with stockinette st and Pattern 1 over the center 20 sts to finished measurements. Note: the 1st row of Pattern 1 is a wrong side row. When the piece measures 37-38-39-40-41 cm bind off for armhole at each side every other row: 3 sts 0-0-1-1-1 time, 2 sts 1-1-1-1-2 times and 1 st 1-3-2-4-4 times = 46-48-50-52-54 sts. When the piece measures 51-53-55-57-59 cm put the center 20 sts on a st holder for the neck. Then dec 1 st at each neck edge every other row 1-1-2-2-2 times = 12-13-13-14-15 sts remain on each shoulder. Bind off when the piece measures 58-60-62-64-66 cm. Back: Cast on 47-53-59-65-71 sts on smaller needles and knit rib as follows: Row 1 (right side): Sizes XS, M/L and XXL: K 1 (edge st knit in garter st), and begin with P 3, end with K 1 (edge st knit in garter st). Sizes S/M and XL: K 1 (edge st knit in garter st), and start with K 3, end with K 1 (edge st knit in garter st). Row 2 (wrong side): Sizes XS, M/L and XXL: K 1 (edge st knit in garter st), and begin with K 3, end with K 1 (edge st knit in garter st). Sizes S/M and XL: K 1 (edge st knit in garter st), and start with P 3, end with K 1 (edge st knit in garter st). After 6 rows rib change to larger needles and stockinette st over all sts. Bind off for armholes as on front = 41-43-45-47-49 sts. When the piece measures 55-57-59-61-63 cm bind off the center 15-15-17-17-17 sts for the neck. On the next row dec 1 st at each neck edge = 12-13-13-14-15 sts remain on each shoulder. Bind off when the piece measures 58-60-62-64-66 cm. Sleeve: Cast on 26-26-32-32-32 sts on smaller needles and knit rib, keeping 1 st at each side in garter st, for 8 cm. Change to larger needles and stockinette st, and inc 1 st at each side every 6.5-5-7-5.5-4 cm a total of 7-8-6-7-8 times = 40-42-44-46-48 sts. When sleeve measures 49-47-45-43-41 cm bind off for sleeve cap at each side every other row: 4 sts 1 time, 2 sts 1-2-2-2-2 times and 1 st 0-0-0-3-4 times, then bind off 2 sts at each side until the piece measures 54 cm. Bind off the remaining sts. Assembly: Sew right shoulder. Collar: Pick up 53 or 59 sts around the neck (incl. sts on st holder) on larger needles and knit as follows: the 20 sts at center front continue in Pattern and the remaining sts knit in rib so that there will be K 3 at each side of Pattern. When the collar measures approx. 14 cm (you need at least 5 rows stockinette st over the last cable at center front) K 2 tog across the 10 sts over the cable = 48 or 54 sts. On the next row bind off all sts in rib. Sew left shoulder and up along the collar. Sew in sleeves. Sew sleeve and side seams using edge sts as a seam allowance. GARTER STITCH PILLOW IN SNOW: Measurement: 45 x 45 cm [17.75" x 17.75"] The pillow can be knit with 1 or 2 strands. If you knit with 1 strand follow the numbers before ( ), if you knit with 2 strands follow the numbers inside ( ). Materials: Garnstudio SNOW from Garnstudio 350 (450) gr nr 01, natural DROPS 9 mm [US 13] (12 mm [US 17]) needles, or size needed to obtain correct gauge. 5 DROPS Light wood button, nr 502 Gauge: 1 strand: 10 sts x 20 rows in garter st on smaller needles = 10x 10 cm. 2 strands: 7 sts x 16 rows in garter st on larger needles = 10 x 10 cm Pillow: Cast on loosely 43 (31) sts on appropriate needles with 1 (2) strands. Knit garter st. If you do not want the flap, bind off when the piece measures 84 cm. If you want the flap, continue until the piece measures 98 cm, then make 5 buttonholes evenly distributed (1 buttonhole = K 2 tog and yo, on the next row, twist and knit the yo so the buttonhole will not be too large. Knit 4 rows garter st after the buttonholes and then bind off. Assembly: Pillow without flap: Fold pillow in half and sew side seams. Insert pillow form and sew top seam, then sew on 5 buttons as decoration 8 cm below top seam. Pillow with flap: Fold the bottom 84 cm of pillow in half (flap = approx. 16 cm), sew side seams. Fold flap over pillow, and sew on buttons to match up with the buttonholes. PILLOW IN ULL-FLAMÉ AND SNOW: Measurement: 45 x 45 cm [17.75" x 17.75"] Materials: DROPS SNOW from Garnstudio 250 gr nr 03, brown and use: DROPS ULL-FLAMÉ from Garnstudio 250 gr nr 19, camel DROPS 12 mm [US 17] needles, or size needed to obtain correct gauge. DROPS 7 mm [US K] crochet hook, or size needed to obtain correct gauge. 2 DROPS Light wood button, nr 502 Gauge: 7 sts x 11 rows with 1 strand Snow + 1 strand Ull-Flamé in stockinette st = 10 x 10 cm. Pillow: Cast on loosely 31 sts with 1 strand of each yarn. Knit garter st for 4 rows, then knit stockinette st until the piece measures 98 cm, then knit 4 rows garter st and bind off. Fold bottom 84 cm in half and sew side seams. The flap measures approx. 16 cm. Button loops: Crochet 1 buttonhole loop at each side of flap with 1 strand of each yarn. 1 loop = start with 1 sc in 2nd st from edge, ch 4, skip over 1 st (in from st with sc) and fasten with a sl st in the next st. Repeat at other side of flap. Tassels: Make 2 tassels. 1 tassel = 10 strands of each yarn 30 cm long. Ch 14 ch with 1 strand of each yarn. Fold strands of yarn over the ch and make tassel. Fasten ch with a sl st 6 ch from hook. Sew the ch-band to the top of each side of pillow. Fasten 1 tassel on the other side. Sew on buttons. CABLED PILLOW IN ALASKA: Finished measurement: 50 x 50 cm [19.75" x 19.75"] Materials: DROPS ALASKA from Garnstudio 500 gr nr 02, natural DROPS 5 mm [US 8] needles, or size needed to obtain correct gauge. 6 DROPS wood buttons nr 511 Gauge: 17 sts x 22 rows in stockinette st = 10 x 10 cm. Pattern: See chart. The pattern is seen from the right side. Pillow: Cast on 86 sts and knit 2 rows garter st, increasing 24 sts evenly distributed over the center 58 sts on the 2nd row = 110 sts. Establish pattern on the next row as follows; K 2 (edge sts knit in garter st), 12 sts in Pattern 3, Pattern 2 (82 sts), 12 sts in Pattern 3, and K 2 (edge sts knit in garter st). Continue in pattern as established until the piece measures 45 cm, then knit 2 rows garter st over all sts (= folding edge), decreasing 24 sts evenly distributed over the center 62 sts on the 1st row = 86 sts. Then knit Pattern 3 over all sts keeping 2 sts in garter st at each side. When the piece measures 90 cm place a marker. When the piece measures 102 cm make 6 buttonholes as follows: K 2 (edge sts in garter st), 5 sts in Pattern 3, bind off 2 sts for buttonhole, * 12 sts in Pattern 3, bind off 2 sts for buttonhole *, repeat from * - * 5 times, 7 sts remain, 5 sts in Pattern 3 and K 2 (edge sts in garter st). Cast on 2 new sts over the bound off sts on the next row, and then knit Pattern 3 over all sts, keeping 2 edge sts in garter st at each side until the piece measures 104 cm. Knit 2 rows garter st and bind off. The piece measures approx. 105 cm. Fold piece at garter st rows and at the marker so that the buttonholes are on the outside of the pillow. Sew side seams using 1 edge st at each side as seam allowance, and sew on buttons. |
|||||||||||||||||||||||||
Diagram explanations |
|||||||||||||||||||||||||
|
|||||||||||||||||||||||||

|
|||||||||||||||||||||||||

|
|||||||||||||||||||||||||

|
|||||||||||||||||||||||||
Have you finished this pattern?Tag your pictures with #dropspattern or submit them to the #dropsfan gallery. Do you need help with this pattern?You'll find 18 tutorial videos, a Comments/Questions area and more by visiting the pattern on garnstudio.com. © 1982-2025 DROPS Design A/S. We reserve all rights. This document, including all its sub-sections, has copyrights. Read more about what you can do with our patterns at the bottom of each pattern on our site. |
|||||||||||||||||||||||||


Post a comment to pattern DROPS 80-23
We would love to hear what you have to say about this pattern!
If you want to leave a question, please make sure you select the correct category in the form below, to speed up the answering process. Required fields are marked *.