
Looking for a yarn?


Comments / Questions (24)
![]() Carole Mairien wrote:
Carole Mairien wrote:
Je ne comprends pas la fin avec A5 et A6
06.05.2025 - 16:21DROPS Design answered:
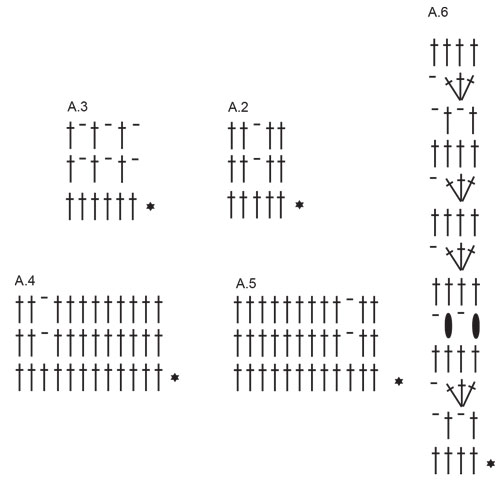
Bonjour Mme Mairien, à la fin du top, crochetez A.4 (bordure devant droit), puis répétez A.6 jusqu'à ce qu'il reste les mailles de la bordure du devant gauche et crocheter ces mailles en suivant A.5. Sur l'envers, crochetez les diagrammes en les lisant de gauche à droite: commencez par A.5, répétez A.6 et terminez par A.4. Bon crochet!
07.05.2025 - 08:49
![]() Irene Kernkamp wrote:
Irene Kernkamp wrote:
Nadat de verschillende bovenkanten aan elkaar gemaakt zijn krijg ik een ongelijk aantal rijen in de linker- en rechtervoorbies. Is dat de bedoeling? De stokjes in de lossen aan het linker voorpand zitten op de eerste toer van het samenvoegen. Daarna komen de stokjes aan de rechterkant pas in de tweede toer. Dan heb je dus links al twee rijen op elkaar. Klopt dat?
29.10.2024 - 09:12DROPS Design answered:
Dag Irene,
Als ik lees hoe de losse delen van het linker en rechter voorpand gehaakt moeten worden dan zijn deze precies in spiegelbeeld. Bij het aan elkaar haken van de panden, haak je eerst stokjes over het linker voorpand, dan haak je 4 lossen oksel), dan stokjes over het achterpand, 4 lossen (oksel), dan stokjes over het rechter voorpand. Je zou nu een gelijk aantal rijen met stokjes op de voorpanden moeten hebben.
31.10.2024 - 20:15
![]() Sophie Koch wrote:
Sophie Koch wrote:
I'm using weight 2 yarn and a 3mm hook but my back panel is much longer than 19cm (size L) when I've increased for 13 more rows. Do I increase more than twice per row? The width between straps is correctly 32cm. I must be doing the body piece wrong, I'm just confused what I'm doing wrong.
22.10.2024 - 04:05DROPS Design answered:
Dear Mrs Koch, do you get both tension right, ie in width as well as in height (24 double crochets (US-crochet terminology) and 13 rows = 4"x4" / 10 x 10 cm ? Then it should be correct with 7 cm for shoulder + 2 rows A.3 after joining straps (approx. 2 cm) + 13 increase rows (10 cm)= 7+2+10= approx. 19 cm. Happy crocheting!
22.10.2024 - 09:24
![]() Sophie wrote:
Sophie wrote:
Hello, I was wondering if the size the model is wearing (S, M, L, etc.) is listed anywhere for reference?
20.10.2024 - 18:58DROPS Design answered:
Dear Sophie, our models usually wear an M size in the photos. Happy knitting!
20.10.2024 - 20:00
![]() Hanna wrote:
Hanna wrote:
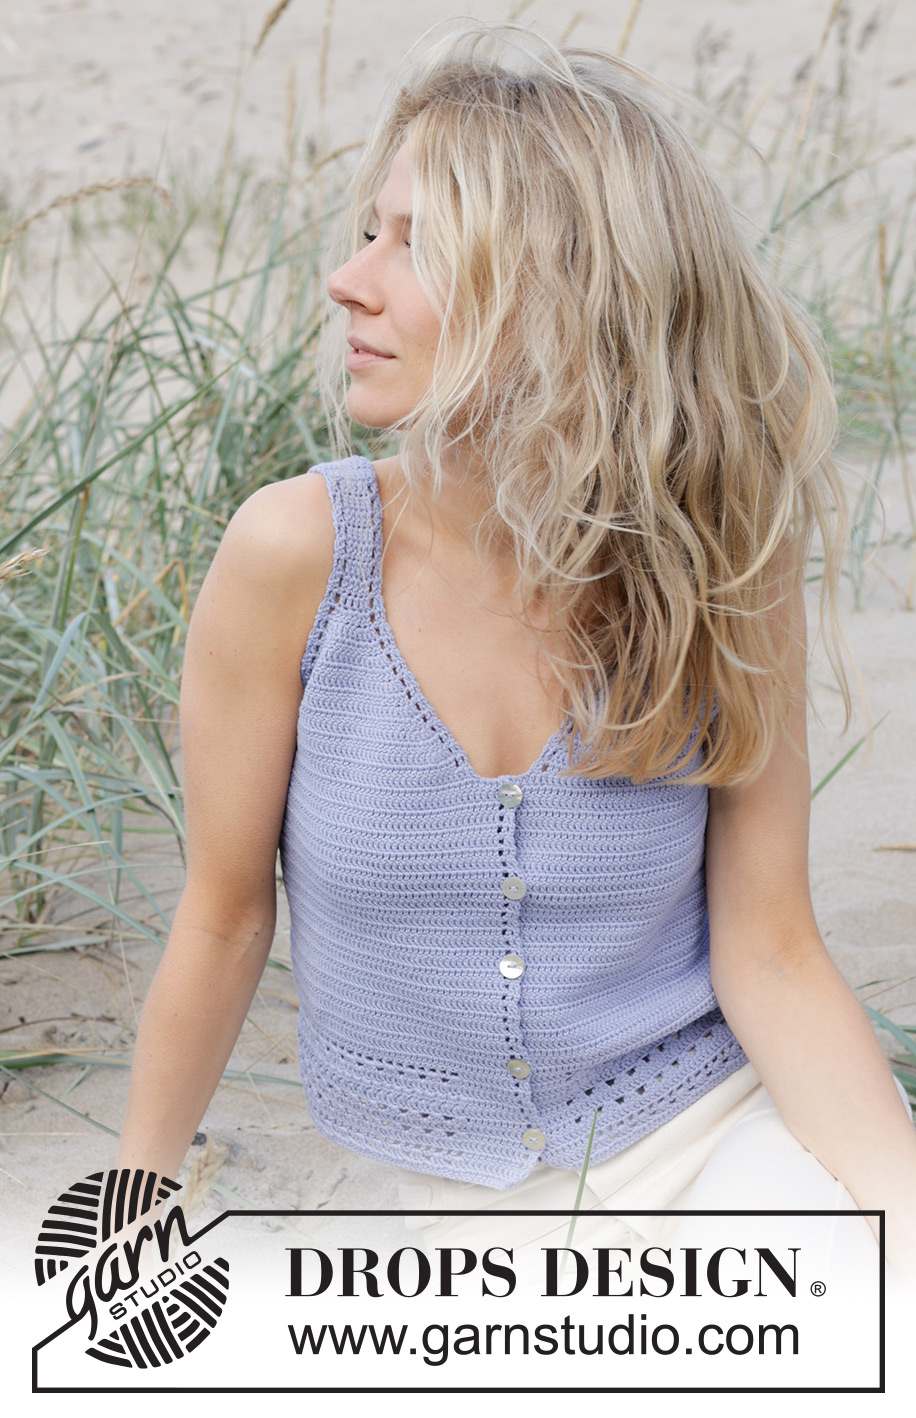
Jag undrar varför ni sällan kan visa baksidan av arbetet samt ge bilder som ligger platt utan modell fram och baksida? Om man har svårt att förstå mönstret kan det ibland underlätta med bild så man ser hur det ska se ut.
01.07.2024 - 20:18DROPS Design answered:
Hej Hanna, den vil se ud som DROPS 241-12 MEN med målene tilpasset ryggen til toppen du laver :)
02.07.2024 - 14:11
![]() Maria Alberola Boluda wrote:
Maria Alberola Boluda wrote:
Igual que Irene no acabo de entender como se hacen las uniones y como se reparten las cadenetas de unión
03.06.2024 - 00:12DROPS Design answered:
Hola Maria, comienzas con el delantero izquierdo y empiezas a trabajar sobre los puntos de cadeneta del final del delantero izquierdo. Después trabajas sobre los puntos del delantero izquierdo y trabajas puntos de cadeneta, que unen el delantero izquierdo a la espalda. Después de los puntos de cadeneta sigues trabajando sobre los puntos de la espalda. Al final de la espalda, montas otros puntos de cadeneta, que unen la espalda y el delantero derecho y terminas con 8 cadenetas al final del delantero derecho (como tenías en el izquierdo). Ya tienes unida la labor.
03.06.2024 - 00:53
![]() Amy wrote:
Amy wrote:
Hello, can you please clarify the increases on the front pieces where is says to increase on the 5th stitch from the side and the 5th and 6th stitch from the mid front? It’s not clear! Does this means that on each row (on the right piece) you start with an increase in the 5th stitch from the beginning of the row and then do the 2 increases in the 5th and 6th stitch before the end of the row, so that each different row will have the alternating increases on top of each other?
16.05.2024 - 08:47DROPS Design answered:
Dear Amy, you will increase for neck in the 5th + in the 6th stitch from edge and you will increase for armhole in the 5th stitch from edge, ie seen from RS: increase in the 5th + 6th st from beg of row (V-neck) + increase in the 5th st before end of row (armhole). From WS increase in the 5th st from edge (armhole) + in the 6th +5th st before end of the row (V-neck). Happy crocheting!
16.05.2024 - 13:50
![]() Marga wrote:
Marga wrote:
Sigo sin entenderlo. Al final del delantero izquierdo se hacen 8 puntos de cadeneta y vuelvo hacia atrás, total me quedarán 6 puntos altos, y después debo hacer lo mismo con el delantero derecho, pero como no uno a la espalda?
15.04.2024 - 06:30DROPS Design answered:
Hola Marga, después de los 8 puntos de cadeneta del delantero izquierdo, giras y trabajas la fila 2: empiezas trabajando 1 punto alto en el 4º pt de cadeneta (los 3 puntos de cadeneta anteriores forman 1 punto alto) y después 1 punto alto en cada punto de la fila anterior (tanto puntos altos como de cadeneta). De este modo, trabajando puntos altos hasta sobre las cadenetas de unión entre las secciones, tendrás todos los puntos del cuerpo unidos/ juntos o regulares. No tienes que repetir lo del 4º pt de cadeneta al final de la fila, porque ya trabajaste así al inicio de la fila anterior, en el delantero derecho.
21.04.2024 - 23:57
![]() Marga wrote:
Marga wrote:
Como se unen los delanteros a la espalda, me lio con los 8 puntos y los doce puntos, no entiendo cómo hacerlos y tejerlos.
14.04.2024 - 21:22DROPS Design answered:
Hola Marga, trabaja como sigue para la talla más pequeña: Trabajar 1 punto alto en el 4º punto de cadeneta desde el ganchillo (2 puntos altos), 1 punto alto en cada uno de los 4 puntos de cadeneta, 1 punto alto en cada punto alto/punto de cadeneta del delantero izquierdo, trabajar 8 puntos de cadeneta, 1 punto alto en cada punto alto/ puntos de cadeneta de la espalda, trabajar 8 puntos de cadeneta, 1 punto alto en cada punto alto/ puntos de cadeneta del delantero derecho, trabajar 8 puntos de cadeneta al final de la fila. Cuando te señalan la secuencia de números con guiones significa que es un número diferente para cada talla.
14.04.2024 - 23:52
![]() Marga wrote:
Marga wrote:
Las explicaciones no se entienden demasiado bien. Sobre todo a la hora de hacer las uniones, imposible de entender. No sé si podré terminarlo.
14.04.2024 - 21:10
|
||||||||||||||||
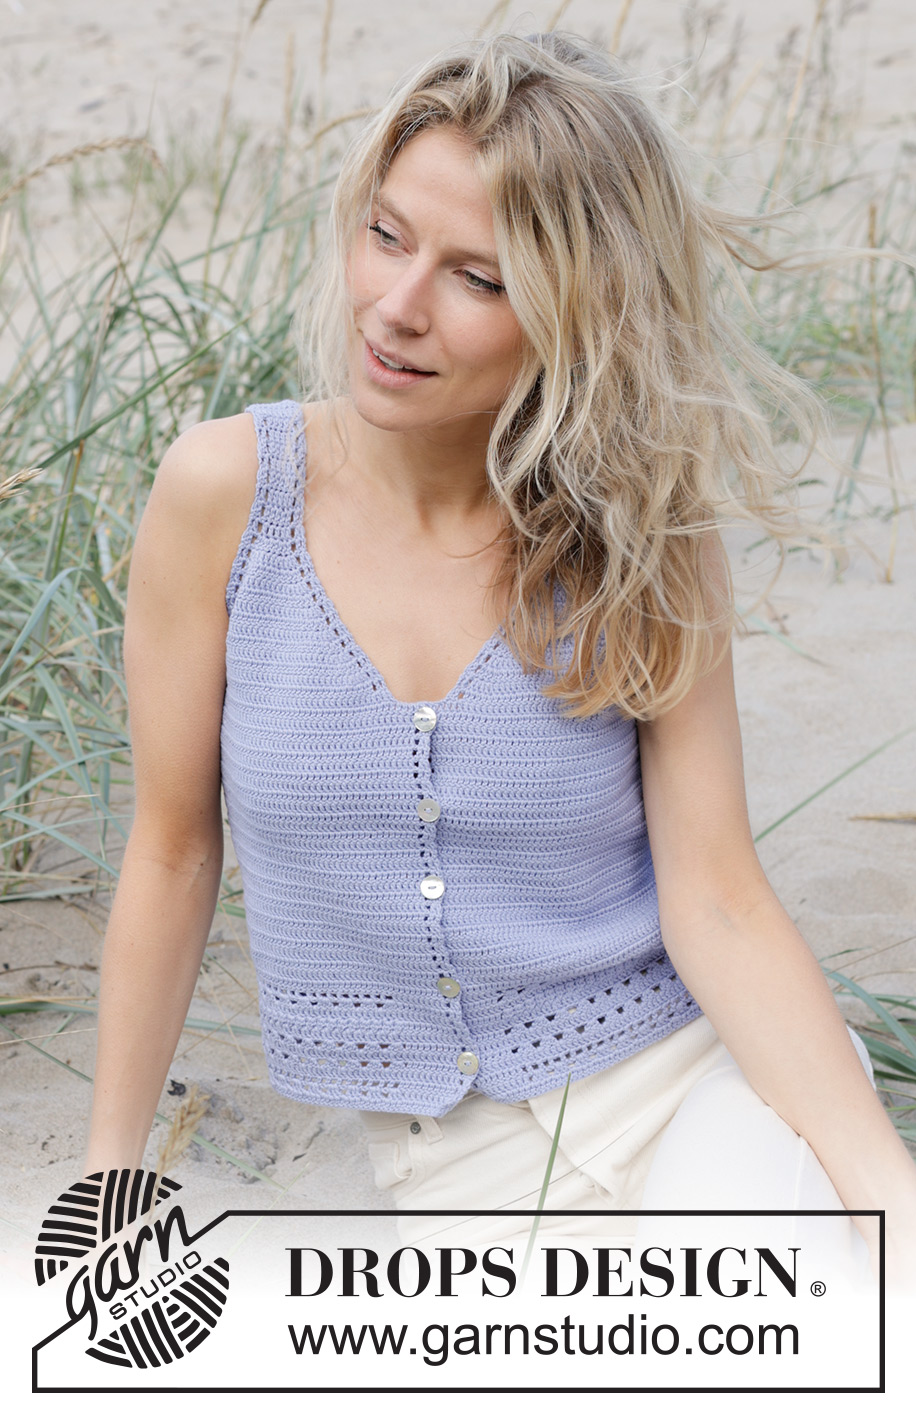
Scent of Lilac Vest#scentoflilacvest |
||||||||||||||||
 |
 |
|||||||||||||||
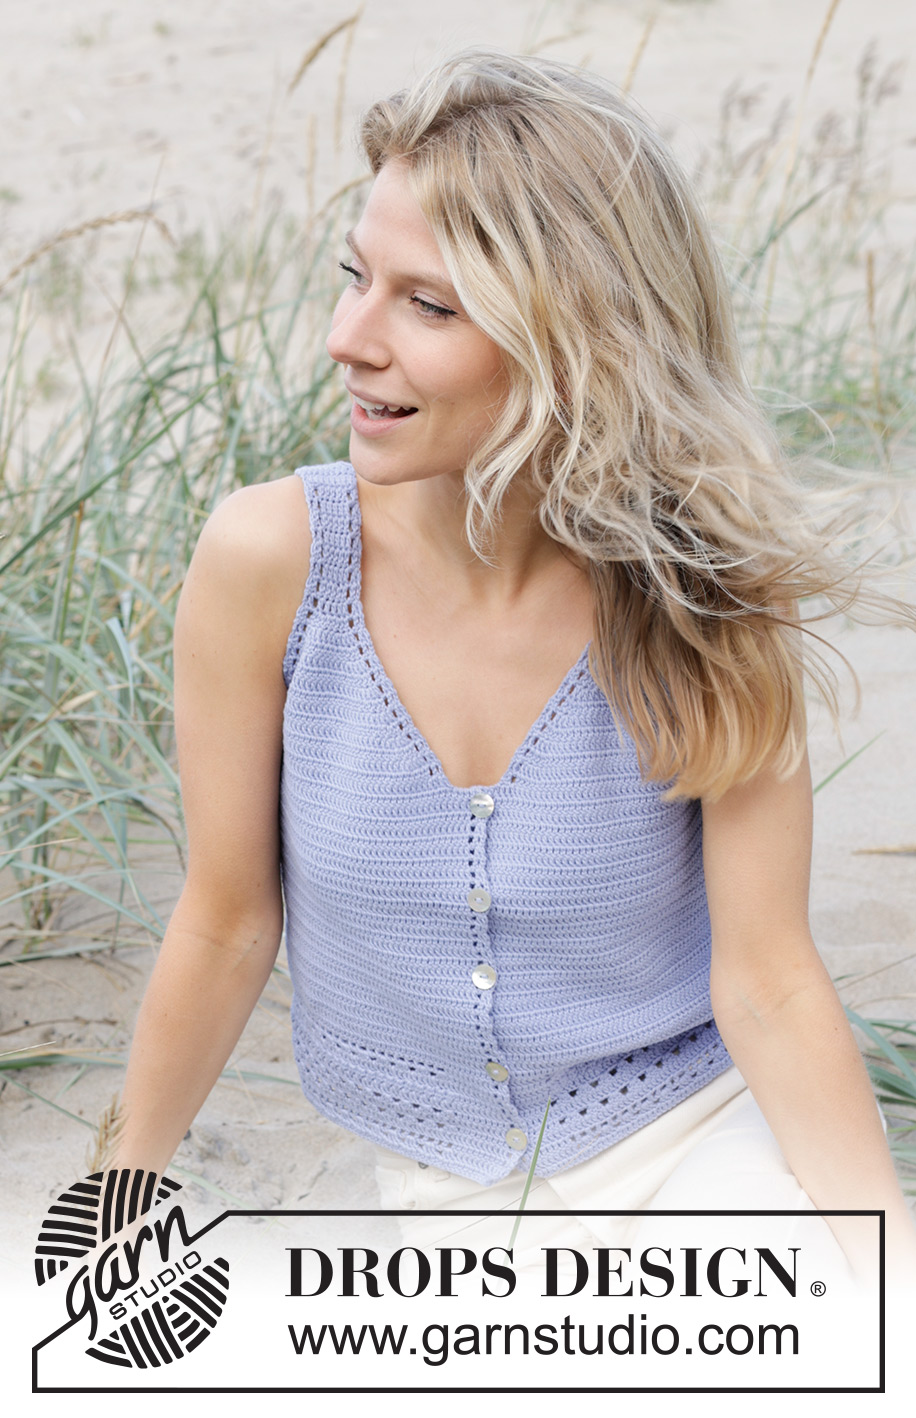
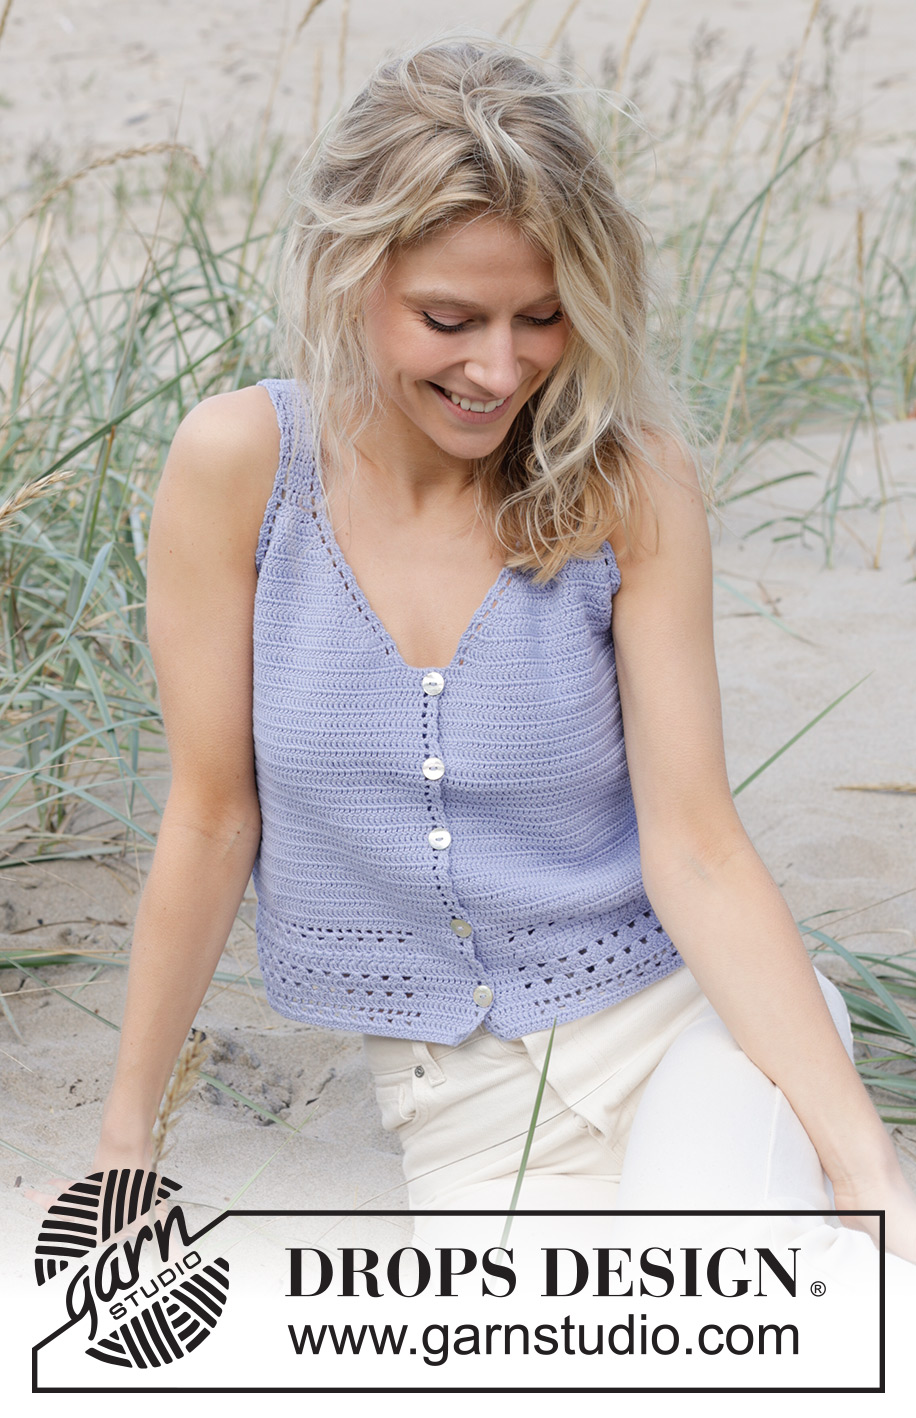
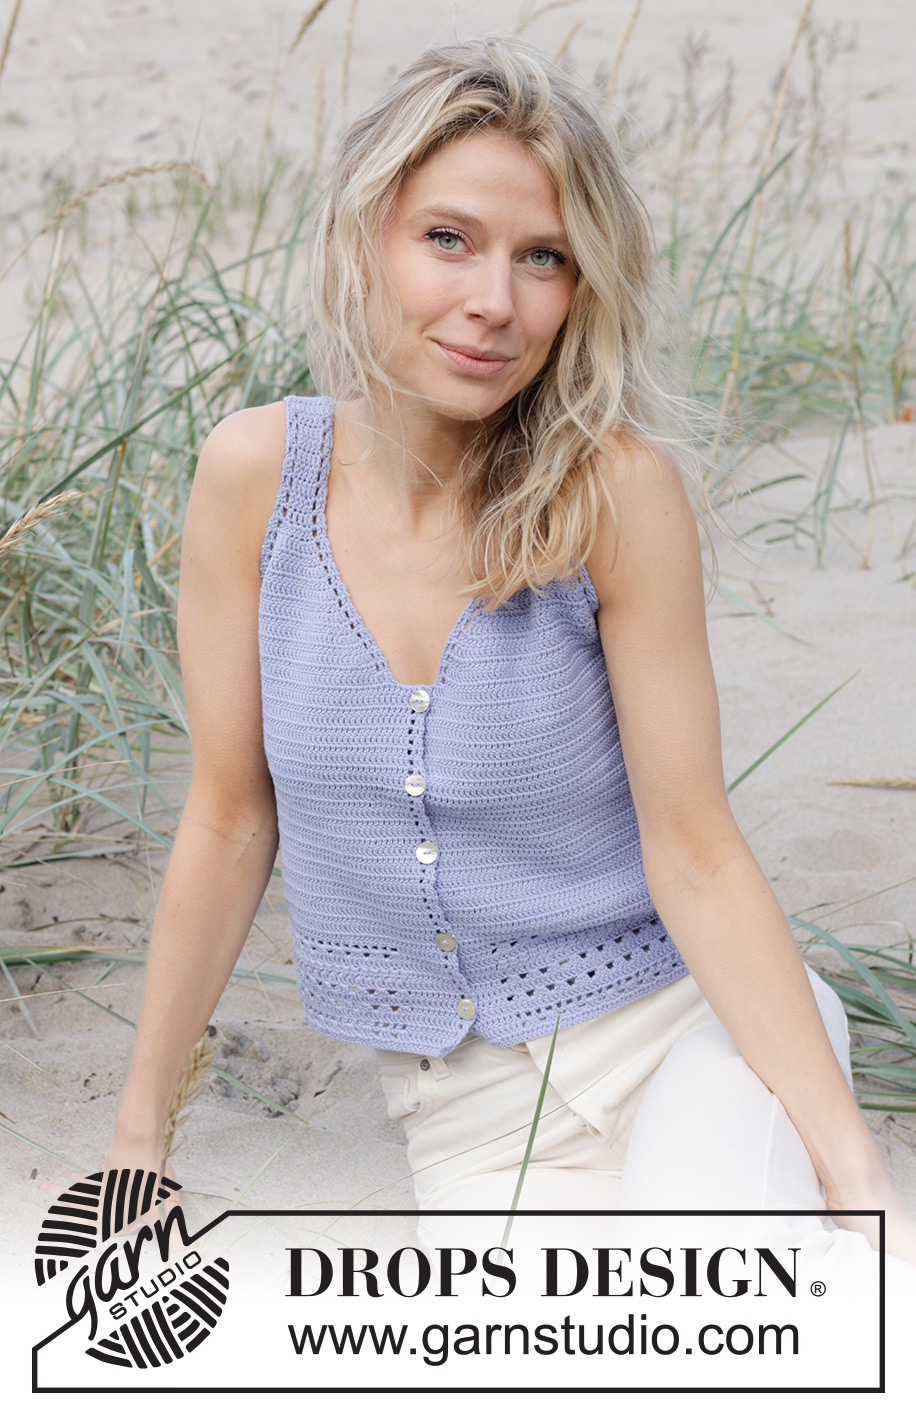
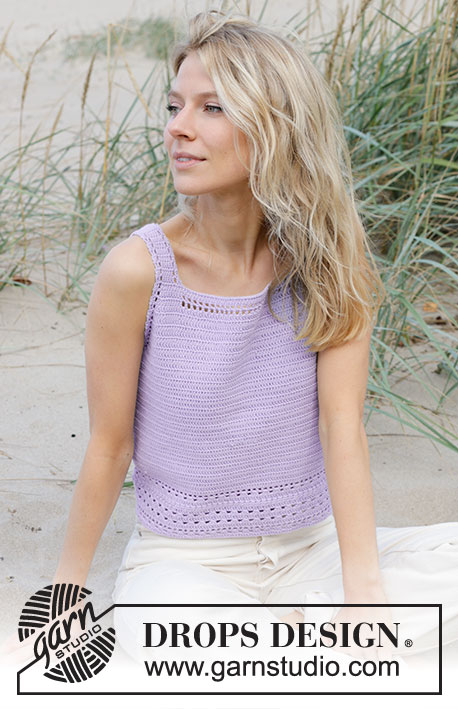
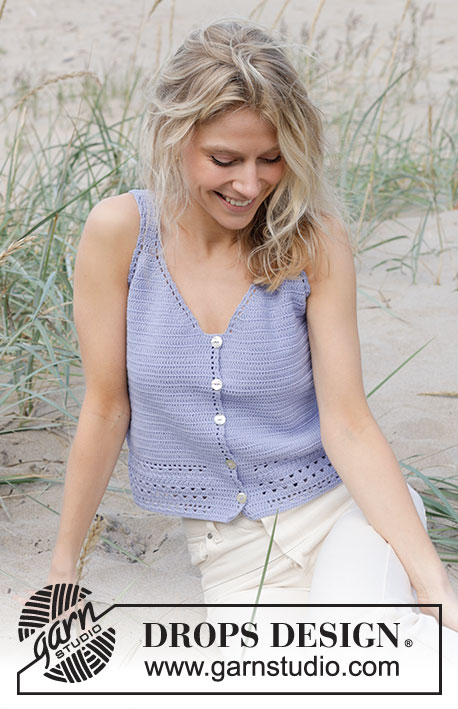
Crocheted top in DROPS Safran. The piece is worked top down with lace pattern. Sizes S - XXXL.
DROPS 241-28 |
||||||||||||||||
|
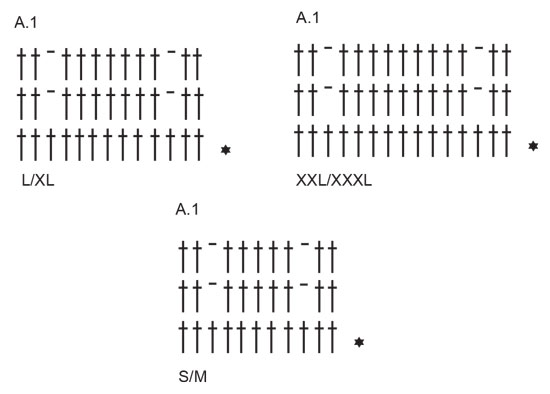
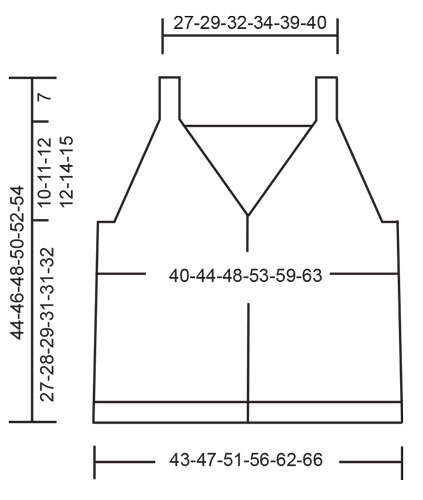
------------------------------------------------------- EXPLANATIONS FOR THE PATTERN: ------------------------------------------------------- CROCHET INFORMATION: At the beginning of each row of double crochets work 3 chain stitches which replace the first double crochet. CHAIN STITCH: If you work outermost on the hook the chain stitch will often be too tight; 1 chain stitch should be as long as 1 double crochet is wide. PATTERN: See diagrams A.1 to A.6. Choose diagram for your size in A.1. ------------------------------------------------------- START THE PIECE HERE: ------------------------------------------------------- TOP - SHORT OVERVIEW OF THE PIECE: The front and back pieces are begun separately, back and forth and top down, then joined and finished back and forth from mid-front. BACK PIECE: Work 13-13-15-15-17-17 CHAIN STITCHES – read description above, with hook size 3 MM = US C and DROPS Safran. Work 1 double crochet in the 4th chain stitch from the hook (2 double crochets) – read CROCHET INFORMATION, 1 double crochet in each of the next 9-9-11-11-13-13 chain stitches = 11-11-13-13-15-15 stitches. Continue with A.1, repeating the 2 top rows until the piece measures 7 cm = 2¾". Lay the piece to one side and work the second strap in the same way. Now work over both straps as follows: 1 double crochet in each of the 11-11-13-13-15-15 stitches from the first strap, work 43-47-51-55-63-67 chain stitches, 1 double crochet in each of the 11-11-13-13-15-15 stitches on the second strap = 65-69-77-81-93-97 stitches. On the next row work as follows: A.2 over the first 5 stitches, 1 double crochet in each double crochet/chain stitch until there are 5 stitches left, work A.2. Read the next section before continuing as you will work pattern as well as increasing for the armholes: On the next 2 rows work A.3 over the new stitches on the neck, A.2 over the 5 outermost stitches and 1 double crochet in each of the remaining stitches. When A.3 is finished, continue with 1 double crochet in each stitch and A.2 on each side. AT THE SAME TIME on the first row in A.3, increase 1 double crochet on each side by working 2 double crochets in 1 stitch (increase in the 5th stitch from the edge on both sides). Increase every row 11-12-13-14-16-17 times. After the increases there are 87-93-103-109-125-131 stitches and the piece measures approx. 17-18-19-19-21-22 cm = 6¾"-7"-7½"-7½"-8¼"-8¾". Finish with a row from the wrong side. Cut the strand. Lay the piece to one side and work the front pieces. RIGHT FRONT PIECE: Work 13-13-15-15-17-17 chain stitches with hook size 3 MM = US C and DROPS Safran. Work 1 double crochet in the 4th chain stitch from the hook (2 double crochets), 1 double crochet in each of the next 9-9-11-11-13-13 chain stitches = 11-11-13-13-15-15 stitches. Continue with A.1 for 7 cm = 2¾". Now increase in each side (differently at the beginning and end of the row). Continue with double crochets and A.2 over the outermost 5 stitches on each side and increase as follows: Increase 1 double crochet towards the side and 2 double crochets towards mid-front (increase every row in the 5th stitch from the side and the 5th and 6th stitch from the edge mid-front by working 2 double crochets in these stitches). Increase11-12-13-14-16-17 times (3 stitches increased each row). After all the increases there are 44-47-52-55-63-66 stitches and the piece measures approx 17-18-19-19-21-22 cm = 6¾"-7"-7½"-7½"-8¼"-8¾". Finish after a row from the wrong side. LEFT FRONT PIECE: Work 13-13-15-15-17-17 chain stitches with hook size 3 MM = US C and DROPS Safran. Work 1 double crochet in the 4th chain stitch from the hook (2 double crochets), 1 double crochet in each of the next 9-9-11-11-13-13 chain stitches = 11-11-13-13-15-15 stitches. Continue with A.1 for 7 cm = 2¾". Now increase in each side (differently at the beginning and end of the row). Continue with double crochets and A.2 over the outermost 5 stitches on each side and increase as follows: Increase 2 double crochets towards mid-front and 1 double crochet towards the side (increase every row in the 5th and 6th stitch from the edge mid-front and the 5th stitch from the side by working 2 double crochets in these stitches). Increase11-12-13-14-16-17 times (3 stitches increased each row). After all the increases there are 44-47-52-55-63-66 stitches and the piece measures approx 17-18-19-19-21-22 cm = 6¾"-7"-7½"-7½"-8¼"-8¾". Finish after a row from the wrong side, working 8 chain stitches at the end of the row. Now join the pieces. BODY: Work 1 double crochet in the 4th chain stitch from the hook (2 double crochets), 1 double crochet in each of the 4 chain stitches, 1 double crochet in each double crochet/chain stitch on the left front piece, work 8-12-12-18-16-20 chain stitches, 1 double crochet in each double crochet/chain stitch on the back piece, work 8-12-12-18-16-20 chain stitches, 1 double crochet in each double crochet/chain stitch on the right front piece, work 8 chain stitches at the end of the row. Turn and work 1 double crochet in the 4th chain stitch from the hook (2 double crochets), 1 double crochet in each of the 4 chain stitches, 1 double crochet in each double crochet/chain stitch to the end of the row = 203-223-243-267-295-315 stitches. Continue with A.4 over the right band, A.5 over the left band and 1 double crochet in each of the other stitches until the piece measures 18-19-20-21-22-23 cm = 7"-7½"-8"-8¼"-8¾"-9" from the join. Work 1 row and increase 14 double crochets evenly spaced (do not increase over A.4/ A.5) = 217-237-257-281-309-329 stitches. Work as follows from the right side: A.5, A.6 until there are 12 stitches left, work the first stitch in A.6, then A.4. When A.6 is finished, cut the strand. The top measures approx. 44-46-48-50-52-54 cm = 17¼"-18"-19"-19¾"-20½"-21¼" from the shoulder. ASSEMBLY: Sew the shoulder seams. Sew the buttons onto the left band; the top button 1 cm = ⅜" below the top edge, the bottom button 4 cm = 1½" up from the bottom edge, with the other 3-3-3-4-4-4 buttons evenly spaced between them. The buttons are buttoned through holes in the right band. |
||||||||||||||||
Diagram explanations |
||||||||||||||||
|
||||||||||||||||
|
||||||||||||||||
|
||||||||||||||||
|
||||||||||||||||
Have you finished this pattern?Tag your pictures with #dropspattern #scentoflilacvest or submit them to the #dropsfan gallery. Do you need help with this pattern?You'll find 6 tutorial videos, a Comments/Questions area and more by visiting the pattern on garnstudio.com. © 1982-2025 DROPS Design A/S. We reserve all rights. This document, including all its sub-sections, has copyrights. Read more about what you can do with our patterns at the bottom of each pattern on our site. |
||||||||||||||||


With over 40 years in knitting and crochet design, DROPS Design offers one of the most extensive collections of free patterns on the internet - translated to 17 languages. As of today we count 314 catalogs and 11821 patterns - 11811 of which are translated into English (US/in).
We work hard to bring you the best knitting and crochet have to offer, inspiration and advice as well as great quality yarns at incredible prices! Would you like to use our patterns for other than personal use? You can read what you are allowed to do in the Copyright text at the bottom of all our patterns. Happy crafting!
Post a comment to pattern DROPS 241-28
We would love to hear what you have to say about this pattern!
If you want to leave a question, please make sure you select the correct category in the form below, to speed up the answering process. Required fields are marked *.