
Popular categories
Looking for a yarn?


Comments / Questions (7)
![]() Petra Fallert wrote:
Petra Fallert wrote:
Wo finde ich das Diagram A.1 ?
02.03.2025 - 21:28DROPS Design answered:
Liebe Frau Fallert, Diagram A.1 finden Sie links der Maßskizze, unter die Zeichnungsbeschreibung. Viel Spaß beim Stricken!
03.03.2025 - 10:53
![]() Rebecca wrote:
Rebecca wrote:
Bonjour, j\'ai eu beau recommencer plusieurs fois, malgré le col que j\'ai finalement pas fait en double ... Le gilet fini n\'a absolument rien à voir avec la photo de description ... c\'est n\'importe quoi. Il y a un gros souci avec les explications françaises. je ne suis pas débutante, je tricote régulièrement vos patrons mais celui ci est à revoir.
28.12.2024 - 05:04
![]() Irene Fagerheim wrote:
Irene Fagerheim wrote:
Bærestykkeøkning- flytt de 4 merkene slik at de sitter i den ytterste masken på for og bakstykket?? Strikke i str 5/6 og har nå 205m. Hvor er de ytterste maskene? Burde stått antall masker på hvert stykke. Skal eg bare telle 35m på midten til hvert erme? Og sette merke der?
04.10.2024 - 09:06DROPS Design answered:
Hei Irene. Ta en titt på hjelpevideoen: Hvordan øke i bærestykket til et plagg med sadelskulder. Du skal sette maskene i den ytterste masken til for -og bakstykket (ikke helt lik videoen), men du ser da hvilken masker som er ytterst. Du finner hjelpevideoer til høyre / eller under bildet. mvh DROPS Design
15.10.2024 - 11:51
![]() Elli wrote:
Elli wrote:
In the instructions for double neck: … When the rib is finished, knit 1 row from the right side, where you increase (…)Purl 1 row from the right side (yarn overs are purled twisted… What should be done on the wrong side row in between these right side rows?
27.06.2024 - 19:52DROPS Design answered:
Dear Elli, this row should be worked from wrong side, pattern has now been edited, thanks for your feedback. Happy knitting!
28.06.2024 - 08:21
![]() VOISINplus wrote:
VOISINplus wrote:
Cardigan
27.04.2024 - 10:10
![]() Rei wrote:
Rei wrote:
(11~12 size ) Shouldn't the yoke increase be more than 81stitch?
01.09.2023 - 10:19DROPS Design answered:
Dear Rei, before yoke increases, there are 237 sts on needle in this size, then you increase (like raglan) 8 sts a total of 5 times on every other row = 40 sts increased + 237 = 277 sts before dividing. Can this help? Happy knitting!
01.09.2023 - 15:27
![]() Jennifer Martone wrote:
Jennifer Martone wrote:
I am having a hard time understanding stitch pattern used in this sweater. The picture shows a different stitch and the directions say knit every row garter stitch. The sweater is not done in garter stitch.
25.08.2022 - 00:42DROPS Design answered:
Dear Mrs Martone, the pattern in this jacket is worked following diagram A.1, work as follow over 2 sts: from RS: K1, P1, from WS, P2 (read from the left towards the right), repeat these 2 rows, in other words, you will get rib (1 stitch in stocking stitch (1st st in A.1), 1 stitch in garter stitch (2nd stitch in A.1). Happy knitting!
25.08.2022 - 09:36
|
|||||||||||||||||||
Weekend Games#weekendgamescardigan |
|||||||||||||||||||
 |
 |
||||||||||||||||||
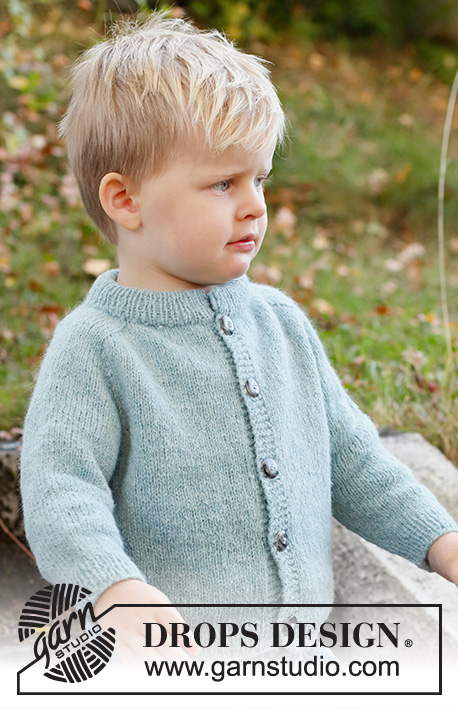
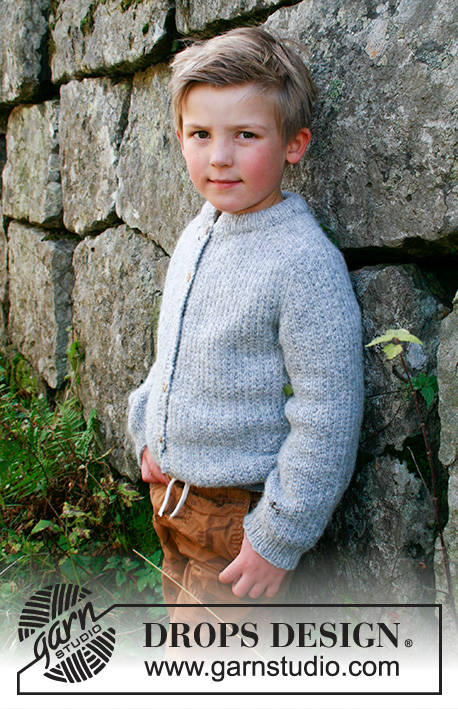
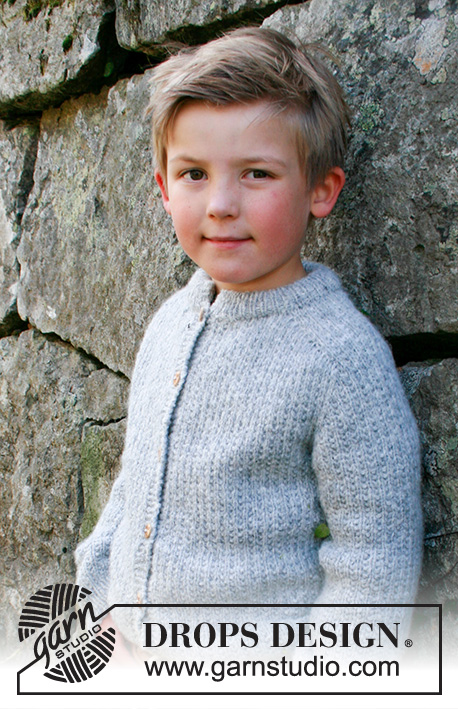
Knitted jacket for children in DROPS Sky. The piece is worked top down with double neck, textured pattern and saddle shoulders. Sizes 3 – 14 years.
DROPS Children 40-18 |
|||||||||||||||||||
|
------------------------------------------------------- EXPLANATIONS FOR THE PATTERN: ------------------------------------------------------- RIDGE/GARTER STITCH (worked back and forth): Knit all rows. 1 ridge in height = Knit 2 rows. PATTERN: See diagram A.1. The diagram shows all rows in the pattern from the right side. INCREASE TIP-1 (evenly spaced): To work out how to increase evenly, count the total number of stitches on the needle (e.g. 87 stitches) minus bands (e.g. 10 stitches) and divide the remaining stitches by the number of increases to be made (e.g. 18) = 4.3. In this example, increase by making 1 yarn over after approx. each 4th stitch. Do not increase on bands. On the next row work the yarn overs twisted to avoid holes. INCREASE TIP-2 (for saddle shoulders, sleeves and yoke, from the RIGHT SIDE): BEFORE MARKER: The new stitch twists to the right. Use the left needle to pick up the strand between 2 stitches from the previous row, pick up the back strand and knit in the front loop. AFTER MARKER: The new stitch twists to the left. Use the left needle to pick up the strand between 2 stitches from the previous row, pick up the front strand and knit in the back loop. INCREASE TIP-3 (for saddle shoulders, from the WRONG SIDE): BEFORE MARKER: The new stitch twists to the right. Use the left needle to pick up the strand between 2 stitches from the previous row, pick up the front strand and purl in the back loop. AFTER MARKER: The new stitch twists to the left. Use the left needle to pick up the strand between 2 stitches from the previous row, pick up the back strand and purl in the front loop. DECREASE TIP (for sleeves): Start 2 stitches before the marker thread, knit 2 together, work the marker-stitch as before, slip 1 stitch as if to knit, knit 1 and pass the slipped stitch over the knitted stitch (2 stitches decreased). BUTTONHOLES: Work buttonholes on the right band (when the garment is worn). Work from the right side when there are 3 stitches left on the row as follows: Make 1 yarn over, knit 2 together and knit 1. On the next row, knit the yarn over to leave a hole. The first buttonhole is worked when the neck is finished (in the transition between the neck and the yoke). The other 4-5-5-6-6-6 buttonholes are then worked with approx. 7-7-7½-7-7-7½ cm between each one. CASTING-OFF TIP: To avoid the cast-off edge being tight you can cast off with a larger size needle. If the edge is still tight, make 1 yarn over after approx. each 6th stitch at the same time as casting off; the yarn overs are cast off as normal stitches. ------------------------------------------------------- START THE PIECE HERE: ------------------------------------------------------- JACKET – SHORT OVERVIEW OF THE PIECE: The neck and yoke are worked back and forth with circular needle, from mid-front and top down. Stitches are increased for the saddle shoulders, then for the sleeves and finally for the yoke. The yoke is divided for the body and sleeves and the body continued back and forth. The sleeves are worked in the round with double pointed needles, top down. DOUBLE NECK: Cast on 87-89-91-93-95-99 stitches (including 5 band stitches on each side towards mid-front) with circular needle size 3 mm and Sky. Purl 1 row (= wrong side). The next row is worked as follows from the right side: 1 edge stitch in GARTER STITCH – read description above, * knit 1, purl 1 *, work from *-* until there are 2 stitches left on the row, knit 1 and 1 edge stitch in garter stitch. Continue this rib for 7 cm. When the rib is finished, knit 1 row from the right side, where you increase 18-20-22-24-22-22 stitches evenly spaced – read INCREASE TIP-1 and remember the BUTTONHOLE on the right band – read description above = 105-109-113-117-117-121 stitches. Purl 1 row from the wrong side (yarn overs are purled twisted and 5 outermost stitches on each side are knitted = bands). Now work the yoke as described below. YOKE: Change to circular needle size 4 mm. Insert 1 marker after the band at the beginning of the row. The yoke is measured from this marker! In addition insert 4 other markers, without working the stitches, as follows – each marker is inserted between 2 stitches, is used when increasing for the saddle shoulders and should have a different colour to the marker on the neck. Marker 1: Start at the beginning of the row and count 21-22-22-22-22-23 stitches (= front piece), insert the marker before the next stitch. Marker 2: Count 15-15-17-19-19-19 stitches from marker 1 (= shoulder), insert the marker before the next stitch. Marker 3: Count 33-35-35-35-35-37 stitches from marker 2 (= back piece), insert the marker before the next stitch. Marker 4: Count 15-15-17-19-19-19 stitches from marker 3 (= shoulder), insert the marker before the next stitch. There are 21-22-22-22-22-23 stitches left on the row after marker 4 (= front piece). Allow these 4 markers to follow your work onwards. SADDLE-SHOULDER INCREASES: Read the whole section before continuing! Work A.1 with 5 band stitches in garter stitch on each side towards mid-front. AT THE SAME TIME, on the first row from the right side, increase 4 stitches for the shoulders as follows: Increase BEFORE markers 1 and 3 and AFTER markers 2 and 4 – read INCREASE TIP-2. You are only increasing on the front and back pieces, the number of shoulder stitches remains the same. On the next row from the wrong side, increase 4 stitches for the shoulders as follows: Increase BEFORE markers 4 and 2 and AFTER markers 3 and 1 – read INCREASE TIP-3. You are increasing EVERY row, differently from the right and wrong sides, so the stitches lie neatly. Continue the pattern and increase every row (both on the right and wrong side) a total of 12-14-16-20-22-26 times = 153-165-177-197-205-225 stitches – the increased stitches are worked into A.1. REMEMBER THE KNITTING TENSION! After the last increase the piece measures approx. 4-5-6-7-8-9 cm from the marker on the neck. Now increase for the sleeves as follows. SLEEVE INCREASES: Continue A.1 with 5 band stitches in garter stitch on each side towards mid-front. AT THE SAME TIME on the next row from the right side increase 4 stitches for the sleeves as follows: Increase AFTER markers 1 and 3 and BEFORE markers 2 and 4 – remember INCREASE TIP-2. You increase only on the sleeves and the number of stitches on the front and back pieces remains the same. The new stitches are worked into A.1. Increase like this every 2nd row (each row from the right side) a total of 10-10-8-7-8-8 times = 193-205-209-225-237-257 stitches. The piece measures approx. 11-12-12-12-14-15 cm from the marker on the neck. Now increase for the yoke as described below. YOKE INCREASES: Move each marker so they are inserted in the outermost stitch on each side of the front and back pieces. There are 35-35-33-33-35-35 stitches between the marker-stitches on each sleeve. On the next row from the right side increase 8 stitches, by increasing both before and after all 4 marker-stitches – remember INCREASE TIP-2. You are now increasing on the front/back pieces and on the sleeves; the increased stitches are worked into A.1. Increase like this every 2nd row (each row from the right side) a total of 5-5-6-5-5-4 times = 233-245-257-265-277-289 stitches. When all the increases are finished, the piece measures approx. 15-16-16-17-18-19 cm from the marker on the neck. Continue working, without further increases, until the piece measures 15-16-16-17-18-19 cm from the marker on the neck. Now divide the yoke for the body and sleeves as follows: Work the first 38-40-42-44-46-48 stitches as before (front piece), place the next 46-48-50-50-52-54 stitches on 1 thread for the sleeve, cast on 6-6-6-8-8-8 new stitches (= in side under sleeve), work the next 65-69-73-77-81-85 stitches as before (= back piece), place the next 46-48-50-50-52-54 stitches on 1 thread for the sleeve, cast on 6-6-6-8-8-8 new stitches (= in side under sleeve), work the last 38-40-42-44-46-48 stitches (= front piece). The body and sleeves are finished separately. THE PIECE IS NOW MEASURED FROM HERE. . BODY: = 153-161-169-181-189-197 stitches. Continue A.1 back and forth with 5 band stitches in garter stitch on each side until the piece measures 15-18-21-24-25-26 cm from the division. There is approx. 3 cm left to finished length; try the jacket on and work to desired length. Change to circular needle size 3 mm. The next row is worked as follows from the right side : 5 band stitches in garter stitch, * knit 1, purl 1 *, work from *-* until there are 6 stitches left, knit 1 and 5 band stitches in garter stitch (the rib should fit A.1 neatly, with knit over knit and purl over garter stitch). Continue this rib for 3 cm. Cast off with garter stitch over garter stitch, knit over knit and purl over purl – remember CASTING-OFF TIP! The jacket measures approx. 36-40-44-48-50-52 cm from the shoulder down. SLEEVES: Place the 46-48-50-50-52-54 stitches from the thread on the one side of the piece on double pointed needles size 4 mm and knit up 1 stitch in each of the 6-6-6-8-8-8 stitches cast on under the sleeve = 52-54-56-58-60-62 stitches. Insert a marker thread in the middle of the 6-6-6-8-8-8 new stitches under the sleeve. Start at the marker thread and work A.1 in the round – make sure the pattern continues the pattern on the yoke. When the sleeve measures 3 cm from the division, decrease 2 stitches mid-under the sleeve – read DECREASE TIP. Decrease like this every 2½-2½-3½-3½-4-4 cm a total of 7-8-8-9-9-10 times = 38-38-40-40-42-42 stitches. Continue working without further decreases until the sleeve measures 21-25-30-34-38-42 cm from the division. There is approx. 3 cm left to finished length; try the jacket on and work to desired length. Change to double pointed needles size 3 mm and work rib (knit 1, purl 1) for 3 cm, making sure the rib matches neatly over A.1. Cast off with knit over knit and purl over purl – remember CASTING-OFF TIP! The sleeve measures approx. 24-28-33-37-41-45 cm from the division. Work the other sleeve in the same way. ASSEMBLY: Fold the neck double to the wrong side and sew down. To avoid the neck being tight and rolling outwards, it is important the seam is elastic. Sew together the openings at the top of the bands with small stitches. Sew the buttons onto the left band. |
|||||||||||||||||||
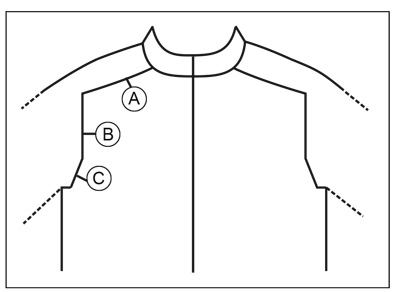
Diagram explanations |
|||||||||||||||||||
|
|||||||||||||||||||
|
|||||||||||||||||||
|
|||||||||||||||||||
Have you finished this pattern?Tag your pictures with #dropspattern #weekendgamescardigan or submit them to the #dropsfan gallery. Do you need help with this pattern?You'll find 34 tutorial videos, a Comments/Questions area and more by visiting the pattern on garnstudio.com. © 1982-2025 DROPS Design A/S. We reserve all rights. This document, including all its sub-sections, has copyrights. Read more about what you can do with our patterns at the bottom of each pattern on our site. |
|||||||||||||||||||


With over 40 years in knitting and crochet design, DROPS Design offers one of the most extensive collections of free patterns on the internet - translated to 17 languages. As of today we count 314 catalogues and 11822 patterns translated into English (UK/cm).
We work hard to bring you the best knitting and crochet have to offer, inspiration and advice as well as great quality yarns at incredible prices! Would you like to use our patterns for other than personal use? You can read what you are allowed to do in the Copyright text at the bottom of all our patterns. Happy crafting!
Post a comment to pattern DROPS Children 40-18
We would love to hear what you have to say about this pattern!
If you want to leave a question, please make sure you select the correct category in the form below, to speed up the answering process. Required fields are marked *.