
Looking for a yarn?


Comments / Questions (6)
![]() Hannele wrote:
Hannele wrote:
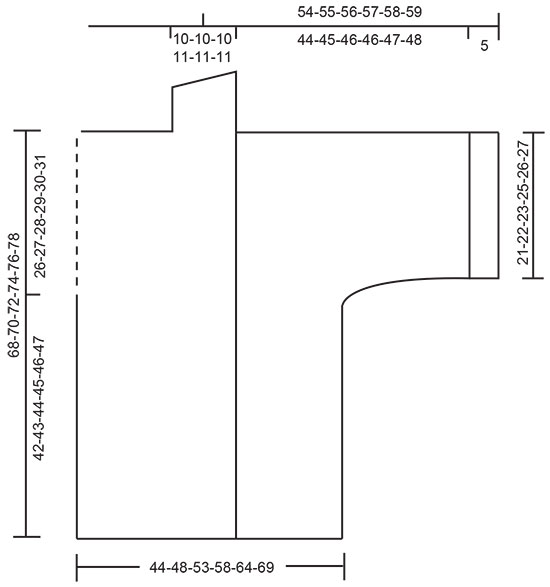
Onko mittapiirroksen jakun keskellä menevä viiva ajkun keskiviiva vai kuvaako se etu-/takakappaletta? Yritän hahmottaa helman ympärysmittaa mutta piirros on tältä osin hieman epäselvä.
19.03.2024 - 16:46DROPS Design answered:
Tämä viiva näyttää miten leveä etukappale on suhteessa takakappaleeseen.
21.03.2024 - 17:31
![]() Nedia wrote:
Nedia wrote:
Bonjour J aurais une petite question qui me tracasse et qui m empêche de réaliser ce modèle ou pleins d autres,,, Comment devons nous travailler avec une aiguille circulaire alors a que je sache quand on travail avec ça résulte a un travail en rond fermé alors qu il devrait y avoir une ouverture par devant.. Pouvez vous éclairer ma lanterne et merci d avance
04.03.2024 - 13:56DROPS Design answered:
Bonjour Nedia, on utilise très souvent des aiguilles circulaires pour tricoter en allers et retours, on a ainsi beaucoup plus de place pour y loger toutes les mailles nécessaires à la réalisation de l'ouvrage, et il suffit de simplement tourner l'ouvrage à chaque fois pour tricoter alternativement sur l'endroit et sur l'envers, dans cette vidéo par exemple, nous montrons comment tricoter du jersey en allers et retours sur aiguille circulaire. Bon tricot!
04.03.2024 - 15:41
![]() Linnéa wrote:
Linnéa wrote:
Hei. Hvordan vil dere anbefale at man starter hver nytt varv for å få en pen kant på stolpene? Skal jeg ta første masken løst av. Eller har dere en bedre og penere måte å anbefale?
15.05.2022 - 22:41DROPS Design answered:
Hei Linnéa. I oppskriften begynner du med å strikke masken som vanlig, altså den strikkes, noen syns det blir penest med å løfte 1. maske over og så strikke videre. Dette er mer smak og behag hva den enkelte ønsker. Men strikk en prøvelapp der du strikker 1. maske på den ene siden og på den andre siden løfter du 1. maske over. Bruke den metoden du syns blir penest (med det garnet du skal bruke). mvh DROPS Design
16.05.2022 - 11:44
![]() Birgitte wrote:
Birgitte wrote:
Diagrammerne???
12.03.2021 - 11:36DROPS Design answered:
Hej Birgitte, dem skal vi få lagt ud om et øjeblik - tak for info :)
12.03.2021 - 11:41
![]() CATHERINE wrote:
CATHERINE wrote:
J'ai hate
18.02.2021 - 19:32
![]() Jnafou wrote:
Jnafou wrote:
Je le veux
05.02.2021 - 12:35
|
||||||||||||||||
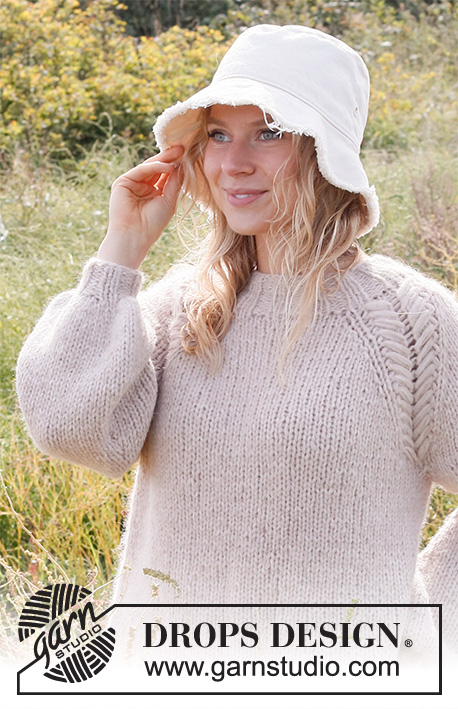
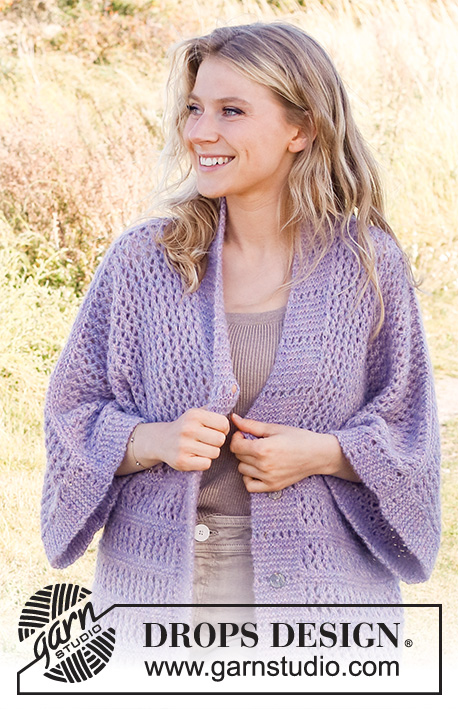
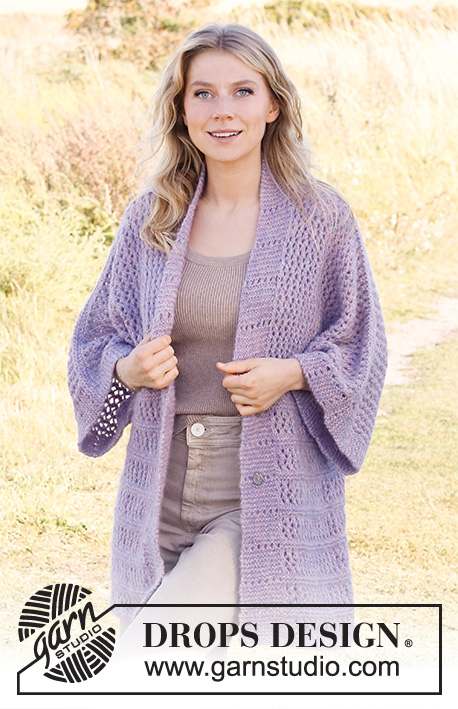
French Countryside#frenchcountrysidejacket |
||||||||||||||||
 |
 |
|||||||||||||||
Knitted jacket in DROPS Air. The piece is worked with lace pattern and shawl collar. Sizes S - XXXL.
DROPS 222-36 |
||||||||||||||||
|
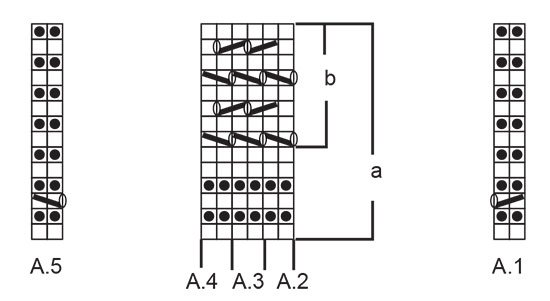
------------------------------------------------------- EXPLANATIONS FOR THE PATTERN: ------------------------------------------------------- RIDGE/GARTER STITCH (worked back and forth): Knit all rows. 1 ridge in height = Knit 2 rows. PATTERN: See diagrams A.1 to A.5. The diagrams show all rows in the pattern from the right side. BUTTONHOLES: Work buttonholes on right band. 1 BUTTONHOLE = Knit the third and fourth stitch from the edge together and make 1 yarn over. On the next row knit the yarn over to leave a hole. Work buttonholes when the piece measures: S: 31 and 43 cm = 12¼" and 17" M: 31 and 43 cm = 12¼" and 17" L: 31 and 43 cm = 12¼" and 17" XL: 37 and 49 cm = 14½" and 19¼" XXL: 37 and 49 cm = 14½" and 19¼" XXXL: 37 and 49 cm = 14½" and 19¼" ------------------------------------------------------- START THE PIECE HERE: ------------------------------------------------------- JACKET – SHORT OVERVIEW OF THE PIECE: The jacket is worked back and forth from mid front as far as the sleeves. Each part is finished separately. New stitches are cast on for the sleeves. BODY: Cast on 150-160-176-196-214-230 stitches (including 12-12-12-14-14-14 band stitches on each side) with circular needle size 5.5 MM = US 9 and Air. Work as follows, from the right side: A.1 (= 2 stitches) over the first 12-12-12-14-14-14 stitches (= band), A.2a (= 2 stitches), A.3a over the next 122-132-148-164-182-198 stitches, A.4a (= 2 stitches) and finish with A.5 (= 2 stitches) over the last 12-12-12-14-14-14 stitches (= band). REMEMBER THE KNITTING GAUGE! Continue this pattern onwards until you have worked 7-7-7-8-8-8 repeats of the diagrams in height. Remember the BUTTONHOLES – read description above. Work the first 6 rows in the diagrams, then repeat A.2b, A.3b. A.4b to finished length, with the bands worked as before. When the piece measures 42-43-44-45-46-47 cm = 16½"-17"-17¼"-17¾"-18"-18½", place the first and last 40-42-46-52-56-60 stitches on threads = 70-76-84-92-102-110 stitches on the needle. Each piece is finished separately. BACK PIECE: = 70-76-84-92-102-110 stitches. Continue the pattern as before and cast on stitches for the sleeves at the end of each row on both sides as follows: Cast on 10 stitches 4-4-4-3-3-3 times and 12-10-8-16-12-10 stitches 1 time, the new stitches are worked in garter stitch until all the stitches have been cast on. When all the stitches are cast on, there are 174-176-180-184-186-190 stitches on the needle, and the pattern is worked like this from the right side: A.1 over de first 8 stitches (= sleeve-edge), A.2b (= 2 stitches), A.3b over the next 154-156-160-164-166-170 stitches, A.4b (= 2 stitches) and A.5 (= 2 stitches) over the last 8 stitches (= sleeve-edge). Continue this pattern onwards. When the piece measures 23-24-25-26-27-28 cm = 9"-9½"-9¾"-10¼"-10⅝"-11" from the first cast-on stitches for the sleeves (the piece measures a total of approx. 65-67-69-71-73-75 cm = 25½"-26⅜"-27⅛"-28"-28¾"-29½"), bind off the middle 14-14-14-16-16-16 stitches for the neck and each shoulder/sleeve is finished separately = 80-81-83-84-85-87 stitches on each shoulder/sleeve. On the next row from the neck bind off 1 stitch = 79-80-82-83-84-86 stitches. When the piece measures 25-26-27-28-29-30 cm = 9¾"-10¼"-10⅝"-11"-11⅜"-11¾" from the first cast-on stitches (the piece measures a total of 67-69-71-73-75-77 cm = 26⅜"-27⅛"-28"-28¾"-29½"-30⅜") work 1 RIDGE – read description above, bind off. Work the other shoulder/sleeve in the same way. RIGHT FRONT PIECE: Place the first 40-42-46-52-56-60 stitches back on the needle. Continue the pattern as before but at the end of each row from the right side cast on new stitches for the sleeve as on the back piece = 92-92-94-98-98-100 stitches. The new stitches are worked in garter stitch until all of the stitches has been cast on. When all stitches are cast on work pattern as follows from the right side: A.1 over the first 12-12-12-14-14-14 stitches (= band), A.2b (= 2 stitches), A.3b over the next 68-68-70-72-72-74 stitches, A.4b (= 2 stitches) and A.5 (= 2 stitches) over the last 8 stitches (= sleeve-edge). Continue this pattern onwards. When the piece measures 25-26-27-28-29-30 cm = 9¾"-10¼"-10⅝"-11"-11⅜"-11¾" from the first cast-on stitches for the sleeves (the piece measures a total of 67-69-71-73-75-77 cm = 26⅜"-27⅛"-28"-28¾"-29½"-30⅜"), work 1 ridge over all stitches. On the next row bind off the first 80-80-82-84-84-86 stitches from the wrong side and work garter stitch to the end of the row = 12-12-12-14-14-14 stitches left for the shawl collar. Work short rows in garter stitch over these stitches, starting from the right side as follows: Work 1 row over the first 8-8-8-9-9-9 stitches, turn and work back, work 1 row over all stitches, turn and work back. Continue like this until the collar measures 7-7-7-8-8-8 cm = 2¾"-2¾"-2¾"-3⅛"-3⅛"-3⅛" along the shortest edge. Bind off. LEFT FRONT PIECE: Place the last 40-42-46-52-56-60 stitches back on the needle. Continue the pattern as before but at the end of each row from the wrong side cast on new stitches for the sleeve as on the back piece = 92-92-94-98-98-100 stitches. The new stitches are worked in garter stitch until all of the stitches has been cast on. When all stitches are cast on work pattern as follows from the right side: A.2 (= 2 stitches) over the first 8 stitches (= sleeve-edge), A.4b (= 2 stitches), A.3b over the next 68-68-70-72-72-74 stitches, A.2b (= 2 stitches) and A.1 (= 2 stitches) over the last 12-12-12-14-14-14 stitches (= band). Continue this pattern onwards. When the piece measures 25-26-27-28-29-30 cm = 9¾"-10¼"-10⅝"-11"-11⅜"-11¾" from the first cast-on stitches for the sleeves (the piece measures a total of 67-69-71-73-75-77 cm = 26⅜"-27⅛"-28"-28¾"-29½"-30⅜"), work 1 ridge over all stitches. On the next row bind off the first 80-80-82-84-84-86 stitches from the right side and work garter stitch to the end of the row = 12-12-12-14-14-14 stitches left for the shawl collar. Work short rows in garter stitch over these stitches, starting from the wrong side as follows: Work 1 row over the first 8-8-8-9-9-9 stitches, turn and work back, work 1 row over all stitches, turn and work back. Continue like this until the collar measures 7-7-7-8-8-8 cm = 2¾"-2¾"-2¾"-3⅛"-3⅛"-3⅛" along the shortest edge. Bind off. ASSEMBLY: Sew the shoulder and sleeve seams. Sew the collar together mid-back (the seam should be on the wrong side when the collar is folded down). Sew the collar to the back piece. Sew the buttons onto the left band. |
||||||||||||||||
Diagram explanations |
||||||||||||||||
|
||||||||||||||||
|
||||||||||||||||
|
||||||||||||||||
Have you finished this pattern?Tag your pictures with #dropspattern #frenchcountrysidejacket or submit them to the #dropsfan gallery. Do you need help with this pattern?You'll find 20 tutorial videos, a Comments/Questions area and more by visiting the pattern on garnstudio.com. © 1982-2025 DROPS Design A/S. We reserve all rights. This document, including all its sub-sections, has copyrights. Read more about what you can do with our patterns at the bottom of each pattern on our site. |
||||||||||||||||


With over 40 years in knitting and crochet design, DROPS Design offers one of the most extensive collections of free patterns on the internet - translated to 17 languages. As of today we count 314 catalogs and 11822 patterns - 11812 of which are translated into English (US/in).
We work hard to bring you the best knitting and crochet have to offer, inspiration and advice as well as great quality yarns at incredible prices! Would you like to use our patterns for other than personal use? You can read what you are allowed to do in the Copyright text at the bottom of all our patterns. Happy crafting!
Post a comment to pattern DROPS 222-36
We would love to hear what you have to say about this pattern!
If you want to leave a question, please make sure you select the correct category in the form below, to speed up the answering process. Required fields are marked *.