
Popular categories
Looking for a yarn?


Comments / Questions (91)
![]() Jonathan wrote:
Jonathan wrote:
Hello. This is my first double neck Jersey. Can you explain the technique for sewing down the double neck? do you use yarn or elastic? the tail yarn or new yarn? Does the type of cast on make a difference? Thank you
10.04.2021 - 21:52DROPS Design answered:
Dear Jonathan, for sewing down teh double neck you should use the yarn. You can use the tail, if it is long enough, or you can use a separate piece, but make sure to sew in the ends carefully. Make sure, your sewing is not to thight. As for the cast on, the more flexible it is, the better. Happy Knitting!
11.04.2021 - 03:10
![]() Curcio Mirella wrote:
Curcio Mirella wrote:
Buongiorno , sto lavorando questo maglione im piano , non con i ferri circolari , ma non capisco se gli aumenti della spalla a sella devo farli anche dal rovescio del lavoro , grazie
10.04.2021 - 07:12DROPS Design answered:
Buongiorno Mirella, gli aumenti per le spalle si lavorano su ogni giro. Buon lavoro!
11.04.2021 - 11:58
![]() Faren Kovacevich wrote:
Faren Kovacevich wrote:
I'm correcting a comment that I posted the other day. I said I was the large. The correction is the xxl. I was doing the math manually when I noticed math error in the number of stitches on the increases of 8. The pattern says I should have a total of 304. I checked myself twice and kept coming up with 308. Later, I noticed another math error after I take off 62 stitches for both sleeves and add on 14 stitches on each side I get a total 212 not 208. You might want to check your math.
06.04.2021 - 03:15DROPS Design answered:
Dear Mrs Kovacevich, you should have 304 sts in XL before dividing: 124 sts +4stsx18 (saddle shoulders) + 4stsx15 (sleeves) + 8 stsx6 (yoke) = 304 sts. And then: 45 sts (1/2 back piece)+ 14sts + 90sts (front piece) + 14sts + 45sts(1/2 back piece)=208 sts. Happy knitting!
07.04.2021 - 08:10
![]() Faren Kovacevich wrote:
Faren Kovacevich wrote:
I'm doing the large. When I did the math, I came up with 308 stitches twice once I calculate the number of stitches on the 8 stitch increase. Is it me or is it a math error in the pattern?
02.04.2021 - 23:26DROPS Design answered:
Dear Mrs Kovacevich, you should have 284 sts at the end of yoke: 120 sts + 4 inc x 16 (saddle soulders) + 4 inc x 13 (sleeves) + 8 sts x 6 (yoke) = 284 sts. Happy knitting!
06.04.2021 - 12:53
![]() Alice wrote:
Alice wrote:
Hello! Thank you for providing such great instructions. I have a short question: I'm working on size XL. After doing the increases for the sleeves, I have the correct number of stiches in the needle for the size (256). However, after moving the 4 markers to the outermost sleeve stitches on each side, I have 50 stiches (instead of 48) between them. (I have 50 stitches between each sleeve, and 78 both back and front = 256). What do you recommend I do? Thank you and keep up the good work! –
18.03.2021 - 19:41DROPS Design answered:
Dear Alice, at the end of increases for the sleeves, there are 50 sts between the markers for the sleeves; now insert the markers in the first of these 50 sts + in the last of these 50 sts = there are now 48 sts for the sleeve between the markers and the stitches are now in a stitch (not between stitches anymore). - You still have 39 sts for each half back piece and 78 sts for front piece. Happy knitting!
19.03.2021 - 06:40
![]() Mirella Curcio wrote:
Mirella Curcio wrote:
Sono di nuovo qua , scusate , se casomai vorrei fare il maglione iniziando dal basso ,come mi devo comportare ? grazie di nuovo
08.03.2021 - 06:28DROPS Design answered:
Buonasera Mirella, purtroppo in questa sede non ci è possibile ridisegnare il modello cambiando la costruzione, ma nel nostro sito può trovare altri modelli con la costruzione che cerca. Buon lavoro!
08.03.2021 - 20:11
![]() Mirella Curcio wrote:
Mirella Curcio wrote:
Buongiorno , grazie per avermi risposto , vorrei dirvi che in questo modello dovrei fare le maniche di un 'altro colore , come devo fare ? grazie
08.03.2021 - 06:12DROPS Design answered:
Buonasera Mirella, per le maniche, quando riporta le maglie sul ferro, può iniziare con il nuovo colore. Per la quantità di filato, si può rivolgere al suo rivenditore DROPS di fiducia. Buon lavoro!
08.03.2021 - 20:07
![]() Curcio Mirella wrote:
Curcio Mirella wrote:
Buongiorno ,non riesco a trovare Urban Forest nella pagina di Aiuto e consigli , come mai ? grazie
07.03.2021 - 06:11DROPS Design answered:
Buongiorno Mirella, nella sezione "Consigli e Aiuti" non ci sono i tutorial per i modelli, se ha bisogno di aiuto può spiegarci il suo problema utilizzando i form sotto il modello, come ha fatto ora. Buon lavoro!
07.03.2021 - 14:54
![]() Edith wrote:
Edith wrote:
Bonjour, je voudrais tricoter ce modèle mais j'hésite. Le pli de devant est tout à fait disgracieux et je ne sais pas comment y remédier. Est ce que quelqu'un à trouvé une solution pour améliorer ce modèle ? Merci de vos réponses !!!
01.03.2021 - 07:32DROPS Design answered:
Bonjour Edith, dans ce type de modèles tricotés de haut en bas, le devant pourra rendre différemment en fonction de la morphologie de chacun (largeur et angle des épaules). Bon tricot!
01.03.2021 - 10:09
![]() Bente La Cour wrote:
Bente La Cour wrote:
Strikkeprøven til Urban forest, der er anbefalede pinde ikke angivet. Skal jeg så teste med pind 4, som ribben strikkes med, eller pind 5, som resten strikkes i?
22.02.2021 - 09:54DROPS Design answered:
Hej Bente, du skal få 17 masker i bredden i glatstrik og vi bruger pinde nr 5 til det glatstrikkede, så prøv med den først :)
23.02.2021 - 14:20
|
|||||||||||||
Urban Forest#urbanforestsweater |
|||||||||||||
 |
 |
||||||||||||
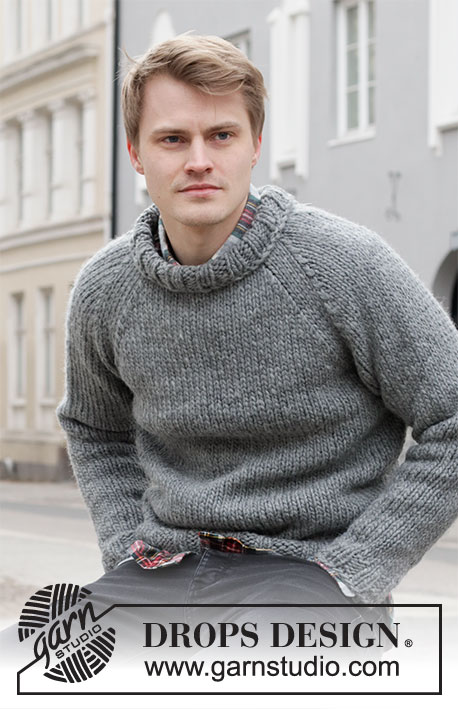
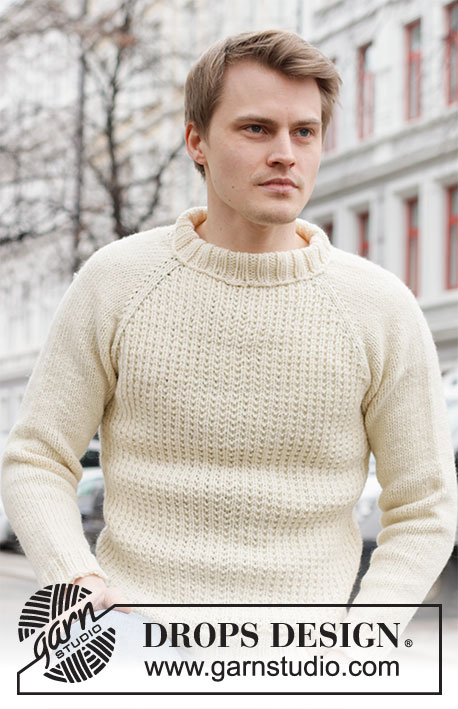
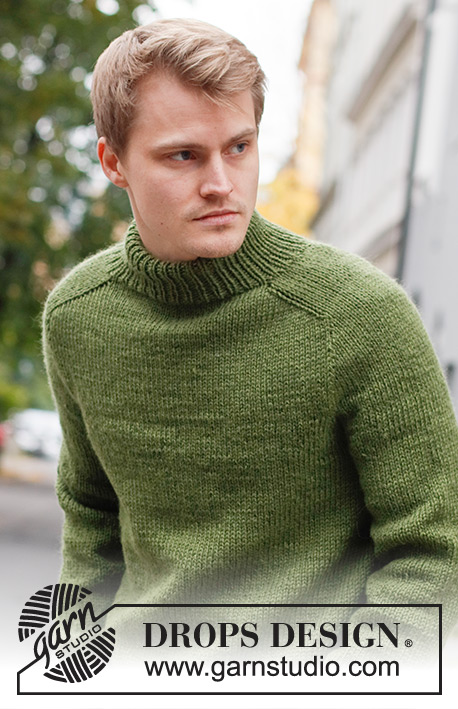
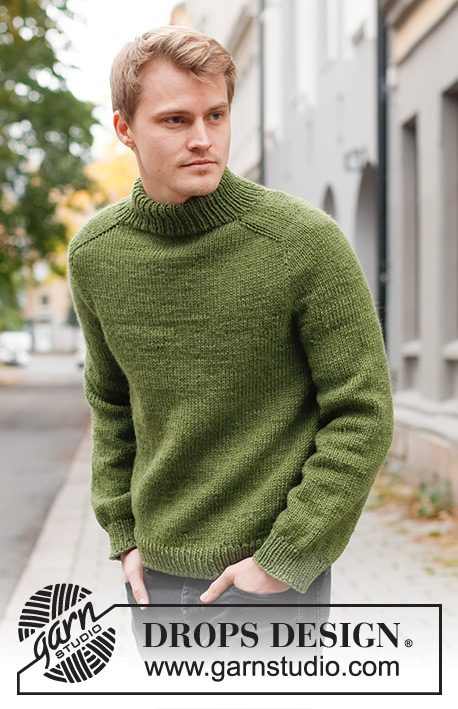
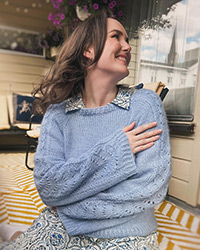
Knitted jumper for men in DROPS Alaska. The piece is worked top down, with double neck and saddle shoulders. Sizes S - XXXL.
DROPS 219-16 |
|||||||||||||
|
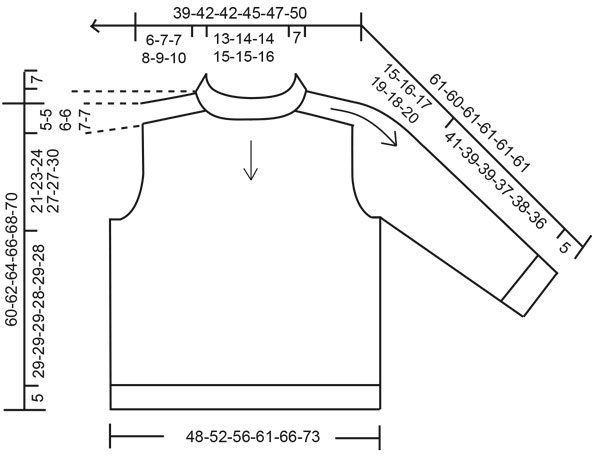
------------------------------------------------------- EXPLANATIONS FOR THE PATTERN: ------------------------------------------------------- INCREASE/DECREASE TIP (evenly spaced): To work out how to increase/decrease evenly, count the total number of stitches on needle (e.g. 78 stitches), and divide by the number of increases/decreases to be made (e.g. 22) = 3.5. In this example, increase by making 1 yarn over after alternately each 3rd and 4th stitch. On the next round work the yarn overs twisted to avoid holes. When decreasing, knit together alternately each 2nd and 3rd stitch and each 3rd and 4th stitch. INCREASE TIP: BEFORE MARKER: The new stitch twists to the right. Use the left needle to pick up the strand between 2 stitches from the previous round; pick up the back strand and knit in the front loop. AFTER MARKER: The new stitch twists to the left. Use the left needle to pick up the strand between 2 stitches from the previous round; pick up the front strand and knit in the back loop. DECREASE TIP (for sleeves): Decrease 1 stitch on either side of the marker thread as follows: Work until there are 3 stitches left before the marker thread, knit 2 together, knit 2 (marker thread sits between these 2 stitches), slip 1 stitch as if to knit, knit 1 and pass the slipped stitch over the knitted stitch. CASTING-OFF TIP: To avoid the cast-off edge being tight you can cast off with a larger size needle. If the edge is still tight, make 1 yarn over after approx. each 4th stitch at the same time as casting off; the yarn overs are cast off as normal stitches. ------------------------------------------------------- START THE PIECE HERE: ------------------------------------------------------- JUMPER – SHORT OVERVIEW OF THE PIECE: The neck and yoke are worked in the round with circular needle, top down from mid back. The yoke is divided for body and sleeves and the body continued in the round with circular needle. The sleeves are worked in the round with short circular needle/double pointed needles, top down. NECK: Cast on 78-82-88-92-98-102 stitches with circular needle size 4 mm and Alaska. Knit 1 round, then work rib (knit 1, purl 1) in the round for 14½ cm. Knit 1 round where you increase 22-22-32-32-34-38 stitches evenly spaced – read INCREASE/DECREASE TIP = 100-104-120-124-132-140 stitches. Change to circular needle size 5 mm. YOKE: Insert a marker at the beginning of the round (= mid-back) – THE PIECE IS MEASURED FROM HERE! In addition, insert 4 new markers as described below – without working the stitches and inserting the markers between 2 stitches. Marker 1: Start mid-back, count 17-18-20-21-21-23 stitches (= ½ back piece), insert marker before the next stitch. Marker 2: Count 16-16-20-20-24-24 stitches from marker 1 (= shoulder), insert marker before the next stitch. Marker 3: Count 34-36-40-42-42-46 stitches from marker 2 (= front piece), insert marker before the next stitch. Marker 4: Count 16-16-20-20-24-24 stitches from marker 3 (= shoulder), insert marker before the next stitch. There are 17-18-20-21-21-23 stitches left on the back piece after marker 4. Allow the markers to follow your work onwards; they are used when increasing for the shoulders. INCREASES FOR SADDLE SHOULDERS: Work stocking stitch in the round. AT THE SAME TIME, on the first round, increase 4 stitches for the shoulders as follows: Increase BEFORE markers 1 and 3 and increase AFTER markers 2 and 4 – read INCREASE TIP. Here you are only increasing on the front and back pieces and the number of shoulder stitches remains the same. Increase like this every round a total of 14-16-16-18-20-22 times = 156-168-184-196-212-228 stitches. REMEMBER THE KNITTING TENSION! After the last increase the piece measures approx. 6-7-7-8-9-10 cm from the marker on the neck. Now increase for the sleeves as follows. INCREASES FOR SLEEVES: Work stocking stitch in the round. AT THE SAME TIME, on the next round, increase 4 stitches for the sleeves as follows: Increase AFTER markers 1 and 3 and increase BEFORE markers 2 and 4 – remember INCREASE TIP. Here you are only increasing on the shoulders and the number of stitches on the front and back pieces remains the same. Increase like this every 2nd round a total of 11-13-13-15-12-12 times = 200-220-236-256-260-276 stitches. The piece should now measure 16-19-19-22-20-21 cm from the marker on the neck. In size S continue working until the piece measures 17 cm. If the length is shorter than the above in sizes M, L, XL, XXL and XXXL, continue to the correct length without further increases. Now increase for the yoke as described below. INCREASES FOR YOKE: Move the 4 markers so each marker sits in the outermost sleeve stitches on each side. There are 36-40-44-48-46-46 stitches between the marker-stitches on each sleeve. On the next round, increase 8 stitches for the yoke by increasing on both sides of all 4 marker-stitches – remember INCREASE TIP. Here you increase on the front and back pieces and on the sleeves; the increased stitches are worked in stocking stitch. Increase like this every 2nd round a total of 4-4-6-6-8-10 times = 232-252-284-304-324-356 stitches. When all the increases are finished, the piece should measure 21-23-24-27-27-30 cm. If the length is shorter than this, continue working to the correct length without further increases. Now divide the yoke for the body and sleeves on the next round as follows: Work the first 35-38-42-45-49-55 stitches (= ½ back piece), place the next 46-50-58-62-64-68 stitches on a thread for the sleeve, cast on 12-12-12-14-14-14 new stitches on the needle (= in side under sleeve), work the next 70-76-84-90-98-110 stitches (= front piece), place the next 46-50-58-62-64-68 stitches on a thread for the sleeve, cast on 12-12-12-14-14-14 new stitches on the needle (= in side under sleeve) and work the last 35-38-42-45-49-55 stitches (= ½ back piece). Body and sleeves are finished separately. THE PIECE IS NOW MEASURED FROM HERE. BODY: = 164-176-192-208-224-248 stitches. Work stocking stitch in the round. When the piece measures 29-29-29-28-29-28 cm from the division, increase 16-18-20-20-22-26 stitches evenly spaced = 180-194-212-228-246-274 stitches. Change to circular needle size 4 mm and work rib (knit 1, purl 1) for 5 cm. Cast off with knit over knit and purl over purl – read CASTING-OFF TIP. The jumper measures approx. 60-62-64-66-68-70 cm from the shoulder down. SLEEVE: Place the 46-50-58-62-64-68 stitches from the thread on the one side of the piece on double pointed needles/short circular needle size 5 mm and knit up 1 stitch in each of the 12-12-12-14-14-14 stitches cast on under the sleeve = 58-62-70-76-78-82 stitches. Insert a marker in the middle of the new stitches under the sleeve. Work stocking stitch in the round. When the sleeve measures 4 cm from the division, decrease 1 stitch on each side of the marker – read DECREASE TIP. Decrease like this every 11-6-3½-3-3-2½ cm a total of 4-6-9-11-11-13 times = 50-50-52-54-56-56 stitches. Continue working until the sleeve measures 41-39-39-37-38-36 cm from the division. Knit 1 round where you decrease 10-8-8-8-10-8 stitches evenly spaced = 40-42-44-46-46-48 stitches. Change to double pointed needles size 4 mm and work rib (knit 1, purl 1) for 5 cm. Cast off with knit over knit and purl over purl – remember CASTING-OFF TIP. Work the other sleeve in the same way. ASSEMBLY: Fold the neck double to the wrong side and sew down. To avoid the neck being tight and rolling outwards, it is important the seam is elastic. |
|||||||||||||
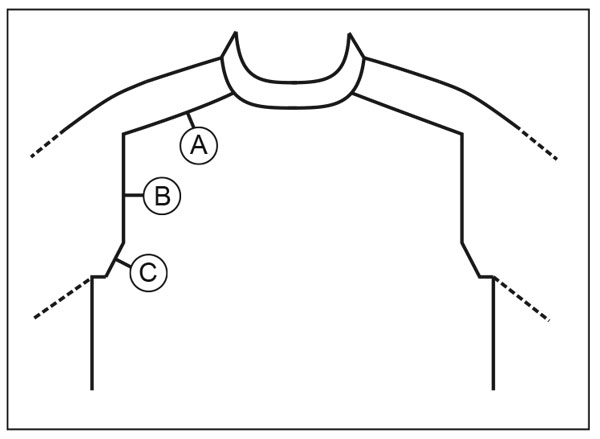
Diagram explanations |
|||||||||||||
|
|||||||||||||
 |
|||||||||||||
 |
|||||||||||||
Have you finished this pattern?Tag your pictures with #dropspattern #urbanforestsweater or submit them to the #dropsfan gallery. Do you need help with this pattern?You'll find 27 tutorial videos, a Comments/Questions area and more by visiting the pattern on garnstudio.com. © 1982-2026 DROPS Design A/S. We reserve all rights. This document, including all its sub-sections, has copyrights. Read more about what you can do with our patterns at the bottom of each pattern on our site. |
|||||||||||||

With over 40 years in knitting and crochet design, DROPS Design offers one of the most extensive collections of free patterns on the internet - translated to 17 languages. As of today we count 320 catalogues and 12110 patterns translated into English (UK/cm). 12110
We work hard to bring you the best knitting and crochet have to offer, inspiration and advice as well as great quality yarns at incredible prices! Would you like to use our patterns for other than personal use? You can read what you are allowed to do in the Copyright text at the bottom of all our patterns. Happy crafting!
Post a comment to pattern DROPS 219-16
We would love to hear what you have to say about this pattern!
If you want to leave a question, please make sure you select the correct category in the form below, to speed up the answering process. Required fields are marked *.