
Looking for a yarn?


Comments / Questions (61)
![]() Tawni wrote:
Tawni wrote:
For size medium should I cast on 101 sets total? Or add a start and end stitch making the total cast on 103?
14.12.2025 - 02:05DROPS Design answered:
Hi Tawni, The 101 stitches include the 2 edge stitches (2 edge stitches + 99 body stitches). Regards, Drops Team.
15.12.2025 - 07:28
![]() Ritva wrote:
Ritva wrote:
Neulepuseroon meni 250g Air lankaa haluaisin neuloa saman ohjeen 2-kertaisella Kid Silk langalla mutta en osaa laskea paljonko sitä lankaa tarvitaan
26.11.2025 - 20:05DROPS Design answered:
Hei, tarvitset 180 grammaa DROPS Kid-Silk -lankaa, eli 8 kerää.
28.11.2025 - 18:10
![]() Isabelle wrote:
Isabelle wrote:
Ok j''ai compris mon erreur. Pour le raglan taille M : on diminue 4 mailles de chaque côté des 4 marqueurs : 8 diminutions par marqueur x 4 marqueurs = 32 diminutions par rang de diminution. 5x32 = 160. 248-160 = 88 mailles restantes
07.11.2025 - 18:21
![]() Isabelle wrote:
Isabelle wrote:
Bonjour, Je ne comprends pas la consigne pour le raglan en taille M : "diminuer 5 fois 4 mailles avant et après les fils marqueurs". Donc, on diminue 16 mailles par rang de diminutions 5 fois : on diminue en tout 80 mailles. Or, vous indiquez qu'on diminue 88 mailles et qu'il reste seulement 88 mailles sur les aiguilles. Mais on démarre les diminutions avec 248 mailles. 248 mailles - 80 mailles = 168 mailles. Qu'est-ce que je n'ai pas compris ?
07.11.2025 - 18:01
![]() Sarah wrote:
Sarah wrote:
Hallo, ich stricke den Pullover mit der Wolle Lima. Ich bin jetzt bei der Passe und überlege, die Abnahmen gleichmäßIger zu verteilen, da es sonst sehr wulstig wird. Wie würde ich das am besten verteilen? Statt 5x je 4 Maschen abnehmen alle 8 Runden, 20 x je 1 Masche jede 2. Runde? Wäre das eine Alternative? Vielen Dank schon einmal für Ihren Rat!
05.09.2025 - 16:56DROPS Design answered:
Liebe Sarah, Sie nehmen ja an beiden Seiten jedes Markierers je 4 M ab, also 32 M pro Abnahmerunde. Das machen Sie 5 x in jeder 8. Runde, Sie nehmen also insgesamt 160 M ab. Pro Abnahmerunde müssen Sie eine durch 8 teilbare Anzahl an M abnehmen (mindestens 2 M an jedem Markierer, es sind 4 Markierer insgesamt). Dann müssten Sie nun ausrechnen, wie Sie die 160 M anders auf die entsprechende Anzahl an Runden verteilen. Beachten Sie auch, dass Sie wahrscheinlich in der Höhe eine andere Maschenprobe haben, da Sie ein Garn aus einer anderen Garngruppe als das Originalgarn verwenden. Achten Sie darauf, dass die Passe nicht insgesamt zu kurz wird. Gutes Gelingen!
23.10.2025 - 22:40
![]() Ewa wrote:
Ewa wrote:
Hej! Om man tittar på sista sidan med teckningen så stämmer inte 14 cm resår jämfört med 13 cm slätstickning i proportion till varandra. Det ser ut att vara mycket längre slätstickning.
15.07.2025 - 16:45DROPS Design answered:
Hei Ewa. Målskissen er bare en tegning som viser målene, den behøver ikke å være riktig proposjonert. Om du forholder deg til oppskriften og tallene i oppskriften, blir modellen slik du ser på bildet. mvh DROPS Design
04.08.2025 - 12:52
![]() Foucher wrote:
Foucher wrote:
Bonjour, quel sera le résultat si j'utilise un fil bulky aiguille 8 en adaptant le patron? Difficile de savoir.
19.03.2025 - 11:58DROPS Design answered:
Bonjour Mme Foucher, le résultat sera naturellement différent avec une laine plus épaisse, retrouvez ici nos pulls avec une tension de 11-9 mailles pour 10 cm à titre d'exemple (n'hésitez pas à modifier les filtres si besoin). Bon tricot!
19.03.2025 - 16:12
![]() Cecile F wrote:
Cecile F wrote:
Je trouve ce modèle très joli. Quel sera le résultat si j'utilise un fil bulky aiguille 8 en adaptant le patron? Pas facile de savoir
19.03.2025 - 11:57DROPS Design answered:
Bonjour Cécile, ce peut être plus simple de trouver un modèle à la tension qui vous correspond, retrouvez par ex ici tous les modèles tricotés sur la base de 11-9 mailles pour 10 cm - modifiez la tension en changeant le filtre si besoin et/ou ajoutez d'autres filtres. Bon tricot!
19.03.2025 - 16:11
![]() Milana C wrote:
Milana C wrote:
Bonjour, J'aimerais savoir si c'est réaliste et pas trop difficile d'adapter ce modèle aux aiguilles droites et d'assembler toutes les parties au moment où il faut faire le raglan ? Je me demande si c'est faisable soit de rassembler les pièces pour le raglan, ou de tricoter toutes les pièces séparément et de les coudre à la fin. Je vous remercie.
08.10.2024 - 10:00DROPS Design answered:
Bonjour Milana, cette leçon peut vous aider à faire les ajustements nécessaires pour tricoter chaque pièce séparément en vue des les coudre ensuite ensemble, il sera toujours plus simple de suivre les indications, autrement dit de tricoter en rond comme ici. N'hésitez pas à essayer les aiguilles circulaires, nombreuses sont celles qui les ont domptées après avoir essayé. Bon tricot!
08.10.2024 - 16:22
![]() Denise Rossi wrote:
Denise Rossi wrote:
On the diagram in this pattern it says 14 cm for ribbing and 14 cm for body height Yet the diagram does not look uniform. It looks like the body should be longer than 14 cm. Could you explain?
26.05.2024 - 15:22DROPS Design answered:
Dear Denise, the schematic drawing is just for illustration, to show you the places of the main measurements. The body shows slightly longer, probably to leave more space for the longer strands of numbers. Happy Knitting!
26.05.2024 - 19:54
|
|
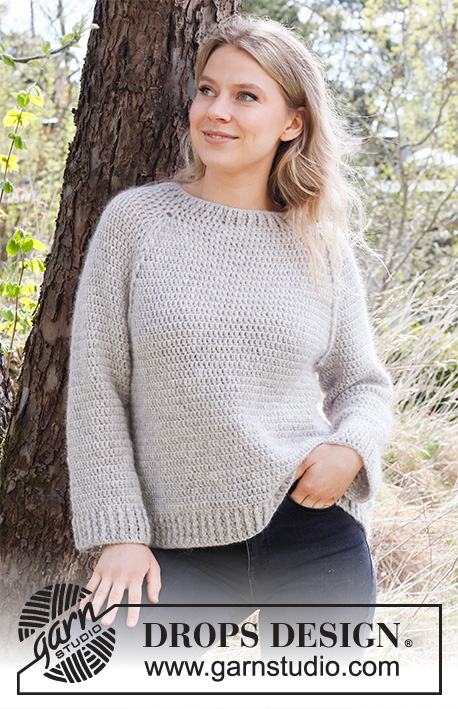
Autumn Pathways Sweater#autumnpathwayssweater |
|
 |
 |
Knitted jumper in DROPS Air. The piece is worked with raglan, split in the sides and double neck. Sizes S - XXXL.
DROPS 216-12 |
|
|
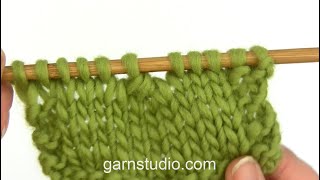
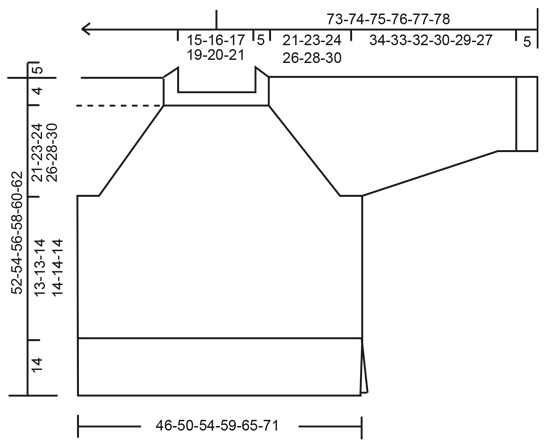
------------------------------------------------------- EXPLANATIONS FOR THE PATTERN: ------------------------------------------------------- RIDGE/GARTER STITCH (worked back and forth): Knit all rows. 1 ridge in height = Knit 2 rows. DECREASE TIP (evenly spaced): To work out how to decrease evenly, count the total number of stitches on needle (e.g. 91 stitches) and divide by the number of decreases to be made (e.g. 16) = 5.6. In this example decrease by knitting together alternately each 4th and 5th stitch and each 5th and 6th stitch. INCREASE TIP (for sleeves): Work until there are 2 stitches left before the marker thread, make 1 yarn over, knit 4 (marker thread sits between these 4 stitches), make 1 yarn over. On the next round knit the yarn overs twisted to avoid holes. Then work the new stitches in stocking stitch. RAGLAN: Decrease 2 stitches as follows: Work until there are 3 stitches left before the marker thread, knit 3 twisted together (= 2 stitches decreased), marker thread, tighten the strand slightly so there is not a large hole between the decreases, knit the next 3 stitches together (= 2 stitches decreased). Decrease 3 stitches as follows: Work until there are 4 stitches left before the marker thread, knit 4 twisted together (= 3 stitches decreased), marker thread, tighten the strand slightly so there is not a large hole between the decreases, knit the next 4 stitches together (= 3 stitches decreased). Decrease 4 stitches as follows: Work until there are 5 stitches left before the marker thread, knit 5 twisted together (= 4 stitches decreased), marker thread, tighten the strand slightly so there is not a large hole between the decreases, knit the next 5 stitches together (= 4 stitches decreased). CASTING-OFF TIP: To avoid the cast-off edge being tight you can cast off with a larger size needle. If the edge is still tight, make 1 yarn over after approx. each 4th stitch at the same time as casting off; the yarn overs are cast off as normal stitches. ------------------------------------------------------- START THE PIECE HERE: ------------------------------------------------------- JUMPER – SHORT OVERVIEW OF THE PIECE: The front and back pieces are worked back and forth separately until the rib and split in the sides are finished. Both pieces are then placed on the same circular needle and continued in the round as far as the armholes. The sleeves are worked in the round with double pointed needles/short circular needle as far as the armhole. The sleeves are placed on the same circular needle as the body and the yoke is worked in the round. Finally the neck is worked in the round with short circular needle. BACK PIECE: Cast on 91-101-109-117-129-141 stitches (including 1 edge stitch on each side) with circular needle size 4 mm and Air. Purl 1 row from the wrong side, then work rib as follows: ROW 1 (right side): 1 edge stitch in GARTER STITCH – read description above, * knit 1 twisted, purl 1 *, work from *-* until there are 2 stitches left on the row, knit 1 twisted and 1 edge stitch in garter stitch. ROW 2 (wrong side): 1 edge stitch in garter stitch * purl 1 twisted, knit 1 *, work from *-* until there are 2 stitches left on the row, purl 1 twisted and finish with 1 edge stitch in garter stitch. Repeat rows 1 and 2 until the rib measures 14 cm. Lay the piece to one side and work the front piece. FRONT PIECE: Cast on and work in the same way as the back piece until the rib measures 14 cm – adjust so the next row is from the right side. BODY: Now work front piece and back piece on circular needle size 4 mm as follows: Knit the first 90-100-108-116-128-140 stitches on the front piece and decrease at the same time 16-20-22-22-24-26 stitches evenly spaced – read DECREASE TIP, knit the last stitch on the front piece together with the first stitch on the back piece (= 1 stitch decreased), insert a marker thread here (= side), knit the next 89-99-107-115-127-139 stitches on the back piece and decrease at the same time 16-20-22-22-24-26 stitches evenly spaced, knit the last stitch on the back piece and the first stitch on the front piece together, insert a marker thread here (= side and beginning of the round). There are 148-160-172-188-208-228 stitches on the needle. Change to circular needle size 5.5 mm and work stocking stitch in the round. REMEMBER THE KNITTING TENSION! When the piece measures 27-27-28-28-28-28 cm, cast off 8-8-10-10-12-12 stitches for the armholes on each side (i.e. 4-4-5-5-6-6 stitches on each side of both marker threads). There are 66-72-76-84-92-102 stitches on the front and back pieces. Lay the piece to one side and work the sleeves. SLEEVES: Cast on 46-48-50-52-52-56 stitches with double pointed needles size 4 mm and Air. Knit 1 round, then work rib (knit 1 twisted, purl 1) in the round for 5 cm. Knit 1 round where you decrease 8-8-8-8-8-10 stitches evenly spaced – remember DECREASE TIP = 38-40-42-44-44-46 stitches. Change to double pointed needles size 5.5 mm. Insert a marker thread at the beginning of the round (= mid under sleeve). Allow the thread to follow your work onwards; it will be used when increasing under the sleeve. Work stocking stitch. When the sleeve measures 8-8-7-8-8-8 cm from the cast-on edge, increase 1 stitch on each side of the marker thread – read INCREASE TIP. Increase like this every 3-3-2½-2-1½-1½ cm a total of 10-10-12-13-15-15 times = 58-60-66-70-74-76 stitches. When the sleeve measures 39-38-37-35-34-32 cm, cast off 8-8-10-10-12-12 stitches under the sleeve (i.e. 4-4-5-5-6-6 stitches on each side of the marker thread) = 50-52-56-60-62-64 stitches. Lay the piece to one side and work the other sleeve in the same way. YOKE: Place the sleeves on the same circular needle as the body, where stitches were cast off for the armholes = 232-248-264-288-308-332 stitches. Insert a marker in the middle of the back piece (= 33-36-38-42-46-51 stitches on each side of the marker on the back piece). This is the beginning of the round. Insert a marker thread in each transition between body and sleeves; you will decrease at these marker threads for raglan. Work stocking stitch in the round. When the yoke measures 4-5-6-5-6-5 cm, start to decrease for RAGLAN – read description above. Decrease every 8th round in the different sizes as follows: Sizes S and XXL Decrease 3 stitches 1-1 time and 4 stitches 4-5 times (= 19-23 stitches decreased on each side of each marker thread) = 80-124 stitches on the needle. Sizes M and L: Decrease 4 stitches 5-5 times (= 20-20 stitches decreased on each side of each marker thread) = 88-104 stitches on the needle. Sizes XL and XXXL: Decrease 2 stitches 1-1 time and 4 stitches 5-6 times (= 22-26 stitches decreased on each side of each marker thread) = 112-124 stitches on the needle. All sizes: There are 80-88-104-112-124-124 stitches on the needle. Continue with stocking stitch until the yoke measures 21-23-24-26-28-30 cm. Knit 1 round where you decrease 6-12-24-28-36-32 stitches evenly spaced = 74-76-80-84-88-92 stitches. DOUBLE NECK: Change to short circular needle size 4 mm and work rib (= knit 1 twisted, purl 1) in the round for 9 cm. Cast off with knit over knit and purl over purl – read CASTING-OFF TIP. Fold the rib at the top of the neck to the wrong side and sew down so you have a double neck. To avoid the neck being tight and rolling outwards, it is important that the seam is elastic. ASSEMBLY: Sew together the openings under the sleeves. |
|
 |
|
Have you finished this pattern?Tag your pictures with #dropspattern #autumnpathwayssweater or submit them to the #dropsfan gallery. Do you need help with this pattern?You'll find 31 tutorial videos, a Comments/Questions area and more by visiting the pattern on garnstudio.com. © 1982-2025 DROPS Design A/S. We reserve all rights. This document, including all its sub-sections, has copyrights. Read more about what you can do with our patterns at the bottom of each pattern on our site. |
|


With over 40 years in knitting and crochet design, DROPS Design offers one of the most extensive collections of free patterns on the internet - translated to 17 languages. As of today we count 320 catalogues and 12094 patterns translated into English (UK/cm). 12094
We work hard to bring you the best knitting and crochet have to offer, inspiration and advice as well as great quality yarns at incredible prices! Would you like to use our patterns for other than personal use? You can read what you are allowed to do in the Copyright text at the bottom of all our patterns. Happy crafting!
Post a comment to pattern DROPS 216-12
We would love to hear what you have to say about this pattern!
If you want to leave a question, please make sure you select the correct category in the form below, to speed up the answering process. Required fields are marked *.