
Popular categories
Looking for a yarn?


Comments / Questions (81)
![]() Berit wrote:
Berit wrote:
Jeg forstår ikke hvordan der kommer de nødvendige udtagninger på bærestykket? Hvis jeg blot strikker A1 op til 18 rækker hvor der er en o på mønsteret, så bliver det blot et megeget højt hals rør?
24.05.2026 - 22:42DROPS Design answered:
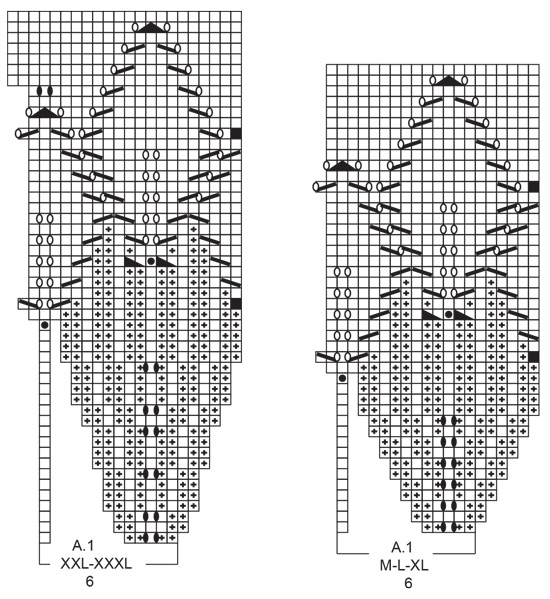
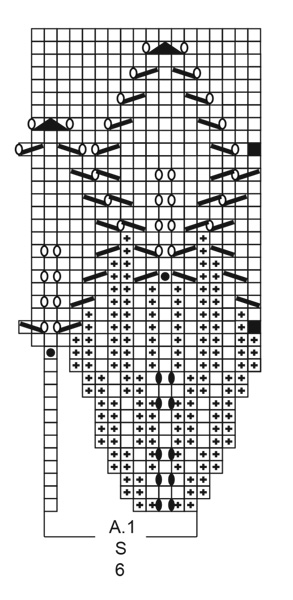
Hej Berit, jo du tager ud ifølge diagrammet, vælg diagram for din størrelse. Du starter nederst i diagrammet med de 6 masker og gentager hele vejen rundt, du tager ud hver gang du skal strikke de sorte ovale ringe i midten af diagrammet. Læs diagram og symboltekst :)
25.05.2026 - 13:27
![]() Sharon Hunt wrote:
Sharon Hunt wrote:
Hello, how do you measure for length? My gauge is fine. But I cannot decide how to measure for length. If I lay flat I get 10 inches. If I hold up the project and measure the length is 11 inches. How does drops do this? Thanks
29.03.2026 - 11:18DROPS Design answered:
Dear Mrs Hunt, then you might have to hang up your work to measure it to avoid getting the piece becoming too long when worn. Happy knitting!
07.04.2026 - 11:38
![]() Sharon Hunt wrote:
Sharon Hunt wrote:
H! In regards to my last question it appears that I figured it out. Thanks for all your help so far on all questions I post here.
22.03.2026 - 19:19
![]() Sharon Hunt wrote:
Sharon Hunt wrote:
Hello, Making XXXL, 120 sts on my needles after rib. Worked the first p2, yo k1 yo p2. When working the next set of sts in this round am I supposed to start with a k1 then p2. Just not working out if I follow pattern after working the first set of 5 sts. Starting over again after completing this section in XXL. Cannot recall having this problem. Thanks as always for your help.
22.03.2026 - 11:39DROPS Design answered:
Dear Mrs Hunt, when working A.1 first row A.1 should fit over rib P2, K1 as you work on first round {P2, (YO), K1, (YO), P2, K1} so that you will increase ine very other K section of the rib you worked before. And you repeat the 6 sts repeat all the round. Can this help? Happy knitting!
23.03.2026 - 09:12
![]() Sharon Hunt wrote:
Sharon Hunt wrote:
Hi after working and completing the round with the misplaced stitch. The round above begins with knit st. Where as on my work the beg. starts with a purl. Thanks for your help with this problem. Not sure what am doing wrong.
10.03.2026 - 17:05DROPS Design answered:
Dear Mrs Hunt, when displacing the round 1 st, this is done at the beginning of the round as this first stitch of the round will be worked together with the last stitch last repeat in the round; and as you work the last stitch each A.1 is worked together with the first stitch next A.1 = this stitch (the decrease), is now the first stitch next repeat, so the next round starts with the decrease, then P1, the round is displaced just there where there is the black square at the beg of the row, afterwards, you just start the rounds as before. Happy knitting!
11.03.2026 - 07:27
![]() Sharon Hunt wrote:
Sharon Hunt wrote:
Hi worked the increase from one to 2 stitches. Thinking back because it seems like this is a hole from the base of the stitch. Are the inc. sts knitted twisted. Thanks
09.03.2026 - 06:52DROPS Design answered:
Hi Sharon, Yes, the yarn overs are worked twisted on the next round as described in the Increase Tip at the top of the pattern. Regards, Drops Team.
09.03.2026 - 06:58
![]() Lene wrote:
Lene wrote:
Har læst kommentarerne vedr. pind 23 og 24 og forstår at jeg skal strikke den sidste maske og den første maske som er taget løst af. Men nu er spørgsmålet så er denne maske nu den først på næste pind og ses som retmasken på pind 24? Og betyder det at vrangmaskerne stadigvæk skal følge hinanden ? Jeg strikker størrelse xxl
15.02.2026 - 10:08DROPS Design answered:
Hei Lene. Ja, vrangmaskerne skal stadigvæk skal følge hinanden. Om du forstørrer bildet av toppen, ser du det også tydelig :) mvh DROPS Design
16.02.2026 - 11:07
![]() Christine wrote:
Christine wrote:
I hope you can assist. We do not have access to Drops Yarn in South Africa. I would like to knit this with a cotton/acrylic blend with a gauge of about 24sts on 4mm.....which size should I knit? On a lucky note, a friend brought me some Belle yarn and I am looking forward to trying the patterns using Belle.
02.11.2025 - 20:45
![]() Josette wrote:
Josette wrote:
In het telpatoon staan er maar vijf steken en in de beschrijving staat dat je zes steken moet breien, sorry dat versta ik niet, graag een antwoord groeten Josette
04.10.2025 - 16:17
![]() Diana Follett wrote:
Diana Follett wrote:
I could not find measurements for the sizes. Am I just overlooking them? Thank you and I love the patterns and can't wait to try your yarn.
29.09.2025 - 16:55DROPS Design answered:
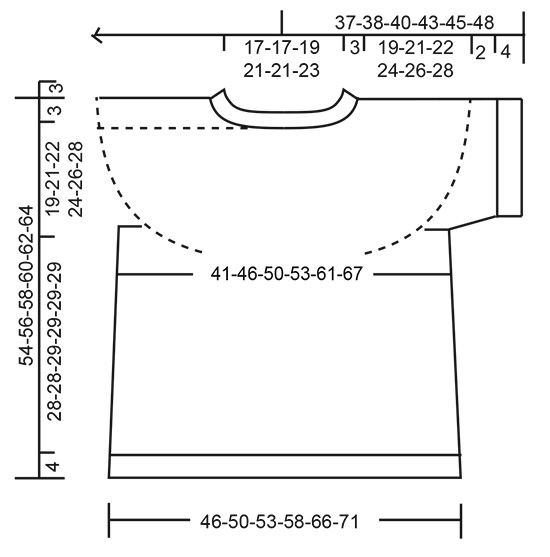
Hi Diana, There is a size chart at the bottom of the pattern, with all the measurements for the different sizes. Regards, Drops team.
30.09.2025 - 06:39
|
|||||||||||||||||||||||||||||||
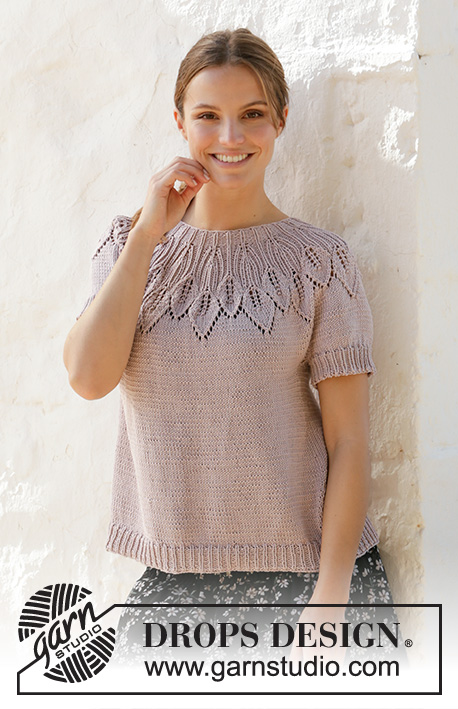
Lavender Charm Top#lavendercharmtop |
|||||||||||||||||||||||||||||||
 |
 |
||||||||||||||||||||||||||||||
Knitted top with round yoke in DROPS Muskat. The piece is worked top down with leaf pattern and lace pattern. Sizes S - XXXL.
DROPS 213-22 |
|||||||||||||||||||||||||||||||
|
------------------------------------------------------- EXPLANATIONS FOR THE PATTERN: ------------------------------------------------------- PATTERN: See diagram A.1. Choose diagram for your size. INCREASE TIP (for sides of body): Work until there are 2 stitches left before the marker thread, make 1 yarn over, knit 4 (marker thread sits between these 4 stitches) make 1 yarn over. On the next round knit the yarn overs twisted to avoid holes. Then work the new stitches in stocking stitch. DECREASE TIP (for sleeves): Decrease 1 stitch on each side of the marker thread as follows: Work until there are 3 stitches left before the marker thread, knit 2 together, knit 2 (marker thread sits between these 2 stitches), slip 1 stitch as if to knit, knit 1 and pass the slipped stitch over the knitted stitch. CASTING-OFF TIP: To avoid the cast-off edge being tight you can cast off with a larger size needle. If the edge is still tight, make 1 yarn over after approx. each 4th stitch at the same time as casting off and the yarn overs are cast off as normal stitches. ------------------------------------------------------- START THE PIECE HERE: ------------------------------------------------------- TOP – SHORT OVERVIEW OF THE PIECE: The neck and yoke are worked in the round with circular needle, from mid back and top down. The yoke is divided for body and sleeve-edges and the body is continued in the round with circular needle. The sleeve-edges are worked in the round with double pointed needles, top down. NECK: Cast on 96-96-102-114-114-120 stitches with circular needle size 3 mm and Muskat. Knit 1 round. Work rib (= purl 2 / knit 1). When the piece measures 3 cm, change to circular needle size 4 mm. Insert 1 marker at the beginning of the round, mid-back; the yoke will be measured from this marker! YOKE: Work A.1 (= 6 stitches) in the round over all stitches (= 16-16-17-19-19-20 times in width). REMEMBER THE KNITTING TENSION! When A.1 has been worked 1 time in height there are 288-320-340-380-418-440 stitches on the needle and the piece measures approx. 14-16-16-16-18-18 cm from the marker. Knit in the round until the piece measures 19-21-22-24-26-28 cm from the marker. Now divide the piece for body and sleeves as follows: Work the first 40-45-49-53-60-65 stitches (= half back-piece), place the next 63-69-72-84-89-90 stitches on a thread for the sleeve-edge and cast on 6-6-6-6-8-10 new stitches under the sleeve, work the next 81-91-98-106-120-130 stitches (= front piece), place the next 63-69-72-84-89-90 stitches on a thread for the sleeve-edge and cast on 6-6-6-6-8-10 new stitches under the sleeve, work the last 41-46-49-53-60-65 stitches (= half back-piece). BODY: = 174-194-208-224-256-280 stitches. Insert 1 marker thread in the middle of the 6-6-6-6-8-10 stitches under each sleeve (= sides of body). There are 87-97-104-112-128-140 stitches between threads on both front and back pieces. Allow the threads to follow your work onwards; they will be used when increasing in the sides. Knit. When the piece measures 4 cm from the division, increase 1 stitch on each side of both marker threads – read INCREASE TIP (= 4 stitches increased). Increase like this every 4 cm a total of 5-4-4-5-5-5 times = 194-210-224-244-276-300 stitches. When the piece measures 28-28-29-29-29-29 cm from the division, increase 13-12-13-14-15-15 stitches evenly spaced = 207-222-237-258-291-315 stitches. Change to circular needle size 3 mm and work rib (= knit 1 / purl 2) for 4 cm. Cast off with knit – read CASTING-OFF TIP. The piece measures 32-32-33-33-33-33 cm from the division. SLEEVE-EDGE: Place the 63-69-72-84-89-90 stitches from the thread on the one side of the piece on double pointed needles size 4 mm and knit up 1 stitch in each of the 6-6-6-6-8-10 stitches cast on under the sleeve = 69-75-78-90-97-100 stitches. Work stocking stitch in the round for 2 cm. Change to double pointed needles size 3 mm and work rib (= knit 1 / purl 2) AT THE SAME TIME as you decrease, on the first round, 0-0-0-0-1-1 stitch = 69-75-78-90-96-99 stitches. Cast off when the rib measures 4 cm, with knit over knit and purl over purl. Work the other sleeve-edge in the same way. |
|||||||||||||||||||||||||||||||
Diagram explanations |
|||||||||||||||||||||||||||||||
|
|||||||||||||||||||||||||||||||
 |
|||||||||||||||||||||||||||||||
 |
|||||||||||||||||||||||||||||||
 |
|||||||||||||||||||||||||||||||
Have you finished this pattern?Tag your pictures with #dropspattern #lavendercharmtop or submit them to the #dropsfan gallery. Do you need help with this pattern?You'll find 28 tutorial videos, a Comments/Questions area and more by visiting the pattern on garnstudio.com. © 1982-2026 DROPS Design A/S. We reserve all rights. This document, including all its sub-sections, has copyrights. Read more about what you can do with our patterns at the bottom of each pattern on our site. |
|||||||||||||||||||||||||||||||


With over 40 years in knitting and crochet design, DROPS Design offers one of the most extensive collections of free patterns on the internet - translated to 17 languages. As of today we count 325 catalogues and 12298 patterns translated into English (UK/cm). 12298
We work hard to bring you the best knitting and crochet have to offer, inspiration and advice as well as great quality yarns at incredible prices! Would you like to use our patterns for other than personal use? You can read what you are allowed to do in the Copyright text at the bottom of all our patterns. Happy crafting!
Post a comment to pattern DROPS 213-22
We would love to hear what you have to say about this pattern!
If you want to leave a question, please make sure you select the correct category in the form below, to speed up the answering process. Required fields are marked *.