
Popular categories
Looking for a yarn?


Comments / Questions (29)
![]() Louise Godet wrote:
Louise Godet wrote:
Merci pour votre réponse. J'espère que, maintenant, je vais pouvoir réaliser ce modèle qui me plait. Cordialement.
01.09.2023 - 09:14
![]() Louise GODET wrote:
Louise GODET wrote:
Bonjour, Ce gilet me tente beaucoup mais je souhaite le faire avec des manches longues. Pensez-vous que je puisse faire une réhausse (dos) et quand ? Pendant les premières côtes ? Merci pour votre avis et conseil de réalisation. Cordialement.
31.08.2023 - 16:31DROPS Design answered:
Bonjour Mme Godet, effectivement, je pense qu'il serait plus simple de la réaliser en côtes, avant de commencer les diagrammes. Bon tricot!
01.09.2023 - 08:35
![]() Margaret Tigchelaar wrote:
Margaret Tigchelaar wrote:
Thank you!- Again!
28.02.2023 - 17:04
![]() Margaret Tigchelaar wrote:
Margaret Tigchelaar wrote:
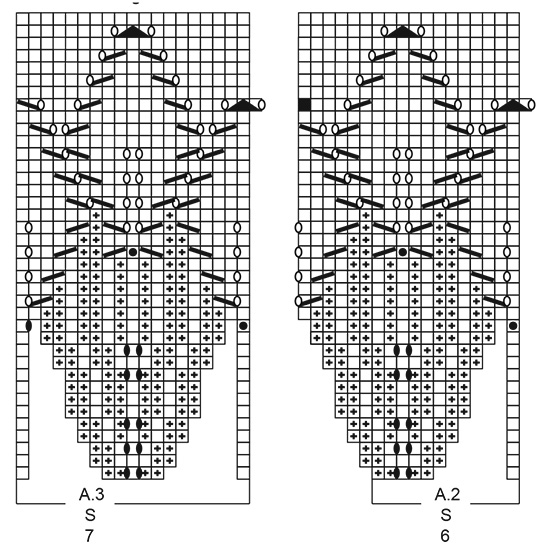
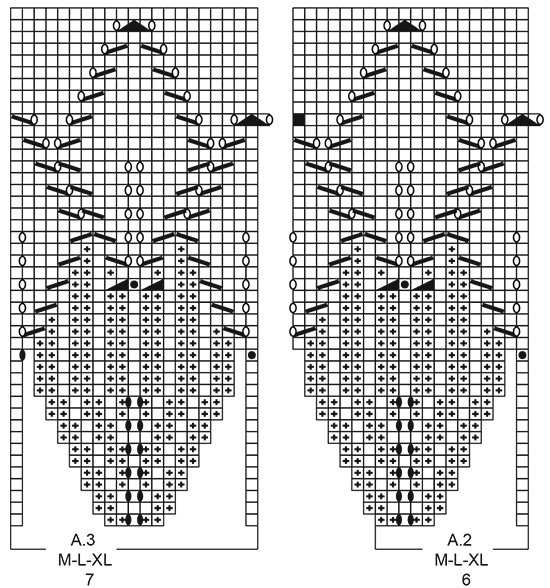
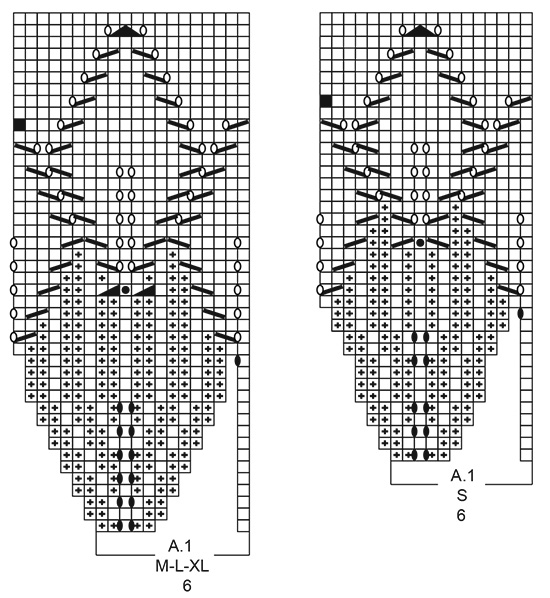
I am working on row 35 of the diagrams, when the last stitch is not to be used and I go to the next symbol. Do I just slide that unused stitch over to the needle on the right then? Thank you, I so enjoy making this pattern!
28.02.2023 - 02:37DROPS Design answered:
Dear Mrs Tigchelaar, on this row, work A.1 until 1 stitch remain, then YO (this is now the last stitch A.1), slip the last stitch A.1 + the first stitch A.2 as if to K tog, K1 and psso = this is the new first stitch A.2, continue diagram that way, ie the last stitch A.2 will be worked together with the first 2 sts next A.2/A.3. Happy knitting!
28.02.2023 - 10:54
![]() Margaret Tigchelaar wrote:
Margaret Tigchelaar wrote:
Thank you so much!!
14.02.2023 - 19:35
![]() Margaret Tigchelaar wrote:
Margaret Tigchelaar wrote:
I want you to know, though, that I love the forum. I have checked all questions to see if anyone else had the same problem, but no. So it must be me. I hope you will not tire of me, I am 85 and have knitted since I was 3 yrs. old and yet.... I started with 111 stitches (M). Would I love to visit Drops!, but there is no store in my area. Maybe when I visit the Netherlands in May! Hope to wear this sweater then, though.
14.02.2023 - 16:59
![]() Margaret Tigchelaar wrote:
Margaret Tigchelaar wrote:
Hello, I have tried row 1 of the diagram 4 times and still get stuck. I end up with 14 st. at the end of row 1 all right, but only need 5 to do diagram 3, which only becomes 7 because of the yos. What do I do with those last 2 stitches before the band? According to my figures all 3 diagrams are equal that first row. The yarn overs add the stitches for the following rows but I still have those two extras in row one. Ending up with 14, use 5 for diagram 3 and then the band. Help and thank you!
14.02.2023 - 16:54DROPS Design answered:
Dear Mrs Tigchelaar, first row A.1 in all sizes is worked over 6 stitches and you increase 2 stitches, this means there are 8 sts in A.1 after the first row has been worked, then repeat the 6 stitches in A.2 (you increase 2 sts in each A.2, there are 8 sts in each A.2) then end with the 7 sts in A.3 (increasing 2 sts as shown in diagram). Just skip the spaces in the diagrams, ie each diagram starts and end with Knit 1, the spaces are there because you will increase stitches later but on first row there are still no stitches. Hope it can help. Happy knitting!
14.02.2023 - 18:05
![]() Margaret Tigchelaar wrote:
Margaret Tigchelaar wrote:
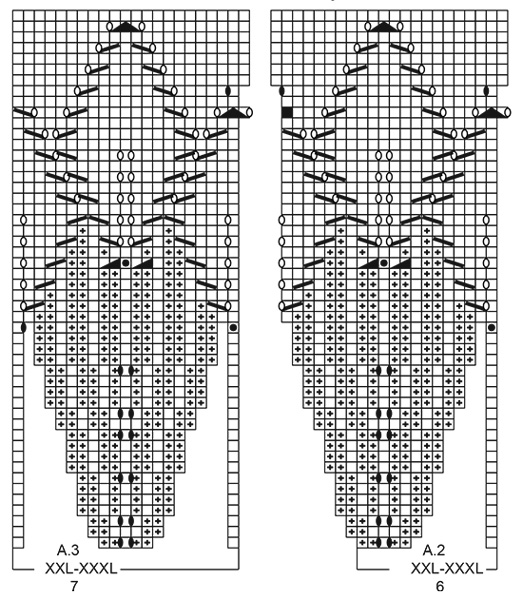
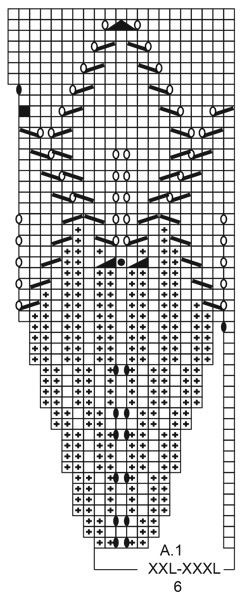
Hello, I want you to know how I love Drops! I received yarn from my daughter for a sweater for myself and I am knitting 213-21. I was confused as well as Amal about the number of times to repeat the diagrams, but you answered my question and now I hope to continue. One other question, though, what do the numbers 6 under Diagram 1 and 2 mean and number 7 under diagram 3? Thank you!
09.02.2023 - 23:44DROPS Design answered:
Hi Margaret, The 7 and 6 refer to the number of stitches in the first rows of diagrams A.3 and A.2. Happy knitting!
10.02.2023 - 08:33
![]() Bettie Scheepers wrote:
Bettie Scheepers wrote:
Heb patroon 213-21 uitgeprint maar helaas staat het telpatroon er niet bij.hoop dat jullie het kunnen oplossen
28.03.2022 - 17:58
![]() Ola wrote:
Ola wrote:
Witam, co to znaczy "nie zapomnieć o dziurce na guzik"? To w którym rzędzie wstawić pierwsza dziurkę na guzik?
12.03.2022 - 22:17DROPS Design answered:
Witaj Olu, górna dziurka na guzik znajduje się już na wykończeniu dekoltu, wykonujesz ją, gdy wys. wykończenia dekoltu wynosi ok. 1½-2 cm. Pozdrawiamy!
14.03.2022 - 08:17
|
|||||||||||||||||||||||||||||||
Lavender Charm#lavendercharmcardi |
|||||||||||||||||||||||||||||||
 |
 |
||||||||||||||||||||||||||||||
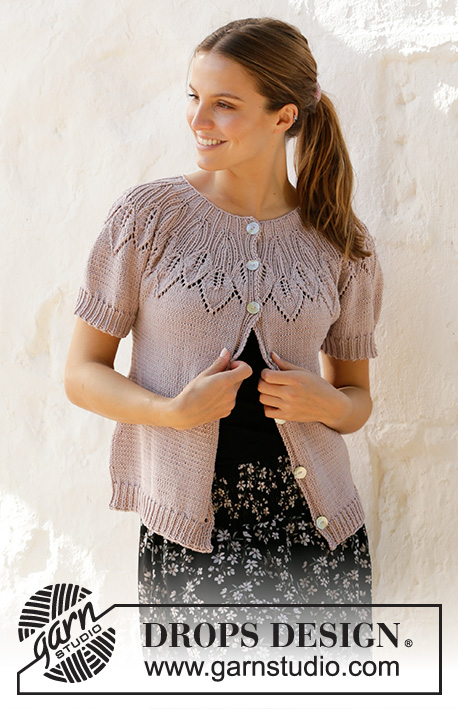
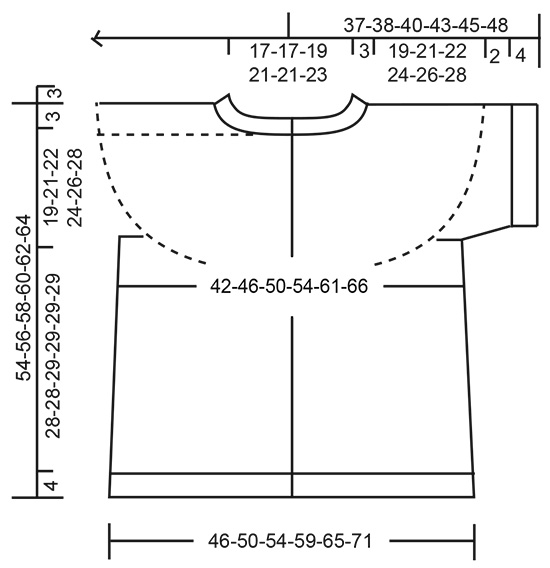
Knitted jacket with round yoke in DROPS Muskat. The piece is worked top down with short sleeves, leaf pattern and lace pattern. Sizes S - XXXL.
DROPS 213-21 |
|||||||||||||||||||||||||||||||
|
------------------------------------------------------- EXPLANATIONS FOR THE PATTERN: ------------------------------------------------------- RIDGE/GARTER STITCH (worked back and forth): Knit all rows. 1 ridge in height = Knit 2 rows. PATTERN: See diagrams A.1 to A.3. Choose diagram for your size. The diagrams show all rows in the pattern seen from the right side. INCREASE TIP (for sides of body): All increases are worked from the right side! Work until there are 2 stitches left before the marker thread, make 1 yarn over, knit 4 (marker thread sits between these 4 stitches) make 1 yarn over. On the next row purl the yarn overs twisted to avoid holes. Then work the new stitches in stocking stitch. CASTING-OFF TIP: To avoid the cast-off edge being tight you can cast off with a larger size needle. If the edge is still tight, make 1 yarn over after approx. each 4th stitch at the same time as casting off and the yarn overs are cast off as normal stitches. BUTTONHOLES: Work buttonholes on the right band (when the garment is worn). Work from the right side when there are 6 stitches left on the row as follows: Make 1 yarn over, knit 2 together and work the last 4 stitches as before. On the next row purl the yarn over to leave a hole. The first buttonhole is worked when the rib on the neck measures approx. 1½-2 cm. Then work the other 6-6-6-6-7-7 buttonholes with approx. 7½-7½-8-8½-7½-7½ cm between each one. ------------------------------------------------------- START THE PIECE HERE: ------------------------------------------------------- JACKET – SHORT OVERVIEW OF THE PIECE. The neck and yoke are worked back and forth with circular needle, from mid front and top down. The yoke is divided for body and sleeve-edges and the body continued back and forth with circular needle. The sleeve-edges are worked in the round with double pointed needles, top down. NECK: Cast on 111-111-117-129-129-135 stitches (including 7 band stitches on each side towards mid front) with circular needle size 3 mm and Muskat. Purl 1 row (= wrong side). The next row is worked as follows from the right side: Work 1 stitch in GARTER STITCH – see description above, knit 1, * purl 2, knit 1 *, work from *-* until there are 4 stitches left, purl 2, knit 1 and 1 stitch in garter stitch. Work the BUTTONHOLE – read description above. When the piece measures 3 cm, change to circular needle size 4 mm. Insert 1 marker after the band at the beginning of the row; the yoke will be measured from this marker! YOKE: Work as follows from the right side: 1 stitch in garter stitch, knit 1, purl 2, knit 1, purl 2 (= band), A.1 (= 6 stitches), A.2 (= 6 stitches) until there are 14 stitches left on the row (= 14-14-15-17-17-18 times in width), A.3 (= 7 stitches) and then purl 2, knit 1, purl 2, knit 1 and 1 stitch in garter stitch (band). REMEMBER THE KNITTING TENSION! When A.1 to A.3 have been worked 1 time in height there are 303-335-355-395-431-453 stitches on the needle. The piece measures approx. 14-16-16-16-18-18 cm from the marker. Work the bands as before and stocking stitch over the other stitches. When the piece measures 19-21-22-24-26-28 cm from the marker, divide the piece for body and sleeve-edges as follows: Work the 7 band stitches as before and stocking stitch over the next 41-45-49-53-60-64 stitches (= front piece), place the next 63-69-72-84-89-90 stitches on a thread for the sleeve-edge and cast on 6-6-6-6-8-10 new stitches under the sleeve, work stocking stitch over the next 81-93-99-107-119-131 stitches (= back piece), place the next 63-69-72-84-89-90 stitches on a thread for the sleeve-edge and cast on 6-6-6-6-8-10 new stitches under the sleeve, work 41-45-49-53-60-64 stitches in stocking stitch and the 7 band stitches as before (= front piece). BODY: = 189-209-223-239-269-293 stitches. Insert 1 marker thread 51-55-59-63-71-76 stitches in from each side (= sides of body). There are 87-99-105-113-127-141 stitches between marker threads on the back piece. Allow the threads to follow your work onwards; they will be used when increasing in the sides. Continue with stocking stitch and the 7 band stitches on each side as before. When the piece measures 4 cm from the division increase 1 stitch on each side of both marker threads – read INCREASE TIP (= 4 stitches increased). Increase like this every 4 cm a total of 5-4-4-5-5-5 times = 209-225-239-259-289-313 stitches. When the piece measures 28-28-29-29-29-29 cm from the division, increase 13-12-13-14-14-14 stitches evenly spaced = 222-237-252-273-303-327 stitches. Change to circular needle size 3 mm and continue as follows from the right side: Work 1 stitch in garter stitch, rib (= knit 1 / purl 2) until there are 2 stitches left and finish with knit 1 and 1 stitch in garter stitch. Cast off with knit from the right side when the rib measures 4 cm – read CASTING-OFF TIP. The piece measures 32-32-33-33-33-33 cm from the division. SLEEVE-EDGE: Place the 63-69-72-84-89-90 stitches from the thread on the one side of the piece on double pointed needles size 4 mm and knit up 1 stitch in each of the 6-6-6-6-8-10 stitches cast on under the sleeve = 69-75-78-90-97-100 stitches. Work stocking stitch in the round for 2 cm. Change to double pointed needles size 3 mm and work rib (= knit 1 / purl 2) AT THE SAME TIME as you decrease, on the first round, 0-0-0-0-1-1 stitch = 69-75-78-90-96-99 stitches. Cast off when the rib measures 4 cm, with knit over knit and purl over purl. Work the other sleeve-edge in the same way. ASSEMBLY: Sew buttons onto the left band. |
|||||||||||||||||||||||||||||||
Diagram explanations |
|||||||||||||||||||||||||||||||
|
|||||||||||||||||||||||||||||||
 |
|||||||||||||||||||||||||||||||
 |
|||||||||||||||||||||||||||||||
 |
|||||||||||||||||||||||||||||||
 |
|||||||||||||||||||||||||||||||
 |
|||||||||||||||||||||||||||||||
 |
|||||||||||||||||||||||||||||||
Have you finished this pattern?Tag your pictures with #dropspattern #lavendercharmcardi or submit them to the #dropsfan gallery. Do you need help with this pattern?You'll find 29 tutorial videos, a Comments/Questions area and more by visiting the pattern on garnstudio.com. © 1982-2026 DROPS Design A/S. We reserve all rights. This document, including all its sub-sections, has copyrights. Read more about what you can do with our patterns at the bottom of each pattern on our site. |
|||||||||||||||||||||||||||||||


With over 40 years in knitting and crochet design, DROPS Design offers one of the most extensive collections of free patterns on the internet - translated to 17 languages. As of today we count 324 catalogues and 12239 patterns translated into English (UK/cm). 12239
We work hard to bring you the best knitting and crochet have to offer, inspiration and advice as well as great quality yarns at incredible prices! Would you like to use our patterns for other than personal use? You can read what you are allowed to do in the Copyright text at the bottom of all our patterns. Happy crafting!
Post a comment to pattern DROPS 213-21
We would love to hear what you have to say about this pattern!
If you want to leave a question, please make sure you select the correct category in the form below, to speed up the answering process. Required fields are marked *.