
Popular categories
Looking for a yarn?


Comments / Questions (74)
![]() Valentina wrote:
Valentina wrote:
Buonasera, Adoro questo modello e sto iniziando a realizzarlo. Sto lavorando lo sprone in taglia M e sono arrivata al punto in cui bisogna iniziare sulla 4° maglia in A.4 e lavorare le 13 maglie successive. Potrei avere delle delucidazioni in merito? Non riesco a capire come faccio a lavorare 13 maglie partendo dalla 4° maglia. Grazie
05.11.2020 - 16:38DROPS Design answered:
Buonasera Valentina, deve lavorare dalla 4° maglia e poi ricominciare il giro. Buon lavoro!
05.11.2020 - 18:59
![]() Mrs Maharaj wrote:
Mrs Maharaj wrote:
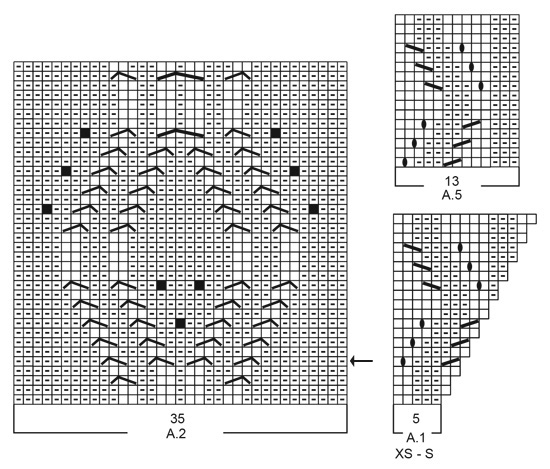
Hi again, In XS YOKE, in the 1st line of pattern, marker thread is not coming in the middle and 1 more time on round is left from being fully completed. Also, are all the diagrams read from right to left? can you give me the break down of the pattern on 1st round of the patterns as - * K1, M1YO, A.1 (P3,K2), A.2 (P11,K2,P2,K2,P1,K2,P2,K2,P11), A.3 (K2.P3), M1YO,K2 (Marker thread), M1YO, ----Please whats after this? Thanks
29.10.2020 - 17:49DROPS Design answered:
Dear Mrs Maharaj, the marker threads inserted at the very beg of yoke are not coming in the middle of piece but should mark the different parts of yoke: beg of round, back piece (= 47 sts); sleeve (= 13 sts), front piece (= 37 sts), sleeve (= 13 sts)- and you will increase as explained on first round in yoke working diagrams at the same time - read more about diagrams here. Happy knitting!
30.10.2020 - 07:17
![]() MRS Maharaj wrote:
MRS Maharaj wrote:
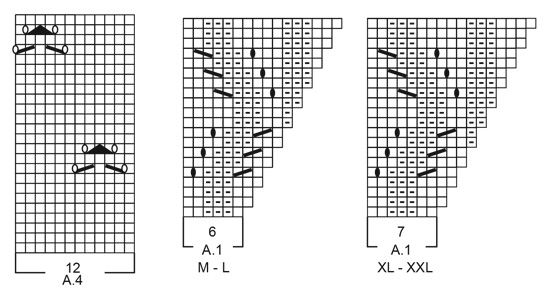
Hi again, thanks for the quick reply earlier. I have another question. Pls help me. Thanks. In YOKE, pls explain me this for XS :- “ begin on 5th-5th-4th-4th-3rd-3rd stitch in A.4 and work the next 11-11-13-13-15-15 stitches”. I don’t understand what to begin on 5th stitch. Thanks.
28.10.2020 - 18:40DROPS Design answered:
Hi Mrs Maharaj, You begin on the 5th stitch in A.4 (reading from the right to left) and then work A.4 over the next 11 stitches. This is so you get a symmetric pattern in your size. Happy knitting!
29.10.2020 - 07:11
![]() Mrs S Maharaj wrote:
Mrs S Maharaj wrote:
Hi, In the NECK EDGE section, it says "Switch to circular needle size 4.5 mm. Insert 1 marker after approx. 23-23-24-24-25-25 stitches (= approx. mid back on back piece), measure yoke from this marker!" Does that mean, we just insert the marker after 23 sts (for XS), without working the line ? Or do we have to work that line? Thanks,
22.10.2020 - 18:19DROPS Design answered:
Hi Mrs Maharaj, You can insert the marker without working the stitches first. It is for measuring the length of the yoke, so the position on the round is not so important. Happy knitting!
23.10.2020 - 07:56
![]() Kat Arnett wrote:
Kat Arnett wrote:
Correction for the transition from body to rib = Work next round as follows: * Knit the first 19-23-27-31-36-42 stitches and increase at the same time 6-6-6-8-9-9 stitches evenly, knit over knit and purl over purl over the next 61 stitches, knit the next 19-23-27-31-36-42 stitches and decrease (SHOULD SAY INCREASE) at the same time 6-6-6-8-9-9 stitches evenly, work from *-* 1 more time on round = 222-238-254-278-302-326 stitches. Knit the first 25-29-33-39-45-51 stitches on round.
22.09.2020 - 05:33
![]() Birgit Sanden wrote:
Birgit Sanden wrote:
Hej. Jeg har skrevet til jer den 19/8 vedr. problemer med diagram A1 og A3, og kan se der er andre der også har problemer. Hvornår kan jeg forvente at få svar? 🙏 Jeg vil gerne snart i gang med at strikke.
20.09.2020 - 18:53
![]() Vibeke Hansen wrote:
Vibeke Hansen wrote:
Har strikket mønstre i mange år, men med dette diagram er jeg ved at opgive:)Jeg strikker i str. M og har problemer fra omgang 6 i diagram A-1 og A-3 (som flere andre). Jeg husker at tage ud som beskrevet, men når vrangmaskerne forskydes i de nævnte diagrammer, går det helt galt. Har haft kontakt til Anita fra Anita Garn, der har været meget behjælpelig, men det er svært at forklare og vejlede, når man ikke lige sidder med strikketøjet . Håber I kan hjælpe. VH Vibeke
07.09.2020 - 14:56
![]() Karen Ida Bech Pedersen wrote:
Karen Ida Bech Pedersen wrote:
Jeg er forøvrigt en rutineret strikker, jeg har strikket i snart 50 år
30.08.2020 - 18:24DROPS Design answered:
Så skal du nok løse det. God fornøjelse! :)
01.09.2020 - 12:34
![]() Karen Ida Bech Pedersen wrote:
Karen Ida Bech Pedersen wrote:
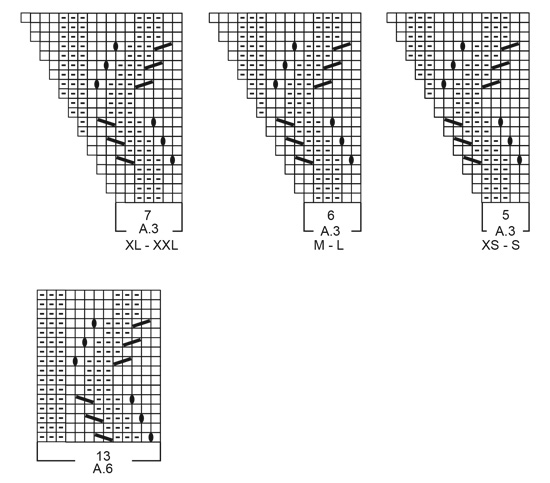
Jeg har skrevet til jer før angående diagram A4 til Golden moments. Jeg er begyndt med 3.m i A4, til række 9 og 11, det er i orden, men når jeg så skal til række 21 og 23, skal jeg så stadig starte med 3.m i diagrammet? Jeg synes ikke, mønsteret passer, når jeg gør det. Det er lige før jeg opgiver . Hjælp med venlig hilsen Karen
30.08.2020 - 18:03DROPS Design answered:
Hej Karen, hvis du tænker at du skal forskyde 2.hulmønster, så du har 1 maske ret imellem yderste omslag (sidst) i nederste hulmønster og yderste omslag (først) i øverste hulmønster ifølge diagrammet.
01.09.2020 - 12:33
![]() Karen Ida Bech Pedersen wrote:
Karen Ida Bech Pedersen wrote:
Det er angående Golden Moments diagram A4, hvordan starter jeg på omgang 9?
23.08.2020 - 13:07DROPS Design answered:
Hei Karen. Det kommer an på hvilken størrelse du strikker. Start på 5. maske (str. XS) - 5.maske (str. S) - 4.maske (str. M) - 4.maske (str. L) - 3.maske (str. XL) eller 3.maske (str. XXL) i A.4 . God Fornøyelse!
24.08.2020 - 13:25
|
|||||||||||||||||||||||||||||||||||||
Golden Moments#goldenmomentssweater |
|||||||||||||||||||||||||||||||||||||
 |
 |
||||||||||||||||||||||||||||||||||||
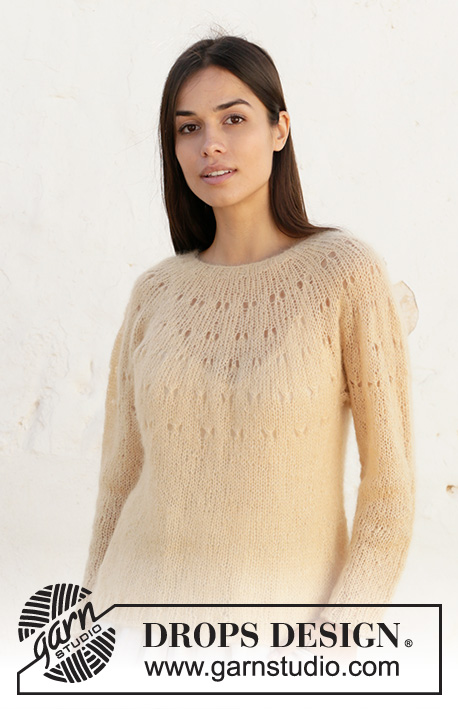
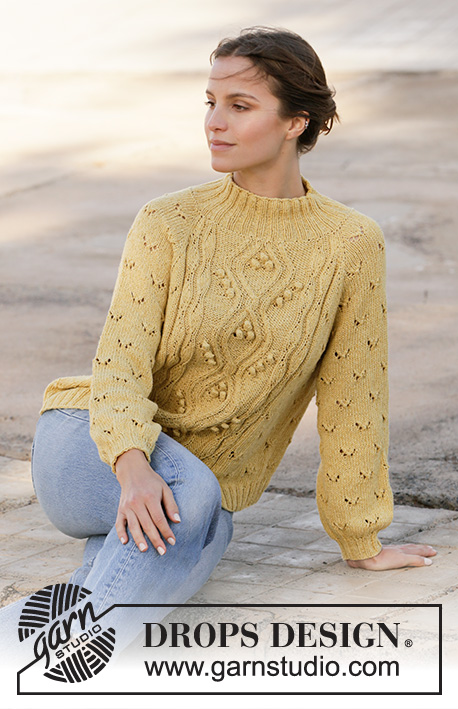
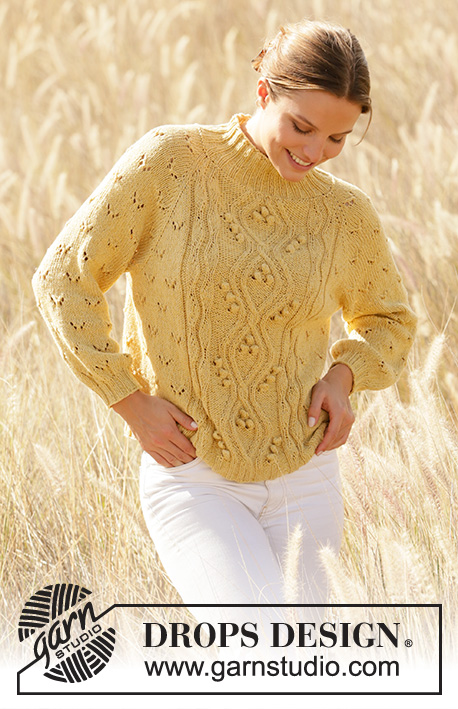
Knitted jumper with raglan in DROPS Belle. Piece is knitted top down with lace pattern, cables and bobbles. Size XS–XXL.
DROPS 213-16 |
|||||||||||||||||||||||||||||||||||||
|
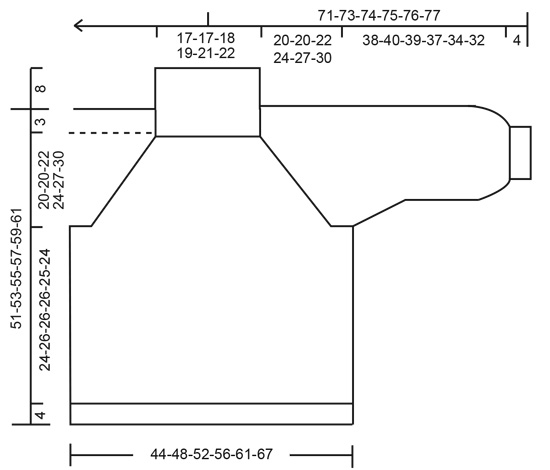
---------------------------------------------------------- EXPLANATION FOR THE PATTERN: ---------------------------------------------------------- PATTERN: See diagrams A.1 to A.6. Choose diagram for your size (applies to A.1 and A.3). INCREASE/DECREASE TIP (evenly): To calculate how to increase/decrease evenly, use the total number of stitches on row (e.g. 92 stitches) , divide stitches by number of increases/decreases to be done (e.g. 28) = 3.2. In this example increase by making 1 yarn over after approx. 3rd stitch. On next round work yarn overs twisted to avoid holes. To decrease in this example knit approx. every 2nd and 3rd stitch together. RAGLAN: Increase 1 stitch on each side of marker thread as follows: Work until 1 stitch remains before marker thread, make 1 yarn over, knit 2, (marker thread is between these stitches), make 1 yarn over. On next round knit yarn overs twisted to avoid holes. Then work the new stitches in pattern. DECREASE TIP (applies to sleeves): If the lace pattern and decrease are on the same round, adjust so that decrease is on next round. Decrease 1 stitch on each side of marker thread as follows: Work until 3 stitches remain before marker thread and knit 2 together, knit 2 (marker thread is between these stitches), slip 1 stitch knitwise, knit 1, pass slipped stitch over stitch worked. CAST-OFF TIP: To avoid a tight cast-off edge you may use a larger needle size. If this also is too tight, work a 1 yarn over after approx. every 4th stitch while casting off (cast off yarn overs as regular stitches). ---------------------------------------------------------- START THE PIECE HERE: ---------------------------------------------------------- JUMPER - SHORT OVERVIEW OF THE PIECE: Neck edge and yoke are worked in the round on circular needle, top down. Now divide yoke for body and sleeves. Body is worked in the round on circular needle, top down. Work sleeves in the round on double pointed needles/short circular needle, top down. NECK EDGE: Cast on 92-92-96-100-108-112 stitches on circular needle size 3.5 mm with Belle. Knit 1 round. Then work rib (= knit 2/purl 2) in the round for 8 cm. When rib is done, knit 1 round while increasing 28-28-32-28-28-24 stitches evenly - read DECREASE/INCREASE TIP = 120-120-128-128-136-136 stitches. Purl 1 round and knit 1 round. Switch to circular needle size 4.5 mm. Insert 1 marker after approx. 23-23-24-24-25-25 stitches (= approx. mid back on back piece), measure yoke from this marker! YOKE: Now insert 4 marker threads in the piece without working: Insert first marker thread at the beginning of round (= in transition between left sleeve and back piece), insert next marker thread after 47-47-49-49-51-51 stitches (= in transition between back piece and right sleeve), insert next marker thread after 13-13-15-15-17-17 stitches (= in transition between right sleeve and front piece), insert next marker thread after 47-47-49-49-51-51 stitches (= in transition between front piece and left sleeve), 13-13-15-15-17-17 stitches remain on round after last marker thread. Now work pattern – choose diagram for your size, as follows: * Knit 1, make 1 yarn over, A.1 over the next 5-5-6-6-7-7 stitches, A.2 over the next 35 stitches, A.3 over the next 5-5-6-6-7-7 stitches, make 1 yarn over, knit 2 (marker thread is in the middle of these 2 stitches), make 1 yarn over, begin on 5th-5th-4th-4th-3rd-3rd stitch in A.4 and work the next 11-11-13-13-15-15 stitches, make 1 yarn over, knit 1 *, work from *-* 1 more time on round. 8 stitches have been increased for RAGLAN - read explanation above. Continue pattern like this and increase every other round 22-26-29-31-35-39 times in total = 296-328-360-376-416-448 stitches, at the same time work pattern as follows: REMEMBER THE KNITTING TENSION! Pattern for front and back piece: When A.1 and A.3 have been worked vertically, work A.5 over the last 13 stitches in A.1 and A.6 over the first 13 stitches in A.3, work the remaining stitches towards each raglan in stocking stitch until 16 increases have been worked for raglan. Then when beginning 3rd lace pattern vertically on sleeves (i.e. on 33rd round on yoke), work lace pattern (A.4) the same way as on sleeves. I.e. there should always be 1-1-2-2-3-3 knit stitches between yarn over in lace pattern and increase for raglan. When increasing more stitches for raglan, work as many whole lace pattern as there is room for. Pattern sleeves: On sleeves repeat A.4 vertically and work as many lace patterns as there is room for in width. There should always be 1-1-2-2-3-3 knit stitches between yarn over in lace pattern and increase for raglan. When all increases for raglan are done, piece measures approx. 17-20-22-24-27-30 cm from marker. In size XS continue with pattern (without increases for raglan) until piece measures 20 cm from marker. If the piece is shorter than 20-22-24-27-30 cm in size S, M, L, XL and XXL continue pattern (without increases for raglan) until correct measurements. Work next round as follows: Work first 91-99-107-111-121-129 stitches (= back piece), slip the next 57-65-73-77-87-95 stitches on a stitch holder for sleeve, cast on 8-8-8-12-12-16 new stitches on needle (= in the side under sleeve), work the next 91-99-107-111-121-129 stitches (= front piece), slip the next 57-65-73-77-87-95 stitches on a stitch holder for sleeve, cast on 8-8-8-12-12-16 new stitches on needle (in the side under sleeve). Cut the yarn. Now finish body and sleeves separately. NOW MEASURE PIECE FROM HERE! BODY: = 198-214-230-246-266-290 stitches. Insert 1 marker thread in each side, in the middle of the new stitches cast-on in the side under the sleeves (= 4-4-4-6-6-8 new stitches on each side of marker thread). Begin round in one side. Continue in the round with pattern as before and work as many repetition with lace pattern as there is room for towards each side (lace patterns should fit on top of each other the same way as earlier in piece). Work the remaining stitches that do not fit lace pattern towards each side in stocking stitch (= 6-4-2-6-5-5 stitches between marker thread in the side and the outermost yarn over in lace pattern towards the side). Continue in the round like this until piece measures approx. 24-26-26-26-25-24 cm - adjust to finish after 1st, 2nd round, 14th-18th round or 30th-34th round in A.2. Work next round as follows: * Knit the first 19-23-27-31-36-42 stitches and increase at the same time 6-6-6-8-9-9 stitches evenly, knit over knit and purl over purl over the next 61 stitches, knit the next 19-23-27-31-36-42 stitches and increase at the same time 6-6-6-8-9-9 stitches evenly, work from *-* 1 more time on round = 222-238-254-278-302-326 stitches. Knit the first 25-29-33-39-45-51 stitches on round. Insert a marker thread here. This is now the beginning of round. Now work rib. There are 2 variants for rib over the 61 stitches in pattern. If you finish after 1st, 2nd or 30th-34th round in A.2 work rib-1, and if you finished after 14th-18th round in A.2 work rib-2. Rib-1: * Knit over knit and purl over purl over the first 18 stitches, knit 2, knit over knit and purl over purl over the next 21 stitches, knit 2, knit over knit and purl over purl over the next 18 stitches, (knit 2/2 purl) over the next 50-58-66-78-90-102 stitches *, work from *-* 1 more time on round. Rib-2: * Knit over knit and purl over purl over the first 61 stitches, (knit 2/2 purl) over the next 50-58-66-78-90-102 stitches *, work from *-* 1 more time on round. Continue like this until rib measures approx. 4 cm. Cast off with knit over knit and purl over purl - read CAST-OFF TIP. Jumper measures approx. 51-53-55-57-59-61 cm from shoulder and down. SLEEVES: Slip the 57-65-73-77-87-95 stitches from stitch holder in one side back on a short circular needle/double pointed needles size 4.5 mm and pick in addition up 1 stitch in each of the 8-8-8-12-12-16 new stitches cast on under sleeve = 65-73-81-89-99-111 stitches. Insert a marker thread in the middle of the new stitches. Move marker thread upwards when working. Use the marker later when decreasing under sleeve. Work pattern in the different sizes as follows: Size XS, S and M: Continue in the round with as many lace pattern as there is room for on round. Work the remaining stitches under sleeve in stocking stitch. When sleeve measures 4 cm, begin decrease under sleeve – read DECREASE TIP. Decrease like this approx. every 0-10-5 cm 1-3-6 times in total = 63-67-69 stitches. Now work as explained below. Size L, XL and XXL: Continue in the round with as many lace pattern as there is room for on round. Work the remaining stitches under sleeve in stocking stitch. At the same time on first round decrease stitches under sleeve - read DECREASE TIP. Decrease like this every other round 2-5-9 times, then every 4-3-2 cm 7-8-9 times in total = 71-73-75 stitches. All sizes: Continue until sleeve measures 38-40-39-37-34-32 cm from division. Knit 1 round while decreasing 23-23-25-23-25-23 stitches evenly = 40-44-44-48-48-52 stitches. Switch to double pointed needles size 3.5 mm. Knit 2/purl 2 in the round. When rib measures 4 cm, cast off with knit over knit and purl over purl - remember CAST-OFF TIP. Sleeve measures 42-44-43-41-38-36 cm in total from division. Work the other sleeve the same way. |
|||||||||||||||||||||||||||||||||||||
Diagram explanations |
|||||||||||||||||||||||||||||||||||||
|
|||||||||||||||||||||||||||||||||||||
 |
|||||||||||||||||||||||||||||||||||||
 |
|||||||||||||||||||||||||||||||||||||
 |
|||||||||||||||||||||||||||||||||||||
 |
|||||||||||||||||||||||||||||||||||||
Have you finished this pattern?Tag your pictures with #dropspattern #goldenmomentssweater or submit them to the #dropsfan gallery. Do you need help with this pattern?You'll find 26 tutorial videos, a Comments/Questions area and more by visiting the pattern on garnstudio.com. © 1982-2026 DROPS Design A/S. We reserve all rights. This document, including all its sub-sections, has copyrights. Read more about what you can do with our patterns at the bottom of each pattern on our site. |
|||||||||||||||||||||||||||||||||||||


With over 40 years in knitting and crochet design, DROPS Design offers one of the most extensive collections of free patterns on the internet - translated to 17 languages. As of today we count 324 catalogues and 12239 patterns translated into English (UK/cm). 12239
We work hard to bring you the best knitting and crochet have to offer, inspiration and advice as well as great quality yarns at incredible prices! Would you like to use our patterns for other than personal use? You can read what you are allowed to do in the Copyright text at the bottom of all our patterns. Happy crafting!
Post a comment to pattern DROPS 213-16
We would love to hear what you have to say about this pattern!
If you want to leave a question, please make sure you select the correct category in the form below, to speed up the answering process. Required fields are marked *.