DROPS Belle
DROPS Belle
53% Cotton, 33% Viscose, 14% Linen
from 2.20 € /50g
Get the yarn to make this pattern from 17.60€.

The yarn cost is calculated from the pattern’s smallest size and the yarn’s cheapest product type. Looking for an even better price? You might find it on the DROPS Deals!

DROPS SS24

Golden Moments

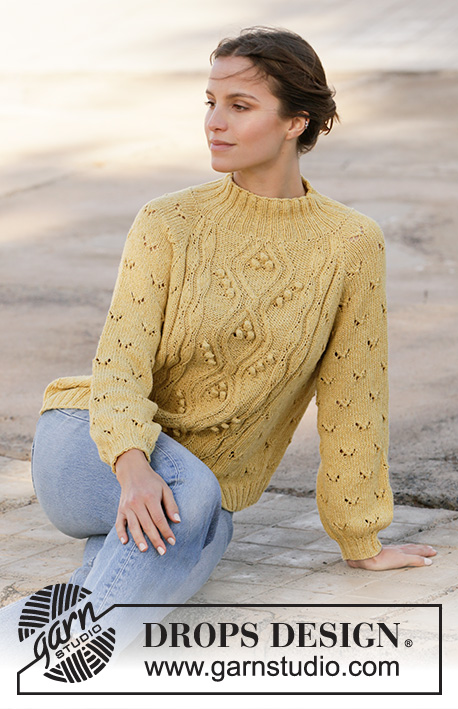
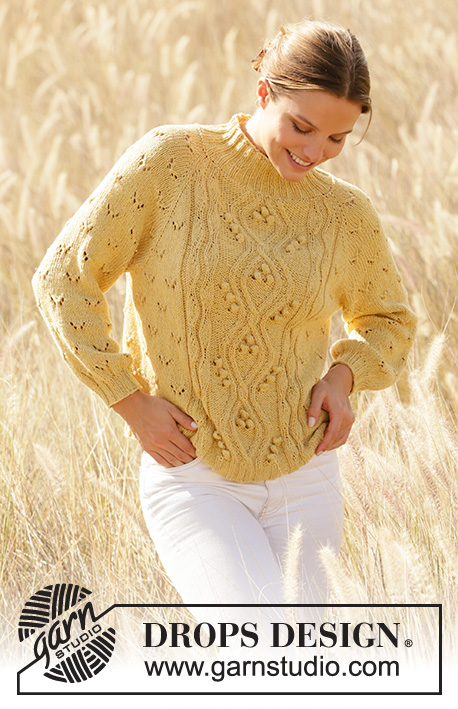
Knitted jumper with raglan in DROPS Belle. Piece is knitted top down with lace pattern, cables and bobbles. Size XS–XXL.

DROPS 213-16
DROPS design: Pattern vs-062
Yarn group B
----------------------------------------------------------

SIZE:
XS - S - M - L - XL - XXL

MATERIALS:
DROPS BELLE from Garnstudio (belongs to yarn group B)
400-450-500-550-600-650 g colour 04, dandelion

KNITTING TENSION:
20 stitches in width and 26 rows vertically in stocking stitch = 10 x 10 cm.

NEEDLES:
DROPS DOUBLE POINTED NEEDLES SIZE 4.5 mm
DROPS CIRCULAR NEEDLE SIZE 4.5 mm: Length 40 and 80 cm for stocking stitch.
DROPS DOUBLE POINTED NEEDLES SIZE 3.5 mm
DROPS CIRCULAR NEEDLE SIZE 3.5 mm: Length 40 and 80 cm for rib.
DROPS CABLE NEEDLE - for cables.
Needle size is only a suggestion! If you have too many stitches on 10 cm switch to a larger needle size. If you have too few stitches on 10 cm switch to a smaller needle size.

-------------------------------------------------------

Alternative Yarn – See how to change yarns here
Yarn Groups A to F – Use the same pattern and change the yarn here
Yarn usage using an alternative yarn – Use our yarn converter here

-------------------------------------------------------

DROPS Belle
DROPS Belle
53% Cotton, 33% Viscose, 14% Linen
from 2.20 € /50g
Get the yarn to make this pattern from 17.60€.

The yarn cost is calculated from the pattern’s smallest size and the yarn’s cheapest product type. Looking for an even better price? You might find it on the DROPS Deals!

Pattern instructions

----------------------------------------------------------

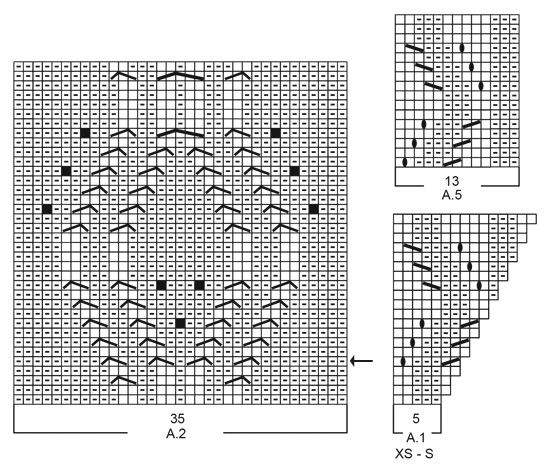
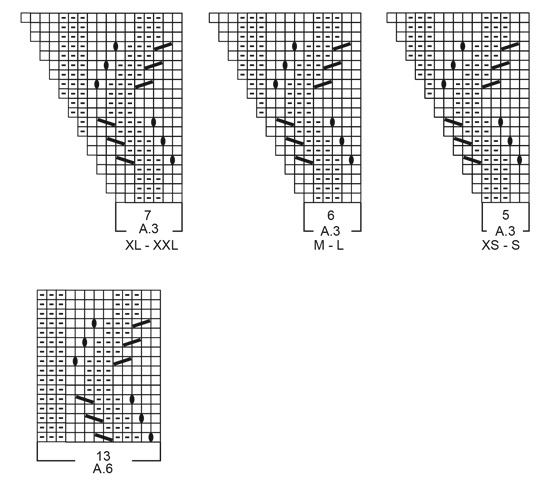
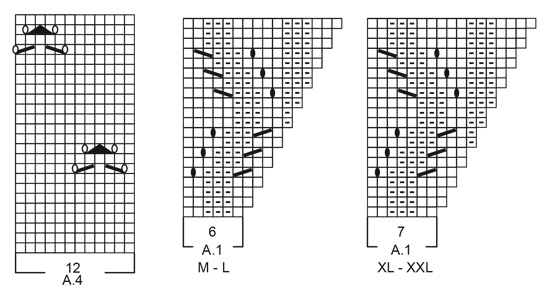
EXPLANATION FOR THE PATTERN:

----------------------------------------------------------

PATTERN:
See diagrams A.1 to A.6. Choose diagram for your size (applies to A.1 and A.3).

INCREASE/DECREASE TIP (evenly):
To calculate how to increase/decrease evenly, use the total number of stitches on row (e.g. 92 stitches) , divide stitches by number of increases/decreases to be done (e.g. 28) = 3.2. 
In this example increase by making 1 yarn over after approx. 3rd stitch. On next round work yarn overs twisted to avoid holes.
To decrease in this example knit approx. every 2nd and 3rd stitch together.

RAGLAN:
Increase 1 stitch on each side of marker thread as follows: Work until 1 stitch remains before marker thread, make 1 yarn over, knit 2, (marker thread is between these stitches), make 1 yarn over. On next round knit yarn overs twisted to avoid holes. Then work the new stitches in pattern. 

DECREASE TIP (applies to sleeves): 
If the lace pattern and decrease are on the same round, adjust so that decrease is on next round.
Decrease 1 stitch on each side of marker thread as follows: Work until 3 stitches remain before marker thread and knit 2 together, knit 2 (marker thread is between these stitches), slip 1 stitch knitwise, knit 1, pass slipped stitch over stitch worked.

CAST-OFF TIP:
To avoid a tight cast-off edge you may use a larger needle size. If this also is too tight, work a 1 yarn over after approx. every 4th stitch while casting off (cast off yarn overs as regular stitches).

----------------------------------------------------------

START THE PIECE HERE:

----------------------------------------------------------

JUMPER - SHORT OVERVIEW OF THE PIECE:
Neck edge and yoke are worked in the round on circular needle, top down. Now divide yoke for body and sleeves. Body is worked in the round on circular needle, top down. Work sleeves in the round on double pointed needles/short circular needle, top down.

NECK EDGE:
Cast on 92-92-96-100-108-112 stitches on circular needle size 3.5 mm with Belle. Knit 1 round. Then work rib (= knit 2/purl 2) in the round for 8 cm. When rib is done, knit 1 round while increasing 28-28-32-28-28-24 stitches evenly - read DECREASE/INCREASE TIP = 120-120-128-128-136-136 stitches. Purl 1 round and knit 1 round. Switch to circular needle size 4.5 mm. Insert 1 marker after approx. 23-23-24-24-25-25 stitches (= approx. mid back on back piece), measure yoke from this marker!

YOKE:
Now insert 4 marker threads in the piece without working: Insert first marker thread at the beginning of round (= in transition between left sleeve and back piece), insert next marker thread after 47-47-49-49-51-51 stitches (= in transition between back piece and right sleeve), insert next marker thread after 13-13-15-15-17-17 stitches (= in transition between right sleeve and front piece), insert next marker thread after 47-47-49-49-51-51 stitches (= in transition between front piece and left sleeve), 13-13-15-15-17-17 stitches remain on round after last marker thread.
Now work pattern – choose diagram for your size, as follows: * Knit 1, make 1 yarn over, A.1 over the next 5-5-6-6-7-7 stitches, A.2 over the next 35 stitches, A.3 over the next 5-5-6-6-7-7 stitches, make 1 yarn over, knit 2 (marker thread is in the middle of these 2 stitches), make 1 yarn over, begin on 5th-5th-4th-4th-3rd-3rd stitch in A.4 and work the next 11-11-13-13-15-15 stitches, make 1 yarn over, knit 1 *, work from *-* 1 more time on round. 8 stitches have been increased for RAGLAN - read explanation above. Continue pattern like this and increase every other round 22-26-29-31-35-39 times in total = 296-328-360-376-416-448 stitches, at the same time work pattern as follows:
REMEMBER THE KNITTING TENSION!
Pattern for front and back piece:
When A.1 and A.3 have been worked vertically, work A.5 over the last 13 stitches in A.1 and A.6 over the first 13 stitches in A.3, work the remaining stitches towards each raglan in stocking stitch until 16 increases have been worked for raglan. Then when beginning 3rd lace pattern vertically on sleeves (i.e. on 33rd round on yoke), work lace pattern (A.4) the same way as on sleeves. I.e. there should always be 1-1-2-2-3-3 knit stitches between yarn over in lace pattern and increase for raglan. When increasing more stitches for raglan, work as many whole lace pattern as there is room for.
Pattern sleeves:
On sleeves repeat A.4 vertically and work as many lace patterns as there is room for in width. There should always be 1-1-2-2-3-3 knit stitches between yarn over in lace pattern and increase for raglan.

When all increases for raglan are done, piece measures approx. 17-20-22-24-27-30 cm from marker. In size XS continue with pattern (without increases for raglan) until piece measures 20 cm from marker. If the piece is shorter than 20-22-24-27-30 cm in size S, M, L, XL and XXL continue pattern (without increases for raglan) until correct measurements.
Work next round as follows:
Work first 91-99-107-111-121-129 stitches (= back piece), slip the next 57-65-73-77-87-95 stitches on a stitch holder for sleeve, cast on 8-8-8-12-12-16 new stitches on needle (= in the side under sleeve), work the next 91-99-107-111-121-129 stitches (= front piece), slip the next 57-65-73-77-87-95 stitches on a stitch holder for sleeve, cast on 8-8-8-12-12-16 new stitches on needle (in the side under sleeve). Cut the yarn. Now finish body and sleeves separately. NOW MEASURE PIECE FROM HERE!

BODY:
= 198-214-230-246-266-290 stitches. Insert 1 marker thread in each side, in the middle of the new stitches cast-on in the side under the sleeves (= 4-4-4-6-6-8 new stitches on each side of marker thread). Begin round in one side. Continue in the round with pattern as before and work as many repetition with lace pattern as there is room for towards each side (lace patterns should fit on top of each other the same way as earlier in piece). Work the remaining stitches that do not fit lace pattern towards each side in stocking stitch (= 6-4-2-6-5-5 stitches between marker thread in the side and the outermost yarn over in lace pattern towards the side). Continue in the round like this until piece measures approx. 24-26-26-26-25-24 cm - adjust to finish after 1st, 2nd round, 14th-18th round or 30th-34th round in A.2.
Work next round as follows: * Knit the first 19-23-27-31-36-42 stitches and increase at the same time 6-6-6-8-9-9 stitches evenly, knit over knit and purl over purl over the next 61 stitches, knit the next 19-23-27-31-36-42 stitches and increase at the same time 6-6-6-8-9-9 stitches evenly, work from *-* 1 more time on round = 222-238-254-278-302-326 stitches. Knit the first 25-29-33-39-45-51 stitches on round. Insert a marker thread here. This is now the beginning of round. Now work rib. There are 2 variants for rib over the 61 stitches in pattern. If you finish after 1st, 2nd or 30th-34th round in A.2 work rib-1, and if you finished after 14th-18th round in A.2 work rib-2.
Rib-1:
* Knit over knit and purl over purl over the first 18 stitches, knit 2, knit over knit and purl over purl over the next 21 stitches, knit 2, knit over knit and purl over purl over the next 18 stitches, (knit 2/2 purl) over the next 50-58-66-78-90-102 stitches *, work from *-* 1 more time on round.
Rib-2:
* Knit over knit and purl over purl over the first 61 stitches, (knit 2/2 purl) over the next 50-58-66-78-90-102 stitches *, work from *-* 1 more time on round.

Continue like this until rib measures approx. 4 cm. Cast off with knit over knit and purl over purl - read CAST-OFF TIP. Jumper measures approx. 51-53-55-57-59-61 cm from shoulder and down.

SLEEVES:
Slip the 57-65-73-77-87-95 stitches from stitch holder in one side back on a short circular needle/double pointed needles size 4.5 mm and pick in addition up 1 stitch in each of the 8-8-8-12-12-16 new stitches cast on under sleeve = 65-73-81-89-99-111 stitches. Insert a marker thread in the middle of the new stitches. Move marker thread upwards when working. Use the marker later when decreasing under sleeve. Work pattern in the different sizes as follows:
Size XS, S and M:
Continue in the round with as many lace pattern as there is room for on round. Work the remaining stitches under sleeve in stocking stitch. When sleeve measures 4 cm, begin decrease under sleeve – read DECREASE TIP. Decrease like this approx. every 0-10-5 cm 1-3-6 times in total = 63-67-69 stitches. Now work as explained below.
Size L, XL and XXL:
Continue in the round with as many lace pattern as there is room for on round. Work the remaining stitches under sleeve in stocking stitch. At the same time on first round decrease stitches under sleeve - read DECREASE TIP. Decrease like this every other round 2-5-9 times, then every 4-3-2 cm 7-8-9 times in total = 71-73-75 stitches.
All sizes:
Continue until sleeve measures 38-40-39-37-34-32 cm from division. Knit 1 round while decreasing 23-23-25-23-25-23 stitches evenly = 40-44-44-48-48-52 stitches. Switch to double pointed needles size 3.5 mm. Knit 2/purl 2 in the round. When rib measures 4 cm, cast off with knit over knit and purl over purl - remember CAST-OFF TIP. Sleeve measures 42-44-43-41-38-36 cm in total from division. Work the other sleeve the same way.

This pattern has been corrected.

Updated online: 02.04.2020
Added an arrow in A.2 (round 5) and added an explanation under Diagram text
Updated online: 22.09.2020
Rettelse:
BODY: ... Work next round as follows: * Knit the first 19-23-27-31-36-42 stitches and increase at the same time 6-6-6-8-9-9 stitches evenly, knit over knit and purl over purl over the next 61 stitches, knit the next 19-23-27-31-36-42 stitches and increase at the same time 6-6-6-8-9-9 stitches evenly, work from *-* 1 more time on round = 222-238-254-278-302-326 stitches. Knit the first 25-29-33-39-45-51 stitches on round...
Updated online: 09.09.2022
RAGLAN:
Increase 1 stitch on each side of marker thread as follows: Work until 1 stitch remains before marker thread, make 1 yarn over, knit 2, (marker thread is between these stitches), make 1 yarn over. On next round knit yarn overs twisted to avoid holes. Then work the new stitches in pattern. 

Diagram

symbols = knit
symbols = purl
symbols = between 2 stitches make 1 yarn over. On next round knit yarn over twisted to avoid holes.
symbols = between 2 stitches make 1 yarn over. On next round knit the yarn over to make holes.
symbols = knit 2 together
symbols = slip 1 stitch knitwise, knit 1, pass slipped stitch over stitch worked
symbols = slip 1 stitch knitwise, knit 2 stitches together, pass slipped stitch over stitches worked together
symbols = slip 1 stitch on cable needle behind piece, knit 2, purl 1 from cable needle
symbols = slip 2 stitches on cable needle in front of piece, purl 1, knit 2 from cable needle
symbols = slip 2 stitches on cable needle in front of piece, knit 2, purl 1, knit 2 from cable needle
symbols = Bobble: Knit 1 in front and back loop of same stitch until 1 stitch has been increased to 5 stitches and work 3 rows in stocking stitch over the 5 stitches, turn and knit 5 together (= 1 stitch).
symbols = when A.2 is worked 1 time in high repeat chart from the round with an arrow
diagram
diagram
diagram
diagram

Each of our patterns has specific tutorial videos to help you.

Do you have a question? See a list of frequently asked questions (FAQ)

Knitting tension is what determines the final measurements of your work, and is usually measured per 10 x 10 cm. It is provided like so: number of stitches in width x number of rows in height - eg: 19 stitches x 26 rows = 10 x 10 cm.

The knitting tension is very individual; some people knit/crochet loosely while others work tightly. You adjust the knitting tension with the needle size, which is why the suggested needle size is only meant as a guide! You need to adjust this (up or down) to ensure that YOUR knitting tension matches the knitting tension provided in the pattern. If you work with a different knitting tension than provided you will have a different yarn consumption, and your work will have different measurements than what the pattern suggests.

The knitting tension also determines which yarns can replace each other. As long as you achieve the same knitting tension you can replace one yarn with another.

See DROPS lesson: How to measure your tension/gauge

See DROPS video: How to make a gauge tension swatch

The required amount of yarn is provided in grams, eg: 450 g. To calculate how many balls you’ll need you first need to know how many grams are in 1 ball (25g, 50g or 100g). This information is available if you click on the individual yarn quality on our pages. Divide the amount required with the amount of each ball. For example, if each ball is 50g (the most common amount), the calculation will be as follows: 450 / 50 = 9 balls.

The important thing when changing from one yarn to another is that the knitting/crochet tension remains the same. This is so that the measurements of the finished piece will be the same as on the sketch provided. It is easier to achieve the same knitting tension using yarns from the same yarn group. It is also possible to work with multiple strands of a thinner yarn to achieve the knitting tension of a thicker one. Please try our yarn converter. We recommend you to always work a test swatch.

Please NOTE: when changing yarn the garment might have a different look and feel to the garment in the photo, due to individual properties and qualities of each yarn.

See DROPS lesson: Can I use a different yarn than the one mentioned in the pattern?

All our yarns are categorised into yarn groups (from A to F) according to thickness and knitting tension – group A contains the thinnest yarns and group F the thickest. This makes it easier for you to find alternative yarns to our patterns, should you wish to switch yarn. All yarns within the same group have a similar knitting tension and can easily replace each other. However, different yarn qualities have different structures and properties which will give the finished work a unique look and feel.

Click here for an overview of the yarns in each yarn group

At the top of all our patterns you’ll find a link to our yarn calculator, which is a helpful tool should you wish to use a different yarn than suggested. By filling in the yarn quality you wish to replace, the amount (in your size) and number of strands, the calculator will present good alternative yarns with the same knitting tension. Additionally it will tell you how much you’ll require in the new qualities and whether you’ll need to work with multiple strands. Most skeins are 50g (some are 25g or 100g).

If the pattern is worked with multiple colours, every colour will have to be calculated separately. Similarly, if the pattern is worked with several strands of different yarns (for example 1 strand Alpaca and 1 strand Kid-Silk) you will have to find alternatives for each, individually.

Click here to see our yarn calculator

Since different yarns have different qualities and textures we have chosen to keep the original yarn in our patterns. However, you can easily find options among our available qualities by using our yarn calculator, or simply pick a yarn from the same yarn group.

It is possible that some retailers still have discontinued yarns in stock, or that someone has a few skeins at home that they would like to find patterns for.

The yarn calculator will provide both alternative yarn as well as required amount in the new quality.

If you think it's hard to decide what size to make, it can be a good idea to measure a garment you own already and like the size of. Then you can pick the size by comparing those measures with the ones available in the pattern's size chart.

You'll find the size chart at the bottom of the pattern.

See DROPS lesson: How to read size chart

The needle size provided in the pattern serves only as a guide, the important thing is to follow the knitting tension. And since knitting tension is very individual, you will have to adjust the needle size to ensure that YOUR tension is the same as in the pattern – maybe you’ll have to adjust 1, or even 2 needle sizes, up or down to achieve the correct tension. For this, we recommend that you work test swatches.

Should you work with a different knitting tension than the one provided, the measurements of the finished garment might deviate from the measurement sketch.

See DROPS lesson: How to measure your tension/gauge

See DROPS video: How to make a tension/gauge swatch

Working a garment top-down provides more flexibility and room for personal adjustment. For example it is easier to try the garment on while working, as well as making adjustments to length of yoke and shoulder caps.

The instructions are carefully explaining every step, in the correct order. Diagrams are adjusted to the knitting direction and are worked as usual.

The diagram depicts all rows/rounds, and every stitch seen from the right side. It is read from bottom to top, from right to left. 1 square = 1 stitch.

When working back and forth, every other row is worked from the right side and every other row is worked from the wrong side. When working from the wrong side, the diagram will have to be worked reversed: from left to right, knit stitches are purled, purl stitches are knit etc.

When working in the round every round is worked from the right side and the diagram are worked from right to left on all rounds.

See DROPS lesson: How to read knitting diagrams

The diagram depicts all rows/rounds, and every stitch seen from the right side. It is worked from bottom to top, from right to left.

When working back and forth every other row is worked from the right side: from right to left and every other row is worked from the wrong side: from left to right.

When working in the round, every row in the diagram are worked from the right side, from right to left.

When working a circular diagram you start in the middle and work your way outwards, counter clockwise, row by row.

The rows usually start with a given number of chain stitches (equivalent to the height of the following stitch), this will either be depicted in the diagram or explained in the pattern.

See DROPS lesson: How to read crochet diagrams

Instructions for working several diagrams after each other on the same row/round, will often be written like so: “work A.1, A.2, A.3 a total of 0-0-2-3-4 times". This means you work A.1 once, then A.2 is worked once, and A.3 is repeated (in width) the number of times provided for your size – in this case like so: S = 0 times, M = 0 times, L=2 times, XL= 3 times and XXL = 4 times.

The diagrams are worked as usual: begin with the first row in A.1, then work the first row in A.2 etc.

See DROPS lesson: How to read knitting diagrams

See DROPS lesson: How to read crochet diagrams

The total width of the garment (from wrist-to-wrist) will be larger in the larger sizes, despite the actual sleeves being shorter. The larger sizes have longer sleeve caps and wider shoulders, so there will be a good fit in all sizes.

The measurement sketch/schematic drawing provides information regarding the full length of the garment. If it’s a jumper or a jacket the length is measured from the highest point on the shoulder closest to the neckline, and straight down to the bottom of the garment. It is NOT measured from the tip of shoulder. Similarly, the length of yoke is measured from the highest point on the shoulder and down to where yoke is split into body and sleeves.

On a jacket measures are never taken along bands, unless specifically stated. Always measure inside band stitches when measuring the length.

See DROPS lesson: How to read a schematic drawing

Diagrams are often repeated on the round or in height. 1 repeat is the diagram the way it appears in the pattern. If it says to work 5 repeats of A.1 in the round, then you work A.1 a total of 5 times after/next to each other in the round. If it says to work 2 repeats of A.1 vertically/in height you work the entire diagram once, then begin again at the start and work the entire diagram one more time.

Chain stitches are slightly narrower than other stitches and to avoid working the cast-on edge too tight, we simply chain more stitches to begin with. The stitch count will be adjusted on the following row to fit the pattern and measurement sketch.

The rib edge is more elastic and will contract slightly compared to, for example, stocking stitch. By increasing before the rib edge, you avoid a visible difference in width between the rib edge and the rest of the body.

It’s very easy to cast off too tightly, and by making yarn overs while casting off (and simultaneously casting these off) you avoid a too tight cast off edge.

See DROPS video: How to bind off with yarn overs (yo)

To achieve an even increase (or decrease) you can increase on, for example: every 3rd and 4th row alternately, like so: work 2 rows and increase on the 3rd row, work 3 rows and increase on the 4th. Repeat this until the increase is complete.

See DROPS lesson: Increase or decrease 1 st on every 3rd and 4th row alternately

Should you prefer to work in the round instead of back and forth, you may of course adjust the pattern. You’ll need to add steeks mid-front (usually 5 stitches), and follow the instructions. When you would normally turn and work from the wrong side, simply work across the steek and continue in the round. At the end you’ll cut the piece open, pick up stitches to work bands, and cover the cut edges.

See DROPS video: How to knit steeks and cut open

Should you prefer to work back and forth instead of in the round, you may of course adjust the pattern so you work the pieces separately and then assemble them at the end. Divide the stitches for the body in 2, add 1 edge stitch in each side (for sewing) and work the front and back pieces separately.

See DROPS lesson: Can I adapt a pattern for circular needles into straight needles?

Pattern repeats can vary slightly in the different sizes, in order to get the correct proportions. If you’re not working the exact same size as the garment in the photo, yours might deviate slightly. This has been carefully developed and adjusted so that the complete impression of the garment is the same in all sizes.

Make sure to follow instructions and diagrams for your size!

If you have found a pattern you like which is available in women’s size it’s not very difficult to convert it to men’s size. The biggest difference will be the length of sleeves and body. Start working on the women size that you think would fit across the chest. The additional length will be worked right before you cast off for the armhole/sleeve cap. If the pattern is worked top-down you can add the length right after the armhole or before the first decrease on sleeve.

Regarding additional yarn amount, this will depend on how much length you add, but it is better with a skein too many than too few.

All yarns will have excess fibres (from production) that might come off as lint or shedding. Brushed yarns (ie hairier yarns) have more of these loose, excess fibres, causing more shedding.

Shedding also depends on what is worn under or over the garment, and whether this pulls at the yarn fibres. It’s therefore not possible to guarantee that there will be no shedding

Below are some tips on how to get the best result when working with hairier yarns:

1. When the garment is finished (before you wash it) shake it vigorously so the looser hairs come off. NOTE: do NOT use a lint roller, brush or any method that pulls at the yarn.

2. Place the garment in a plastic bag and put it in your freezer - the temperature will cause the fibres to become less attached to each other, and excess fibres will come off easier.

3. Leave in the freezer for a few hours before taking it out and shaking it again.

4. Wash the garment according to the instructions on the yarn label.

Pilling is a natural process that happens to even the most exclusive of fibers. It's a natural sign of wear and tear that is hard to avoid, and that is most visible in high friction areas of your garment like a sweater's arms and cuffs.

You can make your garment look as new by removing the pilling, using a fabric comb or a pill/lint remover.

Still can't find the answer you need? Then scroll down and leave your question so one of our experts can try to help you. This will be done normally within 5 to 10 working days.
In the meantime, you can read the questions and answers that others have left to this pattern or join the DROPS Workshop on Facebook to get help from fellow knitters/crocheters!

You might also like...

Golden Moments

Tuuli, Estonia

Golden Moments

J_e_z_i_o_r_k_a, Poland

Golden Moments

Nina, Denmark

Post a comment to pattern DROPS 213-16

We would love to hear what you have to say about this pattern!

If you want to leave a question, please make sure you select the correct category in the form below, to speed up the answering process. Required fields are marked *.

Comments / Questions (65)

country flag Mrs Maharaj wrote:

I am following ‘S’ pattern. Thanks.

24.01.2021 - 16:23

DROPS Design answered:

Dear Mrs Maharaj, I don't understand your question sorry, A.4 is 12 stitches and is worked at the beginning of the yoke for sleeves over 11 stitches starting with the 5th (= work the last 8 sts + the first 3 sts in diagram). Then when you will increase you have 2 sts more after every increase row. If you don't have enough sts to work a whole lace pattern (= as many yarn overs as decreases), just work the stitches in stocking stitch. Hope this helps. Happy knitting!

25.01.2021 - 10:22

country flag Mrs Maharaj wrote:

Hi, I am on the 33rd round where I have to start the A4 pattern in the stocking stitches. I have now (K1, YO, K8). K8 are the stocking stitches I have to fit the A4 pattern. The A4 pattern is of 7 stitches. It is not coming symmetric on both the ends of A5 and A6. How can I do it.? Pls help. Thanks.

23.01.2021 - 19:31

country flag Marina wrote:

How can I download the pattern to my computer? I don't want to print 27 pages. Thank you!

14.01.2021 - 05:25

DROPS Design answered:

Hi Marina, When you have the pattern page open, right click on it and an instruction list will pop up, where you can click on 'save as' and save it with the name and place on your computer of your choice. Happy crafting!

14.01.2021 - 07:30

country flag Tara Schanssema wrote:

Sorry, mijn laatste opmerking klopt niet, heb verkeerd gemeten...

12.01.2021 - 10:18

country flag Tara Schanssema wrote:

Ik ben nu al op 20 cm en nog maar op de helft vd meerderingen.( 31x 8 meerderingen om de naald) klopt dat?? Moet nl bij ong 27cm beginnen met de mouw

12.01.2021 - 07:53

DROPS Design answered:

Dag Tara,

Bij 31 keer meerderen om de naald, brei je 62 naalden in de hoogte en dat zou overeenkomen met ongeveer 24 cm in de hoogte als de stekenverhouding klopt (26 naalden in de hoogte = 24 cm). Misschien even je stekenverhouding controleren? En heb je ook vanaf na de boordsteek gemeten?

17.01.2021 - 12:49

country flag Tara Schanssema wrote:

Vlgs mij klopt het patroon niet bij A1 ...als je moet meerderen met een omslag ben je niet ineens een hokje verder , weet niet zo goed hoe ik het moet uitleggen zonder het te laten zien ..maar vlgs mij klopt het patroon niet bij A1( mt L)

11.01.2021 - 12:57

country flag Giulia wrote:

Grazie per la risposta. Quindi è corretto che alla fine del 6 giro del motivo A.1 mi ritrovo con 4 maglie dritte e non tre come da schema?

21.11.2020 - 22:54

DROPS Design answered:

Buongiorno Giulia, indipendentemente della maglie che si trova, sul giro 6 di A.1, deve lavorare 3 maglie diritto, 3 maglie rovescio e 3 maglie diritto, lavorando a ritorto la maglia gettata del giro precedente. Buon lavoro!

26.11.2020 - 10:03

country flag Giulia wrote:

Salve, Sto eseguendo il motivo in taglia M. Sono bloccata al motivo A.1 giro n 6. Come faccio ad avere le ultime tre maglie a diritto? Facendo la terzultima a diritto sulla terzultima a rovescio del 5 giro io mi ritrovo con 4 maglie a diritto alla fine del 6 giro. Mi ritrovo con tre maglie dritte sulle tre maglie dritte del 5 giro(1 diritto,1 gettato,1 diritto) più un'altra maglia diritta da fare sulla sesta maglia rovescio del 5 giro. Come devo fare per avere il motivo corretto?

21.11.2020 - 12:22

DROPS Design answered:

Buonasera Giulia, deve considerare che all'inizio del giro 5 viene diminuita una maglia, quindi il lavoro si sposta di una maglia verso la destra del diagramma. Il numero delle maglie è corretto. Buon lavoro!

21.11.2020 - 21:11

country flag Valentina wrote:

Buon pomeriggio, sto eseguendo il modello in taglia M e sono arrivata al ferro 11. Nel motivo A4 dovrei partire dalla 4 maglia per poi proseguire. Secondo me c'è un errore nello schema in quanto alla 4 maglia del ferro 11 corrisponde tutto un passaggio che include anche la 3 e la 5 maglia. Come devo procedere? Secondo me c'è un errore dal 9 ferro e bisogna iniziare il motivo dall'inizio e non dalla 4 maglia. Grazie

09.11.2020 - 16:03

DROPS Design answered:

Buonasera Valentina, abbiamo inoltrato la sua richiesta al settore design. Buon lavoro!

15.11.2020 - 19:45

country flag Valentina wrote:

Devo ricominciare il giro dall'inizio oppure sempre dalla 4° maglia? Grazie

05.11.2020 - 19:37

DROPS Design answered:

Buongiorno Valentina, può riprendere dalla 1° maglia di A.4. Buon lavoro!

06.11.2020 - 09:44