
Popular categories
Looking for a yarn?


Comments / Questions (55)
![]() Marie wrote:
Marie wrote:
Hei. Jeg ønsker å strikke denne jakken rundt. Altså ikke frem og tilbake som i oppskriften. Kan jeg gjøre det hvis jeg ikke strikker knappestolpen men legger opp oppklippsmasker i stedet? Eller blir det helt feil...
22.02.2020 - 13:08DROPS Design answered:
Hei Marie. Det kan du gjøre, men husk at DROPS Muskat er et glatt garn, slik at når du skal klippe opp i front kan maske lett gli ut om de ikke er festet godt nok/sydd godt nok over. God Fornøyelse!
24.02.2020 - 09:27
![]() Anna wrote:
Anna wrote:
Stämmer måtten på ärmarna? Det ser ut som att ärmarna ska stickas kortare ju större storlek. Eller läser jag beskrivningen fel?
01.02.2020 - 12:32DROPS Design answered:
Hej Anna. I de större storlekarna kommer den totala vidden (från handled till handled) att vara större än i de mindre storlekarna, även om själva ärmen är kortare. De större storlekarna har längre ärmkupa samt bredare axelvidd. Detta resulterar i en bra passform i alla storlekar. Lycka till!
03.02.2020 - 13:58
![]() Maya wrote:
Maya wrote:
Danke für die Antwort. Jetzt seh ich im Beschreib auch, dass für die Grösse M-XXXL neu das Diagramm auch aufgeschaltet wurde.
31.01.2020 - 11:32
![]() Maya wrote:
Maya wrote:
Wie kann ich herausfinden welches Diagramm ich wählen muss für die Grösse S ? Habe ich im Muster wohl etwas übersehen? Danke für die Antwort
30.01.2020 - 16:49DROPS Design answered:
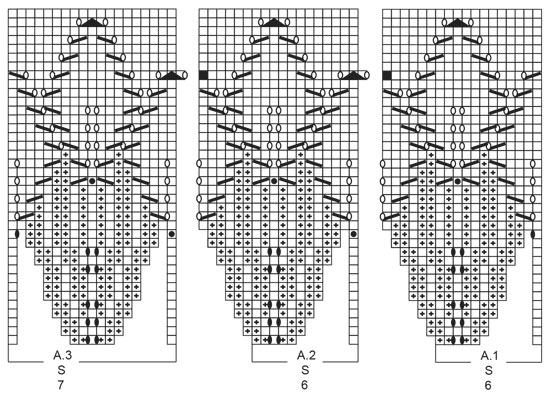
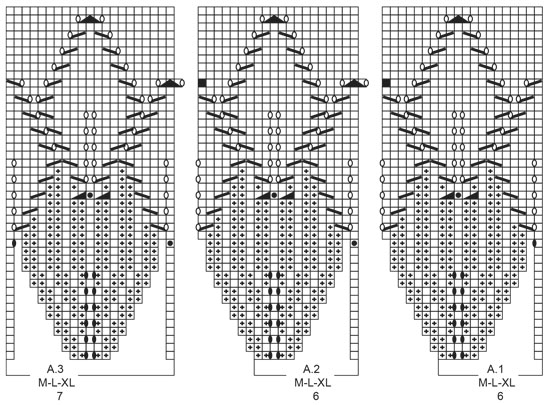
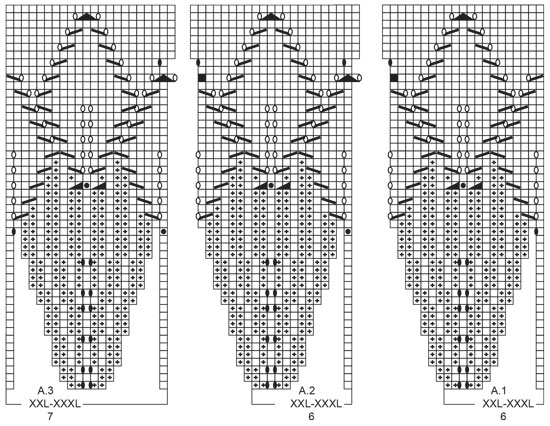
Liebe Maya, die Reihen bei der Passen beginnen mit A.1, dann wiederholen Sie A.2 und enden mit A.3 innerhalb die Blendemaschen. Viel Spaß beim stricken!
31.01.2020 - 07:07
![]() LINA wrote:
LINA wrote:
Fejl i den danske version. Diagram : 1. linje og 2.linje står det samme. Det gør det ikke i den engelske.
29.01.2020 - 08:50
|
|||||||||||||||||||||||||||||||
Listen to Nature Jacket#listentonaturejacket |
|||||||||||||||||||||||||||||||
 |
 |
||||||||||||||||||||||||||||||
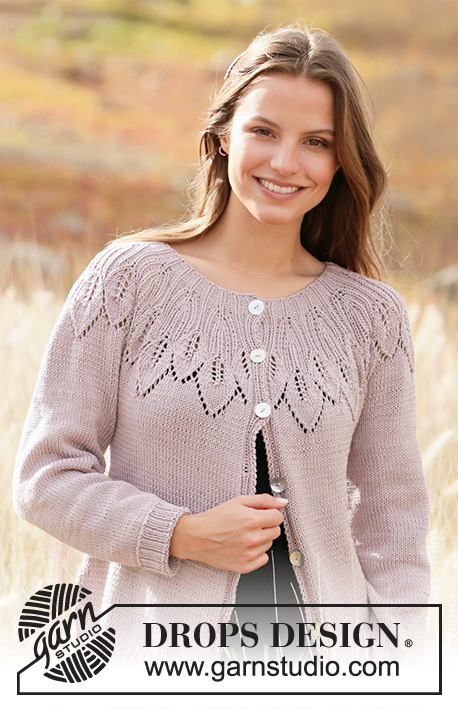
Knitted jacket with round yoke in DROPS Muskat. Piece is knitted top down with leaf pattern and lace pattern. Size: S - XXXL
DROPS 213-2 |
|||||||||||||||||||||||||||||||
|
---------------------------------------------------------- EXPLANATION FOR THE PATTERN: ---------------------------------------------------------- GARTER STITCH (back and forth): Knit all rows. 1 ridge vertically = knit 2 rows. PATTERN: See diagrams A.1 to A.3. Choose diagram for your size. Diagrams show all rows in pattern seen from the right side. INCREASE TIP (applies to sides of body): All increases are done from right side. Work until 2 stitches remain before marker thread, 1 yarn over, knit 4 (marker thread is in the middle of these stitches), 1 yarn over. On next row purl yarn overs twisted to avoid holes. Then work the new stitches in stocking stitch. DECREASE TIP (applies to sleeves): Decrease 1 stitch on each side of marker thread as follows: Work until 3 stitches remain before marker thread and knit 2 together, knit 2 (marker thread is between these stitches), slip 1 stitch knitwise, knit 1, pass slipped stitch over stitch worked. CAST-OFF TIP: To avoid a tight cast-off edge you may use a larger needle. If this also is too tight, make 1 yarn over after approx. every 4th stitch and cast off these as regular stitches. BUTTONHOLES: Decrease for buttonholes on right band (when garment is worn). Decrease from right side when 6 stitches remain on row as follows: Make 1 yarn over, knit the next 2 stitches together and work the last 4 stitches as before. On next row purl yarn over to make holes. Decrease first buttonhole when rib in neck measures approx. 1½-2 cm. Then decrease the next 6-6-6-6-7-7 buttonholes, approx. 7½-7½-8-8½-7½-7½ cm between each. ---------------------------------------------------------- START THE PIECE HERE: ---------------------------------------------------------- JACKET - SHORT OVERVIEW OF THE PIECE: Work neck edge and yoke back and forth on circular needle from mid front, top down. Now divide yoke for body and sleeves. Work body back and forth on circular needle, top down. Work sleeves in the round on double pointed needles, top down. NECK EDGE: Cast on 111-111-117-129-129-135 stitches (including 7 band stitches in each side towards mid front) on circular needle size 3 mm with Muskat. Purl 1 row (= wrong side). Work next row as follows from right side: Work 1 stitch in GARTER STITCH – see explanation above, knit 1, * purl 2, knit 1 *, work from *-* until 4 stitches remain, purl 2, knit 1 and 1 stitch in garter stitch. Decrease for BUTTONHOLES - read explanation above. When piece measures 3 cm, switch to circular needle size 4 mm. Insert 1 marker after band at the beginning of row mid front, measure yoke from this marker! YOKE: Work as follows from right side: Work 1 stitch in garter stitch, knit 1, purl 2, knit 1, purl 2 (= band), A.1 (= 6 stitches), A.2 (= 6 stitches) until 14 stitches remain (= 14-14-15-17-17-18 times in width), A.3 (= 7 stitches), and over band purl 2, knit 1, purl 2, knit 1 and 1 stitch in garter stitch. REMEMBER THE KNITTING TENSION! When A.1 to A.3 have been worked 1 time vertically, there are 303-335-355-395-431-453 stitches on needle. Piece now measures 14-16-16-16-18-18 cm from marker. Work band stitches as before and in stocking stitch over the remaining stitches. When piece measures 19-21-22-24-26-28 cm from marker, divide piece for body and sleeves as follows: Work the 7 band stitches as before, stocking stitch over the next 41-45-49-53-60-64 stitches (= front piece), slip the next 63-69-72-84-89-90 stitches on a stitch holder for sleeve and cast on 6-6-6-6-8-10 new stitches under sleeve, work in stocking stitch over the next 81-93-99-107-119-131 stitches (= back piece), slip the next 63-69-72-84-89-90 stitches on a stitch holder for sleeve and cast on 6-6-6-6-8-10 new stitches under sleeve, work 41-45-49-53-60-64 stitches in stocking stitch, and work 7 band stitches as before (= front piece). BODY: = 189-209-223-239-269-293 stitches. Insert 1 marker thread after 51-55-59-63-71-76 stitches in from each side (= in the side of body). There are 87-99-105-113-127-141 stitches between marker threads on back piece. Move the marker threads upwards when working; they should be used for increase later in the sides. Then work in stocking stitch and the 7 band stitches in each side of piece as before. When piece measures 4 cm from division, increase 1 stitch on each side of every marker thread - read INCREASE TIP (= 4 stitches increased). Increase like this every 4 cm 5-4-4-5-5-5 times in total = 209-225-239-259-289-313 stitches. When piece measures 28-28-29-29-29-29 cm from division, increase 13-12-13-14-14-14 stitches evenly = 222-237-252-273-303-327 stitches. Switch to circular needle size 3 mm and work from right side as follows: Work 1 stitch in garter stitch, work rib (= knit 1/purl 2) until 2 stitches remain, and finish with knit 1 and 1 stitch in garter stitch. Cast off by knitting from right side when rib measures 4 cm - read CAST-OFF TIP. Piece measures 32-32-33-33-33-33 cm from where it was divided. SLEEVES: Slip the 63-69-72-84-89-90 stitches from stitch holder in one side of piece on double pointed needles size 4 mm and pick in addition up 1 stitch in each of the 6-6-6-6-8-10 new stitches cast on under sleeve = 69-75-78-90-97-100 stitches. Insert 1 marker thread in the middle of the 6-6-6-6-8-10 stitches under sleeve. Move the marker upwards when working. Decrease on each side of this marker thread later. Work in stocking stitch in the round. When piece measures 2 cm, decrease 1 stitch on each side of marker thread- read DECREASE TIP (= 2 stitches decreased). Decrease like this every 3-2-2-1½-1-1 cm 11-13-14-19-21-22 times in total = 47-49-50-52-55-56 stitches. When piece measures 38-37-36-34-33-31 cm, increase 1-2-1-2-2-1 stitches evenly on next round= 48-51-51-54-57-57 stitches. Switch to double pointed needles size 3 mm and work rib in the round (= knit 1/purl 2). When rib measures 4 cm, cast off knit over knit and purl over purl. Sleeve measures 42-41-40-38-37-35 cm from division. Work the other sleeve the same way. ASSEMBLY: Sew the buttons on to the left band. |
|||||||||||||||||||||||||||||||
Diagram explanations |
|||||||||||||||||||||||||||||||
|
|||||||||||||||||||||||||||||||
 |
|||||||||||||||||||||||||||||||
 |
|||||||||||||||||||||||||||||||
 |
|||||||||||||||||||||||||||||||
 |
|||||||||||||||||||||||||||||||
Have you finished this pattern?Tag your pictures with #dropspattern #listentonaturejacket or submit them to the #dropsfan gallery. Do you need help with this pattern?You'll find 25 tutorial videos, a Comments/Questions area and more by visiting the pattern on garnstudio.com. © 1982-2026 DROPS Design A/S. We reserve all rights. This document, including all its sub-sections, has copyrights. Read more about what you can do with our patterns at the bottom of each pattern on our site. |
|||||||||||||||||||||||||||||||


With over 40 years in knitting and crochet design, DROPS Design offers one of the most extensive collections of free patterns on the internet - translated to 17 languages. As of today we count 324 catalogues and 12239 patterns translated into English (UK/cm). 12239
We work hard to bring you the best knitting and crochet have to offer, inspiration and advice as well as great quality yarns at incredible prices! Would you like to use our patterns for other than personal use? You can read what you are allowed to do in the Copyright text at the bottom of all our patterns. Happy crafting!
Post a comment to pattern DROPS 213-2
We would love to hear what you have to say about this pattern!
If you want to leave a question, please make sure you select the correct category in the form below, to speed up the answering process. Required fields are marked *.