
Popular categories
Looking for a yarn?


Comments / Questions (32)
![]() Matilda wrote:
Matilda wrote:
Ein sehr schöner Pullover, leider finde ich die Anleitung unübersichtlich, z.B. steht nirgends, dass die Passe bis auf das Muster links gestrickt wird.
11.04.2020 - 17:47
![]() Ineke wrote:
Ineke wrote:
Hoe brei ik figuur A1. 2x uitgehaald. Eerst gedaan zoals figuur A1 aangaf. Maar kreeg geen blad figuur. Was een rommeltje. Uitgehaald. En anders gedaan. 1ste naald zoals figuur A1 aanduiden. 2de naald herhaald. Ect. Maar toen werd het bladfiguur te lang. Patroon ook. Hoe moet wel. Snap het even niet.
21.03.2020 - 14:32DROPS Design answered:
Dag Ineke,
Jammer dat ik vanaf hier niet mee kan kijken wat er precies mis gaat. Ik neem aan dat je het telpatroon van onder naar boven leest? Alle naalden staan aangegeven in het patroon. Je moet inderdaad niet naalden dubbel gaan breien anders komt het niet uit en de aangegeven steken moeten precies boven elkaar komen, dus je moet ervoor zorgen dat er geen verschuivingen zijn. Bij bepaalde steken staan er rondjes naast. Kijk even goed waar die precies staan, zodat je ze niet per ongeluk overslaat.
22.03.2020 - 18:50
![]() Dany wrote:
Dany wrote:
Come mai dopo gli aumenti nello sprone i risultati della somma tra maglie presenti sul ferro e numero di maglie aumentate non è la somma esatta? Es. 294+76=370 e non 381. Chiedo quindi se vi siamo errori nelle spiegazioni. Grazie
18.02.2020 - 09:18DROPS Design answered:
Buongiorno Dany. Abbiamo corretto il testo. La ringraziamo per la segnalazione. Buon lavoro!
18.02.2020 - 13:49
![]() Lorraine wrote:
Lorraine wrote:
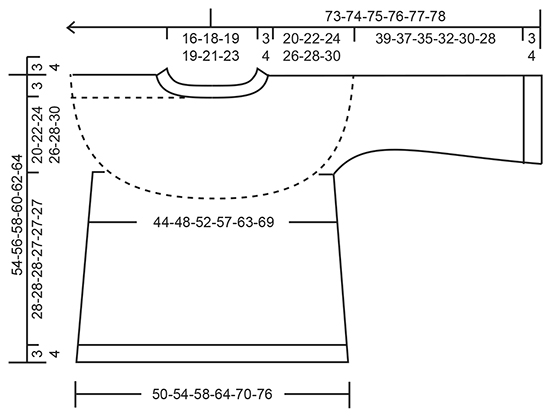
The chest measurements at the beginning of the pattern are different from the diagram at the bottom. Is the diagram correct?
17.12.2019 - 02:14DROPS Design answered:
Dear Lorraine, you are right, the chest measurements will be edited, diagram is correct - you can convert from cm into inches here. Happy knitting!
17.12.2019 - 09:32
![]() Angela wrote:
Angela wrote:
It would appear that this pattern is still not available to knit? When will it be added to the items available to knit. It reminds me of a jumper I have knitted in the past and is very feminine and pretty.
06.10.2019 - 10:17DROPS Design answered:
Dear Angela, our editors and translators are working, and we continiously publishing the patterns of the new collection until the end of the year. Keep an eye on the design you liked, as it will be available to knit sooner or later. Happy Knitting!
08.10.2019 - 22:22
![]() Elise Pedersen wrote:
Elise Pedersen wrote:
Rigtig flot model- hvornår er opskriften klar.
18.09.2019 - 18:03
![]() Svetlana wrote:
Svetlana wrote:
Veilchen - der Name :-) Wunderschöne elegante Form!
06.09.2019 - 15:51
![]() Laure wrote:
Laure wrote:
Très beau pull. Comment puis-je recevoir les explications?
28.08.2019 - 19:25
![]() Nath wrote:
Nath wrote:
A quand les explications ???!!!!
28.08.2019 - 15:46
![]() Cécile M wrote:
Cécile M wrote:
Joli design, féminin et flatteur, à quand les explications ? Merci.
31.07.2019 - 07:33
|
|||||||||||||||||||||||||||||||
Quiet Moments#quietmomentssweater |
|||||||||||||||||||||||||||||||
 |
 |
||||||||||||||||||||||||||||||
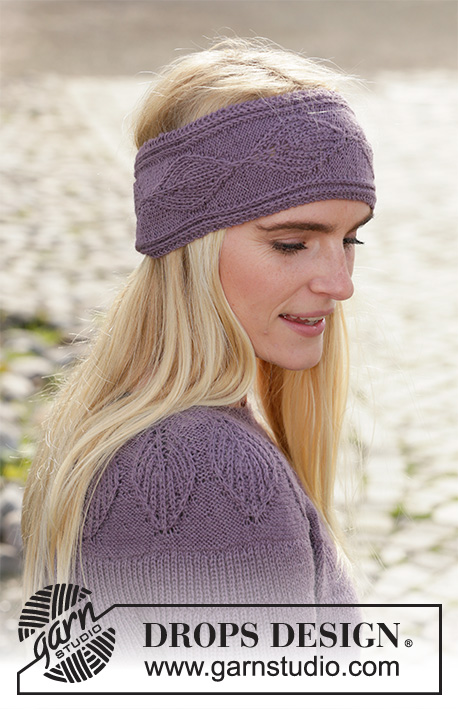
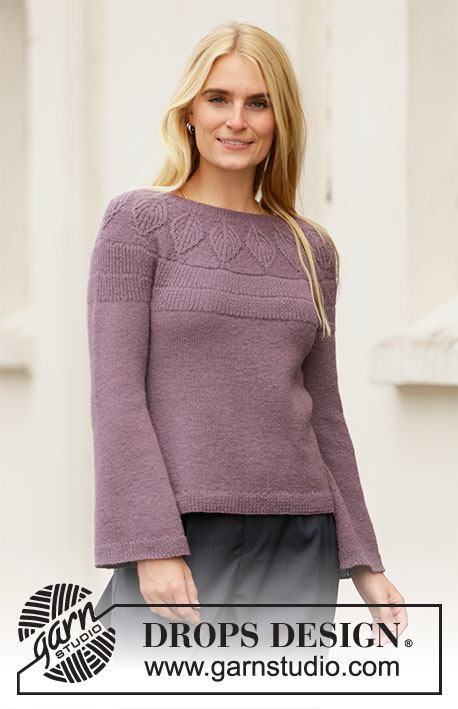
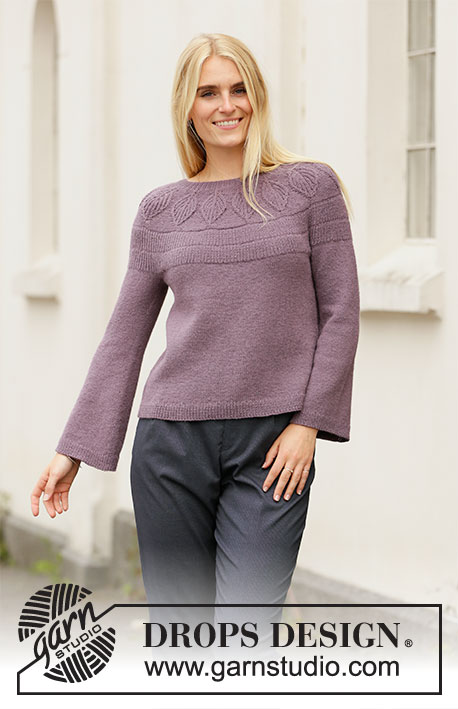
Knitted jumper in DROPS Flora. The piece is worked top down with round yoke and with rib, leaf pattern and false Fisherman’s rib on the yoke. Sizes S - XXXL.
DROPS 206-9 |
|||||||||||||||||||||||||||||||
|
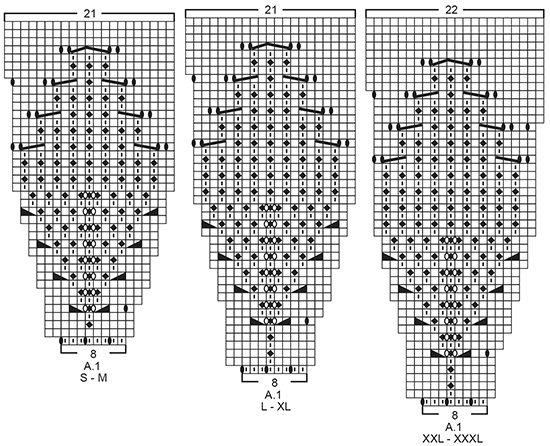
------------------------------------------------------- EXPLANATIONS FOR THE PATTERN: ------------------------------------------------------- PATTERN: See diagram A.1. Choose diagram for your size. INCREASE/DECREASE TIP (evenly spaced): To work out how to increase/decrease evenly, count the total number of stitches on needle (e.g. 273 stitches), and divide by the number of increases/decreases to be made (e.g. 59) = 4.6. In this example, increase by making 1 yarn over after alternately each 4th and 5th stitch. On the next row work the yarn overs twisted to avoid holes. When decreasing, alternately work together each 3rd and 4th stitch and each 4th and 5th stitch. INCREASE TIP (for sides of body and mid under sleeves): Start 2 stitches before the marker thread, 1 yarn over, knit 4 (marker thread sits between these 4 stitches), 1 yarn over. On the next round knit the yarn overs twisted to avoid holes. Then work the new stitches in stocking stitch. DECREASE TIP (for mid under sleeves): Start 3 stitches before the marker thread, knit 2 together, knit 2 (marker thread sits between these 2 stitches), slip 1 stitch as if to knit, knit 1 and pass the slipped stitch over the knitted stitch (= 2 stitches decreased). CASTING-OFF TIP: To avoid the cast-off edge being tight you can cast off with a larger size needle; or make 1 yarn over after approx. each 8th stitch at the same time as casting off (yarn overs cast off as normal stitches). ------------------------------------------------------- START THE PIECE HERE: ------------------------------------------------------- JUMPER – SHORT OVERVIEW OF THE PIECE: The neck and yoke are worked in the round with circular needle, top down. The yoke is divided for the body and sleeves and the body continued in the round with circular needle. The sleeves are worked in the round with double pointed needles/short circular needle, top down. NECK: Cast on 104-112-120-120-128-136 stitches with short circular needle size 2.5 mm and Flora. Knit 1 round, then work rib in the round (= knit 1 / purl 1) for 3-3-3-4-4-4 cm. When the rib is finished insert 1 marker in the middle of the round (= mid-front); the yoke is measured from here! YOKE: Change to circular needle size 3 mm and work A.1 in the round (= 13-14-15-15-16-17 repeats of 8 stitches). Continue this pattern and increase as shown in the diagram. REMEMBER THE KNITTING TENSION! When A.1 has been completed there are 273-294-315-315-352-374 stitches on the needle and the piece measures approx. 11-11-12-12-13-13 cm from the marker on the neck. Work 2 rounds of stocking stitch – AT THE SAME TIME on the last round increase 59-76-81-85-90-106 stitches evenly spaced – read INCREASE/DECREASE TIP = 332-370-396-400-442-480 stitches. Now work rib (= knit 1 / purl 1) for 3-3-4-4-5-5 cm. Then work 2 rounds of stocking stitch – AT THE SAME TIME on the last round increase 36-38-40-42-46-48 stitches evenly spaced = 368-408-436-442-488-528 stitches. Work rib (= knit 1 / purl 1) for 3-3-4-4-5-5 cm. Then knit 1 round where you decrease 46-46-42-16-34-34 stitches evenly spaced – read INCREASE/DECREASE TIP = 322-362-394-426-454-494 stitches. The piece now measures approx. 18-18-21-21-24-24 cm from the marker on the neck. Continue with stocking stitch (without increasing or decreasing), until the piece measures 20-22-24-26-28-30 cm from the marker on the neck. The yoke is now divided for body and sleeves, working the next round as follows: Work 48-53-57-63-69-76 stitches in stocking stitch (= ½ back piece), place the next 64-74-82-86-88-94 stitches on 1 thread for sleeve, cast on 8-8-10-10-12-12 new stitches on the needle (= in side under sleeve), work 97-107-115-127-139-153 stitches in stocking stitch (= front piece), place the next 64-74-82-86-88-94 stitches on 1 thread for sleeve, cast on 8-8-10-10-12-12 new stitches on the needle (= in side under sleeve) and work the remaining 49-54-58-64-70-77 stitches in stocking stitch (= ½ back piece). Cut the strand. Body and sleeves are finished separately. THE PIECE IS NOW MEASURED FROM HERE! BODY: = 210-230-250-274-302-330 stitches. Insert 1 marker thread in the middle of the 8-8-10-10-12-12 stitches under each sleeve and allow them to follow your work onwards; they will be used when increasing in the sides. Work stocking stitch in the round. When the piece measures 3-3-3-4-4-4 cm from the division increase 1 stitch on each side of both marker threads – read INCREASE TIP (= 4 stitches increased). Increase like this every 3½-3½-3½-3-3-3 cm a total of 7-7-7-8-8-8 times in each side = 238-258-278-306-334-362 stitches. Continue working until the piece measures 28-28-28-27-27-27 cm from the division (there is approx. 3-3-3-4-4-4 cm left to finished length; try the jumper on and work to desired length). Knit 1 round where you increase 64-70-74-80-88-96 stitches evenly spaced = 302-328-352-386-422-458 stitches; this is done to avoid the rib being tight. Change to circular needle size 2.5 mm and work rib (= knit 1 / purl 1) for 3-3-3-4-4-4 cm. Cast off with knit over knit and purl over purl – read CASTING-OFF TIP! The jumper measures approx. 54-56-58-60-62-64 cm from the shoulder down. SLEEVE: Place the 64-74-82-86-88-94 stitches from the thread on the one side of the piece on short circular needle size 3 mm and knit up 1 stitch in each of the 8-8-10-10-12-12 stitches cast on under the sleeve = 72-82-92-96-100-106 stitches. Insert a marker thread in the middle of the 8-8-10-10-12-12 stitches under the sleeve (allow the thread to follow your work onwards; it will be used when decreasing and increasing mid under sleeve). Start the round at the marker thread and work stocking stitch in the round. When the sleeve measures 2-2-2-2-1-1 cm from the division decrease 2 stitches under the sleeve – read DECREASE TIP. Decrease like this every 2½-1½-1-1-1-1 cm a total of 5-9-12-12-13-15 times = 62-64-68-72-74-76 stitches. When the sleeve measures 16 cm from the division in all sizes, increase 2 stitches mid under sleeve – read INCREASE TIP. Increase like this every 2-2-1½-1-1-½ cm a total of 10-11-12-12-13-14 times = 82-86-92-96-100-104 stitches. Continue working until the sleeve measures 39-37-35-32-30-28 cm from the division (there is approx. 3-3-3-4-4-4 cm left to finished length; try the jumper on and work to desired length). NOTE: Shorter measurements in larger sizes due to wider neck and longer yoke. Knit 1 round where you increase 24-26-28-28-30-32 stitches evenly spaced = 106-112-120-124-130-136 stitches. Change to short circular needle size 2.5 mm and work rib (= knit 1 / purl 1) for 3-3-3-4-4-4 cm. Cast off with knit over knit and purl over purl– remember CASTING-OFF TIP! The sleeve measures approx. 42-40-38-36-34-32 cm from the division. Work the other sleeve in the same way. |
|||||||||||||||||||||||||||||||
Diagram explanations |
|||||||||||||||||||||||||||||||
|
|||||||||||||||||||||||||||||||
 |
|||||||||||||||||||||||||||||||
 |
|||||||||||||||||||||||||||||||
Have you finished this pattern?Tag your pictures with #dropspattern #quietmomentssweater or submit them to the #dropsfan gallery. Do you need help with this pattern?You'll find 30 tutorial videos, a Comments/Questions area and more by visiting the pattern on garnstudio.com. © 1982-2026 DROPS Design A/S. We reserve all rights. This document, including all its sub-sections, has copyrights. Read more about what you can do with our patterns at the bottom of each pattern on our site. |
|||||||||||||||||||||||||||||||


With over 40 years in knitting and crochet design, DROPS Design offers one of the most extensive collections of free patterns on the internet - translated to 17 languages. As of today we count 324 catalogues and 12245 patterns translated into English (UK/cm). 12245
We work hard to bring you the best knitting and crochet have to offer, inspiration and advice as well as great quality yarns at incredible prices! Would you like to use our patterns for other than personal use? You can read what you are allowed to do in the Copyright text at the bottom of all our patterns. Happy crafting!
Post a comment to pattern DROPS 206-9
We would love to hear what you have to say about this pattern!
If you want to leave a question, please make sure you select the correct category in the form below, to speed up the answering process. Required fields are marked *.