
Popular categories
Looking for a yarn?


Comments / Questions (19)
![]() Aase wrote:
Aase wrote:
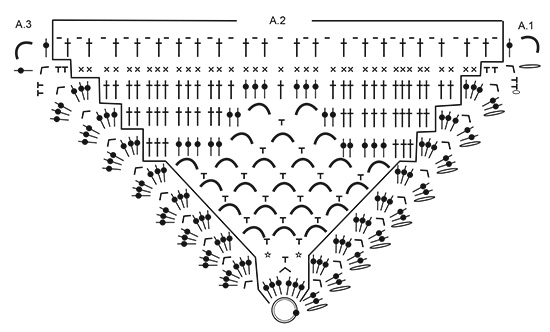
Hjælp - Jeg kan ikke finde ud af skabelonen til denne opskrift. A1 viser, hvordan omgangen starter - men den starter også med 3 stangmasker - og så kommer A2 -stangmaskerne i ringen (24 stk) - hvorefter den slutter med 6 stangmasker - A3. Det er vildt ærgerligt, den er så svær, for det er et virkeligt flot tæppe.
15.11.2019 - 11:15DROPS Design answered:
Hej, du starter med 24 st (den første af de 24 = 3lm) med 3 lm efter hver 3.st. På næste omgang hækler du 3st-3lm-3st i hvert af de 4 "lm-hjørner". Prøv om du kan få hjælp hos din DROPS forhandler, har du først hæklet en rude, så er det enkelt :)
21.11.2019 - 15:38
![]() Cecile wrote:
Cecile wrote:
Ik loop bij derde toer al vast bij patroon 198-4. Bij A1 moeten de stokjes in de lossenlus, maar dat lukt niet, als ik de drie losse heb gemaakt moet ik twee stokjes overslaan alvorens ik bij de lossenlus ben, hierdoor wordt er een extra gaatje gecreëerd, dit is dan bij alle volgende toeren zo. Ik heb het inmiddels al meerdere malen uitgehaald en op andere manier geprobeerd, maar ik blijf er steeds tegenaan lopen. Wat doe ik verkeerd?
15.07.2019 - 12:21DROPS Design answered:
Dag Cecile,
Heb je ook halve vasten gehaakt tot de eerste lossenlus voordat je de 3 lossen (welke het eerste stokje vervangt) haakt? Zie ook laatste zin bij 'INFORMATIE VOOR HET HAKEN'
15.07.2019 - 13:49
![]() Aase wrote:
Aase wrote:
Synes jeres design er flotte. Men det er godt nok ikke let med opskrifterne. Fx 198-4. Det er sørme svært at overskue.
28.04.2019 - 18:31
![]() Heidi wrote:
Heidi wrote:
Wat is de omgekeerde v tussen de stokjes in A1 en A3?
11.02.2019 - 11:36DROPS Design answered:
Dag Heidi,
Dit zijn drie lossen. Dit staat ook aangegeven in de lijst met symbolen.
13.02.2019 - 11:22
![]() Kristina wrote:
Kristina wrote:
Hej. Er det muligt, at få denne opskrift i skreven form, da jeg ikke kan hækle ud fra et diagram. I har så mange fede opskrifter, det er bare super ærgerligt, at man kun kun kan hækle dem, hvis man kan læse diagrammer. Kh Kristina
07.02.2019 - 10:21DROPS Design answered:
Hei Kristina. Nei, vi har dessverre ikke mulighet til å skrive om oppskriften. Det brukes diagram nettopp fordi det er veldig uoversiktleig å forklare alt med ord. Det kommer snart en leksjon på våre hjemmesider med detaljert informasjon om hvordan man leser heklediagrammer. Du begynner med sirkelen nederst (eller ved pilen) og leser hvert symbol fra høyre mot venstre, rad for rad, nedenfra og opp. Symbolene hekles i akkurat den rekkefølgen de står, i den masken som er rett under (forrige rad). Om det er noe spesielt du lurer på må du gjerne spørre så skal vi hjelpe deg så godt vi kan.
11.02.2019 - 11:12
![]() Nicole Schmeitz wrote:
Nicole Schmeitz wrote:
I like this! 1. Is there a Dutch translation available? 2. Can a order the yarn from the Netherlands? What is the price of shipment?
24.01.2019 - 12:34DROPS Design answered:
Dear Mrs Schmeitz, edit language under the photo choosing "Nederlands" - you'll then get the list of DROPS retailer in your country in our dutch pages. Happy crocheting!
24.01.2019 - 12:39
![]() Anke Van Der Werf wrote:
Anke Van Der Werf wrote:
Prachtig leuk om te maken
11.01.2019 - 17:08
![]() Lina wrote:
Lina wrote:
Underbar som överkast!
14.12.2018 - 21:48
![]() Laura Waterfield wrote:
Laura Waterfield wrote:
Stunning!
14.12.2018 - 11:56
|
|||||||||||||||||||||||||||||||||||||||||||||||||||||||
Asta#astablanket |
|||||||||||||||||||||||||||||||||||||||||||||||||||||||
 |
 |
||||||||||||||||||||||||||||||||||||||||||||||||||||||
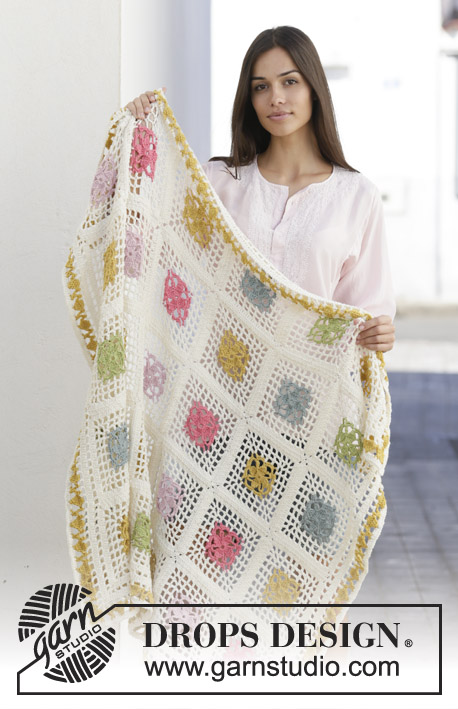
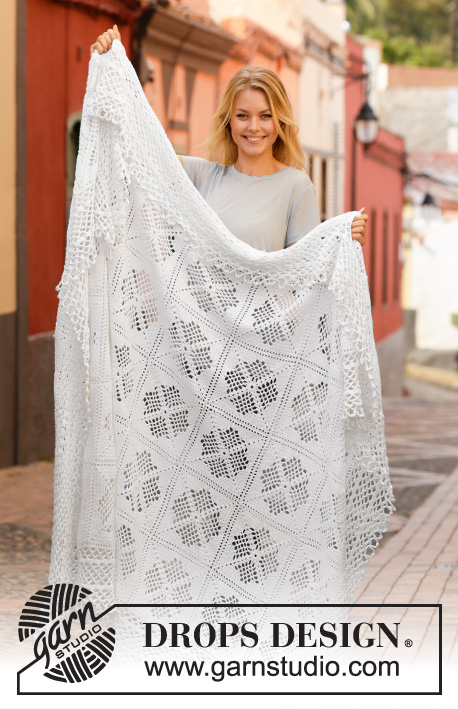
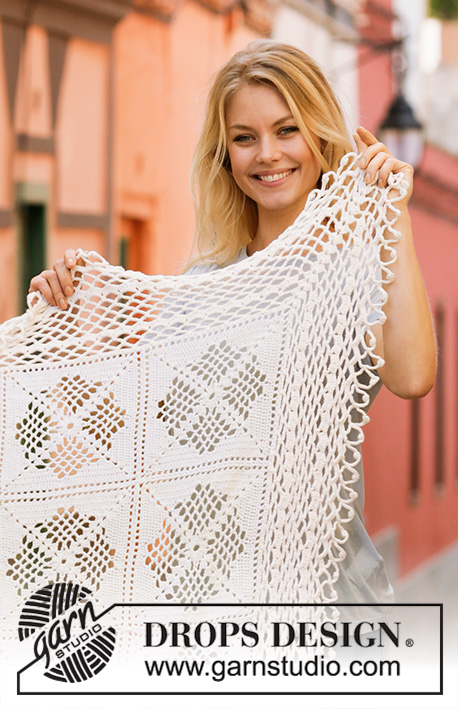
Crocheted blanket in DROPS Safran. The piece is worked with lace pattern and squares.
DROPS 198-4 |
|||||||||||||||||||||||||||||||||||||||||||||||||||||||
|
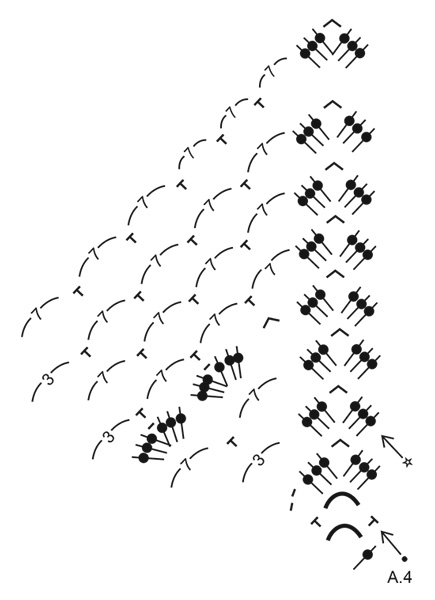
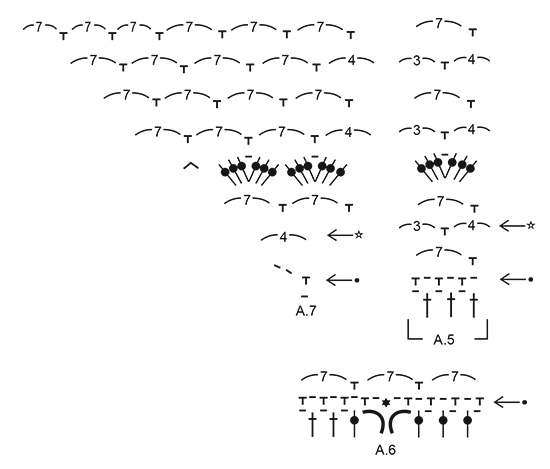
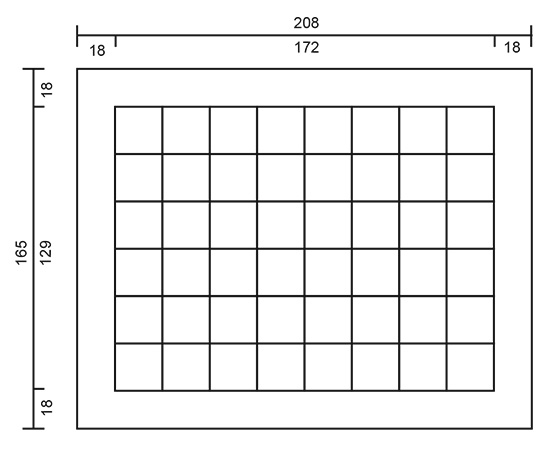
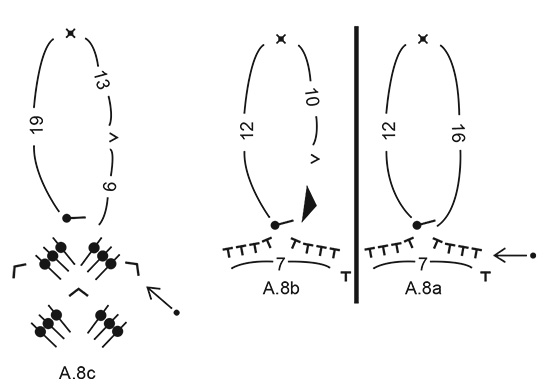
------------------------------------------------------- EXPLANATIONS FOR THE PATTERN: ------------------------------------------------------- PATTERN: See diagrams A.1 to A.8. CROCHET INFORMATION (for edge): The first round when working the edge is finished with 1 slip stitch in the first double crochet on the round, and then slip stitches are worked to the first chain-space in the corner. At the beginning of the other rounds in diagram A.4, you work 3 chain stitches (replace the first treble crochet) and finish the round with 1 slip stitch in the 3rd chain stitch on the round and then work slip stitches to the first chain-space in the corner. ------------------------------------------------------- START THE PIECE HERE: ------------------------------------------------------- BLANKET - SHORT OVERVIEW OF THE PIECE: There are 48 crochet squares worked and then sewn together. You work an edge around the whole blanket to finish. CROCHET SQUARE: Work 5 chain stitches with hook size 3.5 mm and Safran and form them into a ring with 1 slip stitch in the first chain stitch. Then work pattern in the round as follows: A.1 (shows how the rounds start and finish), * A.2, A.3 *, work from *-* a total of 3 times and finish with A.2, but on the first round: skip the last 3 treble crochets = 24 treble crochets and 8 chain spaces. REMEMBER THE CROCHET TENSION. When A.1 to A.3 have been completed in height, the square measures approx. 21.5 cm x 21.5 cm. Work a total of 48 squares. ASSEMBLY: Sew the blanket together with 6 crochet squares in width and 8 in length. Sew each square together in the outermost loop of the outermost stitch, first lengthwise and then across. EDGE: Start around the chain-space in one corner of the blanket and work the edge as follows – read CROCHET INFORMATION: Work * A.4 around the chain-space in the corner, A.5 to the next corner, but in the transition between each square work 1 double crochet in the seam as shown in diagram A.6 (see black star), work A.7 *, work from *-* a total of 4 times on the round. When the diagrams have been completed in height, repeat the pattern from the arrow with a white star one more time in height and until there is 1 round left in the diagrams. The last round (= next to last round in diagrams) finishes with 1 slip stitch in the 3rd chain stitch at the beginning of the round. Cut the strand. Now work a finishing edge as follows: Start in the first chain-space after one of the corners and work A.8a around this chain-space, * A.8b to the next corner, A.8c in the corner *, work from *-* a total of 4 times on the round and finish with 1 slip stitch in the first double crochet on the round. Cut and fasten the strand. When is finished, the edge should measure approx. 18 cm. |
|||||||||||||||||||||||||||||||||||||||||||||||||||||||
Diagram explanations |
|||||||||||||||||||||||||||||||||||||||||||||||||||||||
|
|||||||||||||||||||||||||||||||||||||||||||||||||||||||
 |
|||||||||||||||||||||||||||||||||||||||||||||||||||||||
 |
|||||||||||||||||||||||||||||||||||||||||||||||||||||||
 |
|||||||||||||||||||||||||||||||||||||||||||||||||||||||
 |
|||||||||||||||||||||||||||||||||||||||||||||||||||||||
 |
|||||||||||||||||||||||||||||||||||||||||||||||||||||||
Have you finished this pattern?Tag your pictures with #dropspattern #astablanket or submit them to the #dropsfan gallery. Do you need help with this pattern?You'll find 8 tutorial videos, a Comments/Questions area and more by visiting the pattern on garnstudio.com. © 1982-2026 DROPS Design A/S. We reserve all rights. This document, including all its sub-sections, has copyrights. Read more about what you can do with our patterns at the bottom of each pattern on our site. |
|||||||||||||||||||||||||||||||||||||||||||||||||||||||


With over 40 years in knitting and crochet design, DROPS Design offers one of the most extensive collections of free patterns on the internet - translated to 17 languages. As of today we count 324 catalogues and 12245 patterns translated into English (UK/cm). 12245
We work hard to bring you the best knitting and crochet have to offer, inspiration and advice as well as great quality yarns at incredible prices! Would you like to use our patterns for other than personal use? You can read what you are allowed to do in the Copyright text at the bottom of all our patterns. Happy crafting!
Post a comment to pattern DROPS 198-4
We would love to hear what you have to say about this pattern!
If you want to leave a question, please make sure you select the correct category in the form below, to speed up the answering process. Required fields are marked *.