
Popular categories
Looking for a yarn?


Comments / Questions (30)
![]() Lise wrote:
Lise wrote:
Hei. I begynnelsen av mönsteret, og i ökn.tips 1, står det at det skal väre 1 omslag, men i diagrammet står det at det skal väre 2 omslag. Så jeg undrer skal det väre 2 omslag hele tiden, eller 1 omslag på ökn. maskene og 2 i selve mönsteret.....tross at det står 2 omslag hele veien der.
07.01.2022 - 13:01DROPS Design answered:
Hej Lise, ja det stemmer når du laver omslagene i diagrammet følger du diagramforklaringen, laver 2 omslag (det enea stickas och det andra släpps ned) Lycka till :)
17.01.2022 - 10:26
![]() Marcia Rachel wrote:
Marcia Rachel wrote:
Bonjour je trouve que vos explications ne correspondent pas du tout avec les graphiques c'est bien dommage sa gâche tout le plaisir car il est vraiment beau ce châle
17.11.2021 - 20:20DROPS Design answered:
Bonjour Marcia Rachel, qu'entendez-vous par là? Avez-vous besoin d'aide pour la lecture des diagrammes? Cette leçon explique comment lire des diagrammes et pourra sans doute vous aider, n'hésitez pas à expliquer ici ce que vous n'avez pas compris pour que l'on puisse vous aider à le réaliser. Bon tricot!
18.11.2021 - 08:59
![]() Ben Belkacem Nadège wrote:
Ben Belkacem Nadège wrote:
Bonsoir je voudrais faire le chale au aiguilles circulaires, mes je débute aurait vous une vidéo D avance merci
20.06.2021 - 19:30DROPS Design answered:
Bonjour Mme Ben Belkacem, nous n'avons pas de vidéo particulière pour ce modèle, vous trouverez en bas de page une liste de vidéos des principales techniques utilisées dans ce châle et également une liste de leçon pouvant vous aider. Bon tricot!
21.06.2021 - 08:02
![]() Margit Brunnhuber wrote:
Margit Brunnhuber wrote:
Hallo Drops-Team, bitte kann man diese Anleitungen auch runterladen? Dies ist ein Tablet und da ist kein Drucker. Wenn es möglich ist, dann bitte eine genaue Erklärung, wie es funktioniert. Oder kann man es mit einer E-mail an einen PC senden? Liebe Grüße Margit Brunnhuber
27.03.2021 - 14:53DROPS Design answered:
Liebe Margit, Sie können die Anleitung als pdf drucken. Dies passiert ebenso wie beim normalen Druckvorgang, nur dass sie als Ausgabeformat pdf angeben. Dann haben Sie die Anleitung als pdf-Datei gespeichert. Gutes Gelingen!
04.04.2021 - 23:00
![]() Lis Batalla wrote:
Lis Batalla wrote:
Jeg forstår ikke mønsteret. A1 er det et mønster og så gør igen og igen ???? De midterste masker er 2. Men der står at man skal markerer 1 midter maske. Jeg håber i kan hjælpe mig. Kærlig hilsen Lis Batalla
06.02.2021 - 12:37DROPS Design answered:
Hei Lis. Du legger opp 9 masker og maske nr. 5 = midtmaske. Så øker du til 13 masker. Midtmasken er fremdeles den samme. Så begynner du på diagram A.1 slik: strikk 2 masker i riller + A.1a+A.1b+A.1c, da kommer du til midtmasken som strikkes i glattstrikk og du er halvveis på pinnen. Nå strikker du andre halvdel slik: A.1c+A.1b+A.1a+2 masker i riller = 2 masker i riller på hver side og 4 masker på hver side av midtmasken = 13 maske. God Fornøyelse!
12.02.2021 - 13:17
![]() Bogusia wrote:
Bogusia wrote:
Witam serdecznie. Jaka ilość włóczki jest potrzebna przy wykonaniu chusty tylko jednym kolorem? Pozdrawiam
10.06.2019 - 21:32DROPS Design answered:
Witaj Bogusiu! Będziesz potrzebować ok. 300 g włóczki (6 motków). Pozdrawiamy!
11.06.2019 - 07:54
![]() Bente Bigset wrote:
Bente Bigset wrote:
Eg er no ferdig med sjalet, og begynte å felle av med rett i frå retta, slik det står i oppskrifta. Det syns eg ikkje vart fint, så det tok eg opp og felte av med vrangt frå retta. Det vart finast :-)
01.05.2019 - 19:42
![]() Bente Bigset wrote:
Bente Bigset wrote:
Hei! Eg har no strikka dette sjalet ferdig. Masketalet stemmer heile vegen når kvar mønsterrapport er ferdig, men ikkje til slutt. Eg får 523 maskar, i oppskrifta står 463 maskar. Når eg reknar ut masketalet som står oppgitt i rapporten når siste rapporten er ferdig i oppskrifta, vert det også 523 maskar. Er det feil i oppskrifta?
29.04.2019 - 10:54DROPS Design answered:
Hei Bente. Det har du helt rett i, det korrekte maskeantallet etter at A.9 er ferdig i høyden er 523, som du sier. Vi har nå rettet dette i oppskriften. Takk for beskjed, og god fornøyelse
29.04.2019 - 13:25
![]() Jette Krog wrote:
Jette Krog wrote:
Hvordan får man strikketøjet fordelt over 3 rundpinde, uden at de glider af? Det forstår jeg simpelthen ikke?
10.03.2019 - 17:49DROPS Design answered:
Hej Jette, Normalt falder maskerne ikke af rundpindene... men hvis du strikker meget løst, så kan det være du er nødt til at sætte et elastik i hver ende af de rundpinde du ikke strikker over. Eller bruge yderligere en rundpind. God fornøjelse!
12.03.2019 - 14:08
![]() Susanne wrote:
Susanne wrote:
Hallo, bei der 3. Erklärung der Stricksymbole heißt es, dass der Umschlag in der RR links abgestrickt wird ... gemäß Strickschrift wird der Umschlag in RR mit rechten Maschen auch rechts gestrickt. Wie sollte das Muster denn nun korrekt gestrickt werden?
05.01.2019 - 16:42DROPS Design answered:
Liebe Susanne, die Umschläge werden ja je nach der folgenden Reihe (entweder rechts oder links) gestrickt - eine Korrektur erfolgt sicher bald. Viel Spaß beim stricken!
07.01.2019 - 10:20
|
|||||||||||||||||||
Liljesjal#liljesjal |
|||||||||||||||||||
 |
 |
||||||||||||||||||
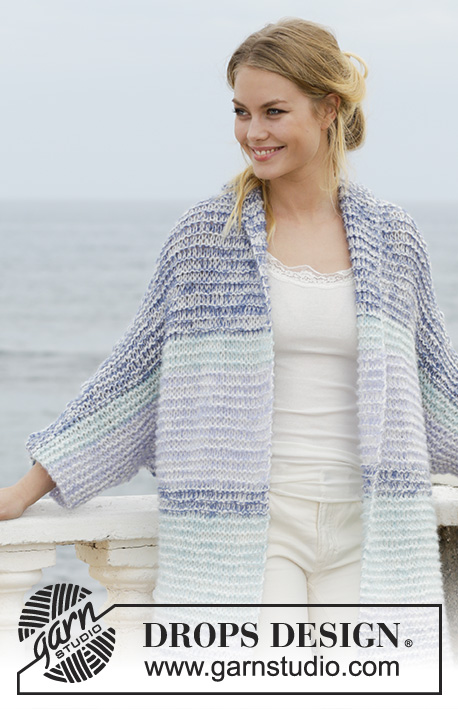
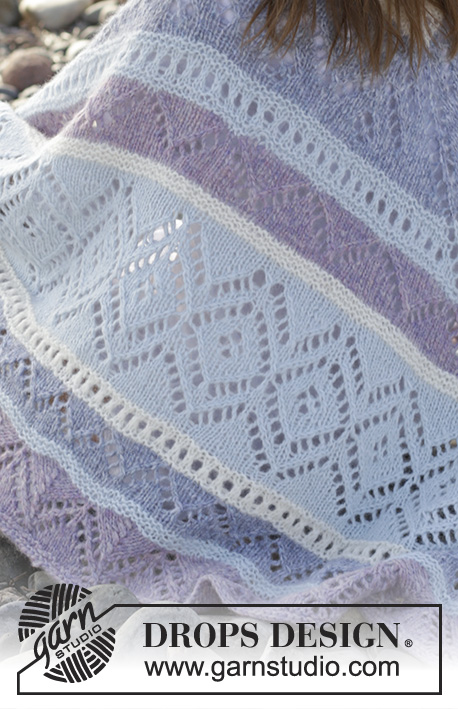
Knitted shawl with stripes and lace pattern, worked top down. The piece is worked in DROPS Air.
DROPS 191-7 |
|||||||||||||||||||
|
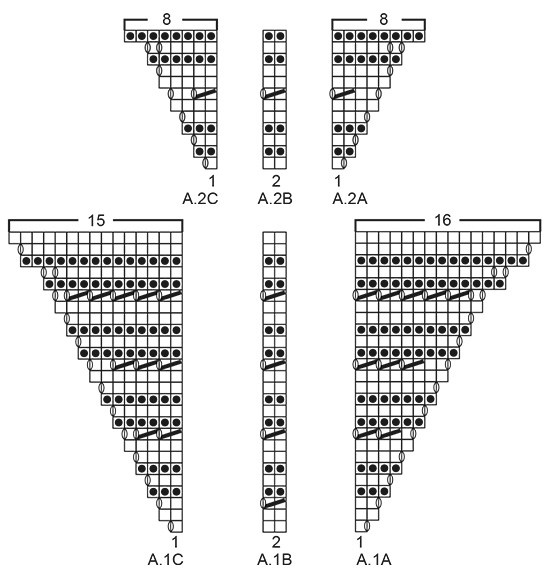
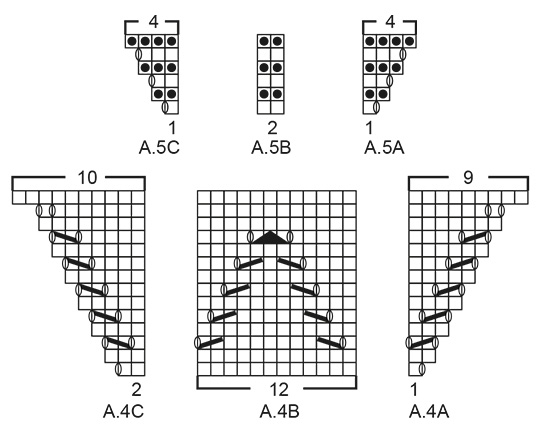
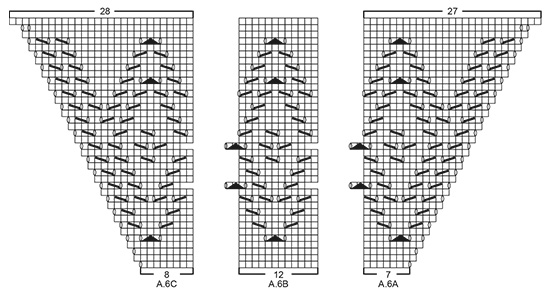
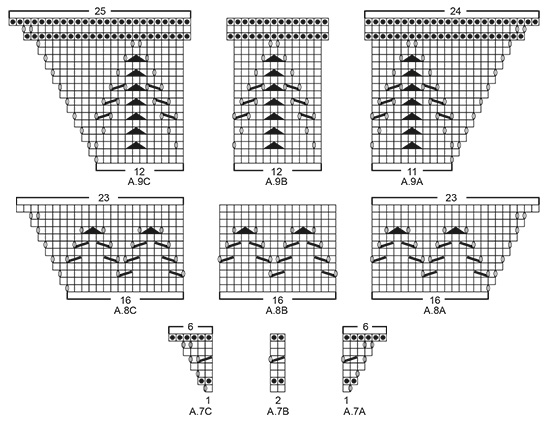
INFORMATION FOR THE PATTERN: RIDGE/GARTER STITCH (worked back and forth): 1 ridge = Knit 2 rows. INCREASE TIP-1: Increase 1 stitch by making 1 yarn over. On the next row knit the yarn over to leave a hole. INCREASE TIP-2 (when increasing evenly spaced): Increase 1 stitch by making 1 yarn over. On the next row work the yarn over twisted to avoid a hole. PATTERN: See diagrams A.1 to A.9. The diagrams show all the rows in the pattern seen from the right side. ---------------------------------------------------------- SHAWL: The shawl is worked top down from mid back. Because of the number of stitches, the shawl is worked back and forth on circular needle, but to have room for all the stitches it is a good idea to divide the stitches between several needles as described in DROPS CIRCULAR NEEDLE. Cast on 9 stitches with circular needle size 5.5 mm and light grey green. Work 1 RIDGE - see description above. Insert a marker in the middle stitch on the row. The next row is worked as follows from the right side: 2 edge stitches in garter stitch, make 1 yarn over – read INCREASE TIP-1, knit 2, make 1 yarn over, work the middle stitch in stocking stitch (= the stitch with the marker), make 1 yarn over, knit 2, make 1 yarn over, finish with 2 edge stitches in garter stitch = 13 stitches. Knit 1 row from the wrong side. Then continue with pattern as described below, with 2 edge stitches in garter stitch in each side and the middle stitch in stocking stitch. REMEMBER THE KNITTING TENSION! Work A.1 as follows: 2 edge stitches in garter stitch, A.1A (= 1 stitch), A.1B (= 2 stitches), A.1C (= 1 stitch), 1 stitch stocking stitch (=middle stitch), A.1A (= 1 stitch), A.1B (= 2 stitches), A.1C (= 1 stitch) and 2 edge stitches in garter stitch. Continue the pattern as shown in the diagrams. AT THE SAME TIME on row 25 in A.1 (the last row from the right side) increase 2 stitches evenly spaced (increase 1 stitch before the middle stitch and 1 stitch after the middle stitch so that there still are the same number of stitches on each side of the middle stitch – read INCREASE TIP-2). When A.1 has been completed, there are 73 stitches on the needle. Change to off white. Work A.2 as follows with off white: 2 edge stitches in garter stitch, A.2A (= 1 stitch), repeat A.2B until there is 1 stitch left before the middle stitch (= 16 repeats of 2 stitches), A.2C (= 1 stitch), 1 stitch stocking stitch (= middle stitch), A.2A (= 1 stitch), repeat A.2B until there are 3 stitches left on the row (= 16 repeats of 2 stitches), A.2C (= 1 stitch) and 2 edge stitches in garter stitch. Continue the pattern as shown in the diagrams. AT THE SAME TIME on row 11 in A.2 (the last row from the right side) increase 6 stitches evenly spaced (increase 3 stitches before the middle stitch and 3 stitches after the middle stitch so that there still are the same number of stitches on each side of the middle stitch). When A.2 has been completed, there are 107 stitches on the needle and the piece measures approx. 21 cm measured along the middle stitch. Change to fog. Work A.3 as follows with fog: 2 edge stitches in garter stitch, A.3A (= 7 stitches), repeat A.3B until there are 8 stitches left before the middle stitch (= 3 repeats of 12 stitches), A.3C (= 8 stitches), 1 stitch stocking stitch (= middle stitch), A.3A (= 7 stitches), repeat A.3B until there are 10 stitches left on the row (= 3 repeats of 12 stitches), A.3C (= 8 stitches) and 2 edge stitches in garter stitch. AT THE SAME TIME on row 25 in A.3 (the last row from the right side) increase 2 stitches evenly spaced (increase 1 stitch before the middle stitch and 1 stitch after the middle stitch). When A.3 has been completed, there are 169 stitches on the needle. Change to light grey green. Work A.2 again in the same way as described above, but with light grey green (there is now room for 40 repeats of A.2B on each side of middle). AT THE SAME TIME on row 11 in A.2 increase 6 stitches evenly spaced (increase 3 stitches before the middle stitch and 3 stitches after the middle stitch). When A.2 has been completed, there are 203 stitches on the needle. Change to purple haze. Work A.4 as follows with purple haze: 2 edge stitches in garter stitch, A.4A (= 1 stitch), repeat A.4B until there are 2 stitches left before the middle stitch (= 8 repeats of 12 stitches), A.4C (= 2 stitches), 1 stitch stocking stitch (= middle stitch), A.4A (= 1 stitch), repeat A.4B until there are 4 stitches left on the row (= 8 repeats of 12 stitches), A.4C (= 2 stitches) and 2 edge stitches in garter stitch. AT THE SAME TIME on row 13 in A.4 (the last row from the right side) increase 2 stitches evenly spaced (increase 1 stitch before the middle stitch and 1 stitch after the middle stitch). When A.4 has been completed, there are 237 stitches on the needle and the piece measures approx. 49 cm measured along the middle stitch. Change to off white. Work A.5 as follows with off white: 2 edge stitches in garter stitch, A.5A (= 1 stitch), repeat A.5B until there is 1 stitch left before the middle stitch (= 57 repeats of 2 stitches), A.5C (= 1 stitch), 1 stitch stocking stitch (= middle stitch), A.5A (= 1 stitch), repeat A.5B until there are 3 stitches left on the row (= 57 repeats of 2 stitches), A.5C (= 1 stitch) and 2 edge stitches in garter stitch. AT THE SAME TIME on row 5 in A.5 (the last row from the right side) increase 2 stitches evenly spaced (increase 1 stitch before the middle stitch and 1 stitch after the middle stitch). When A.5 has been completed, there are 251 stitches on the needle. Change to light grey green. Work A.6 as follows with light grey green: 2 edge stitches in garter stitch, A.6A (= 7 stitches), repeat A.6B until there are 8 stitches left before the middle stitch (= 9 repeats of 12 stitches), A.6C (= 8 stitches), 1 stitch stocking stitch (= middle stitch), A.6A (= 7 stitches), repeat A.6B until there are 10 stitches left on the row (= 9 repeats of 12 stitches), A.6C (= 8 stitches) and 2 edge stitches in garter stitch. AT THE SAME TIME on row 37 in A.6 (the last row from the right side) increase 2 stitches evenly spaced (increase 1 stitch before the middle stitch and 1 stitch after the middle stitch). When A.6 has been completed, there are 333 stitches on the needle and the piece measures approx. 78 cm along the middle stitch. Change to off white. Work A.7 as follows with off white: 2 edge stitches in garter stitch, A.7A (= 1 stitch), repeat A.7B until there is 1 stitch left before the middle stitch (= 81 repeats of 2 stitches), A.7C (= 1 stitch), 1 stitch stocking stitch (= middle stitch), A.7A (= 1 stitch), repeat A.7B until there are 3 stitches left on the row (= 81 repeats of 2 stitches), A.7C (= 1 stitch) and 2 edge stitches in garter stitch. AT THE SAME TIME on row 7 in A.7 (the last row from the right side) increase 4 stitches evenly spaced (increase 2 stitches before the middle stitch and 2 stitches after the middle stitch). When A.7 has been completed, there are 357 stitches on the needle. Change to fog. Work A.8 as follows with fog: 2 edge stitches in garter stitch, A.8A (= 16 stitches), repeat A.8B until there are 16 stitches left before the middle stitch (= 9 repeats of 16 stitches), A.8C (= 16 stitches), 1 stitch stocking stitch (= middle stitch), A.8A (= 16 stitches), repeat A.8B until there are 18 stitches left on the row (= 9 repeats of 16 stitches), A.8C (= 16 stitches) and 2 edge stitches in garter stitch. When A.8 has been completed, there are 385 stitches on the row. Change to light grey green. Work A.5 again in the same way as described earlier in the text, but with light grey green (there is now room for 94 repeats of A.5B on each side of middle). AT THE SAME TIME on row 5 in A.5 (the last row from the right side) increase 14 stitches evenly spaced (increase 7 stitches before the middle stitch and 7 stitches after the middle stitch). When A.5 has been completed, there are 411 stitches on the needle. Change to purple haze. Work A.9 as follows with purple haze: 2 edge stitches in garter stitch, A.9A (= 11 stitches), repeat A.9B until there are 12 stitches left before the middle stitch (= 15 repeats of 12 stitches), A.9C (= 12 stitches), 1 stitch stocking stitch (= middle stitch), A.9A (= 11 stitches), repeat A.9B until there are 14 stitches left on the row (= 15 repeats of 12 stitches), A.9C (= 12 stitches) and 2 edge stitches in garter stitch. When A.9 has been completed, there are 523 stitches on the needle and the piece measures approx. 104 cm along the middle stitch. Loosely cast off with knit from the right side. |
|||||||||||||||||||
Diagram explanations |
|||||||||||||||||||
|
|||||||||||||||||||
 |
|||||||||||||||||||
 |
|||||||||||||||||||
 |
|||||||||||||||||||
 |
|||||||||||||||||||
 |
|||||||||||||||||||
Have you finished this pattern?Tag your pictures with #dropspattern #liljesjal or submit them to the #dropsfan gallery. Do you need help with this pattern?You'll find 21 tutorial videos, a Comments/Questions area and more by visiting the pattern on garnstudio.com. © 1982-2026 DROPS Design A/S. We reserve all rights. This document, including all its sub-sections, has copyrights. Read more about what you can do with our patterns at the bottom of each pattern on our site. |
|||||||||||||||||||


With over 40 years in knitting and crochet design, DROPS Design offers one of the most extensive collections of free patterns on the internet - translated to 17 languages. As of today we count 324 catalogues and 12272 patterns translated into English (UK/cm). 12272
We work hard to bring you the best knitting and crochet have to offer, inspiration and advice as well as great quality yarns at incredible prices! Would you like to use our patterns for other than personal use? You can read what you are allowed to do in the Copyright text at the bottom of all our patterns. Happy crafting!
Post a comment to pattern DROPS 191-7
We would love to hear what you have to say about this pattern!
If you want to leave a question, please make sure you select the correct category in the form below, to speed up the answering process. Required fields are marked *.