
Popular categories
Looking for a yarn?


Comments / Questions (44)
![]() Clara wrote:
Clara wrote:
Materiaal wat bij mijn maat hoort besteld. Nu blijkt dat ik niet genoeg wol hebt voor dit vestje te breien. Er staat wel dat er met 2 draden wordt gebreid. Aangenomen dat dit ook mee genomen is in de te bestellen wol. Er zijn 3 kleuren wat echt niet gaat om die met 2 draden dezelfde kleur te breien. Moest hetzelfde aantal te bestellen wol dan 2x bestellen Zo ja is het onhandig om dit niet vermeld te hebben. Graag zie ik het antwoord in hoe nu verder.
02.03.2020 - 11:13DROPS Design answered:
Dag Clara,
Als ik het zo bekijk zou de hoeveelheid garen wel moeten kloppen. Als er met meerdere draden gebreid wordt is hier al rekening mee gehouden in de patronen (dus je hoeft nooit het dubbele te bestellen).
10.03.2020 - 19:30
![]() Klaasje wrote:
Klaasje wrote:
Met wat voor streeppatroon ga je verder na de markeerdraad?
14.02.2020 - 10:39DROPS Design answered:
Dag Klaasje,
Je gaat gewoon verder met het streeppatroon waar je mee bezig was. Dus als je bij de rechter mouw en het voor- en achterpand bent ga je verder met de strepen voor dat gedeelte, zoals bovenaan bij 'informatie voor het patroon' beschreven.
23.02.2020 - 19:46
![]() Milaine wrote:
Milaine wrote:
Bonsoir Je viens de le réaliser, il est magnifique et les couleurs vont très bien ensemble Par contre pour la taille L, je recommande de prendre une pelote de couleur corail en plus Je n'avais pas assez de laine couleur corail pour le col, il ne m'en manquait pas beaucoup, j'ai fait le col en couleur cerise Sinon le gilet est beau, chaud et doux Merci pour ce beau modèle
12.06.2019 - 21:59
![]() Katharina wrote:
Katharina wrote:
Tolle Anleitung und ein wunderschönes Ergebnis-flauschig, schimmernd und sehr schön in uni koralle. Die Jacke ist schnell fertig und sieht mit den 3/4 langen Ärmeln toll aus zu Rock und Kleid. Das Alpaka Garn ist ein Traum.
18.03.2019 - 17:58
![]() Katharina wrote:
Katharina wrote:
Zu den Zunahmen am Ärmel folgende Frage: beidseits jeweils am Ende der Reihe heisst dann also, jeweils am Ende der Hinreihe und am Ende der Rückreihe 1 Masche (insgesamt 2) zunehmen? Ist die 1. Zunahmereihe dann auch gleichzeitig die erste von jeder 6. Reihe? Danke und Gruß Katharina
20.02.2019 - 22:31DROPS Design answered:
Liebe Katharina, Sie nehmen für die Ärmel so zu (in der Grösse XXXL): am Ende der Hinreihe 1 neue Masche zunehmen, am Ende der nächste Rückreihe 1 neue Masche zunehmen, 4 Reihe ohne zunahme stricken, am Ende der nächsten Hinreihe 1 M zunehmen, am Ende der nächsten Rückreihe 1 M zunehmen = Sie haben jetzt 2 M in jede 6. Reihe auf beiden seiten zugenommen. Viel Spaß beim stricken!
21.02.2019 - 09:58
![]() Katja wrote:
Katja wrote:
Hallo. Schöne Jacke! Ein bißchen schwierig zu sehen, wie lang die Ärmel sind... sieht so aus als seien sie 3/4 lang? Ich würde sie gern lang stricken. Wären 10 cm/ 16 Reihen mehr ausreichend?
10.02.2019 - 11:01DROPS Design answered:
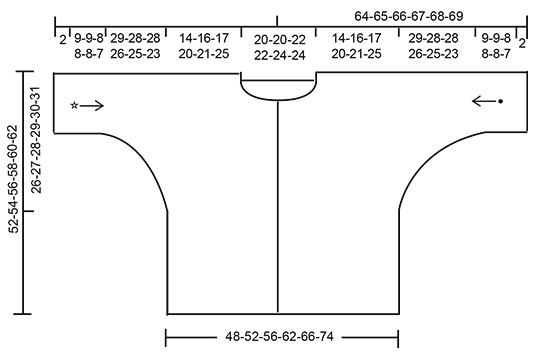
Liebe Katja, Sie finden alle Maßen in der Skizze, dh die für den Ärmel sowie die gesamte Länge bzw Breite von einem Ärmel bis die andere, so können Sie vergleichen, mit einer ähnlichen Jacke die Sie gerne haben, und so kalkulieren wieviel Sie cm länger stricken sollen. Viel Spaß beim stricken!
11.02.2019 - 09:46
![]() Ulla wrote:
Ulla wrote:
Wie sind die Streifen gerechnet ? zum beispiel 4 reihen rot , sind die hin und rückreihen gemeint, oder immer nur die rechten Reihen? Danke für Ihre hilfe.
06.02.2019 - 15:24DROPS Design answered:
Liebe Ulla, unter den Streifen sind alle Reihen damit gezählt, dh die Hin- sowie die Rückreihen. Viel Spaß beim stricken!
06.02.2019 - 16:19
![]() ROSA wrote:
ROSA wrote:
Si se teje en un único color, cuántos gramos son necesarios?
15.01.2019 - 09:17DROPS Design answered:
Hola Rosa. Depende de la talla vas a necesitar a partir de 225 gr de lana.
20.01.2019 - 12:08
![]() CHANTAL wrote:
CHANTAL wrote:
Bonjour, superbe modèle que je souhaite réaliser mais je m'aperçois que la couleur vert ocean clair n'existe plus. Par quoi la remplacer. Pourriez vous autrement me proposer ce modèle en tons de bleus. Merci
14.01.2019 - 18:39DROPS Design answered:
Bonjour Chantal, je suis heureuse de vous informer que la couleur n°15, vert océan clair est toujours disponible - vous la trouverez notamment sur le nuancier de Brushed Alpaca Silk. Pour toute aide dans le choix des couleurs, contactez votre magasin DROPS (même par mail ou téléphone), on pourra vous y conseiller en fonction de ce que vous souhaitez. Bon tricot!
15.01.2019 - 08:51
![]() Katharina wrote:
Katharina wrote:
Frage: Was heißt Randmasche kraus rechts stricken genau? Sind es Randmaschen links gestrickt auf der rechts erscheinenden Seite und Randmaschen rechts auf der links erscheinenden Seite? Eigentlich wollte ich die Ärmel mit dem unsichtbaren Maschenstich zusammennähen und brauche dafür normal abgestreckte Randmaschen. Warum diese Variante? Danke und Gruß von Katharina
04.01.2019 - 20:35DROPS Design answered:
Liebe Katharina, 1 Randmasche kraus rechts wird rechts bei der Hin sowie bei der Rückreihe gestrickt -siehe Video. Dann werden die Ärmel zusammegenäht wie in diesem Video gezeigt. Viel Spaß beim stricken!
07.01.2019 - 09:11
|
|||||||
Red Berry Hill#redberryhillcardigan |
|||||||
 |
 |
||||||
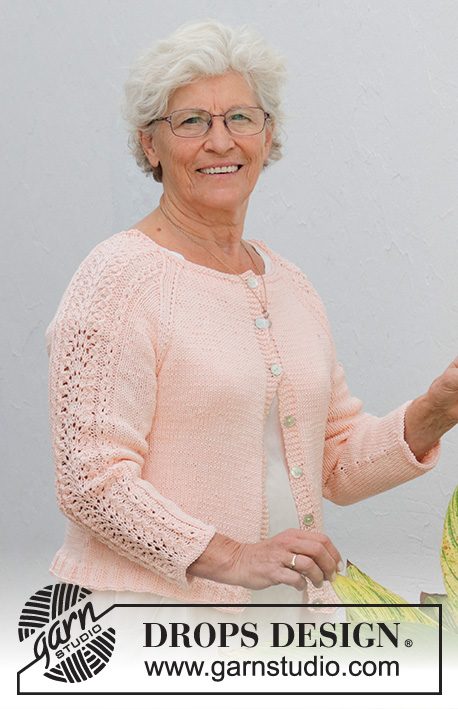
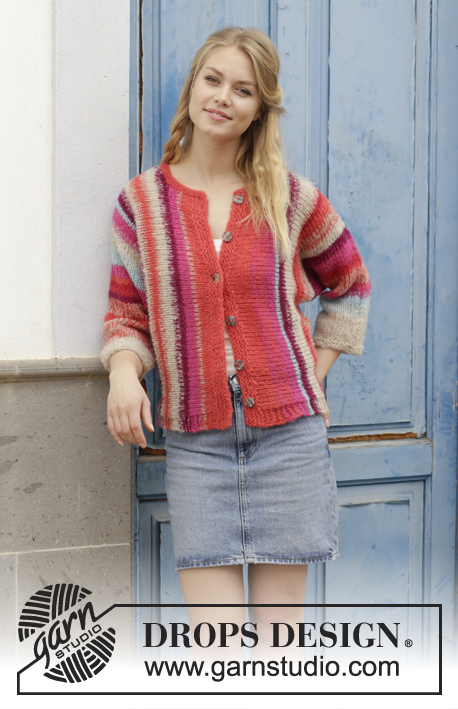
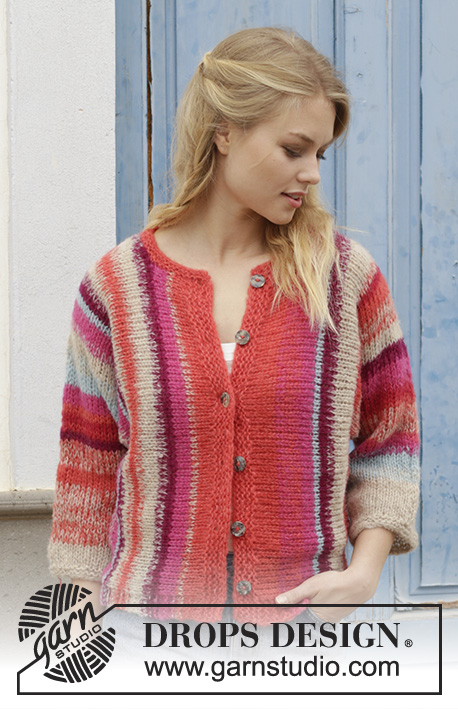
Knitted jacket with stripes, worked sideways. Sizes S - XXXL. The piece is worked in 2 strands Brushed Alpaca Silk.
DROPS 187-18 |
|||||||
|
INFORMATION FOR THE PATTERN: RIDGE/GARTER STITCH (worked back and forth): 1 ridge = Knit 2 rows. STRIPES (right sleeve, front and back pieces): STRIPE 1: Work with 2 strands light beige until the piece measures 6-7-8-8-9-9 cm from the cast-on edge. Then work stripes as follows: ROWS 1-4: 1 strand light beige + 1 strand light sea green. ROWS 5-8: 2 strands light sea green. ROWS 9-10: 1 strand light sea green + 1 strand cerise. ROWS 11-12: 2 strands cerise. ROWS 13-14: 1 strand cerise + 1 strand coral. ROWS 15-22: 2 strands coral. ROWS 23-30: 1 strand coral + 1 strand light beige. ROWS 31-32: 1 strand coral + 1 strand red. ROWS 33-34: 2 strands red. ROWS 35-36: 1 strand red + 1 strand cerise. ROWS 37-40: 2 strands cerise. ROWS 41-42: 1 strand cerise + 1 strand purple. ROWS 43-44.: 2 strands purple. ROWS 45-48: 2 strands light beige. ROWS 49-54: 1 strand light beige + 1 strand coral. ROWS 55-58: 2 strands coral . ROWS 59-60: 2 strands red. ROWS 61-62: 1 strand coral + 1 strand light beige. ROWS 63-68: 2 strands light beige. ROWS 69-70: 1 strand beige + 1 strand purple. ROWS 71-72: 2 strands purple. ROWS 73-74: 2 strands light sea green. ROWS 75-78: 2 strands cerise. ROWS 79-84: 1 strand cerise + 1 strand coral. Then work with 2 strands coral to finished length. STRIPES (left sleeve, front and back pieces): STRIPE 1: Work with 2 strands light beige until the piece measures 4-5-6-6-7-7 cm from the cast-on edge. Then work stripes as follows: ROWS 1-21: 1 strand light beige + 1 strand coral. ROWS 22-25: 2 strands coral. ROWS 26-31: 1 strand coral + 1 strand light beige. ROWS 32-33: 2 strands purple. ROWS 34-35: 1 strand coral + 1 strand red. ROWS 36-37: 2 strands red. ROWS 38-39: 2 strands coral. ROWS 40-43: 2 strands cerise. ROWS 44-47: 2 strands light sea green. ROWS 48-51: 1 strand light sea green + 1 strand light beige. ROWS 52-55: 2 strands light beige. ROWS 56-57: 1 strand light beige + 1 strand cerise. ROWS 58-61: 2 strands cerise. ROWS 62-63: 2 strands light sea green. ROWS 64-65: 2 strands purple. ROWS 66-67: 1 strand purple + 1 strand light beige. ROWS 68-69: 2 strands light beige. ROWS 70-71: 1 strand light beige + 1 strand coral. ROWS 72-73: 2 strands coral. ROWS 74-75: 1 strand coral + 1 strand light beige. ROWS 76-79: 2 strands light beige. ROWS 80-81: 1 strand light beige + 1 strand purple. ROWS 82-83: 2 strands purple. ROWS 84-86: 2 strands cerise. ROWS 87-88: 1 strand coral + 1 strand light beige. Then work with 2 strands coral to finished length (= approx. 3-3-3-4-4-5 cm + 2 ridges on back piece and 4 ridges on front piece). ---------------------------------------------------------- JACKET: The piece is worked back and forth with circular needle. The 2 parts are worked sideways from the sleeves towards mid back/front. The jacket is sewn together mid back. The whole piece is worked in 2 strands Brushed Alpaca Silk. RIGHT SLEEVE, FRONT AND BACK PIECE: Cast on 36-38-38-40-42-42 stitches with circular needle size 7 mm and 2 strands light beige. Work 2 RIDGES – see description above. Then work stocking stitch with 1 edge stitch in garter stitch in each side and work STRIPES (right sleeve, front and back pieces) – see description above. REMEMBER THE KNITTING TENSION! AT THE SAME TIME when the piece measures 11-11-10-10-10-9 cm cast on new stitches at the end of each row in each side as follows: Cast on 1 stitch every 6th row 6-5-5-4-3-2 times, 1 stitch every 2nd row 7-9-9-11-13-14 times and 31-32-34-35-35-37 stitches 1 time = 124-130-134-140-144-148 stitches. The piece measures approx. 40-39-38-36-35-32 cm. Insert a marker thread here. THE PIECE IS NOW MEASURED FROM HERE! Continue stripes, stocking stitch and 4 stitches garter stitch in each side (= bottom of body on front and back pieces). When the piece measures 14-16-17-20-21-25 cm work the next row from the right side as follows: 4 stitches garter stitch, 52-55-56-59-60-62 stitches stocking stitch, place these 56-59-60-63-64-66 stitches for the front piece on a thread, cast off the next 9-9-10-10-11-11 stitches (= 6-6-7-7-8-8 stitches for neck on front piece and 3 stitches for neck on back piece), work stocking stitch over the next 55-58-60-63-65-67 stitches, 4 stitches garter stitch. There are now 59-62-64-67-69-71 stitches for the back piece. RIGHT BACK PIECE: = 59-62-64-67-69-71 stitches. Continue with stripes, stocking stitch and 1 edge stitch garter stitch towards the neck and 4 stitches garter stitch towards the bottom edge as before. On the next row from the neck cast off 1 stitch = 58-61-63-66-68-70 stitches. When the piece measures 22-24-26-29-31-35 cm from the marker thread work 2 ridges over all stitches on the row. The piece measures a total of 64-65-66-67-68-69 cm from the cast on edge on the sleeve. Cast off. To avoid the cast-off edge being tight, you can make 1 yarn over after approx. every 5th stitch. The yarn over is cast off as a normal stitch. RIGHT FRONT PIECE: = 56-59-60-63-64-66 stitches. Start from the wrong side (by the neck) and continue with stripes, stocking stitch, 1 edge stitch garter stitch towards the neck and 4 stitches garter stitch towards the bottom edge as before, AT THE SAME TIME cast off stitches every row from the neck as follows: Cast off 2 stitches 1 time and 1 stitch 2 times = 52-55-56-59-60-62 stitches. When the piece measures 22-24-26-29-31-35 cm work 2 ridges over all stitches on the row. Then work buttonholes as follows: ROW 1 (right side): Knit 8-6-7-5-6-8 stitches, * knit 2 together, 1 yarn over, knit 6-7-7-8-8-8 stitches *, work from *-* a total of 5 times, knit 2 together, 1 yarn over, knit 2 stitches. ROW 2: Knit all stitches and yarn overs. Work 1 ridge. The piece measures 26-28-30-33-35-39 cm (= a total of 66-67-68-69-70-71 cm from the cast on edge on the sleeve). Cast off. To avoid the cast-off edge being tight, you can make 1 yarn over after approx. every 5th stitch. The yarn over is cast off as a normal stitch. LEFT SLEEVE, FRONT AND BACK PIECES: Cast on 36-38-38-40-42-42 stitches with circular needle size 7 mm and 2 strands light beige. Work 2 ridges. Then work stocking stitch with 1 edge stitch in garter stitch in each side and work STRIPES (left sleeve, front and back pieces) – see description above. AT THE SAME TIME when the piece measures 11-11-10-10-10-9 cm cast on stitches at the end of the row in each side as follows: Cast on 1 stitch every 6th row 6-5-5-4-3-2 times, 1 stitch every 2nd row 7-9-9-11-13-14 times and 31-32-34-35-35-37 stitches 1 time = 124-130-134-140-144-148 stitches. The piece measures approx. 40-39-38-36-35-32 cm. Insert a marker thread here. THE PIECE IS NOW MEASURED FROM HERE! Continue with stripes, stocking stitch and 4 stitches garter stitch in each side (= bottom of body on front and back pieces). When the piece measures 14-16-17-20-21-25 cm work the next row from the right side as follows: 4 stitches garter stitch, 55-58-60-63-65-67 stitches stocking stitch, place these 59-62-64-67-69-70 stitches on a thread for back piece, cast off the next 9-9-10-10-11-11 stitches (= 3 stitches for neck on back piece and 6-6-7-7-8-8 stitches for neck on front piece), 52-55-56-59-60-62 stitches stocking stitch, 4 stitches garter stitch. There are now 56-59-60-63-64-66 stitches for front piece. LEFT FRONT PIECE: = 56-59-60-63-64-66 stitches. Continue with stripes, stocking stitch, 1 edge stitch garter stitch towards the neck and 4 stitches garter stitch towards bottom edge as before, AT THE SAME TIME cast off stitches on each row from the neck as follows: Cast off 2 stitches 1 time and 1 stitch 2 times = 52-55-56-59-60-62 stitches. When the piece measures 22-24-26-29-31-35 cm work 4 ridges over all stitches on the row. The piece measures 26-28-30-33-35-39 cm (= a total of 66-67-68-69-70-71 cm from the cast on edge on the sleeve). Cast off. To avoid the cast-off edge being tight, you can make 1 yarn over after approx. every 5th stitch. The yarn over is cast off as a normal stitch. LEFT BACK PIECE: = 59-62-64-67-69-71 stitches. Start from the wrong side (at the neck) and continue with stripes, stocking stitch, 1 edge stitch garter stitch towards the neck and 4 stitches garter stitch towards the bottom edge as before. On the next row from the neck cast off 1 stitch = 58-61-63-66-68-70 stitches. When the piece measures 22-24-26-29-31-35 cm work 2 ridges over all stitches on the row. The piece measures 64-65-66-67-68-69 cm from the cast-on edge on the sleeve. Cast off. To avoid the cast-off edge being tight, you can make 1 yarn over after approx. every 5th stitch. The yarn over is cast off as a normal stitch. ASSEMBLY: Sew the seam mid back inside the cast-off edge on each of the back pieces. Sew the seam under the sleeve and the side seam inside the 1 edge stitch in garter stitch/outermost stitch. Make sure the seam is not tight! Repeat on the other side. Sew buttons onto left band. NECK EDGE: Knit up 54-54-60-60-68-68 stitches from the right side of piece with circular needle size 7 with 2 strands coral. Work 2 ridges back and forth. Cast off with knit. To avoid a tight cast off, make a yarn over after approx. every 5th stitch. The yarn overs should be cast off as a stitch. |
|||||||
Diagram explanations |
|||||||
|
|||||||
 |
|||||||
Have you finished this pattern?Tag your pictures with #dropspattern #redberryhillcardigan or submit them to the #dropsfan gallery. Do you need help with this pattern?You'll find 26 tutorial videos, a Comments/Questions area and more by visiting the pattern on garnstudio.com. © 1982-2026 DROPS Design A/S. We reserve all rights. This document, including all its sub-sections, has copyrights. Read more about what you can do with our patterns at the bottom of each pattern on our site. |
|||||||


With over 40 years in knitting and crochet design, DROPS Design offers one of the most extensive collections of free patterns on the internet - translated to 17 languages. As of today we count 325 catalogues and 12298 patterns translated into English (UK/cm). 12298
We work hard to bring you the best knitting and crochet have to offer, inspiration and advice as well as great quality yarns at incredible prices! Would you like to use our patterns for other than personal use? You can read what you are allowed to do in the Copyright text at the bottom of all our patterns. Happy crafting!
Post a comment to pattern DROPS 187-18
We would love to hear what you have to say about this pattern!
If you want to leave a question, please make sure you select the correct category in the form below, to speed up the answering process. Required fields are marked *.