
Popular categories
Looking for a yarn?


Comments / Questions (27)
![]() Kathy McCabe wrote:
Kathy McCabe wrote:
Good morning, I would like to know if your patterns come in written versions? Following graphs doesn't work for me.
26.04.2019 - 14:34DROPS Design answered:
Dear Mrs McCabe, most of the time when there are diagrams, there aren't any written pattern but you will find here how to read diagrams. Happy crocheting!
26.04.2019 - 15:47
![]() Yvonne Lagarde wrote:
Yvonne Lagarde wrote:
Wat betekent in patroon A.2b het tekentje dat lijkt op een vlindertje met een lang lijfje ?
26.12.2018 - 13:24DROPS Design answered:
Dag Yvonne,
Vermoedelijk bedoel je het 8e symbool van boven in de lijst? Dit is een half stokje in de steek, dus je maakt het halve stokje in de steek van de vorige toer en niet om de steek.
27.12.2018 - 10:36
![]() Yvonne wrote:
Yvonne wrote:
Wat betekent in A2.b het tekentje dat lijkt op een vlinder met lang lijfje?
23.12.2018 - 23:59
![]() Tanja Rocks wrote:
Tanja Rocks wrote:
Hallo, ich finde einige der Zeichnungen nicht. Alle mit den Zahlen 2 + 3 sind nicht aufzufinden. Können Sie mir helfen? Danke und Gruß Tanja
22.09.2018 - 22:15DROPS Design answered:
Liebe Tanja, ich verstehe Ihre Frage leider nicht. Welche Zeichnungen in welchem Diagram finden Sie nicht? Es sollten alle Zeichnungen im Diagram unter Diagram Text beschrieben werden.
24.09.2018 - 09:03
![]() Iben wrote:
Iben wrote:
Hei. Jeg skal til å hekle denne fine genseren, men ser i forklaringen til diagrammet at noen av tegnene er erstattet med åpne firkanter. Er dette en feil?
14.08.2018 - 12:28DROPS Design answered:
Hej Iben, alle diagramtegn findes med på nettet. Prøv at tage en refresh. God fornøjelse!
14.08.2018 - 13:47
![]() Giusi Rapella wrote:
Giusi Rapella wrote:
Buongiorno! Devo unire davanti e dietro...dove si dice \"Cucire le spalle insieme maglia con maglia\" cosa si intende? Prendo tutta la maglia o solo l\'esterno o l\'interno? e negli archi di catenelle lavoro intorno all\'arco? Grazie!
11.06.2018 - 11:23DROPS Design answered:
Buongiorno Giusi. Può cucire nel filo esterno delle maglie, anche quando queste sono catenelle. Buon lavoro!
11.06.2018 - 11:48
![]() Christina Isberg wrote:
Christina Isberg wrote:
Om man inte ökar antalet maskor på varje varv blir det ju en mössa, inte en ruta, varv 13- 15 och snare också.
05.05.2018 - 18:15DROPS Design answered:
Hei Christina. Det er fort gjort å hekle litt for stramt når man hekler luftmasker; en luftmaske skal være like bred som en stav eller en fastmaske. Vær ekstra obs på at du overholder heklefastheten, så skal du se at plagget ikke bøyer seg innover. Selvom maskeanetallet forblir det samme fra 12-14 omgang på A.1 (og igjen fra 16-18 omgang) vil sirkelen likevel vokse utover da luftmaskebuene er mer bøyd på de innerste omgangene mens de har rettet seg ut på de ytterste. God fornøyelse.
23.05.2018 - 10:24Joanne wrote:
Thanks awfully for this gorgeous pattern. Is it suitable for a wool mohair blend?
03.05.2018 - 12:03
![]() Marjo Bodewes wrote:
Marjo Bodewes wrote:
In het telpatroon staan bij A1a dichte driehoekjes. Welke steek moet ik hiervoor gebruiken. Er staan ook boogjes. Ik neem aan dat dat een losse betekent.
18.02.2018 - 19:44DROPS Design answered:
Hallo Marjo, De zwartgekleurde driehoekjes staan voor 5 lossen (het 5e symbool in de lijst)
19.02.2018 - 21:25
![]() Marit Strindlund wrote:
Marit Strindlund wrote:
När kommer beskrivningen ut?
02.02.2018 - 11:58DROPS Design answered:
Hei Marit. Den kommer snart den er ferdig skrevet, tipper den kommer i neste uke. vmh Drops design
02.02.2018 - 14:00
|
|||||||||||||||||||||||||||||||||||||||||||||||||||||||||||||
Roulette#roulettesweater |
|||||||||||||||||||||||||||||||||||||||||||||||||||||||||||||
 |
 |
||||||||||||||||||||||||||||||||||||||||||||||||||||||||||||
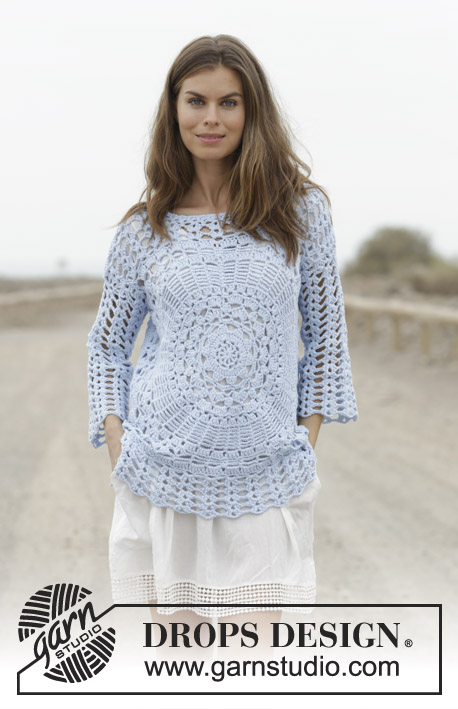
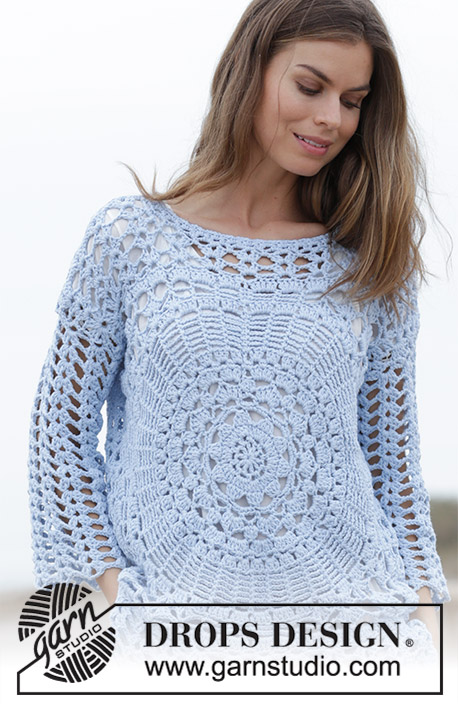
Crocheted jumper with lace pattern, worked from the middle outwards. Sizes S - XXXL. The piece is worked in DROPS Paris.
DROPS 186-25 |
|||||||||||||||||||||||||||||||||||||||||||||||||||||||||||||
|
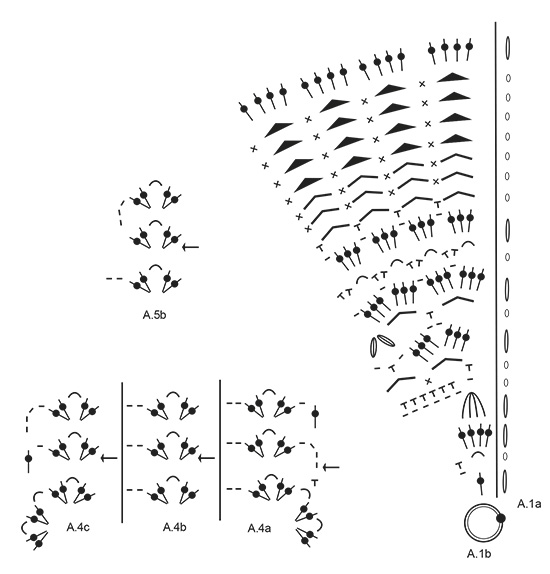
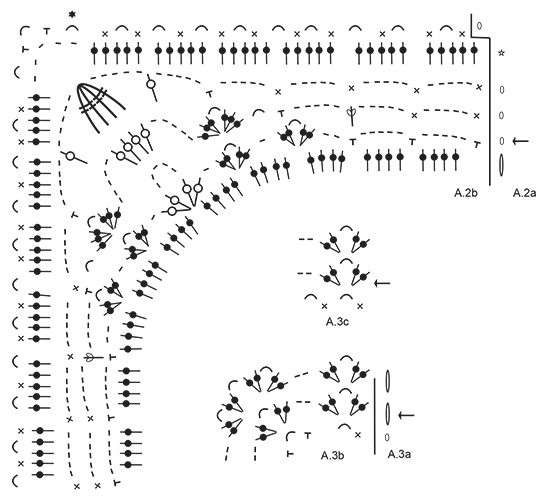
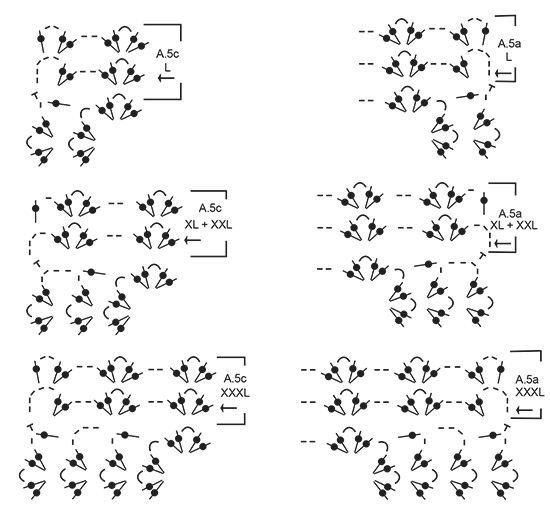
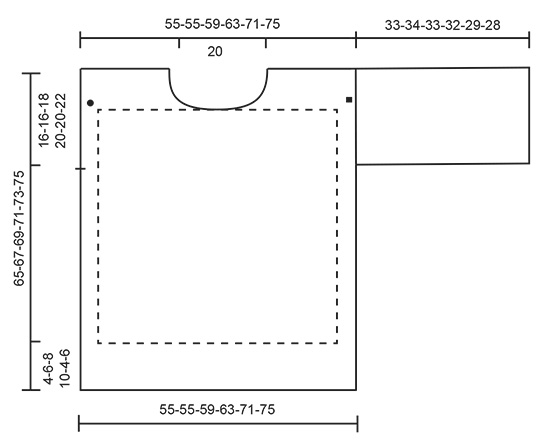
INFORMATION FOR THE PATTERN: PATTERN: See diagrams A.1 to A.5. Choose diagram for your size (applies to A.5a and A.5c). ---------------------------------------------------------- JUMPER: The piece is worked in the round from middle of front/back piece and outwards. You first work a circle, then continue so that it becomes a square making the front/back piece. Then the shoulders are worked and finally you work back and forth along bottom of body. The sleeves are worked in the round, top down. BACK PIECE: Start with crochet hook size 5.5 mm and Paris and work pattern according to diagram A.1b a total of 10 times on the round (A.1a shows how the rounds start and finish). REMEMBER THE CROCHET TENSION! When A.1a and A.1b are finished, the circle measures approx. 40 cm in diameter. Continue working to make a square as follows: Start on the round with an arrow and work A.2b a total of 4 times in the round (A.2a shows how the rounds start and finish). When A.2a and A.2b are finished the piece measures approx. 47 x 47 cm. Cut the strand. Fasten the strand with 1 double crochet around the chain-space marked with a black star - see last round in A.2b, and work from the round marked with an arrow as follows: Work A.3a (shows how the rounds start and finish), work A.3b in the same chain-space and the next chain-space (= corner), * work A.3c to the next corner (= 10 repeats), work A.3b around the next 2 chain-spaces (= corner) *, work from *-* 2 more times, work A.3c to the start of the round. Work the last round in the diagrams. Sizes S + M + L + XL are now finished. For sizes XXL + XXXL continue by repeating the last 2 rounds 1 more time in height All sizes: There are now 2-2-2-2-4-4 rounds of A.3a - A.3c around the square and 13-13-13-13-15-15 fans (= 2 treble crochets + 3 chain stitches + 2 treble crochets) along each side of the square. The piece measures approx. 55-55-55-55-63-63 x 55-55-55-55-63-63 cm. Cut the strand. Sizes S + M are finished. For sizes L + XL + XXL + XXXL continue working outwards on each side of the back piece. Fasten the strand with 1 double crochet around the middle chain-space in one of the corners and work from the row with an arrow from the right side as follows: Work A.4a, A.4b until there is 1 treble crochet group left (= 2 treble crochets + 3 chain stitches + 2 treble crochets) before the next corner, A.4c. Repeat the last 2 rows of A.4a - A.4c until you have worked a total of 1-2-2-3 rows in height. All sizes: You have now worked 0-0-1-2-2-3 rows of A.4a - A.4c outwards on the one side. Work in the same way on the opposite side of the square. RIGHT SHOULDER: Work for the different sizes as follows: Sizes S + M: Fasten the strand with 1 double crochet around the chain-space in the corner – see black square on sketch. Work pattern from the row with an arrow in the diagrams back and forth from the right side as follows: ROW 1: Work A.4a, A.4b 2-2 times, A.5b (= towards neck). ROW 2: Turn and work the last row in the diagrams back in the same way ROW 3: Turn and work as for row 1. Cut the strand. Sizes L + XL, XXL + XXXL: Fasten the strand with 1 double crochet outermost in the corner – see black square in the sketch. Work pattern from the row with an arrow in the diagrams, back and forth from the right side as follows: ROW 1: Work A.5a (choose diagram for your size), A.4b 2-2-2-2 times, A.5b (= towards neck). ROW 2: Turn and work the last row in the diagrams back in the same way. ROW 3: Turn and work as for row 1. Cut the strand. LEFT SHOULDER: Work in the same way as for right shoulder, but start from the wrong side and in the corner marked with a black dot – see sketch. NOTE: Do not work over the middle 5 repeats of treble crochet groups (= 2 treble crochets + 3 chain stitches + 2 treble crochets) in the middle of this side = neck. BOTTOM OF BACKPIECE: Insert a marker thread at the bottom of the backpiece and work for the different sizes as follows: Sizes S + M: Fasten the strand with 1 double crochet around the chain-space in the corner at the bottom of the backpiece. Work pattern from the row with an arrow in the diagrams back and forth from the right side as follows: ROW 1: Work A.4a, A.4b 11 times, A.4c. ROW 2: Turn and work the last row in the diagrams back in the same way. Repeat rows 1 and 2 until the piece measures approx. 4-6 cm from the marker thread at bottom of backpiece. The piece measures approx. 65-67 cm from the shoulder down. Cut and fasten the strand. Sizes L + XL, XXL + XXXL: Fasten the strand with 1 double crochet outermost in the corner at the bottom of the backpiece. Work pattern from the row with an arrow in the diagrams back and forth from the right side as follows: ROW 1: Work A.5a (choose diagram for your size), A.4b 11 times, A.5c (choose diagram for your size). ROW 2: Turn and work the last row in the diagrams back in the same way. Repeat rows 1 and 2 until the piece measures approx. 8-10-4-6 cm from the marker thread at the bottom of the backpiece. The piece measures approx. 69-71-73-75 cm from the shoulder down. Cut and fasten the strand. FRONT PIECE: Work in the same way as for the back piece. ASSEMBLY: Sew the shoulders together working in each and every stitch along the seam. Insert a marker thread 16-16-18-20-20-22 cm from the shoulder down the side (marks the armhole). Sew the side seam from the bottom and up as far as the marker thread in the armhole. Repeat in the other side. SLEEVE: The sleeve is worked in the round from the armhole. Fasten the strand with 1 double crochet by the marker thread in one of the armholes mid under the sleeve and work as follows: ROUND 1: Work * 3 chain stitches, skip approx. 2 cm, 1 double crochet *, work from *-* a total of 15-15-17-19-19-21 times, work 3 chain stitches and finish with 1 slip stitch in the first double crochet on the round = 16-16-18-20-20-22 chain-spaces. ROUND 2: Work from the round with an arrow: A.3a (shows how the rounds start and finish), A.3c a total of 8-8-9-10-10-11 times on the round. Repeat the last round in the diagrams until the sleeve measures approx. 33-34-33-32-29-28 cm. Cut and fasten the strand. Work the other sleeve in the same way. NECK: Fasten the strand with 1 double crochet on one of the shoulders and work as follows: ROUND 1: Work * 3 chain stitches, skip 1-1½ cm, 1 double crochet *, work from *-* around the whole neck, but in each corner in the transition between shoulder and neck work 1 treble crochet instead of 1 double crochet. ROUND 2: Work 1 chain stitch (does not replace the first double crochet), * 2 double crochets around the first/next chain-space, 1 chain stitch *, work from *-* around the whole neck, finish with 1 slip stitch in the first chain stitch at the beginning of the round, then work slip stitches as far as the first chain stitch. ROUND 3: Work 1 chain stitch (does not replace the first double crochet), * 1 double crochet around the first/next chain stitch, 3 chain stitches *, work from *-* to end of round, finish with 1 slip stitch in the first chain stitch. Cut and fasten the strand. |
|||||||||||||||||||||||||||||||||||||||||||||||||||||||||||||
Diagram explanations |
|||||||||||||||||||||||||||||||||||||||||||||||||||||||||||||
|
|||||||||||||||||||||||||||||||||||||||||||||||||||||||||||||
 |
|||||||||||||||||||||||||||||||||||||||||||||||||||||||||||||
 |
|||||||||||||||||||||||||||||||||||||||||||||||||||||||||||||
 |
|||||||||||||||||||||||||||||||||||||||||||||||||||||||||||||
 |
|||||||||||||||||||||||||||||||||||||||||||||||||||||||||||||
Have you finished this pattern?Tag your pictures with #dropspattern #roulettesweater or submit them to the #dropsfan gallery. Do you need help with this pattern?You'll find 14 tutorial videos, a Comments/Questions area and more by visiting the pattern on garnstudio.com. © 1982-2026 DROPS Design A/S. We reserve all rights. This document, including all its sub-sections, has copyrights. Read more about what you can do with our patterns at the bottom of each pattern on our site. |
|||||||||||||||||||||||||||||||||||||||||||||||||||||||||||||


With over 40 years in knitting and crochet design, DROPS Design offers one of the most extensive collections of free patterns on the internet - translated to 17 languages. As of today we count 324 catalogues and 12245 patterns translated into English (UK/cm). 12245
We work hard to bring you the best knitting and crochet have to offer, inspiration and advice as well as great quality yarns at incredible prices! Would you like to use our patterns for other than personal use? You can read what you are allowed to do in the Copyright text at the bottom of all our patterns. Happy crafting!
Post a comment to pattern DROPS 186-25
We would love to hear what you have to say about this pattern!
If you want to leave a question, please make sure you select the correct category in the form below, to speed up the answering process. Required fields are marked *.