DROPS Paris
DROPS Paris
100% Cotton
from 1.60 $ /50g
Get the yarn to make this pattern from 22.40$.

The yarn cost is calculated from the pattern’s smallest size and the yarn’s cheapest product type. Looking for an even better price? You might find it on the DROPS Deals!

DROPS SS24

Roulette

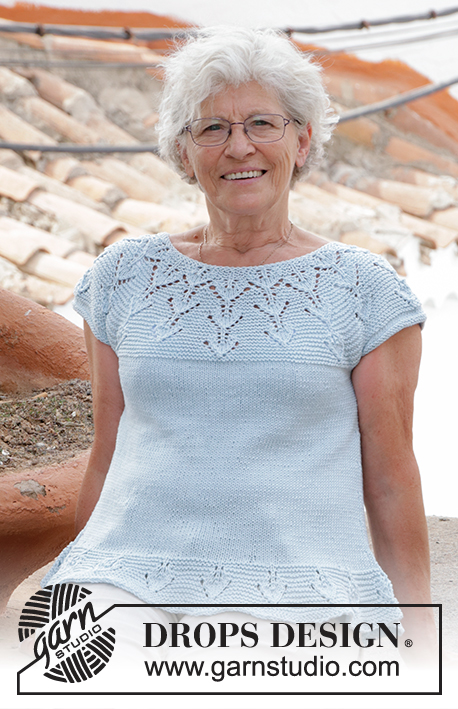
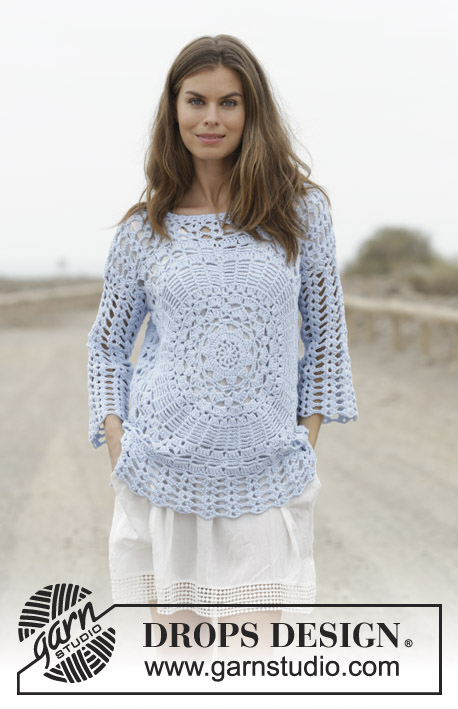
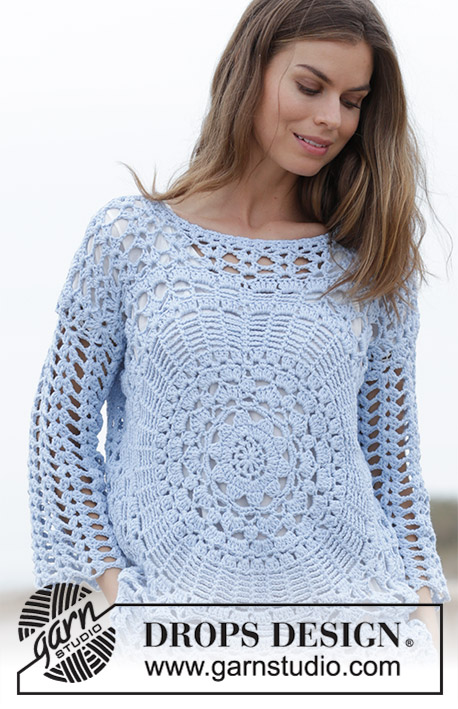
Crocheted sweater with lace pattern, worked from the middle outwards. Sizes S - XXXL. The piece is worked in DROPS Paris.

DROPS 186-25
DROPS Design: Pattern no w-684
Yarn group C or A + A
-----------------------------------------------------------
Sizes: S - M - L - XL - XXL - XXXL
Materials:
DROPS PARIS from Garnstudio (belongs to yarn group C)
700-750-850-900-1000-1100 g color 100, light wash

The piece can also be crocheted with yarn from:
"Alternative yarn (Yarn group C)" – see link below.

DROPS CROCHET HOOK SIZE 5.5 MM/US I/9 – or the size needed to get 13 double crochets and 8 rows on 10 cm / 4" in width and 10 cm / 4" in height.
The last 2 rounds in A.3c measure 4 cm / 1½" in width and 4 cm / 1½" in height.

-------------------------------------------------------

Alternative Yarn – See how to change yarns here
Yarn Groups A to F – Use the same pattern and change the yarn here
Yarn usage using an alternative yarn – Use our yarn converter here

-------------------------------------------------------

DROPS Paris
DROPS Paris
100% Cotton
from 1.60 $ /50g
Get the yarn to make this pattern from 22.40$.

The yarn cost is calculated from the pattern’s smallest size and the yarn’s cheapest product type. Looking for an even better price? You might find it on the DROPS Deals!

Pattern instructions

NOTE: This pattern is written in American English. All measurements in charts are in cm. For conversion from inches to cm - click here. There are different terms for crocheting in American and British English. If this pattern includes crochet, click for "crochet terms" here. For this pattern in British English, please click here.
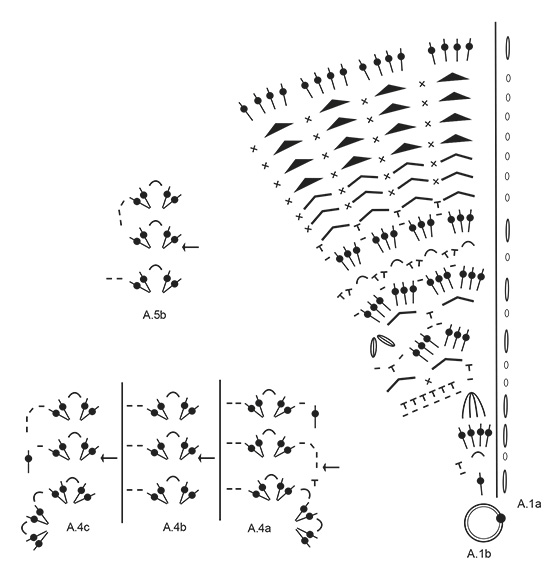
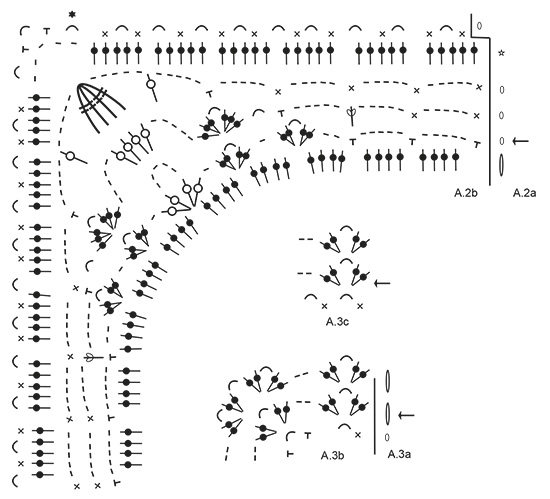
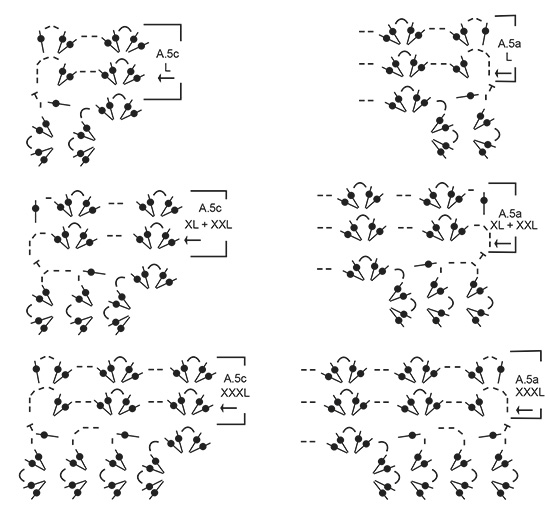
INFORMATION FOR THE PATTERN:

PATTERN:
See diagrams A.1 to A.5. Choose diagram for your size (applies to A.5a and A.5c).
----------------------------------------------------------

SWEATER:
The piece is worked in the round from middle of front/back piece and outwards. You first work a circle, then continue so that it becomes a square making the front/back piece. Then the shoulders are worked and finally you work back and forth along bottom of body. The sleeves are worked in the round, top down.

BACK PIECE:
Start with crochet hook SIZE 5.5 mm/US I/9 and Paris and work pattern according to diagram A.1b a total of 10 times on the round (A.1a shows how the rounds start and finish). REMEMBER THE CROCHET GAUGE! When A.1a and A.1b are finished, the circle measures approx. 40 cm / 15¾" in diameter. Continue working to make a square as follows: Start on the round with an arrow and work A.2b a total of 4 times in the round (A.2a shows how the rounds start and finish). When A.2a and A.2b are finished the piece measures approx. 47 x 47 cm / 18½" x 18½". Cut the strand.
Fasten the strand with 1 single crochet around the chain-space marked with a black star - see last round in A.2b, and work from the round marked with an arrow as follows:
Work A.3a (shows how the rounds start and finish), work A.3b in the same chain-space and the next chain-space (= corner), * work A.3c to the next corner (= 10 repeats), work A.3b around the next 2 chain-spaces (= corner) *, work from *-* 2 more times, work A.3c to the start of the round.
Work the last round in the diagrams. Sizes S + M + L + XL are now finished.
For sizes XXL + XXXL continue by repeating the last 2 rounds 1 more time in height

All sizes:
There are now 2-2-2-2-4-4 rounds of A.3a - A.3c around the square and 13-13-13-13-15-15 fans (= 2 double crochets + 3 chain stitches + 2 double crochets) along each side of the square. The piece measures approx. 55-55-55-55-63-63 x 55-55-55-55-63-63 cm / 21½"-21½"-21½"-21½"-24¾"-24¾" x 21½"-21½"-21½"-21½"-24¾"-24¾". Cut the strand.
Sizes S + M are finished. For sizes L + XL + XXL + XXXL continue working outwards on each side of the back piece. Fasten the strand with 1 single crochet around the middle chain-space in one of the corners and work from the row with an arrow from the right side as follows:
Work A.4a, A.4b until there is 1 double crochet group left (= 2 double crochets + 3 chain stitches + 2 double crochets) before the next corner, A.4c.
Repeat the last 2 rows of A.4a - A.4c until you have worked a total of 1-2-2-3 rows in height.

All sizes:
You have now worked 0-0-1-2-2-3 rows of A.4a - A.4c outwards on the one side. Work in the same way on the opposite side of the square.

RIGHT SHOULDER:
Work for the different sizes as follows:

Sizes S + M:
Fasten the strand with 1 single crochet around the chain-space in the corner – see black square on sketch. Work pattern from the row with an arrow in the diagrams back and forth from the right side as follows:
ROW 1: Work A.4a, A.4b 2-2 times, A.5b (= towards neck).
ROW 2: Turn and work the last row in the diagrams back in the same way
ROW 3: Turn and work as for row 1. Cut the strand.

Sizes L + XL, XXL + XXXL:
Fasten the strand with 1 single crochet outermost in the corner – see black square in the sketch. Work pattern from the row with an arrow in the diagrams, back and forth from the right side as follows:
ROW 1: Work A.5a (choose diagram for your size), A.4b 2-2-2-2 times, A.5b (= towards neck).
ROW 2: Turn and work the last row in the diagrams back in the same way.
ROW 3: Turn and work as for row 1. Cut the strand.

LEFT SHOULDER:
Work in the same way as for right shoulder, but start from the wrong side and in the corner marked with a black dot – see sketch. NOTE: Do not work over the middle 5 repeats of double crochet groups (= 2 double crochets + 3 chain stitches + 2 double crochets) in the middle of this side = neck.

BOTTOM OF BACKPIECE:
Insert a marker thread at the bottom of the backpiece and work for the different sizes as follows:

Sizes S + M:
Fasten the strand with 1 single crochet around the chain-space in the corner at the bottom of the backpiece. Work pattern from the row with an arrow in the diagrams back and forth from the right side as follows:
ROW 1: Work A.4a, A.4b 11 times, A.4c.
ROW 2: Turn and work the last row in the diagrams back in the same way.
Repeat rows 1 and 2 until the piece measures approx. 4-6 cm / 1½"-2¼" from the marker thread at bottom of backpiece. The piece measures approx. 65-67 cm / 25½"-26½" from the shoulder down. Cut and fasten the strand.

Sizes L + XL, XXL + XXXL:
Fasten the strand with 1 single crochet outermost in the corner at the bottom of the backpiece. Work pattern from the row with an arrow in the diagrams back and forth from the right side as follows:
ROW 1: Work A.5a (choose diagram for your size), A.4b 11 times, A.5c (choose diagram for your size).
ROW 2: Turn and work the last row in the diagrams back in the same way.
Repeat rows 1 and 2 until the piece measures approx. 8-10-4-6 cm / 3"-4"-1½"-2¼" from the marker thread at the bottom of the backpiece. The piece measures approx. 69-71-73-75 cm / 27"-28"-28¾"-29½" from the shoulder down. Cut and fasten the strand.

FRONT PIECE:
Work in the same way as for the back piece.

ASSEMBLY:
Sew the shoulders together working in each and every stitch along the seam. Insert a marker thread 16-16-18-20-20-22 cm / 6¼"-6¼"-7-"8"-8"-8¾" from the shoulder down the side (marks the armhole). Sew the side seam from the bottom and up as far as the marker thread in the armhole. Repeat in the other side.

SLEEVE:
The sleeve is worked in the round from the armhole.
Fasten the strand with 1 single crochet by the marker thread in one of the armholes mid under the sleeve and work as follows:
ROUND 1: Work * 3 chain stitches, skip approx. 2 cm / ¾", 1 single crochet *, work from *-* a total of 15-15-17-19-19-21 times, work 3 chain stitches and finish with 1 slip stitch in the first single crochet on the round = 16-16-18-20-20-22 chain-spaces.
ROUND 2: Work from the round with an arrow: A.3a (shows how the rounds start and finish), A.3c a total of 8-8-9-10-10-11 times on the round.
Repeat the last round in the diagrams until the sleeve measures approx. 33-34-33-32-29-28 cm / 13"-13½"-13"-12½"-11½"-11".
Cut and fasten the strand. Work the other sleeve in the same way.

NECK:
Fasten the strand with 1 single crochet on one of the shoulders and work as follows:
ROUND 1: Work * 3 chain stitches, skip 1-1½ cm / ⅜"-½", 1 single crochet *, work from *-* around the whole neck, but in each corner in the transition between shoulder and neck work 1 double crochet instead of 1 single crochet.
ROUND 2: Work 1 chain stitch (does not replace the first single crochet), * 2 single crochets around the first/next chain-space, 1 chain stitch *, work from *-* around the whole neck, finish with 1 slip stitch in the first chain stitch at the beginning of the round, then work slip stitches as far as the first chain stitch.
ROUND 3: Work 1 chain stitch (does not replace the first single crochet), * 1 single crochet around the first/next chain stitch, 3 chain stitches *, work from *-* to end of round, finish with 1 slip stitch in the first chain stitch.
Cut and fasten the strand.

Diagram

All measurements in charts are in cm.

symbols = work 4 chain stitches and form them into a ring with 1 slip stitch in the first chain stitch worked. Black dot is start of round
symbols = 1 chain stitch
symbols = 3 chain stitches
symbols = 4 chain stitches
symbols = 5 chain stitches
symbols = 1 single crochet around chain stitch/chain-space
symbols = 1 single crochet in stitch
symbols = 1 half double crochet in stitch
symbols = 1 double crochet around chain stitch ring/chain-space/space between 2 stitches
symbols = 1 treble crochet around space between 2 stitches/chain-space
symbols = work 4 double crochets together as follows: work 1 double crochet in each of the next 3 double crochets, but wait with the last yarn over and pull through on each of these double crochets, work 1 double crochet in the next double crochet and pull the last yarn over through all 5 loops on the hook
symbols = work 4 double treble crochets together as follows: work 1 double treble crochet in each of the next 3 treble crochets, but wait with the last yarn over and pull through on each of these double treble crochets, work 1 double treble crochet in the next double crochet and pull the last yarn over through all the lops on the hook
symbols = work 2 and 2 double crochets together as follows: work 2 double crochets around the first chain stitch, but wait with the last yarn over and pull through on each of these double crochets, work 1 double crochet around the next chain stitch, but wait with the last yarn over and pull through, work 1 more double crochet around the same chain stitch and pull the last yarn over through all 5 loops on the hook
symbols = at the beginning of each round of double crochets, replace the first double crochet with 3 chain stitches. The round finishes with 1 slip stitch in the 3rd chain stitch at the beginning of the round.
symbols = at the beginning of each round of double crochets, replace the first double crochet with 3 chain stitches. The round finishes with 1 slip stitch in the 3rd chain stitch at the beginning of the round, then work 1 slip stitch in the next double crochet
symbols = at the beginning of each round of chain stitches or single crochets, work 1 chain stitch (does not replace the first stitch), finish the round with 1 slip stitch in the first chain stitch at the beginning of the round
symbols = start on this round/row, previous round/row has already been worked
symbols = start i in this chain-space when continuing work with A.3a to A.3c
symbols = start here when working right shoulder on back piece
symbols = start here when working left shoulder on back piece
diagram
diagram
diagram
diagram
Do you have a question? See a list of frequently asked questions (FAQ)

Knitting tension is what determines the final measurements of your work, and is usually measured per 10 x 10 cm. It is provided like so: number of stitches in width x number of rows in height - eg: 19 stitches x 26 rows = 10 x 10 cm.

The knitting tension is very individual; some people knit/crochet loosely while others work tightly. You adjust the knitting tension with the needle size, which is why the suggested needle size only serve as a guide! You need to adjust this (up or down) to ensure that YOUR knitting tension matches the knitting tension provided in the pattern. If you work with a different knitting tension than provided you will have a different yarn consumption, and your work will have different measurements than what the pattern suggests.

The knitting tension also determines which yarns can replace each other. As long as you achieve the same knitting tension you can replace one yarn with another.

See DROPS lesson: How to measure your tension/gauge

See DROPS video: How to make a gauge tension swatch

The required amount of yarn is provided in grams, eg: 450 g. To calculate how many balls you’ll need you first need to know how many grams are in 1 ball (25g, 50g or 100g). This information is available if you click on the individual yarn quality on our pages. Divide the amount required with the amount of each ball. For example, if each ball is 50g (the most common amount), the calculation will be as follows: 450 / 50 = 9 balls.

The important thing when changing from one yarn to another is that the knitting/crochet tension remains the same. This is so that the measurements of the finished piece will be the same as on the sketch provided. It is easier to achieve the same knitting tension using yarns from the same yarn group. It is also possible to work with multiple strands of a thinner yarn to achieve the knitting tension of a thicker one. Please try our yarn converter. We recommend you to always work a test swatch.

Please NOTE: when changing yarn the garment might have a different look and feel to the garment in the photo, due to individual properties and qualities of each yarn.

See DROPS lesson: Can I use a different yarn than the one mentioned in the pattern?

All our yarns are categorised into yarn groups (from A to F) according to thickness and knitting tension – group A contains the thinnest yarns and group F the thickest. This makes it easier for you to find alternative yarns to our patterns, should you wish to switch yarn. All yarns within the same group have a similar knitting tension and can easily replace each other. However, different yarn qualities have different structures and properties which will give the finished work a unique look and feel.

Click here for an overview of the yarns in each yarn group

At the top of all our patterns you’ll find a link to our yarn converter, which is a helpful tool should you wish to use a different yarn than suggested. By filling in the yarn quality you wish to replace, the amount (in your size) and number of strands, the converter will present good alternative yarns with the same knitting tension. Additionally it will tell you how much you’ll require in the new qualities and whether you’ll need to work with multiple strands. Most skeins are 50g (some are 25g or 100g).

If the pattern is worked with multiple colours, every colour will have to be converted separately. Similarly, if the pattern is worked with several strands of different yarns (for example 1 strand Alpaca and 1 strand Kid-Silk) you will have to find alternatives for each, individually.

Click here to see our yarn converter

Since different yarns have different qualities and textures we have chosen to keep the original yarn in our patterns. However, you can easily find options among our available qualities by using our yarn converter, or simply pick a yarn from the same yarn group.

It is possible that some retailers still have discontinued yarns in stock, or that someone has a few skeins at home that they would like to find patterns for.

The yarn converter will provide both alternative yarn as well as required amount in the new quality.

If you think it's hard to decide what size to make, it can be a good idea to measure a garment you own already and like the size of. Then you can pick the size by comparing those measures with the ones available in the pattern's size chart.

You'll find the size chart at the bottom of the pattern.

See DROPS lesson: How to read size chart

The needle size provided in the pattern serves only as a guide, the important thing is to follow the knitting tension. And since knitting tension is very individual, you will have to adjust the needle size to ensure that YOUR tension is the same as in the pattern – maybe you’ll have to adjust 1, or even 2 needle sizes, up or down to achieve the correct tension. For this, we recommend that you work test swatches.

Should you work with a different knitting tension than the one provided, the measurements of the finished garment might deviate from the measurement sketch.

See DROPS lesson: How to measure your tension/gauge

See DROPS video: How to make a gauge tension swatch

Working a garment top-down provides more flexibility and room for personal adjustment. For example it is easier to try the garment on while working, as well as making adjustments to length of yoke and shoulder caps.

The instructions are carefully explaining every step, in the correct order. Diagrams are adjusted to the knitting direction and are worked as usual.

The diagram depicts all rows/rounds, and every stitch seen from the right side. It is read from bottom to top, from right to left. 1 square = 1 stitch.

When working back and forth, every other row is worked from the right side and every other row is worked from the wrong side. When working from the wrong side, the diagram will have to be worked reversed: from left to right, knit stitches are purled, purl stitches are knit etc.

When working in the round every round is worked from the right side and the diagram are worked from right to left on all rounds.

See DROPS lesson: How to read knitting diagrams

The diagram depicts all rows/rounds, and every stitch seen from the right side. It is worked from bottom to top, from right to left.

When working back and forth every other row is worked from the right side: from right to left and every other row is worked from the wrong side: from left to right.

When working in the round, every row in the diagram are worked from the right side, from right to left.

When working a circular diagram you start in the middle and work your way outwards, counter clockwise, row by row.

The rows usually start with a given number of chain stitches (equivalent to the height of the following stitch), this will either be depicted in the diagram or explained in the pattern.

See DROPS lesson: How to read crochet diagrams

Instructions for working several diagrams after each other on the same row/round, will often be written like so: “work A.1, A.2, A.3 a total of 0-0-2-3-4 times". This means you work A.1 once, then A.2 is worked once, and A.3 is repeated (in width) the number of times provided for your size – in this case like so: S = 0 times, M = 0 times, L=2 times, XL= 3 times and XXL = 4 times.

The diagrams are worked as usual: begin with the first row in A.1, then work the first row in A.2 etc.

See DROPS lesson: How to read knitting diagrams

See DROPS lesson: How to read crochet diagrams

The total width of the garment (from wrist-to-wrist) will be larger in the larger sizes, despite the actual sleeves being shorter. The larger sizes have longer sleeve caps and wider shoulders, so there will be a good fit in all sizes.

The measurement sketch/schematic drawing provides information regarding the full length of the garment. If it’s a jumper or a jacket the length is measured from the highest point on the shoulder (usually closest to the neckline), and straight down to the bottom of the garment. It is NOT measured from the tip of shoulder. Similarly, the length of yoke is measured from the highest point on the shoulder and down to where yoke is split into body and sleeves.

See DROPS lesson: How to read a schematic drawing

Diagrams are often repeated on the round or in height. 1 repeat is the diagram the way it appears in the pattern. If it says to work 5 repeats of A.1 in the round, then you work A.1 a total of 5 times after/next to each other in the round. If it says to work 2 repeats of A.1 vertically/in height you work the entire diagram once, then begin again at the start and work the entire diagram one more time.

Chain stitches are slightly narrower than other stitches and to avoid working the cast-on edge too tight, we simply chain more stitches to begin with. The stitch count will be adjusted on the following row to fit the pattern and measurement sketch.

The rib edge is more elastic and will contract slightly compared to, for example, stocking stitch. By increasing before the rib edge, you avoid a visible difference in width between the rib edge and the rest of the body.

It’s very easy to cast off too tightly, and by making yarn overs while casting off (and simultaneously casting these off) you avoid a too tight cast off edge.

See DROPS video: How to bind off with yarn overs (yo)

To achieve an even increase (or decrease) you can increase on, for example: every 3rd and 4th row alternately, like so: work 2 rows and increase on the 3rd row, work 3 rows and increase on the 4th. Repeat this until the increase is complete.

See DROPS lesson: Increase or decrease 1 st on every 3rd and 4th row alternately

Should you prefer to work in the round instead of back and forth, you may of course adjust the pattern. You’ll need to add steeks mid-front (usually 5 stitches), and follow the instructions. When you would normally turn and work from the wrong side, simply work across the steek and continue in the round. At the end you’ll cut the piece open, pick up stitches to work bands, and cover the cut edges.

See DROPS video: How to knit steeks and cut open

Should you prefer to work back and forth instead of in the round, you may of course adjust the pattern so you work the pieces separately and then assemble them at the end. Divide the stitches for the body in 2, add 1 edge stitch in each side (for sewing) and work the front and back pieces separately.

See DROPS lesson: Can I adapt a pattern for circular needles into straight needles?

Pattern repeats can vary slightly in the different sizes, in order to get the correct proportions. If you’re not working the exact same size as the garment in the photo, yours might deviate slightly. This has been carefully developed and adjusted so that the complete impression of the garment is the same in all sizes.

Make sure to follow instructions and diagrams for your size!

If you have found a pattern you like which is available in women’s size it’s not very difficult to convert it to men’s size. The biggest difference will be the length of sleeves and body. Start working on the women size that you think would fit across the chest. The additional length will be worked right before you cast off for the armhole/sleeve cap. If the pattern is worked top-down you can add the length right after the armhole or before the first decrease on sleeve.

Regarding additional yarn amount, this will depend on how much length you add, but it is better with a skein too many than too few.

All yarns will have excess fibres (from production) that might come off as lint or shedding. Brushed yarns (ie hairier yarns) have more of these loose, excess fibres, causing more shedding.

Shedding also depends on what is worn under or over the garment, and whether this pulls at the yarn fibres. It’s therefore not possible to guarantee that there will be no shedding

Below are some tips on how to get the best result when working with hairier yarns:

1. When the garment is finished (before you wash it) shake it vigorously so the looser hairs come off. NOTE: do NOT use a lint roller, brush or any method that pulls at the yarn.

2. Place the garment in a plastic bag and put it in your freezer - the temperature will cause the fibres to become less attached to each other, and excess fibres will come off easier.

3. Leave in the freezer for a few hours before taking it out and shaking it again.

4. Wash the garment according to the instructions on the yarn label.

Pilling is a natural process that happens to even the most exclusive of fibers. It's a natural sign of wear and tear that is hard to avoid, and that is most visible in high friction areas of your garment like a sweater's arms and cuffs.

You can make your garment look as new by removing the pilling, using a fabric comb or a pill/lint remover.

Still can't find the answer you need? Then scroll down and leave your question so one of our experts can try to help you. This will be done normally within 5 to 10 working days.
In the meantime, you can read the questions and answers that others have left to this pattern or join the DROPS Workshop on Facebook to get help from fellow knitters/crocheters!

You might also like...

Post a comment to pattern DROPS 186-25

We would love to hear what you have to say about this pattern!

If you want to leave a question, please make sure you select the correct category in the form below, to speed up the answering process. Required fields are marked *.

Comments / Questions (24)

country flag Ninette Larsen wrote:

Hej Er denne Hæklet i dobbelt tråd?

12.06.2023 - 16:27

DROPS Design answered:

Hej Ninette, den er hæklet i 1 tråd DROPS Paris på hæklenål 5,5, du skal få 13 stangmasker på 10 cm i din hækleprøve :)

13.06.2023 - 13:51

country flag Estelle Rademeyer wrote:

Do you perhaps have a written version of this patten as I am having difficulty in following the charts

29.12.2022 - 12:55

DROPS Design answered:

Hello Estelle Rademeyer! Charts are much easier to follow than written patterns and have fewer mistakes. Please look at the videos and step-by-step tutorials at the end of the pattern. Happy crocheting!

30.12.2022 - 12:17

country flag Anneke wrote:

Hoeveel stokjes worden er in de eerste toer van de lossen ring gehaakt? Ik kom er niet uit.

16.03.2021 - 21:23

DROPS Design answered:

Dag Anneke,

Je haakt eerst 4 lossen en deze sluit je tot een ring. In deze ring haak je A.1b in totaal 10 keer, dus je haakt 10 stokje in de ring. In plaats van het eerste stokje haak je 3 lossen (dus deze 3 lossen vervangen het eerste stokje).

21.03.2021 - 11:38

country flag Anna Pacifico wrote:

Buongiorno Quante maglie alte nel primo giro,

20.02.2021 - 15:28

DROPS Design answered:

Buonasera Anna, deve iniziare a lavorare dal diagramma A.1b. Buon lavoro!

20.02.2021 - 19:11

country flag GHISLAINE wrote:

Bonjour, je suis sur le diagramme A.3a, A.3b et A.3C. Il est écrit "*répéter A.3c jusqu'au coin suivant (= 10 fois). On commence sur l'arceau près du coin "2 brides/3ml/2 brides" - 2ml - puis le coin (A.2b) - 2ml et à nouveau "2 brides/3ml/2 brides". Si vous comptez 10 fois à partir du coin, cela fait 11 fois. Pouvez-vous m'expliquer, je suis un peu perdue.Dans l'attente de votre réponse. Merci à vous.

02.07.2019 - 20:48

DROPS Design answered:

Bonjour Ghislaine, dans le dernier arceau avant le coin, on crochète comme A.3c, puis le coin, et on répète A.3c 10 fois jusqu'à ce qu'il reste 1 arceau avant le coin suivant, on crochète A.3b : dans le dernier arceau avant le coin + dans le coin. Bon crochet!

03.07.2019 - 07:22

country flag Larruy Chantal wrote:

JE NE COMPRENDS PAS BIEN L\'ENCHAINEMENT DES DIAGRAMMES\r\nhelp!\r\nmerci

03.05.2019 - 21:42

DROPS Design answered:

Bonjour Mme Larruy, vous trouverez ici quelques informations complémentaires sur les diagrammes. Bon crochet!

06.05.2019 - 15:29

country flag Tanja Rocks wrote:

Ich verstehe leider nicht, wie man die Schulterpartie arbeiten soll. Könnt Ihr das bitte detaillierter erläutern? Danke

28.04.2019 - 23:13

DROPS Design answered:

Liebe Frau Rocks, rechte Schulter (Rückenteil) beginnen Sie in der Ecke mit dem schwarzen Vierecke in der Maßskizze) und häkeln Sie von hier: Größe S+M(= von Schulter) die Reihe mit dem Pfeil im Diagram: A.4a, A.4b x 2, A.5.b (Hals) - Größe L bis XXXL: A.5a, A.4b x 2, A.5b. Wenden Sie und dann häkeln Sie die nächste Reihe genauso links nach rechts. Wenden Sie, und dann noch mal die 1. Reihe wierderholen. Viel Spaß beim häkeln!

29.04.2019 - 10:56

country flag Kathy McCabe wrote:

Good morning, I would like to know if your patterns come in written versions? Following graphs doesn't work for me.

26.04.2019 - 14:34

DROPS Design answered:

Dear Mrs McCabe, most of the time when there are diagrams, there aren't any written pattern but you will find here how to read diagrams. Happy crocheting!

26.04.2019 - 15:47

country flag Yvonne Lagarde wrote:

Wat betekent in patroon A.2b het tekentje dat lijkt op een vlindertje met een lang lijfje ?

26.12.2018 - 13:24

DROPS Design answered:

Dag Yvonne,

Vermoedelijk bedoel je het 8e symbool van boven in de lijst? Dit is een half stokje in de steek, dus je maakt het halve stokje in de steek van de vorige toer en niet om de steek.

27.12.2018 - 10:36

country flag Yvonne wrote:

Wat betekent in A2.b het tekentje dat lijkt op een vlinder met lang lijfje?

23.12.2018 - 23:59