DROPS Super Sale - SAVE 30% on 5 wonderful yarns!
Product image DROPS Karisma yarn
DROPS Karisma
100% Wool
from 2.50 € /50g
Get the yarn to make this pattern from 32.50€.

The yarn cost is calculated from the pattern’s smallest size and the yarn’s cheapest product type. Looking for an even better price? You might find it on the DROPS Deals!

DROPS Super Sale

Aure

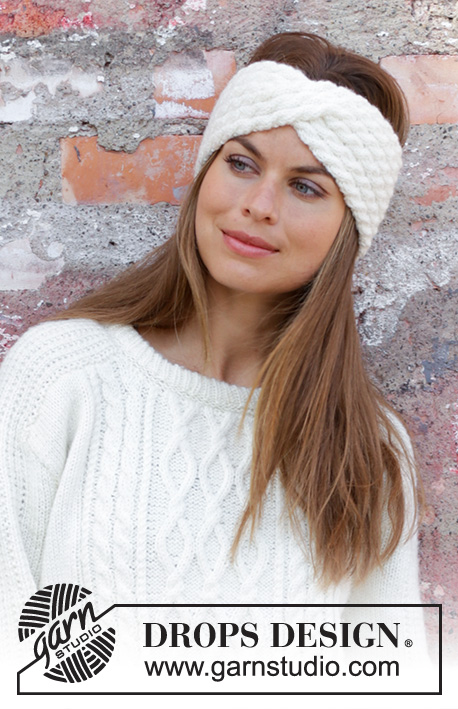
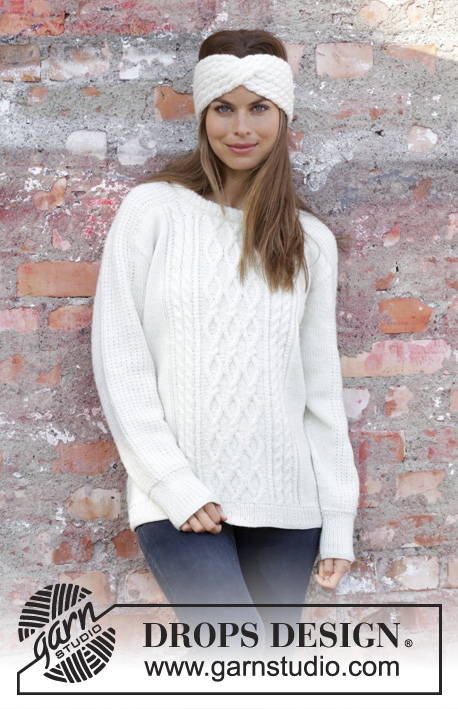
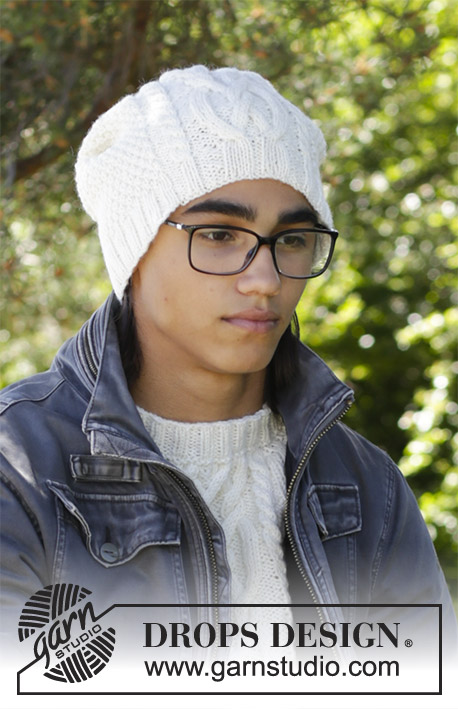
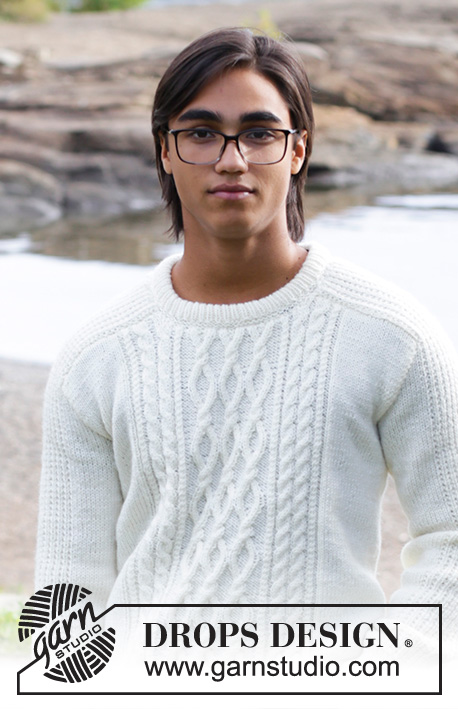
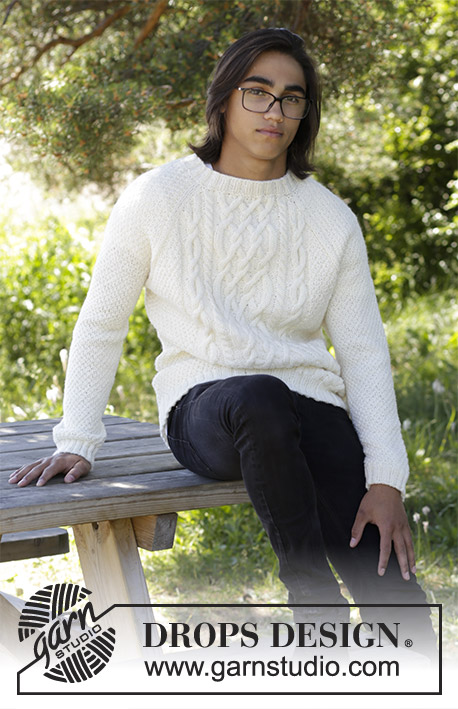
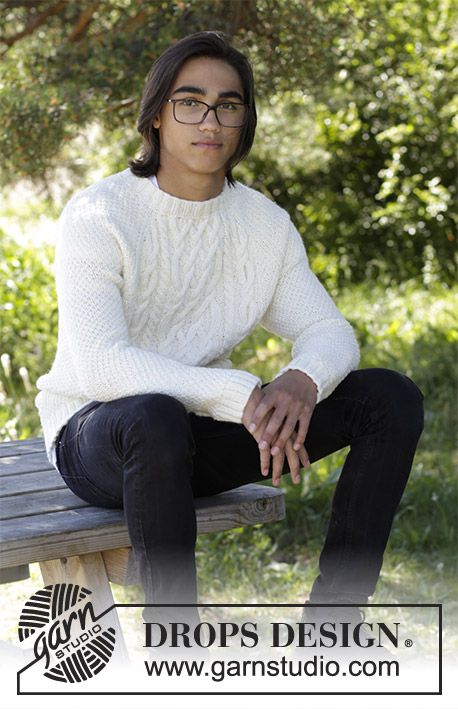
Knitted jumper with raglan and cables for men. Size: S - XXXL Piece is knitted in DROPS Karisma or Sky.

Highlight Size:
DROPS 185-9

#auresweater

DROPS design: Pattern u-841
Yarn group B
----------------------------------------------------------
Size: S - M - L - XL - XXL - XXXL
Materials:
DROPS KARISMA from Garnstudio (belongs to yarn group B)
650-700-800-850-950-1050 g colour no 01, off white

Or use:
DROPS SKY from Garnstudio (belongs to yarn group B)
350-400-450-450-500-600 g colour 01, white

Piece can also be knitted with yarn from:
“Alternative yarn (yarn group B)” - see link below.

DROPS DOUBLE POINTED NEEDLES AND CIRCULAR NEEDLE (40 or 80 cm) SIZE 4.5 mm – or size needed to get 20 stitches and 26 rows in stocking stitch = width 10 cm and 10 cm vertically.

DROPS DOUBLE POINTED NEEDLES AND CIRCULAR NEEDLE (40 and 80 cm) SIZE 3.5 mm for rib – or size needed to get 22 stitches and 30 rows in stocking stitch = width 10 cm and 10 cm vertically.

DROPS CABLE NEEDLE - for cables.
----------------------------------------------------------

-------------------------------------------------------

Alternative Yarn – See how to change yarns here
Yarn Groups A to F – Use the same pattern and change the yarn here
Yarn usage using an alternative yarn – Use our yarn converter here

-------------------------------------------------------

You might also like...

Product image DROPS Karisma
DROPS Karisma
100% Wool
from 2.50 € /50g
Get the yarn to make this pattern from 32.50€.

The yarn cost is calculated from the pattern’s smallest size and the yarn’s cheapest product type. Looking for an even better price? You might find it on the DROPS Deals!

Pattern instructions

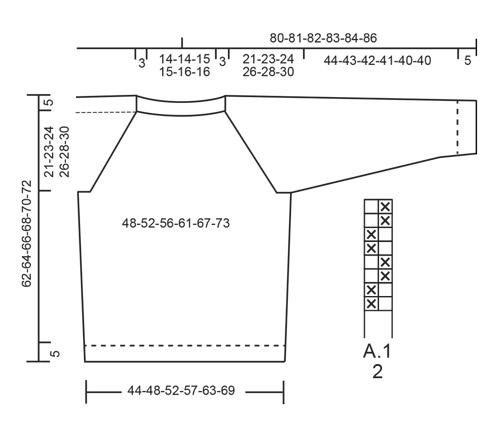
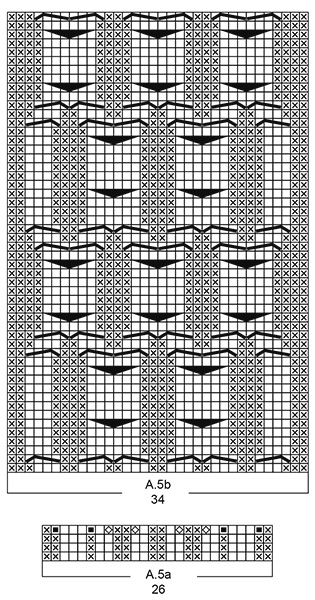
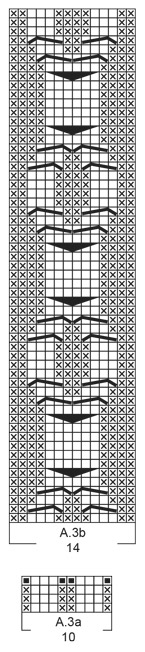
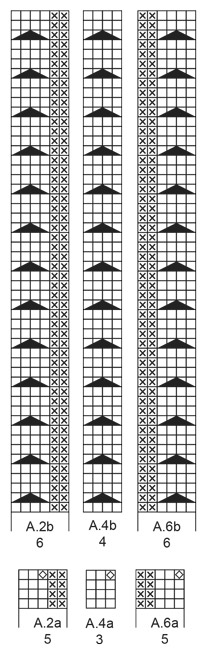
INFORMATION FOR PATTERN:

PATTERN:
See diagram A.1 to A.6 (diagrams A.2 and A.6 only applies to size XL, XXL and XXXL). Diagrams show all rows in pattern seen from the right side.

INCREASE TIP (applies to sides on body and under sleeve):
Work until 1 stitch remains before marker thread, 1 yarn over, knit 2 A.1 as before (marker thread is in the middle of these 2 stitches), 1 yarn over. On next round purl/knit yarn over twisted and work the new stitches in A.1.

RAGLAN:
Work until 3 stitches remain before marker thread. Purl 2 together, knit 2 (marker thread is in the middle of these 2 stitches), purl 2 together. Repeat decease at each of the remaining marker threads (= 8 stitches decreased on round).

DECREASE/INCREASE TIP (evenly):
To calculate how to decrease/increase evenly, use the number of stitches decreases/increases are done over (e.g. 26 stitches) and divide stitches by number of decreases/increases to be done (e.g. 6) = 4.3. In this example knit approx. every 3rd and 4th stitch together.
When increasing stitches make (in this example) 1 yarn over after approx. every 4th stitch. On next round work yarn over twisted to avoid hole.
----------------------------------------------------------

JUMPER:
Body is worked in the round on circular needle, bottom up. Work cables on front piece and moss stitch in the sides, on back piece and on sleeves. Work sleeves in the round on double pointed needles. NOTE: Size XL, XXL and XXXL have one small cable (= A.2/A.6) more towards each side than model on picture.

BODY:
Cast on 218-234-254-276-304-328 stitches on circular needle size 3.5 mm with Karisma or Sky. Knit 1 round. Insert 1 marker thread at the beginning of the round (= side). Now work rib in the different sizes as follows:
SIZE S, M AND L:
Work (knit 2, purl 2) over the first 24-28-32 stitches, knit 2, A.3a (= 10 stitches), A.4a (= 3 stitches), A.5a (= 26 stitches), A.4a, A.3a, work (knit 2, purl 2) over the remaining 140-152-168 stitches.
SIZE XL, XXL AND XXXL:
Work (knit 2, purl 2) over the first 32-40-44 stitches, knit 2, work A.2a (= 5 stitches), A.3a (= 10 stitches), A.4a (= 3 stitches), A.5a (= 26 stitches), A.4a, A.3a, A.6a (= 5 stitches), work (knit 2, purl 2) over the remaining 180-200-220 stitches.
Continue like this and repeat the first 3 rounds in diagrams until rib measures 5 cm. Work next round as follows: Knit the first 26-30-34-34-42-46 stitches and decrease at the same time 6-6-6-8-8-8 stitches evenly – read DECREASE/INCREASE TIP, work last row in diagrams over the next 52-52-52-62-62-62 stitches, knit the next 26-30-34-34-42-46 stitches and decrease at the same time 6-6-6-8-8-8 stitches evenly, knit the remaining stitches on round and decrease at the same time 26-26-30-32-32-36 stitches evenly = 198-214-230-248-276-296 stitches.

Switch to circular needle size 4.5 mm. Now work pattern in the different sizes as follows:
SIZE S, M AND L:
(marker in the side is here = beginning of round), work A.1 (= 2 stitches) over the first 20-24-28 stitches, A.3b (= 14 stitches), A.4b (= 4 stitches), A.5b (= 34 stitches), A.4b, A.3b, A.1 over the next 20-24-28 stitches, insert a marker thread here (= the other side), work A.1 over the next 88-96-104 stitches.
SIZE XL, XXL and XXXL:
(marker in the side is here = beginning of round), work A.1 (= 2 stitches) over the first 26-34-38 stitches, A.2b (= 6 stitches), A.3b (= 14 stitches), A.4b (= 4 stitches), A.5b (= 34 stitches), A.4b, A.3b, A.6b (= 6 stitches), A.1 over the next 26-34-38 stitches, insert a marker thread here (= the other side), work A.1 over the next 114-126-138 stitches.

Continue pattern in the round like this. REMEMBER THE KNITTING TENSION! When piece measures 8-8-8-9-9-9 cm, increase 2 stitches on each side – read INCREASE TIP. Increase like this every 8 cm 4 times in total = 214-230-246-264-292-312 stitches. REMEMBER THE KNITTING TENSION! When piece measures 36-36-37-37-37-37 cm, work one round while casting off 12-12-14-14-16-18 stitches under each sleeve for armhole (= 6-6-7-7-8-9 stitches on each side of marker thread in each side = 190-206-218-236-260-276 stitches on round. Cut the yarn. Put piece aside and work the sleeves.

SLEEVES:
Work sleeves in the round on double pointed needles.
Cast on 56-60-60-64-64-68 stitches on double pointed needles size 3.5 mm with Karisma. Work rib (knit 2/purl 2) for 5 cm. Knit 1 round while decreasing 14-16-14-16-14-16 stitches evenly = 42-44-46-48-50-52 stitches. Switch to double pointed needles size 4.5 mm. Insert a marker thread at beginning of round. Work diagram A.1 in the round. When sleeve measures 5-7-6-11-9-7 cm from cast-on edge, increase 1 stitch on each side of marker thread mid under sleeve (= 2 stitches increased) - remember INCREASE TIP. Increase like this every 8th-6th-5th-4th-4th-4th round 14-17-20-21-22-23 times in total = 70-78-86-90-94-98 stitches. When sleeve measures 49-48-47-46-45-45 cm (NOTE: Shorter measurements in the larger sizes because of longer yoke), cast off the middle 12-12-14-14-16-18 stitches under sleeve (i.e. cast off 6-6-7-7-8-9 stitches on each side of marker thread) = 58-66-72-76-78-80 stitches remain. Put piece aside and knit another sleeve.

YOKE:
Slip sleeves on to same circular needle as body where armholes were cast off = 306-338-362-388-416-436 stitches. NOW MEASURE PIECE FROM HERE!
Begin in transition after sleeve and before body on back piece and work pattern as before as follows: Work 4-4-4-4-6-8 stitches, insert a marker thread here (NOTE: this is the beginning of round onwards), work 76-84-90-100-106-112 stitches (= back piece), insert a marker thread here, work 66-74-80-84-90-96 stitches (= sleeve), insert a marker thread here, work 98-106-112-120-130-132 stitches (= front piece), insert a marker thread here, work 66-74-80-84-90-96 stitches (= sleeve). Continue pattern as before and knit 1 stitch on each side of the 4 marker threads in piece. On next round begin decrease for RAGLAN – see explanation above. Decrease like this every 4th round 3-2-0-0-0-0 times and every other round 20-25-30-32-35-38 times (a total of 23-27-30-32-35-38 rounds with deceases) = 122-122-122-132-136-132 stitches. When decreasing for raglan and there are not enough stitches to work cables on front piece, work knit over knit and purl over purl. When all decreases are done, the piece measures approx. 21-23-24-26-28-30 cm. Knit over stitches on back piece, knit over the remaining stitches (the 2 sleeves and front piece) and decrease at the same time 22-22-22-16-16-12 stitches evenly = 100-100-100-116-120-120 stitches.

NECK EDGE:
Switch to a short circular needle size 3.5 mm. Purl 1 round. Knit 1 round while increasing 8-8-12-8-8-8 stitches evenly - remember INCREASE TIP = 108-108-112-124-128-128 stitches. Purl 1 round and knit 1 round. Work rib (knit 2/purl 2) for 3 cm. Cast off stitches with knit over knit and purl over purl. Fasten off.

ASSEMBLY:
Sew the openings under the sleeves.

Diagram

knit = knit
purl = purl
slip 2 stitches on cable needle in front of piece, knit 2, knit 2 from cable needle = slip 2 stitches on cable needle in front of piece, knit 2, knit 2 from cable needle
slip 3 stitches on cable needle in front of piece, purl 1, knit 3 from cable needle = slip 3 stitches on cable needle in front of piece, purl 1, knit 3 from cable needle
slip 1 stitch on cable needle behind piece, knit 3, purl 1 from cable needle = slip 1 stitch on cable needle behind piece, knit 3, purl 1 from cable needle
slip 3 stitches on cable needle behind piece, knit 3, knit 3 from cable needle = slip 3 stitches on cable needle behind piece, knit 3, knit 3 from cable needle
knit 2 in the same stitch (knit 1 stitch in back loop and knit 1 stitch in front loop) = knit 2 in the same stitch (knit 1 stitch in back loop and knit 1 stitch in front loop)
purl 2 in the same stitch (purl 1 stitch in back loop and purl 1 stitch in front loop) = purl 2 in the same stitch (purl 1 stitch in back loop and purl 1 stitch in front loop)
Diagram for DROPS 185-9

Each of our patterns has specific tutorial videos to help you.

Do you have a question? See a list of frequently asked questions (FAQ)

Knitting tension is what determines the final measurements of your work, and is usually measured per 10 x 10 cm. It is provided like so: number of stitches in width x number of rows in height - eg: 19 stitches x 26 rows = 10 x 10 cm.

The knitting tension is very individual; some people knit/crochet loosely while others work tightly. You adjust the knitting tension with the needle size, which is why the suggested needle size is only meant as a guide! You need to adjust this (up or down) to ensure that YOUR knitting tension matches the knitting tension provided in the pattern. If you work with a different knitting tension than provided you will have a different yarn consumption, and your work will have different measurements than what the pattern suggests.

The knitting tension also determines which yarns can replace each other. As long as you achieve the same knitting tension you can replace one yarn with another.

See DROPS lesson: How to measure your tension/gauge

See DROPS video: How to make a gauge tension swatch

The required amount of yarn is provided in grams, eg: 450 g. To calculate how many balls you’ll need you first need to know how many grams are in 1 ball (25g, 50g or 100g). This information is available if you click on the individual yarn quality on our pages. Divide the amount required with the amount of each ball. For example, if each ball is 50g (the most common amount), the calculation will be as follows: 450 / 50 = 9 balls.

The important thing when changing from one yarn to another is that the knitting/crochet tension remains the same. This is so that the measurements of the finished piece will be the same as on the sketch provided. It is easier to achieve the same knitting tension using yarns from the same yarn group. It is also possible to work with multiple strands of a thinner yarn to achieve the knitting tension of a thicker one. Please try our yarn converter. We recommend you to always work a test swatch.

Please NOTE: when changing yarn the garment might have a different look and feel to the garment in the photo, due to individual properties and qualities of each yarn.

See DROPS lesson: Can I use a different yarn than the one mentioned in the pattern?

All our yarns are categorised into yarn groups (from A to F) according to thickness and knitting tension – group A contains the thinnest yarns and group F the thickest. This makes it easier for you to find alternative yarns to our patterns, should you wish to switch yarn. All yarns within the same group have a similar knitting tension and can easily replace each other. However, different yarn qualities have different structures and properties which will give the finished work a unique look and feel.

Click here for an overview of the yarns in each yarn group

At the top of all our patterns you’ll find a link to our yarn calculator, which is a helpful tool should you wish to use a different yarn than suggested. By filling in the yarn quality you wish to replace, the amount (in your size) and number of strands, the calculator will present good alternative yarns with the same knitting tension. Additionally it will tell you how much you’ll require in the new qualities and whether you’ll need to work with multiple strands. Most skeins are 50g (some are 25g or 100g).

If the pattern is worked with multiple colours, every colour will have to be calculated separately. Similarly, if the pattern is worked with several strands of different yarns (for example 1 strand Alpaca and 1 strand Kid-Silk) you will have to find alternatives for each, individually.

Click here to see our yarn calculator

Since different yarns have different qualities and textures we have chosen to keep the original yarn in our patterns. However, you can easily find options among our available qualities by using our yarn calculator, or simply pick a yarn from the same yarn group.

It is possible that some retailers still have discontinued yarns in stock, or that someone has a few skeins at home that they would like to find patterns for.

The yarn calculator will provide both alternative yarn as well as required amount in the new quality.

If you think it's hard to decide what size to make, it can be a good idea to measure a garment you own already and like the size of. Then you can pick the size by comparing those measures with the ones available in the pattern's size chart.

You'll find the size chart at the bottom of the pattern.

See DROPS lesson: How to read size chart

The needle size provided in the pattern serves only as a guide, the important thing is to follow the knitting tension. And since knitting tension is very individual, you will have to adjust the needle size to ensure that YOUR tension is the same as in the pattern – maybe you’ll have to adjust 1, or even 2 needle sizes, up or down to achieve the correct tension. For this, we recommend that you work test swatches.

Should you work with a different knitting tension than the one provided, the measurements of the finished garment might deviate from the measurement sketch.

See DROPS lesson: How to measure your tension/gauge

See DROPS video: How to make a tension/gauge swatch

Working a garment top-down provides more flexibility and room for personal adjustment. For example it is easier to try the garment on while working, as well as making adjustments to length of yoke and shoulder caps.

The instructions are carefully explaining every step, in the correct order. Diagrams are adjusted to the knitting direction and are worked as usual.

The diagram depicts all rows/rounds, and every stitch seen from the right side. It is read from bottom to top, from right to left. 1 square = 1 stitch.

When working back and forth, every other row is worked from the right side and every other row is worked from the wrong side. When working from the wrong side, the diagram will have to be worked reversed: from left to right, knit stitches are purled, purl stitches are knit etc.

When working in the round every round is worked from the right side and the diagram are worked from right to left on all rounds.

See DROPS lesson: How to read knitting diagrams

The diagram depicts all rows/rounds, and every stitch seen from the right side. It is worked from bottom to top, from right to left.

When working back and forth every other row is worked from the right side: from right to left and every other row is worked from the wrong side: from left to right.

When working in the round, every row in the diagram are worked from the right side, from right to left.

When working a circular diagram you start in the middle and work your way outwards, counter clockwise, row by row.

The rows usually start with a given number of chain stitches (equivalent to the height of the following stitch), this will either be depicted in the diagram or explained in the pattern.

See DROPS lesson: How to read crochet diagrams

Instructions for working several diagrams after each other on the same row/round, will often be written like so: “work A.1, A.2, A.3 a total of 0-0-2-3-4 times". This means you work A.1 once, then A.2 is worked once, and A.3 is repeated (in width) the number of times provided for your size – in this case like so: S = 0 times, M = 0 times, L=2 times, XL= 3 times and XXL = 4 times.

The diagrams are worked as usual: begin with the first row in A.1, then work the first row in A.2 etc.

See DROPS lesson: How to read knitting diagrams

See DROPS lesson: How to read crochet diagrams

The total width of the garment (from wrist-to-wrist) will be larger in the larger sizes, despite the actual sleeves being shorter. The larger sizes have longer sleeve caps and wider shoulders, so there will be a good fit in all sizes.

The measurement sketch/schematic drawing provides information regarding the full length of the garment. If it’s a jumper or a jacket the length is measured from the highest point on the shoulder closest to the neckline, and straight down to the bottom of the garment. It is NOT measured from the tip of shoulder. Similarly, the length of yoke is measured from the highest point on the shoulder and down to where yoke is split into body and sleeves.

On a jacket measures are never taken along bands, unless specifically stated. Always measure inside band stitches when measuring the length.

See DROPS lesson: How to read a schematic drawing

Diagrams are often repeated on the round or in height. 1 repeat is the diagram the way it appears in the pattern. If it says to work 5 repeats of A.1 in the round, then you work A.1 a total of 5 times after/next to each other in the round. If it says to work 2 repeats of A.1 vertically/in height you work the entire diagram once, then begin again at the start and work the entire diagram one more time.

Chain stitches are slightly narrower than other stitches and to avoid working the cast-on edge too tight, we simply chain more stitches to begin with. The stitch count will be adjusted on the following row to fit the pattern and measurement sketch.

The rib edge is more elastic and will contract slightly compared to, for example, stocking stitch. By increasing before the rib edge, you avoid a visible difference in width between the rib edge and the rest of the body.

It’s very easy to cast off too tightly, and by making yarn overs while casting off (and simultaneously casting these off) you avoid a too tight cast off edge.

See DROPS video: How to bind off with yarn overs (yo)

To achieve an even increase (or decrease) you can increase on, for example: every 3rd and 4th row alternately, like so: work 2 rows and increase on the 3rd row, work 3 rows and increase on the 4th. Repeat this until the increase is complete.

See DROPS lesson: Increase or decrease 1 st on every 3rd and 4th row alternately

Should you prefer to work in the round instead of back and forth, you may of course adjust the pattern. You’ll need to add steeks mid-front (usually 5 stitches), and follow the instructions. When you would normally turn and work from the wrong side, simply work across the steek and continue in the round. At the end you’ll cut the piece open, pick up stitches to work bands, and cover the cut edges.

See DROPS video: How to knit steeks and cut open

Should you prefer to work back and forth instead of in the round, you may of course adjust the pattern so you work the pieces separately and then assemble them at the end. Divide the stitches for the body in 2, add 1 edge stitch in each side (for sewing) and work the front and back pieces separately.

See DROPS lesson: Can I adapt a pattern for circular needles into straight needles?

Pattern repeats can vary slightly in the different sizes, in order to get the correct proportions. If you’re not working the exact same size as the garment in the photo, yours might deviate slightly. This has been carefully developed and adjusted so that the complete impression of the garment is the same in all sizes.

Make sure to follow instructions and diagrams for your size!

If you have found a pattern you like which is available in women’s size it’s not very difficult to convert it to men’s size. The biggest difference will be the length of sleeves and body. Start working on the women size that you think would fit across the chest. The additional length will be worked right before you cast off for the armhole/sleeve cap. If the pattern is worked top-down you can add the length right after the armhole or before the first decrease on sleeve.

Regarding additional yarn amount, this will depend on how much length you add, but it is better with a skein too many than too few.

All yarns will have excess fibres (from production) that might come off as lint or shedding. Brushed yarns (ie hairier yarns) have more of these loose, excess fibres, causing more shedding.

Shedding also depends on what is worn under or over the garment, and whether this pulls at the yarn fibres. It’s therefore not possible to guarantee that there will be no shedding

Below are some tips on how to get the best result when working with hairier yarns:

1. When the garment is finished (before you wash it) shake it vigorously so the looser hairs come off. NOTE: do NOT use a lint roller, brush or any method that pulls at the yarn.

2. Place the garment in a plastic bag and put it in your freezer - the temperature will cause the fibres to become less attached to each other, and excess fibres will come off easier.

3. Leave in the freezer for a few hours before taking it out and shaking it again.

4. Wash the garment according to the instructions on the yarn label.

Pilling is a natural process that happens to even the most exclusive of fibers. It's a natural sign of wear and tear that is hard to avoid, and that is most visible in high friction areas of your garment like a sweater's arms and cuffs.

You can make your garment look as new by removing the pilling, using a fabric comb or a pill/lint remover.

Still can't find the answer you need? Then scroll down and leave your question so one of our experts can try to help you. This will be done normally within 5 to 10 working days.
In the meantime, you can read the questions and answers that others have left to this pattern or join the DROPS Workshop on Facebook to get help from fellow knitters/crocheters!
Have you finished this pattern?
Tag your pictures with #dropspattern #auresweater or submit them to the #dropsfan gallery.

Post a comment to pattern DROPS 185-9

We would love to hear what you have to say about this pattern!

If you want to leave a question, please make sure you select the correct category in the form below, to speed up the answering process. Required fields are marked *.

Comments / Questions (63)

country flag Chantal wrote:

Bonjour Comment faire les augmentations des manches avec un point de ble ? Après avoir terminé mes augmentations, je ne peux plus reconstituer le point. Je tombe toujours sur deux mailles endroit ou de mailles envers Merci pour votre réponse Cordialement

07.01.2025 - 09:25

DROPS Design answered:

Bonjour Chantal, tricotez les nouvelles mailles en fonction de la maille suivante ou précédente, autrement dit, si la maille précédente/la maille suivante doit être tricotée à l'endroit, tricotez la nouvelle maille à l'envers et vice versa - ainsi, le point de blé restera bien en continu. Bon tricot!

07.01.2025 - 13:27

country flag Jutta wrote:

Warum werden die Raglanschrägen nicht an den Übergängen von Ärmel zu Vorder- Rückenteil gestrickt, sondern mitten in den Teilen?

01.12.2024 - 15:39

DROPS Design answered:

Liebe Jutta, das ist wahrscheinlich Designerin's Wahl je nach Modell und Muster. Aber die Verteilung entsteht nicht mitten in den Teilen, nur nicht genau wie bei den jeweiligen Stücke. Viel Spaß beim Stricken!

02.12.2024 - 10:04

country flag Jutta wrote:

Nach dem Abketten des Armausschnittes beim Ärmel habe ich bei L noch 72 Maschen übrig, soll aber in der ersten Reihe des gesamten Teiles 80 Maschen Ärmel stricken. Wo kommen die 8 Maschen her?

30.11.2024 - 12:29

country flag Ute wrote:

Ich stricke aber L. Da wird die Passe ja deutlich kürzer.

28.10.2024 - 15:21

country flag Ute wrote:

Ich wundere mich über die 37 cm Länge bis unter dem Arm. Viele andere Pullover werden 43-44 cm lang gestrickt. Vom Bild kommt er mir auch deutlich länger vor. Ist die Angabe richtig?

27.10.2024 - 16:57

DROPS Design answered:

Liebe Ute, die Länge der Passe kommt noch dazu für die fertige gesamte Länge - z.B. in 3XL: 30 cm Passe + 5 cm Schulter + 37 cm Rumpfteil sind insgesamt 72 cm. Viel Spaß beim Stricken!

28.10.2024 - 10:14

country flag Olivia Ljungdahl wrote:

M: uppläggning 234m, ökar med (4+1+8+1+4 = 18m) det femte varvet enligt diagram (totalt 252m) 

Nästa steg: Framsidan (24+14+4+34+4+14+24 = 118m), sen står det att jag ska sticka de resterande 96m i mosstickning men det är 252-118 = 134 maskor kvar. Fel i mönstret? Några Tips eller förklaringar som kan hjälpa?

16.10.2024 - 15:01

DROPS Design answered:

Hej Olivia. Innan du byter till rundsticka 4,5 och stickar mönster står det om minskningar du ska göra. I storlek M minskar du 6+6+26 maskor, så om du gör det så stämmer det. Mvh DROPS Design

17.10.2024 - 07:34

country flag Ute wrote:

Wie viele Knäuel Wolle brauche ich, wenn ich Größe XL in doppelter Alpaka stricken möchte?

24.09.2024 - 13:33

DROPS Design answered:

Liebe Ute, Alpaca gehört der Garngruppe A, dieser Pullover wird mit einem Faden der Garngruppe B gestrickt, benutzen Sie den Garnumrechner um die Garnalternative sowie die passende Garnmenge zu finden. Oder hier finden Sie Anleitungen, die Sie mit 2 Fäden Alpaca stricken können (Garnumrechner wird Ihnen auch hier helfen). Viel Spaß beim Stricken!

25.09.2024 - 08:05

country flag Sylvie Guertault wrote:

Je vous remercie pour votre réponse. Par contre je bloque toujours car vous dites que sur les 96m du dos, j'en tricote 4 qui seront pour la manche (reste donc 92m pour le dos), puis les 84m suivantes pour le dos, il reste 4 m qui sont pour la manche. Dans mon tricot, il restera 8m et non 4 (92 - 84=8) Merci de m'expliquer, car je ne comprends toujours pas.

21.06.2024 - 16:37

DROPS Design answered:

Bonjour Mme Guertault, le décompte précédent était faux, pour le dos vous devez avoir 92 mailles après la séparation (96 m après les côtes + 2 x 4 augmentations - 2 x 6 m rabattues pour les emmanchures); les 4 premières mailles du dos sont pour la manche droite et les 4 dernières mailles du dos sont pour la manche gauche, il reste bien 84 mailles pour le dos; Bon tricot!

24.06.2024 - 09:45

country flag Birgitte wrote:

Hej drops. Strikker xxl Markering på bærestykke driller. For 130 m Bag 130 m Ærme 78m Ærme 78 m Ialt 416 så lang så godt. Kan ikke få inddeling af markerings tråde for indtagning til at passe. Skal der være 130 foran og kun 106 på ryggen? Skal de 12 m på hvert ærme tages fra ryggens masker? Passer det at det kun er 6 m man skal strikke når bærestykke startes? Jeg har kæmpet i flere timer. Håber på hjælp. Mvh Birgitte

17.06.2024 - 13:15

DROPS Design answered:

Hei Birgitte. Det er ikke fletter på bakstykket, slik at det er flere masker på forstykket (flettene trekker arbeidet sammen). Når du strikker forstykket, bakstykket og ermene sammen går noen masker fra forstykket og bakstrykket til ermer. Start i overgangen etter ermet og før bolen på bakstykket og strikk mønster som før: Strikk 6 masker (litt av 1.erme), sett en merketråd her, strikk 106 masker (= bakstykket), sett en merketråd her, strikk 6+78+6 masker (=2.erme), sett en merketråd her, strikk 130 masker (= forstykket), sett en merketråd her, strikk 6+78 masker (= resten av 1.erme). Husk du startet med 6 masker og starten er etter disse 6 maskene. mvh DROPS Design

24.06.2024 - 14:35

country flag Birgitte wrote:

Test

17.06.2024 - 13:09