
Popular categories
Looking for a yarn?


Comments / Questions (101)
![]() Inger J N Sørensen wrote:
Inger J N Sørensen wrote:
Hei igjen ! Hvor høy er modellen, og hvilken str viser han ? Mvh Inger
03.06.2019 - 15:56DROPS Design answered:
Hei Inger. Han er nok rundt 180cm, og det er en størrelse M. Nederst på siden ligger det en målskisse med alle genserens mål i de ulike størrelsene. Det er lurt å bruke denne når du velger størrelse. God fornøyelse
04.06.2019 - 07:56
![]() Inger J N Sørensen wrote:
Inger J N Sørensen wrote:
Når begynner første økning på bolen, på den 24 omgang eller med en gang arbeidet begynner etter den første omgang med rett ?
30.05.2019 - 15:22DROPS Design answered:
Hei Inger. Den første økningen gjøres rett etter vrangborden, og videre gjentas økningen hver 24 omgang 3 ganger til (= totalt 4 ganger). God fornøyelse
31.05.2019 - 10:27
![]() Birgit Wolf wrote:
Birgit Wolf wrote:
Hallo muss ich 36 cm mit Bund rechnen oder ohne ???Lieb gefragt Für die Anleitung Dalvik
16.03.2019 - 18:48DROPS Design answered:
Liebe Frau Wolf, die 36 cm werden von der Anschlagskante gemessen -siehe auch Maßskizze: 7 cm Bündchen + 29 cm Rumpfteil. Viel Spaß beim stricken!
18.03.2019 - 09:00
![]() Päivi Metsätähti wrote:
Päivi Metsätähti wrote:
Sopiiko malli harteikkaalle miehelle?
11.02.2019 - 16:55DROPS Design answered:
Neule venyy käytössä, joten sopii kyllä.
13.01.2020 - 19:52
![]() Silvia Gantzert wrote:
Silvia Gantzert wrote:
Mein Mann möchte einen Rollrasen. Kann ich dann einfach länger stricken und dann locker abketten?
13.01.2019 - 17:25DROPS Design answered:
Liebe Frau Gantzert, für einen Rollkragen können Sie ja einfach länger stricken - nehmen Sie bitte Kontakt mit Ihrem DROPS Laden auf, dort bekommen Sie individuelle Hilfe - auch telefonisch oder per Email. Viel Spaß beim stricken!
14.01.2019 - 11:54
![]() GIOVANNA wrote:
GIOVANNA wrote:
Sto eseguendo questo maglione in taglia L ma mi sembra che 30 cm. dalla fine del bordo a coste allo scalfo manica siano pochi. Grazie per la risposta
05.12.2018 - 11:06DROPS Design answered:
Buongiorno Giovanna. Per la misura, può confrontare il suo lavoro con un maglione dalla misura corretta. Dovesse risultare troppo corto, può aumentare la parte lavorata a maglia rasata e a tinta unita prima degli scalfi. Buon lavoro!
05.12.2018 - 12:50
![]() Dorothea wrote:
Dorothea wrote:
Für die Variante in Blautönen, welche Farben wurden genommen, gibt es evt. ein Bild?
18.11.2018 - 22:38DROPS Design answered:
Liebe Dorothea, für die Farben A wurden die Farben DROPS Karisma 69, 50, 56, 01, 55 gestrickt. Wir haben kein ganzes Bild, nur das kleinere als Beispiel für Alternativen. Viel Spaß beim stricken!
19.11.2018 - 09:17
![]() Suleika wrote:
Suleika wrote:
Der Pullover ist super geworden. Mein Sohn ist begeistert. Ich habe nur andere Farben genommen: grau mit Blautönen.
10.11.2018 - 18:36
![]() Rosa Alvarez wrote:
Rosa Alvarez wrote:
Buenas noches , no entiendo la parte del canesu. Me parecio q al unir las mangas y el cuerpo ya se comenzaba con el dibujo. Me podriais explicar mejo como hacer el ranglan? Por q no lo entiendo. Gracias
09.11.2018 - 01:43DROPS Design answered:
Hola Rosa . El patrón está correcto. Al unir las mangas y el cuerpo continuamos con el color gris medio. Al mismo tiempo se trabajan las disminuciones para el raglán. Las disminuciones para el raglán se trabajan según el TIP PARA LAS DISMINUCIONES.
11.11.2018 - 19:26
![]() Ritva Mustonen wrote:
Ritva Mustonen wrote:
Onko tämä kuvio Dalvikin kylästä? Kuinka vanha kuvio on? Voitko kertoa lisää sen historiasta?
06.11.2018 - 01:03
|
|||||||||||||||||||
Dalvik#dalviksweater |
|||||||||||||||||||
 |
 |
||||||||||||||||||
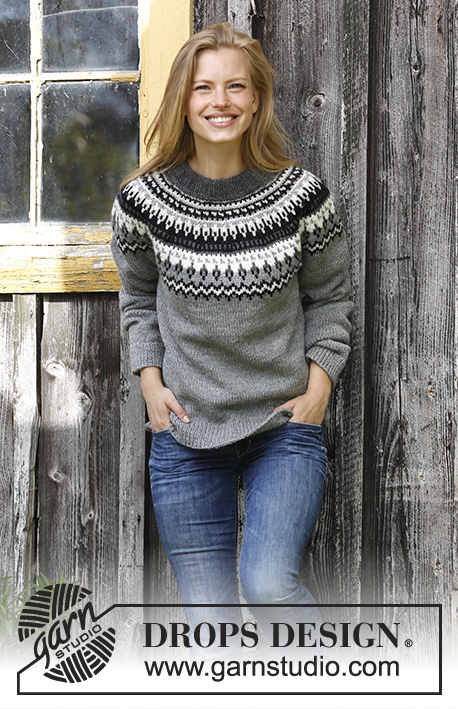
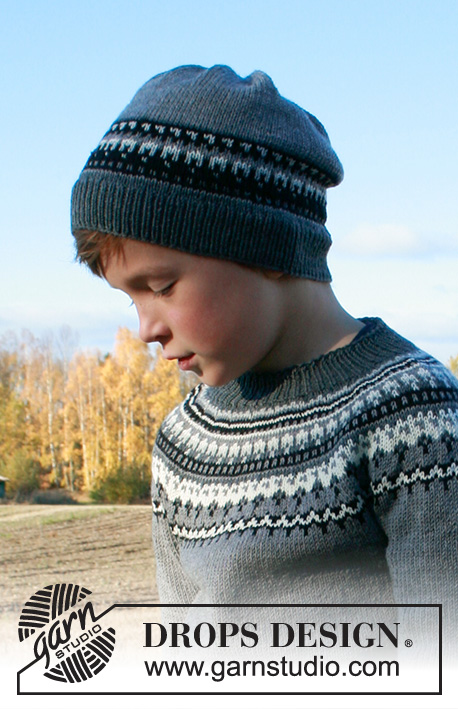
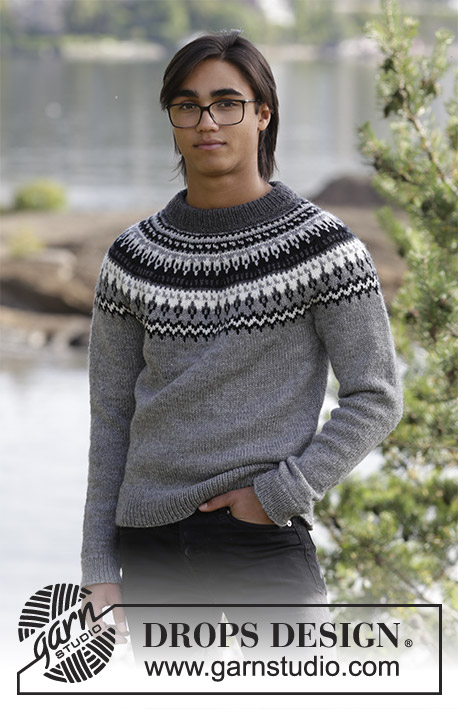
The set consists of: Men’s knitted jumper with raglan, round yoke and multi-coloured Nordic pattern and knitted hat with multi-coloured Nordic pattern. Sizes S - XXXL. The piece is worked in DROPS Karisma.
DROPS 185-1 |
|||||||||||||||||||
|
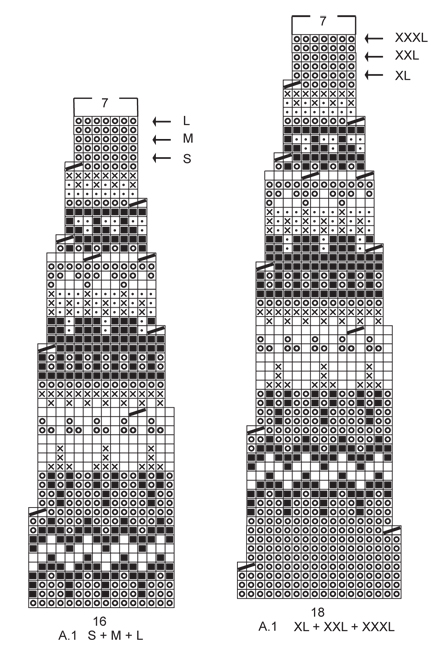
INFORMATION FOR THE PATTERN: RIDGE/GARTER STITCH (worked in the round): 1 ridge = 2 rounds. Knit 1 round and purl 1 round. INCREASE TIP (for sides of body and mid under sleeves): Start 1 stitch before the marker, make 1 yarn over, knit 2 (the marker sits in the middle of these 2 stitches), make 1 yarn over (= 2 stitches increased). On the next round knit the yarn overs twisted to avoid holes. DECREASE/INCREASE TIP: To work out how to decrease/increase evenly, count the total number of stitches on the needle (e.g. 230 stitches), and divide by the number of decreases/increase to be made (e.g. 46) = 5. In this example, when decreasing knit every 4th and 5th stitch together. If you are increasing, make 1 yarn over after every 5th stitch, on the next round knit the yarn overs twisted to avoid holes. RAGLAN: Decrease to raglan on each side of the marker in each transition between body and sleeves. Start 2 stitches before the marker, knit 2 together, marker sits here, slip 1 stitch as if to knit, knit 1, pass the slipped stitch over the knitted stitch (= 2 stitches decreased). PATTERN: Jumper: See diagram A.1. Choose diagram for your size. Hat: See diagram A.2. The diagrams show all the rows in the pattern seen from the right side. The whole pattern is worked in stocking stitch. KNITTING TIP: To avoid the knitting tension becoming tighter when working pattern with more than one colour, it is important that the strands at the back of the piece do not pull. You can increase a needle size when working pattern if this is a problem. ---------------------------------------------------------- JUMPER: The piece is worked in the round with circular needle, bottom up. The sleeves are worked in the round with double pointed needles. BODY: Cast on 230-252-270-300-332-362 stitches with circular needle size 3 mm and medium grey. Work rib (knit 1 / purl 1) for 7 cm. Knit 1 round where you decrease 46-50-50-60-70-72 stitches evenly on round – read DECREASE/INCREASE TIP = 184-202-220-240-262-290 stitches. Change to circular needle size 4 mm. Continue with stocking stitch. REMEMBER THE KNITTING TENSION! On the next round, insert 1 marker at the beginning of the round and 1 marker after 92-101-110-120-131-145 stitches (= in the sides). Now increase 1 stitch on each side of both markers – read INCREASE TIP (= 4 stitches increased on the round). Increase in each side every 22nd-23rd-24th-24th-28th-28th round a total of 4 times = 200-218-236-256-278-306 stitches. When the piece measures 35-36-37-37-39-40 cm, cast off 8-8-10-10-12-14 stitches in each side for the armholes (i.e. cast off 4-4-5-5-6-7 stitches on each side of both markers) = 92-101-108-118-127-139 stitches left on the front and back pieces. Lay the piece to one side and work sleeves. SLEEVE: Cast on 66-66-76-76-76-84 stitches with double pointed needles size 3 mm and medium grey. Work rib (knit 1 /purl 1) for 5 cm. Knit 1 round where you decrease 18-18-22-22-22-24 stitches evenly on round = 48-48-54-54-54-60 stitches. Insert 1 marker at the beginning of the round (= mid under sleeve). Change to double pointed needles size 4 mm and work stocking stitch in the round. When the piece measures 6-7-9-7-6-10 cm increase 2 stitches mid under the sleeve – read INCREASE TIP. Increase in this way every10th-8th-9th-8th-7th-6th round a total of 12-14-12-14-16-16 times = 72-76-78-82-86-92 stitches. When the piece measures 49-48-48-46-47-46 cm (NOTE: Shorter measurements in the larger sizes because of broader shoulder measurements), cast off the middle 8-8-10-10-12-14 stitches under the sleeve = 64-68-68-72-74-78 stitches left on the needle. Lay the piece to one side and work one more sleeve. YOKE: Place the sleeves on the same circular needle as the body where you cast off stitches for the armholes = 312-338-352-380-402-434 stitches on the needle. Insert 1 marker in each transition between body and sleeves (= 4 markers). Work stocking stitch with medium grey. AT THE SAME TIME on the first round decrease to RAGLAN – see description above (= 8 stitches decreased). Decrease in this way every 2nd round a total of 2-2-3-3-3-3 times = 296-322-328-356-378-410 stitches. After the last round of decreases, knit 1 round where you decrease 24-34-24-32-36-32 stitches evenly on round = 272-288-304-324-342-378 stitches left on needle. Continue by working pattern according to diagram A.1 (choose diagram for your size = 17-18-19-18-19-21 repeats on the round). Read KNITTING TIP! Continue pattern in this way and decrease as shown in the diagram. When A.1 has been completed (finish after a round marked with an arrow in the diagram for your size) there are 119-126-133-126-133-147 stitches left on the needle and the piece measures approx. 54-56-58-60-62-64 cm. Now you can work an elevation in the back of the neck or go straight to working neckline if you do not want an elevation. ELEVATION IN BACK OF NECK: For a better fit you can work an elevation in the back of the neck with dark grey. Insert 1 marker mid back of neck. Knit 14-15-16-15-16-18 stitches past the marker, turn, tighten strand and purl 28-30-32-30-32-36 stitches back. Turn and knit 42-45-48-45-48-54 stitches, turn, tighten strand and purl 56-60-64-60-64-72 stitches back. Turn and knit 70-75-80-75-80-90 stitches, turn, tighten strand and purl 84-90-96-90-96-108 stitches back. Turn, tighten strand and knit to mid back. NECKLINE: Knit 1 round with dark grey where you decrease 25-30-35-26-29-39 stitches evenly on round = 94-96-98-100-104-108 stitches around the neck. Change to short circular needle size 3 mm. Work 2 RIDGES – see description above, AT THE SAME TIME on the last round, increase 22-22-24-26-26-26 stitches evenly on round = 116-118-122-126-130-134 stitches. Continue working rib (knit 1 /purl 1). When the rib measures 8 cm work 1 ridge. Loosely cast off – Make sure the cast-off edge is not tight! Fold the collar double and fasten on the inside, ridge to ridge. ASSEMBLY: Sew the openings under the sleeves ---------------------------------------------------------- HAT: The hat is worked in the round with circular needle. Change to double pointed needles when necessary. Cast on 132-154 stitches with circular needle size 3 mm and dark grey. Work rib (knit 1 /purl 1) for 4 cm. Change to circular needle size 4 mm. Knit 1 round AT THE SAME TIME as you decrease 24-34 stitches evenly on round – read DECREASE/INCREASE TIP = 108-120 stitches. Work A.2 (= 9-10 repeats of 12 stitches) – read KNITTING TIP! REMEMBER THE KNITTING TENSION! When A.2 has been completed continue working with medium grey to finished length. When the piece measures 17-18 cm decrease 8-0 stitches evenly on round and at the same time insert 10 markers in the piece with 10-12 stitches between each marker = 100-120 stitches. On the next round decrease 1 stitch after each marker by knitting 2 stitches together (= 10 stitches decreased). Decrease in this way every 2nd round a total of 9-11 times = 10-10 stitches. On the next round knit all stitches together 2 and 2 = 5 stitches. Cut the strand, pull it through the remaining stitches and fasten well. The hat measures approx. 24-26 cm in height. |
|||||||||||||||||||
Diagram explanations |
|||||||||||||||||||
|
|||||||||||||||||||
 |
|||||||||||||||||||
 |
|||||||||||||||||||
Have you finished this pattern?Tag your pictures with #dropspattern #dalviksweater or submit them to the #dropsfan gallery. Do you need help with this pattern?You'll find 32 tutorial videos, a Comments/Questions area and more by visiting the pattern on garnstudio.com. © 1982-2026 DROPS Design A/S. We reserve all rights. This document, including all its sub-sections, has copyrights. Read more about what you can do with our patterns at the bottom of each pattern on our site. |
|||||||||||||||||||


With over 40 years in knitting and crochet design, DROPS Design offers one of the most extensive collections of free patterns on the internet - translated to 17 languages. As of today we count 324 catalogues and 12245 patterns translated into English (UK/cm). 12245
We work hard to bring you the best knitting and crochet have to offer, inspiration and advice as well as great quality yarns at incredible prices! Would you like to use our patterns for other than personal use? You can read what you are allowed to do in the Copyright text at the bottom of all our patterns. Happy crafting!
Post a comment to pattern DROPS 185-1
We would love to hear what you have to say about this pattern!
If you want to leave a question, please make sure you select the correct category in the form below, to speed up the answering process. Required fields are marked *.