
Popular categories
Looking for a yarn?


Comments / Questions (101)
![]() Tina wrote:
Tina wrote:
Aus welchem Grund kann ich beim Ausdrucken der Anleitungen (nicht nur bei dieser) die Diagramme und die Maßzeichnung nicht mehr ausdrucken, es ist auch egal welches Endgerät ich dafür benutze. Es ist schon nervig jedesmal Screenshots davon machen zu müssen
19.09.2021 - 13:03DROPS Design answered:
Liebe Tina, es sollte klappen... prüfen Sie, daß Ihr Drucker nicht ehemalige/ältere Einstellungen gespeichert hatte, und seien Sie sicher, daß "alle Seiten" ausgedruckt werden. Viel Spaß beim stricken!
20.09.2021 - 11:02
![]() Rosemary wrote:
Rosemary wrote:
Love this pattern. It was my first Fair Isle project.
12.09.2021 - 18:29
![]() Rosemary wrote:
Rosemary wrote:
I have finished my Dalvik sweater for my husband. It was my first Fair Isle knitting project. Your instructions are excellent but I am having trouble joining my yarn on a new ball. I usually overlapped 3stitches and threaded the tails on the end but I tried to do the Russian spliced joining and it was very noticeable in the finish. What is your recommended joining method please? Also, there was no mention whether one can 'float' yarn from say row one to row 6. ??
12.09.2021 - 18:28
![]() Marianne Bergkvist wrote:
Marianne Bergkvist wrote:
Ni måste titta över garn-åtgången på mönstret. Jag behövde 11 nystan av grundfärgen i storlek large. Ni har uppgett att det räcker med 10 nystan. 50 gram för färg 16 och 50 gram för färg nummer 05 istället för 100 gram av varje.
07.09.2021 - 20:30
![]() Anne Jørgensen wrote:
Anne Jørgensen wrote:
Kan man ikke bare slå 236 masker op og strikke 37 cm
22.08.2021 - 15:28DROPS Design answered:
Hej Anne. Se svar under. Mvh DROPS Design
24.08.2021 - 13:18
![]() Anne Jørgensen wrote:
Anne Jørgensen wrote:
Hvad er formålet med at slå 270 masker op og så på første pind efter rib at tage 50 masker ind ? Kan man ikke bare slå 236 op og så strikke de 37 cm op ?
22.08.2021 - 15:26DROPS Design answered:
Hej Anne. Ribkanten er mere elastisk og vil trække sig lidt sammen i forhold til det glatstrikkede. Ved at tage ind efter ribben, så undgår du en for stor forskel mellem krop og kant. Mvh DROPS Design
24.08.2021 - 13:17
![]() Marianne wrote:
Marianne wrote:
Jag har stickat tröjan Dalvik i båda färgkombinationerna. Om jag istället vill göra den i gröna nyanser i Karisma, vad har ni då för förslag?
03.08.2021 - 21:43DROPS Design answered:
Hej Marianne, Fråga gärna din DROPS butik, de är superbra på att sätta ihop färger i DROPS Karisma :)
04.08.2021 - 08:29
![]() Anja Bråthen Sture wrote:
Anja Bråthen Sture wrote:
Hei. Jeg strikker til en som er 197cm høy. Hvordan vet jeg at den blir lang nok uten å måle den. Han er ikke her så jeg kan prøvemåle. Jeg strikker xxl Har lagte til 5 cm på bolen og 3 cm på ermene. Jeg strikker modell u-845
08.06.2021 - 13:18DROPS Design answered:
Hej Anja. Det bästa är om du kan be han måle en genser han redan har hemma. Mvh DROPS Design
10.06.2021 - 09:26
![]() Melinda wrote:
Melinda wrote:
Hei. Hvor er begynnelsen av omgangen etter at jeg setter ermene på samme rundpinne som bolen?
16.05.2021 - 21:32DROPS Design answered:
Hej Melinda, de fleste vælger at lade omgangen starte og skifte farve midt på ryggen. God fornøjelse!
17.05.2021 - 11:24
![]() Sylviane wrote:
Sylviane wrote:
Bonjour, Je ne trouve nulle part comment rattraper le décalage dans du jacquard , quand il y a plus q’un rang avec le même ton ça va mais quand le ton change à chaque rang? Merci pour votre réponse
13.05.2021 - 11:27DROPS Design answered:
Bonjour Sylviane, il n'y a pas vraiment d'astuce pour éviter ce type de décalage, vous pouvez jouer avec les fils en les serrant suffisamment mais pas trop non plus au niveau du début des tours. Bon tricot!
17.05.2021 - 07:48
|
|||||||||||||||||||
Dalvik#dalviksweater |
|||||||||||||||||||
 |
 |
||||||||||||||||||
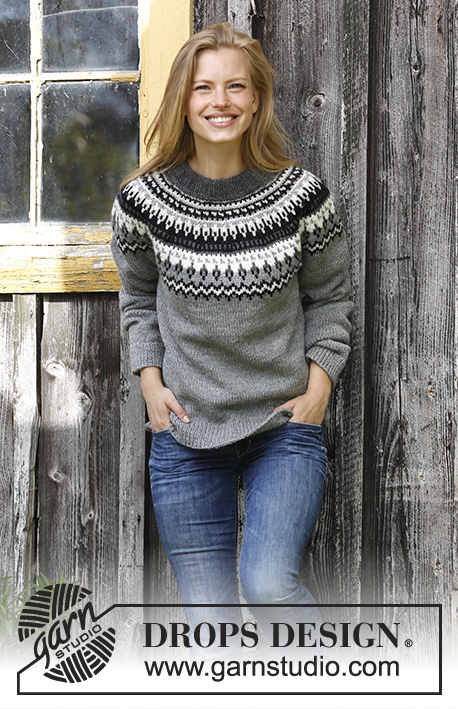
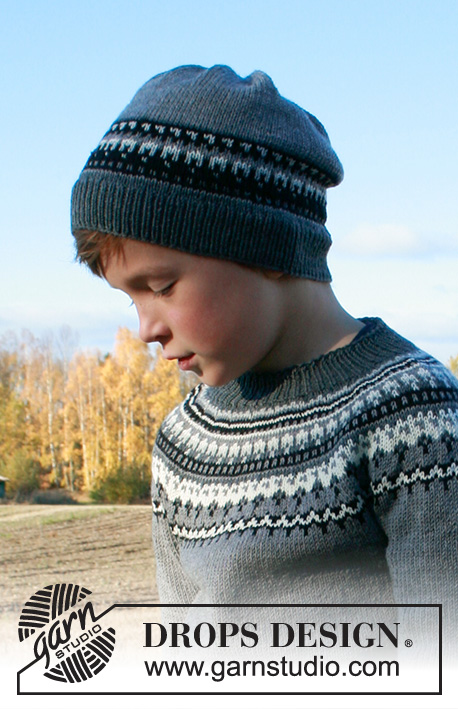
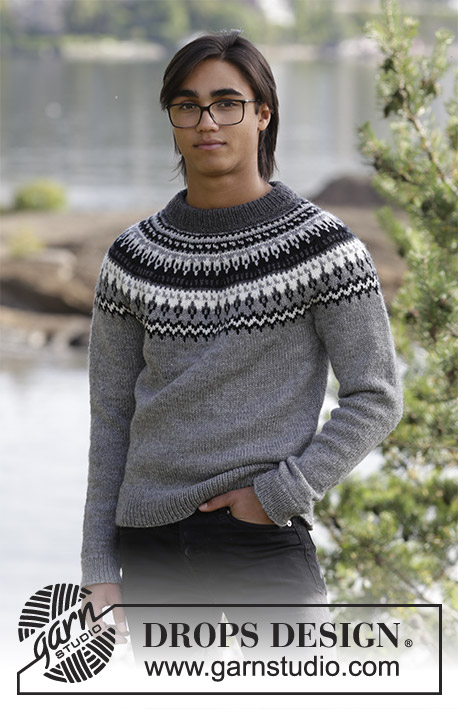
The set consists of: Men’s knitted jumper with raglan, round yoke and multi-coloured Nordic pattern and knitted hat with multi-coloured Nordic pattern. Sizes S - XXXL. The piece is worked in DROPS Karisma.
DROPS 185-1 |
|||||||||||||||||||
|
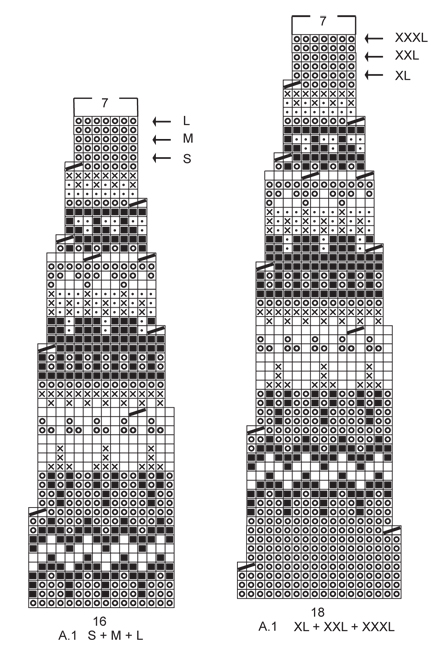
INFORMATION FOR THE PATTERN: RIDGE/GARTER STITCH (worked in the round): 1 ridge = 2 rounds. Knit 1 round and purl 1 round. INCREASE TIP (for sides of body and mid under sleeves): Start 1 stitch before the marker, make 1 yarn over, knit 2 (the marker sits in the middle of these 2 stitches), make 1 yarn over (= 2 stitches increased). On the next round knit the yarn overs twisted to avoid holes. DECREASE/INCREASE TIP: To work out how to decrease/increase evenly, count the total number of stitches on the needle (e.g. 230 stitches), and divide by the number of decreases/increase to be made (e.g. 46) = 5. In this example, when decreasing knit every 4th and 5th stitch together. If you are increasing, make 1 yarn over after every 5th stitch, on the next round knit the yarn overs twisted to avoid holes. RAGLAN: Decrease to raglan on each side of the marker in each transition between body and sleeves. Start 2 stitches before the marker, knit 2 together, marker sits here, slip 1 stitch as if to knit, knit 1, pass the slipped stitch over the knitted stitch (= 2 stitches decreased). PATTERN: Jumper: See diagram A.1. Choose diagram for your size. Hat: See diagram A.2. The diagrams show all the rows in the pattern seen from the right side. The whole pattern is worked in stocking stitch. KNITTING TIP: To avoid the knitting tension becoming tighter when working pattern with more than one colour, it is important that the strands at the back of the piece do not pull. You can increase a needle size when working pattern if this is a problem. ---------------------------------------------------------- JUMPER: The piece is worked in the round with circular needle, bottom up. The sleeves are worked in the round with double pointed needles. BODY: Cast on 230-252-270-300-332-362 stitches with circular needle size 3 mm and medium grey. Work rib (knit 1 / purl 1) for 7 cm. Knit 1 round where you decrease 46-50-50-60-70-72 stitches evenly on round – read DECREASE/INCREASE TIP = 184-202-220-240-262-290 stitches. Change to circular needle size 4 mm. Continue with stocking stitch. REMEMBER THE KNITTING TENSION! On the next round, insert 1 marker at the beginning of the round and 1 marker after 92-101-110-120-131-145 stitches (= in the sides). Now increase 1 stitch on each side of both markers – read INCREASE TIP (= 4 stitches increased on the round). Increase in each side every 22nd-23rd-24th-24th-28th-28th round a total of 4 times = 200-218-236-256-278-306 stitches. When the piece measures 35-36-37-37-39-40 cm, cast off 8-8-10-10-12-14 stitches in each side for the armholes (i.e. cast off 4-4-5-5-6-7 stitches on each side of both markers) = 92-101-108-118-127-139 stitches left on the front and back pieces. Lay the piece to one side and work sleeves. SLEEVE: Cast on 66-66-76-76-76-84 stitches with double pointed needles size 3 mm and medium grey. Work rib (knit 1 /purl 1) for 5 cm. Knit 1 round where you decrease 18-18-22-22-22-24 stitches evenly on round = 48-48-54-54-54-60 stitches. Insert 1 marker at the beginning of the round (= mid under sleeve). Change to double pointed needles size 4 mm and work stocking stitch in the round. When the piece measures 6-7-9-7-6-10 cm increase 2 stitches mid under the sleeve – read INCREASE TIP. Increase in this way every10th-8th-9th-8th-7th-6th round a total of 12-14-12-14-16-16 times = 72-76-78-82-86-92 stitches. When the piece measures 49-48-48-46-47-46 cm (NOTE: Shorter measurements in the larger sizes because of broader shoulder measurements), cast off the middle 8-8-10-10-12-14 stitches under the sleeve = 64-68-68-72-74-78 stitches left on the needle. Lay the piece to one side and work one more sleeve. YOKE: Place the sleeves on the same circular needle as the body where you cast off stitches for the armholes = 312-338-352-380-402-434 stitches on the needle. Insert 1 marker in each transition between body and sleeves (= 4 markers). Work stocking stitch with medium grey. AT THE SAME TIME on the first round decrease to RAGLAN – see description above (= 8 stitches decreased). Decrease in this way every 2nd round a total of 2-2-3-3-3-3 times = 296-322-328-356-378-410 stitches. After the last round of decreases, knit 1 round where you decrease 24-34-24-32-36-32 stitches evenly on round = 272-288-304-324-342-378 stitches left on needle. Continue by working pattern according to diagram A.1 (choose diagram for your size = 17-18-19-18-19-21 repeats on the round). Read KNITTING TIP! Continue pattern in this way and decrease as shown in the diagram. When A.1 has been completed (finish after a round marked with an arrow in the diagram for your size) there are 119-126-133-126-133-147 stitches left on the needle and the piece measures approx. 54-56-58-60-62-64 cm. Now you can work an elevation in the back of the neck or go straight to working neckline if you do not want an elevation. ELEVATION IN BACK OF NECK: For a better fit you can work an elevation in the back of the neck with dark grey. Insert 1 marker mid back of neck. Knit 14-15-16-15-16-18 stitches past the marker, turn, tighten strand and purl 28-30-32-30-32-36 stitches back. Turn and knit 42-45-48-45-48-54 stitches, turn, tighten strand and purl 56-60-64-60-64-72 stitches back. Turn and knit 70-75-80-75-80-90 stitches, turn, tighten strand and purl 84-90-96-90-96-108 stitches back. Turn, tighten strand and knit to mid back. NECKLINE: Knit 1 round with dark grey where you decrease 25-30-35-26-29-39 stitches evenly on round = 94-96-98-100-104-108 stitches around the neck. Change to short circular needle size 3 mm. Work 2 RIDGES – see description above, AT THE SAME TIME on the last round, increase 22-22-24-26-26-26 stitches evenly on round = 116-118-122-126-130-134 stitches. Continue working rib (knit 1 /purl 1). When the rib measures 8 cm work 1 ridge. Loosely cast off – Make sure the cast-off edge is not tight! Fold the collar double and fasten on the inside, ridge to ridge. ASSEMBLY: Sew the openings under the sleeves ---------------------------------------------------------- HAT: The hat is worked in the round with circular needle. Change to double pointed needles when necessary. Cast on 132-154 stitches with circular needle size 3 mm and dark grey. Work rib (knit 1 /purl 1) for 4 cm. Change to circular needle size 4 mm. Knit 1 round AT THE SAME TIME as you decrease 24-34 stitches evenly on round – read DECREASE/INCREASE TIP = 108-120 stitches. Work A.2 (= 9-10 repeats of 12 stitches) – read KNITTING TIP! REMEMBER THE KNITTING TENSION! When A.2 has been completed continue working with medium grey to finished length. When the piece measures 17-18 cm decrease 8-0 stitches evenly on round and at the same time insert 10 markers in the piece with 10-12 stitches between each marker = 100-120 stitches. On the next round decrease 1 stitch after each marker by knitting 2 stitches together (= 10 stitches decreased). Decrease in this way every 2nd round a total of 9-11 times = 10-10 stitches. On the next round knit all stitches together 2 and 2 = 5 stitches. Cut the strand, pull it through the remaining stitches and fasten well. The hat measures approx. 24-26 cm in height. |
|||||||||||||||||||
Diagram explanations |
|||||||||||||||||||
|
|||||||||||||||||||
 |
|||||||||||||||||||
 |
|||||||||||||||||||
Have you finished this pattern?Tag your pictures with #dropspattern #dalviksweater or submit them to the #dropsfan gallery. Do you need help with this pattern?You'll find 32 tutorial videos, a Comments/Questions area and more by visiting the pattern on garnstudio.com. © 1982-2026 DROPS Design A/S. We reserve all rights. This document, including all its sub-sections, has copyrights. Read more about what you can do with our patterns at the bottom of each pattern on our site. |
|||||||||||||||||||


With over 40 years in knitting and crochet design, DROPS Design offers one of the most extensive collections of free patterns on the internet - translated to 17 languages. As of today we count 324 catalogues and 12245 patterns translated into English (UK/cm). 12245
We work hard to bring you the best knitting and crochet have to offer, inspiration and advice as well as great quality yarns at incredible prices! Would you like to use our patterns for other than personal use? You can read what you are allowed to do in the Copyright text at the bottom of all our patterns. Happy crafting!
Post a comment to pattern DROPS 185-1
We would love to hear what you have to say about this pattern!
If you want to leave a question, please make sure you select the correct category in the form below, to speed up the answering process. Required fields are marked *.