
Popular categories
Looking for a yarn?


Comments / Questions (33)
![]() Michał wrote:
Michał wrote:
Przejrzysty układ informacje zapodane w sposób czytelny
28.08.2020 - 11:01
![]() Sorpon wrote:
Sorpon wrote:
Thank you so much for your help! I got it now ❣️💖👍
04.06.2020 - 05:58
![]() Sorpon wrote:
Sorpon wrote:
Thank you so much for your help! I got it now ❣️💖👍
04.06.2020 - 05:58
![]() Sorpon wrote:
Sorpon wrote:
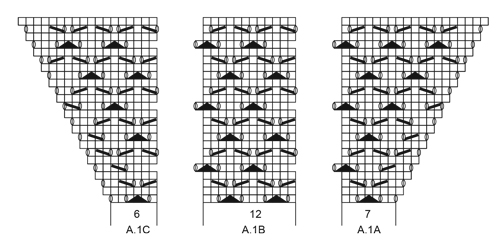
I am not sure how to read the diagram A.1A-A.1C. Does it start as Round 1, and next Purl row as Round 2, or is the Purl row considers part of Round 1? Which row is Round 2 and which one is Round 4 to do the increase? I casted on 122 sts, and increase 12sts = 134 sts. When I divided the body, K20 (half back), K1, 1yo, Work A.1A-A.1C (=25 sts right sleeve), K1,1yo, K40 (front), 1yo, k1, K20 (half other back), I only got 138 sts, with 4 sts left that is not inside the pattern giving me 142sts.
31.05.2020 - 11:52DROPS Design answered:
Dear Mrs Sorpon - read more about diagrams here - And work first round as follows (M):Knit 20 sts (= half back piece), 1 YO, K1, A.1A (= 7 sts + 1 inc = 8 sts), A.1B (= 12 sts), A.1C (= 6 sts + 1 inc = 7 sts) (= right sleeve), K1, YO, K40 sts(= front piece), YO, K1, A.1A, A.1B, A.1C (= left sleeve), K1, YO, K 20 sts (= half back piece). at the end of this round you will have: 20+1+1+ 8+12+7 + 1+1+40+1+1+ 8+12+7+ 1+1+20= 142 sts. You will increase with 1 yarn over in A.1A and increase with a YO as explained in text. Happy knitting!
02.06.2020 - 09:54
![]() Susanne wrote:
Susanne wrote:
Og hva menes med rapport ? Det står "For hver gang A.1A til A.1C er strikket en gang i høyden fortsettes det med 2 mer rapporter av A.1B mellom A.1A og A.1C." Hva må jeg gjøre her ?
25.03.2020 - 12:04DROPS Design answered:
Hej Susanne, du gentager mønsteret efter hver rapport, du strikker en mønsterrapport og starter forfra igen med denne mønsterrapport. God fornøjelse!
25.03.2020 - 13:29
![]() Susanne wrote:
Susanne wrote:
Hei, jeg hår nå strikket ferdig den første delen av oppskriften og sitter nå med 138 masker på rundpinnen, men nå står jeg bom fast. Jeg skjønner ikke hvordan jeg skal gå videre, og jeg skjønner ikke hva jeg skal følge, syns oppskriften er alt for rotete. Har strikket omg.2 i A.1A-A.1C med glattstrikk over alle maskene, skal jeg kun følge mønster til riktig maske antall, eller teksten for økning hver 2.omg. og hver 4.omg ? Hva er enkleste fremgangsmåte her nå ? Takk på forhånd.
25.03.2020 - 11:55DROPS Design answered:
Hei Susanne. Det økes forskjellig på bol og erme. Begge er forklaring i oppskriften, men økningene er også tegnet inn i diagrammene (A.1A og A.1C ). Skriv gjerne ned for deg selv når du gjøre økningene (både ved 2. og 4. omgang), slik at du får en bedre oversikt. God Fornøyelse!
30.03.2020 - 10:18
![]() Anx wrote:
Anx wrote:
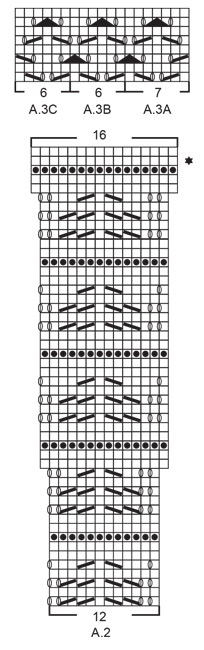
Dzień dobry, robie sukienkę w rozmiarze L. Po dodaniu 3 oczek w rzędzie z gwiazdką mam 357 oczek, a nie 355. I nie rozumiem jak robic schematy A3? Jesli robie A3a i A3b na przemian i na koncu A3c, tak jak w opisie, ( ilosc oczek w sumie 357) to w kolejnym okrazeniu nie zgadza mi się wzór. Zamiast 3 oczek razem w co drugim mam 4.
23.08.2019 - 20:02DROPS Design answered:
Witaj! Co do pierwszej części: Po przerobieniu schematu A.2 jest 352 o. (22 motywy po 16 o.), a po dodaniu 3 o. mamy razem 355 o. Jeśli schemat A.2 wychodził poprawnie, to musiała mieć miejsce jakaś pomyłka, ja w takim przypadku, albo cofam się do miejsca, gdzie ostatni raz miałam właściwą liczbę oczek i pruję (ale w przypadku ażuru nie polecam tej praktyki), albo po prostu zamykam 2 nadplanowe oczka i robię dalej. Co do schematu A.3: przerabiasz 1 raz schemat A.3a (7 o.), dalej 57 razy schemat A.3b i na końcu okrążenia 1 raz schemat A.3 c. Liczba oczek w schemacie A.3 po uwzględnieniu narzutów pozostaje cały czas taka sama czyli jest to 355 o. Powodzenia!
26.08.2019 - 08:55
![]() Magda wrote:
Magda wrote:
Jeszcze do poprzedniego pytania. Jeśli na przodzie i tyle dodałam oczka 23 razy, na rękawach wyszło mi 30 razy, a nie 28 jak w opisie.
11.08.2019 - 13:18DROPS Design answered:
Witaj Magdo! Na rękawach musisz zakończyć dodawanie oczek jak tylko dodasz je w sumie 28 razy (razem z pierwszym dodawaniem oczek z początku opisu), nawet jeśli będziesz jeszcze musiała dodawać oczka na tyle i przodzie. Miłej pracy!
12.08.2019 - 18:10
![]() Magda wrote:
Magda wrote:
Cześć, robię sukienkę w rozmiarze L. Przerobiłam karczek i rękawy. Na przodzie i tyle mam 90 oczek, tak jak w opisie, ale na rękawach mam 87 oczek ( w opisie jest 81). Co zrobiłam źle? Czy oczko między narzutami należy do rękawa?
11.08.2019 - 13:15DROPS Design answered:
Witaj Magdo! Oczka dodawane na reglan na rękawach są uwzględnione w schematach A1A i A1C. W rozmiarze L, co 2 okrążenia powinnaś dodać (nie musisz o tym specjalnie myśleć, są to po prostu te 2 skrajne narzuty w tych schematach) 2 o. na każdy rękaw w sumie 28 razy. Jeżeli początkowo rękaw miał 25 o. to plus (28x2 o.)= 25+56=81 o. na każdy rękaw. Oczko między narzutami należy do przodu/tyłu. Powodzenia!
12.08.2019 - 18:08
![]() Lisbeth Nielsen wrote:
Lisbeth Nielsen wrote:
Der er fejl i diagram A2. Omgang 29 og 30 skal ikke være der. Har strikket modellen flere gange og har selv undladt disse, men kan se at der stadig er denne fejl. Med venlig hilsen Lisbeth Nielsen
25.03.2019 - 14:08
|
||||||||||||||||||||||
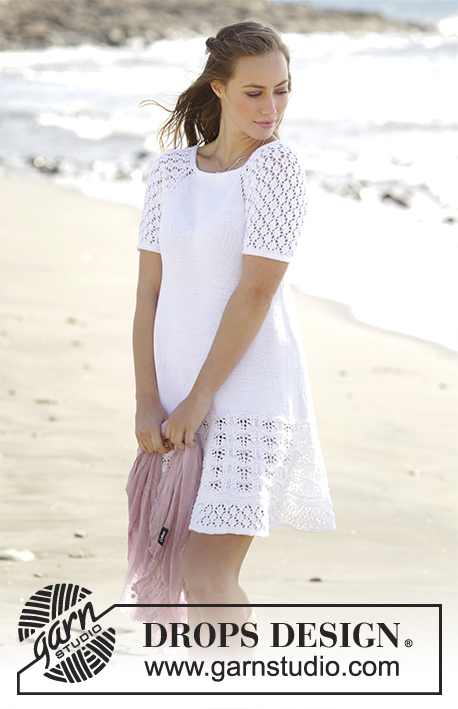
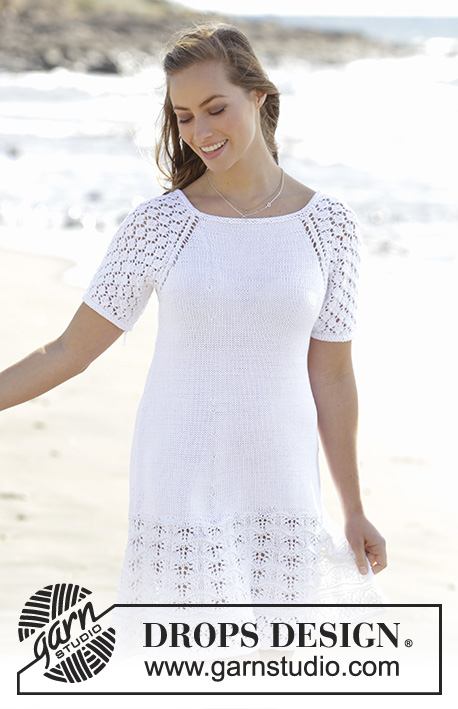
Spanish Sonata#spanishsonatadress |
||||||||||||||||||||||
 |
 |
|||||||||||||||||||||
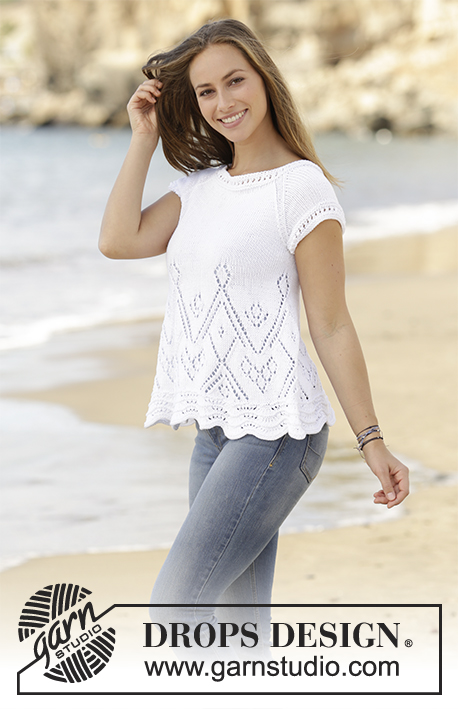
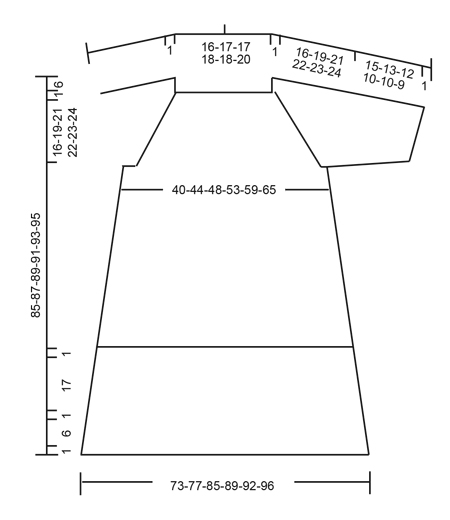
Dress with raglan, A-shape and lace pattern, worked top down in Muskat. Sizes S - XXXL.
DROPS 178-47 |
||||||||||||||||||||||
|
RIDGE/GARTER STITCH (worked in the round): 1 ridge = 2 rounds. Knit 1 round and purl 1 round. PATTERN: See diagrams A.1 to A.3. INCREASE TIP-2: Work as far as 2 stitches before the marker thread in the side, 1 yarn over, knit 4 stitches (the marker sits in the middle of these stitches), 1 yarn over. Repeat in the other side (= 4 stitches increased on the round). On the next round knit the yarn overs twisted to prevent holes. INCREASE TIP-1 (evenly spaced): To work out how to increase evenly along the round, count the total number of stitches on the needle (e.g. 122 stitches) and divide the stitches by the number of increases to be made (e.g. 12) = 10.1. In this example, increase after approx. every 10th stitch. RAGLAN: INCREASE EVERY 2ND ROUND: Increase to raglan on each side of A.1 in each transition between body and sleeves as follows: Start 1 stitch before A.1A, make 1 yarn over, knit 1, work A.1A-A.1C (there are 2 stitches increased to raglan in the diagrams), knit 1, make 1 yarn over. On the next round knit the yarn overs so that there are holes. INCREASE EVERY 4TH ROUND: ROUND 1: Start 1 stitch before A.1A: 1 yarn over, knit 1, work A.1a-A.1c, knit 1, 1 yarn over. Repeat before and after the next A.1a-A.1c. ROUND 2: Knit the yarn overs so that there are holes. ROUND 3: Start 2 stitches before A.1A: Knit 2 stitches together, 1 yarn over, knit 1, work A.1A-A.1C, knit 1, 1 yarn over, slip 1 stitch as if to knit, knit 1, pass the slipped stitch over the knitted stitch – no increase in stitches, but the row of holes is continued as before. Repeat before and after the next A.1A-A.1C. ROUND 4: Knit the yarn overs, there will be holes. DECREASE TIP (for the sleeve): Decrease 2 stitches as follows: Work until there are 4 stitches left before the marker, knit 3 stitches together (= 2 stitches decreased), knit 2 (the marker thread sits in the middle of these stitches), knit 3 stitches twisted together (= 2 stitches decreased). Decrease 1 stitch as follows: Work until there are 3 stitches left before the marker thread, knit 2 stitches together (= 1 stitch decreased), knit 2 (the marker thread sits in the middle of these stitches), slip 1 stitch as if to knit, knit 1, pass the slipped stitch over (= 1 stitch decreased). ---------------------------------------------------------- DRESS: The piece is worked in the round with circular needle from mid back, top down. Cast on 118-122-122-126-126-134 stitches with circular needle size 3,5 mm and Muskat. Work 2 RIDGES – see description above, on the next to last round of the ridges increase 12-12-16-16-20-24 stitches evenly along the round – READ INCREASE TIP-1 (evenly spaced) = 130-134-138-142-146-158 stitches. Change to circular needles 4 mm and work pattern as follows: Knit 19-20-21-22-23-26 stitches (= half the back piece), 1 yarn over, knit 1, A.1A (= 7 stitches), A.1B (= 12 stitches), A.1C (= 6 stitches) (= right sleeve), knit 1, 1 yarn over, knit 38-40-42-44-46-52 stitches (= front piece), 1 yarn over, knit 1, A.1A, A.1B, A.1C (= left sleeve), knit 1, 1 yarn over, knit 19-20-21-22-23-26 stitches (= half the back piece). The first increase to RAGLAN – see description above, is now finished = 138-142-146-150-154-166 stitches. From now onwards, the increases on the body and sleeves are different. On the body, you increase every 2nd round a total of 14-16-17-25-32-34 times and then every 4th round 4-5-6-3-0-0 times. On the sleeve, you increase every 2nd round (the increases are shown in diagram A.1) 21-25-28-30-32-34 times. Each time you have completed A.1A to A.1C once in height, continue with 2 more repeats of A.1B between A.1A and A.1C. When you have increased a total of 21-25-28-30-32-34 times on the sleeves and 18-21-23-28-32-34 times on the front and back pieces, there will be 67-75-81-85-89-93 stitches on each sleeve, 76-84-90-102-112-122 stitches on the front and back pieces = 286-318-342-374-402-430 stitches in total. The yoke should now measure 17-20-22-23-24-25 cm from the neckline mid front and down. If the measurements are not correct, you need to continue with pattern on the sleeves and stocking stitch on the front and back pieces until you get the right length. The next round is worked as follows: Knit 38-42-45-51-56-61 stitches (= half the back piece), place the next 67-75-81-85-89-93 stitches on a thread (= sleeve), cast on 8-8-10-10-12-14 new stitches under the sleeve, knit the next 76-84-90-102-112-122 stitches (= front piece), place the next 67-75-81-85-89-93 stitches on a thread (= sleeve), cast on 8-8-10-10-12-14 new stitches under the sleeve, knit the last 38-42-45-51-56-61 stitches (= half the back piece). BODY: There are now 168-184-200-224-248-272 stitches on the body. Continue with stocking stitch. Insert a marker thread in each side, in the middle of the 8-8-10-10-12-14 new stitches which were cast on under the sleeves. THE PIECE IS NOW MEASURED FROM HERE! When the piece measures 3 cm increase 1 stitch on each side of each marker thread – READ INCREASE TIP-2! Increase in this way approx. every 6th-7th-6th-7th-10th-15th round, 15-14-16-13-10-7 times = 228-240-264-276-288-300 stitches. Continue with stocking stitch until the piece measures 36-35-35-36-37-38 cm. Now work 2 ridges. Then work pattern as follows: Work according to diagram A.2 (= 19-20-22-23-24-25 repeats of 12 stitches on the first round). On the next to last round of A.2 (the round with the star) increase 3-5-3-5-1-3 stitches evenly along the round = 307-325-355-373-385-403 stitches on the round. Work 2 ridges. Now work pattern as follows: Work A.3A (= 7 stitches), A.3B (= 6 stitches) until there are 6 stitches left on the round, A.3C (= 6 stitches). When you have completed the whole of diagrams A.3a to A.3c in height, work the repeat one more time in height. Change to circular needle size 3.5 mm. Work 2 ridges. Change back to circular needle size 4 mm and cast off in knit. SLEEVES: Place the stitches from the thread back on double pointed needles size 4 mm and knit up 1 stitch in each of the 8-8-10-10-12-14 stitches which were cast on under the sleeve = 75-83-91-95-101-107 stitches. Insert 1 marker thread in the middle of the new stitches = mid under the sleeve. Continue with A.1B, the stitches which do not fit the pattern mid under the sleeve are worked in stocking stitch. Continue with this pattern. When the piece measures 3 cm start decreasing under the sleeve – READ DECREASE TIP. Decrease 2 stitches on each side of the marker thread, every 2nd round 0-0-0-4-5-6 times and 1 stitch on each side of the marker thread every 5th-3rd-2nd-2nd-2nd-2nd round 7-10-13-5-4-3 times = 61-63-65-69-73-77 stitches. The stitches that do not fit the pattern under the sleeve are worked in stocking stitch. When the piece measures 15-13-12-10-10-9 cm (shorter measurements in the larger sizes due to wider shoulder measurements and longer sleeve cap) change to double pointed needles size 3.5 mm. Work 2 ridges. Change back to double pointed needles size 4 mm and cast off in knit. Work the other sleeve in the same way. |
||||||||||||||||||||||
Diagram explanations |
||||||||||||||||||||||
|
||||||||||||||||||||||
 |
||||||||||||||||||||||
 |
||||||||||||||||||||||
 |
||||||||||||||||||||||
Have you finished this pattern?Tag your pictures with #dropspattern #spanishsonatadress or submit them to the #dropsfan gallery. Do you need help with this pattern?You'll find 26 tutorial videos, a Comments/Questions area and more by visiting the pattern on garnstudio.com. © 1982-2026 DROPS Design A/S. We reserve all rights. This document, including all its sub-sections, has copyrights. Read more about what you can do with our patterns at the bottom of each pattern on our site. |
||||||||||||||||||||||


With over 40 years in knitting and crochet design, DROPS Design offers one of the most extensive collections of free patterns on the internet - translated to 17 languages. As of today we count 324 catalogues and 12245 patterns translated into English (UK/cm). 12245
We work hard to bring you the best knitting and crochet have to offer, inspiration and advice as well as great quality yarns at incredible prices! Would you like to use our patterns for other than personal use? You can read what you are allowed to do in the Copyright text at the bottom of all our patterns. Happy crafting!
Post a comment to pattern DROPS 178-47
We would love to hear what you have to say about this pattern!
If you want to leave a question, please make sure you select the correct category in the form below, to speed up the answering process. Required fields are marked *.