
Popular categories
Looking for a yarn?


Comments / Questions (239)
![]() JANET PURCELL wrote:
JANET PURCELL wrote:
Shaping shawl collar left side do I Increase on next to last stitch at end of the row on right side of band every other row 18 times, the decrease after doe this include also 1 stitch from band and 1 stitch from mid front ?
24.02.2018 - 16:26DROPS Design answered:
Dear Janet, the increases for the shawl collar should be done at the edge, next to the endge stitch (one but last stitch). The decreases to shape the V neck should be done inside the garter stitch band/collar, in other words, the firts two stitches after the collar / band on the left side and the last two stitches before the band/ collar on teh right side. I hope this helps. Happy Knitting!
24.02.2018 - 23:21
![]() Lucy Schouten wrote:
Lucy Schouten wrote:
Beste mensen,Mouw:'Kant TEGELIJKERTIJD af aan het begin van elke nld.1 keer 3 st. 1 keer 2 st. en 2 keer 1 st.' Is het de bedoeling dat ik aan beide kanten van de mouw afkant. dus 1 keer 3 st. aan het begin, als ik dan weer terug ga weer 1 keer 3 st. lks en rts hetzelfde afkant. Zo moet ik dat ook doen voor 1 keer 2 en 2 keer 1 st.? Daarna staat in stukje (dat is dan ook mijn verwarring) kant 2 st af aan ELKE kant van het werk. Ook zowel links als rechts? Ik wacht af, gr Lucy Schouten
23.02.2018 - 12:04DROPS Design answered:
Hoi Lucy, Ja, dat klopt helemaal. Je kant aan beide kanten af, dus aan het begin van de heengaande naald en aan het begin van de teruggaande naald. Als er 2 keer 2 steken staat, betekent dat dus dat je 2 keer aan beide kanten 2 steken afkant (in totaal dus 8 steken)
23.02.2018 - 16:00
![]() Hélène wrote:
Hélène wrote:
Bonjour, pour les manches, comment doit-on tricoter la maille avec le marqueur au milieu sous la manche ?
12.02.2018 - 15:33DROPS Design answered:
Bonjour Hélène, la maille au milieu sous la manche se tricote au point mousse (comme la dernière m de A.3A et la 1ère m de A.3C). Bon tricot!
12.02.2018 - 17:13
![]() A.Zwaan wrote:
A.Zwaan wrote:
Goedendag, ik heb een vraag over de Tip voor het meerderen-1: Bij welke steek moet ik meerderen? Is dat de 9de steek vanaf het begin van de naald?
02.02.2018 - 11:12DROPS Design answered:
Hallo A. Zwaan, Je meerdert de steek vlak naast de sjaalkraag, dus de 1e steek vlak naast de steken in ribbelsteek. (Ik heb de omschrijving bij 'tip voor het meerderen-1' een beetje aangepast, zodat het wat duidelijker is.)
06.02.2018 - 15:09
![]() Hélène wrote:
Hélène wrote:
Bonjour, après avoir rabattu les 33 mailles pour l'épaule, je dois "tricoter ces mailles en allers et retours au point mousse ainsi : 1 côte mousse sur toutes les mailles puis une côte mousse sur les 18 premières mailles". Si j'ai bien compris, ce sont des rangs raccourcis ?
01.02.2018 - 11:50DROPS Design answered:
Bonjour Hélène, tout à fait, on tricote les mailles du col en rangs raccourcis pour qu'il soit plus large à l'extérieur et se retourne comme il faut. Bon tricot!
01.02.2018 - 12:09
![]() Alma COELHO wrote:
Alma COELHO wrote:
Bonjour et merci de vos explications, réponse rapide et claire ;-)bonne journée à vous
15.01.2018 - 10:27
![]() Alma COELHO wrote:
Alma COELHO wrote:
Bonjour, je suis je cale dans le montage du col. Je ne comprends pas bien comment le coudre au dos, je me demande si j'ai bien compris les explications. Merci de votre aide
12.01.2018 - 22:33DROPS Design answered:
Bonjour Mme Coelho, assemblez d'abord entre elles les mailles du col (devant gauche + devant droit). Puis, vous allez coudre les côtés du col (début/fin de rangs du côté le plus étroit du col) le long de l'encolure dos (la couture des 2 cols entre eux doit arriver au milieu de l'encolure dos). Bon assemblage!
15.01.2018 - 08:46
![]() Gunhild Laukvik wrote:
Gunhild Laukvik wrote:
Mønster 174-1 M. Det passer ikke med 13 rapporter a 7, til midt bak på str. M. Ettr å ha strikket 13 rapporter, er det 20 igjen. Det er surt å rekke opp, og begynne å telle omigjen. Har dere et rett antall rapporter å gi meg. 13x7 x 2+ 7 midt bak + 10 til kant blir 209, og jeg skal legge opp 271.
05.01.2018 - 16:10DROPS Design answered:
Hei Gunhild. Ser ut som du har glemt A.1A og A.2A + 3 masker rett før de 7 vrange midt maskene, de 3 rett maklene før A.2A (= 62 glemte masker). Slik står det i oppskriften: 10 stolpe-m i RILLE, A.1A (= 28 m), * 3 rett, 4 vrang *, gjenta fra *-* totalt 13-ganger, 3 rett, 7 vrang (= midt bak), * 3 rett, 4 vrang *, gjenta fra *-* totalt 13 ganger, 3 rett, A.2A (= 28 m) og 10 stolpe-m i rille = 271 masker (10+28+91+3+7+91+3+28+10= 271 masker). God Fornøyelse!
10.01.2018 - 09:44
![]() Bente Bøme wrote:
Bente Bøme wrote:
Maskeantal til str L i model 174-1 er ulige (299) Dette går ikke op med rapporterne i ribkanten. Har prøvet at tælle m sammen, fx 15x7+10 (ryg),+15x7 + 2 gange kantm. Dette får jeg til 260 m. Hvad gør jeg forkert?
24.12.2017 - 12:40DROPS Design answered:
Hej Bente, jo hvis du følger opskriften nøjagtig som vi skriver, så ser du at du har 7 vrang midt bagpå, så maskeantallet skal stemme. God fornøjelse!
02.01.2018 - 11:38Emmanouela Evaggelatou wrote:
Hello, PLEASE explain me how i work the inc sts (sleeves) in the pattern A3. And wich pattern is this? A3A , A3B, A3C ? How i count with the new sts without changing the line of purl sts ? thank you!
19.12.2017 - 19:36DROPS Design answered:
Dear Mrs Evaggelatou, you increase on each side of the st in garter st middle under arm and work the sts following diagram so that you have always pattern working in the round with (K5, 1 st in garter st) on either side of the st with marker. Happy knitting!
20.12.2017 - 09:15
|
|||||||||||||||||||
Jackson#jacksoncardigan |
|||||||||||||||||||
 |
 |
||||||||||||||||||
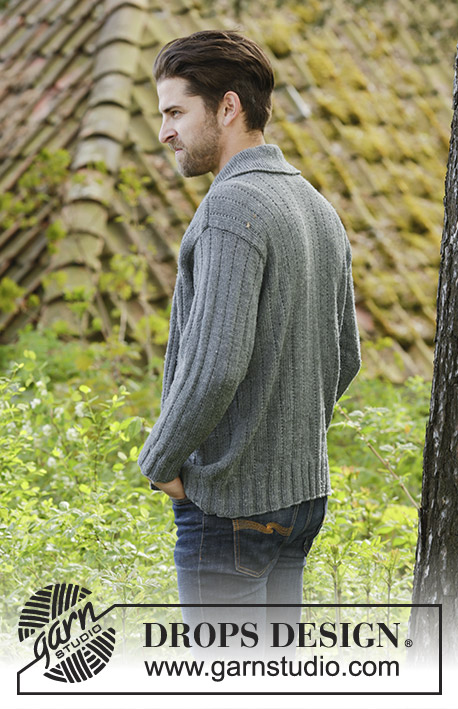
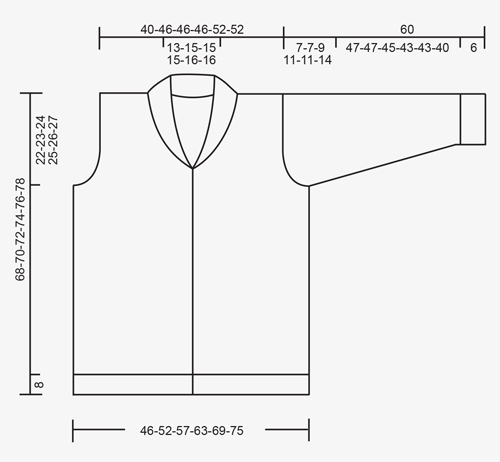
Knitted DROPS men’s jacket with simple cable, textured pattern and shawl collar in Karisma. Size: XS - XXXL.
DROPS 174-1 |
|||||||||||||||||||
|
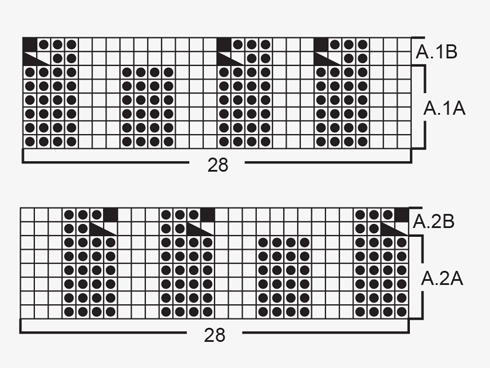
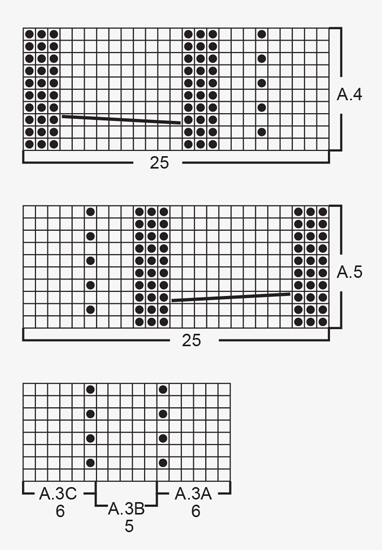
GARTER ST (back and forth): K all rows. 1 ridge = 2 rows K. PATTERN: See diagrams A.1 to A.5. The diagrams show all rows in pattern seen from RS. KNITTING TIP (applies to bands): To keep the bands from contracting vertically work short rows over bands as follows: * Beg mid front and K the outermost 10 sts (= band), turn piece, slip 1st st as if to K, tighten yarn and K the rest of row *, repeat from *-* after approx. every 10 rows in piece. INCREASE TIP-1 (applies to shawl collar): Inc 1 st in next to last st towards mid front by K in front and back loop of same st. INCREASE TIP-2 (applies to mid under sleeve): Inc 1 st on each side of st with marker mid under sleeve. Inc 1 st by making 1 YO, on next round work YO twisted to avoid holes. Work the inc sts in the pattern A.3. DECREASE TIP (applies to neckline): Dec inside 10 band sts in garter st + inc sts for shawl collar. All dec are done from RS! Dec as follows before band + collar: K 2 tog. Dec as follows after collar + band: Slip 1 st as if to K, K 1, psso. BUTTONHOLES: Dec for buttonholes from RS on left band (when garment is worn). 1 buttonhole = work 6 band sts as before, slip next to last st on right needle over outermost st on right needle, K 1, slip next to last st on right needle over outermost st on right needle (2 sts cast off), K the last 3 sts. On next row cast on 2 new sts over the cast off sts. Dec for buttonholes when piece measures: SIZE XS/S: 2, 12, 21, 31, 40 and 50 cm. SIZE M: 2, 12, 21, 31, 41 and 51 cm. Size L: 2, 12, 22, 32, 42 and 52 cm. SIZE XL: 3, 13, 23, 33, 43 and 53 cm. Size XXL: 3, 13, 23, 33, 43 and 54 cm. SIZE XXXL: 3, 13, 24, 34, 45 and 55 cm. ---------------------------------------------------------- JACKET: Worked back and forth on circular needle from mid front. BODY: Cast on 243-271-299-327-355-383 sts (incl 10 band sts in each side towards mid front) on circular needle size 3 mm with Karisma. P 1 row from WS. Work next row as follows from RS: 10 band sts in GARTER ST – see explanation above, A.1A (= 28 sts), * K 3, P 4 *, repeat from *-* 11-13-15-17-19-21 times in total, K 3, P 7 (= mid back), * K 3, P 4 *, repeat from *-* 11-13-15-17-19-21 times in total, K 3, A.2A (= 28 sts) and 10 band sts in garter st. Work back from WS with garter st over garter st, P over P, K over K. Continue rib until piece measures 8 cm, remember BUTTONHOLES on left band – see explanation above and KNITTING TIP. Work next row as follows from RS: 10 band sts as before, A.1B (= 28 sts dec to 25 sts), * K 3, P 2, P 2 tog *, repeat from *-* 11-13-15-17-19-21 times in total, K 3, P 2 tog, P 3, P 2 tog, * K 3, P 2, P 2 tog *, repeat from *-* 11-13-15-17-19-21 times in total, K 3, A.2B (= 28 sts dec to 25 sts) and 10 band sts as before = 213-237-261-285-309-333 sts. Work back from WS with garter st over garter st, P over P, K over K, (work A.1B and A.2B as shown in diagram). Switch to circular needle size 4 mm and work next row from RS as follows: 10 band sts as before, A.4 (= 25 sts), work A.3A over the next 72-84-96-108-120-132 sts (= 12-14-16-18-20-22 repetitions of 6 sts), work A.3B (= 5 sts), work A.3C over the next 66-78-90-102-114-126 sts (= 11-13-15-17-19-21 repetitions of 6 sts), work A.5 (= 25 sts) and finish with 10 band sts as before. Insert 1 marker in the 59th-65th-71st-77th-83rd-89th st in from each side (markers are in a st in garter st in the sides on body). Continue the pattern like this and move the markers upwards when working. REMEMBER THE KNITTING TENSION When piece measures 46-47-48-49-50-51 cm, cast off 7 sts in each side for armholes (i.e. cast off st with marker + 3 sts on each side of this). Then finish front and back piece separately. BACK PIECE: = 89-101-113-125-137-149 sts. Continue A.3 on back piece as before and cast off for armholes at beg of every row in each side as follows: Cast off 2 sts 0-0-2-5-5-7 times and 1 st 2-2-4-4-4-6 times = 85-97-97-97-109-109 sts. Continue to work until piece measures 66-68-70-72-74-76 cm. Now cast off the middle 23-27-27-27-29-29 sts for neck and finish each shoulder separately. Cast off 2 st on next row from neck = 29-33-33-33-38-38 sts remain on the shoulder. Continue to work until piece measures 68-70-72-74-76-78 cm and loosely cast off. Repeat on the other shoulder. LEFT FRONT PIECE: = 55-61-67-73-79-85 sts. Continue the pattern as before and cast off for armhole at beg of every row from the side as on back piece. AT THE SAME TIME when 2 rows have been worked after last buttonhole on band work 1 ridge (i.e. 2 rows K) over only the outermost 10 band sts towards mid front (do not work the other sts on row). Then work over all sts on row as before. AT THE SAME TIME inc 1 st for shawl collar towards mid front – READ INCREASE TIP-1. Inc like this every other row 18-18-18-20-20-20 times in total. AT THE SAME TIME when piece measures 52-53-54-55-56-57 cm (2 cm should now be worked after last buttonhole), dec 1 st for neckline towards mid front - READ DECREASE TIP. Dec like this every other row (i.e. every row from RS) a total of 10-12-12-12-13-13 times and then every 4th row (i.e. every other row from RS) 4 times in total in all sizes. After all inc and dec, there are 57-61-61-63-68-68 sts on needle. When piece measures 68-70-72-74-76-78 cm, cast off the outermost 29-33-33-33-38-38 sts on shoulder = 28-28-28-30-30-30 sts remain for collar. Continue back and forth in garter st over these sts as follows: * 1 ridge over all sts, 1 ridge over only the outermost 18-18-18-20-20-20 sts *, repeat from *-* until collar measures approx. 9-9-9-10-10-10 cm inside on the most narrow (collar measures approx. 18-18-18-20-20-20 cm at the edge on the widest). Cast off. RIGHT FRONT PIECE: Work as left but reversed. NOTE: Do not dec for buttonholes on right band. When working 1 ridge over only the outermost 10 sts towards mid front, adjust according to left front piece. SLEEVE: Cast on 56-56-63-63-63-70 sts on double pointed needles size 3 mm with Karisma. K 1 round. Work next round as follows: * K 3, P 4 *, repeat from *-* the entire round. When piece measures 6 cm, work next round as follows: * K 3, P 2, P 2 tog *, repeat from *-* the entire round = 48-48-54-54-54-60 sts. Switch to double pointed needles size 4 mm and work pattern in the round according to diagram A.3A. Insert 1 marker in last st on round (i.e. in st in garter st = mid under sleeve) and move the marker upwards. When piece measures 8 cm, inc 2 sts mid under sleeve - READ INCREASE TIP-2. Inc a total of 18-20-20-22-25-25 times in Size S: On every 7th round, in size M + L: On every 6th round, in size XL: On every 5th round, in size XXL: Alternately on every 4th and 5th round and size XXXL: On every 4th round = 84-88-94-98-104-110 sts. When piece measures 53-53-51-49-49-46 cm (NOTE: Shorter measurements in the larger sizes because of longer sleeve cap and wider shoulders) cast off the middle 7 sts under sleeve (cast off st with marker + 3 sts on each side of this). Now work sleeve cap back and forth on circular needle. Continue with the pattern while AT THE SAME TIME casting off at beg of every row in each side as follows: Cast off 3 sts 1 time, 2 sts 1-1-2-3-3-4 time and 1 st 2-2-3-3-3-6 times. Continue to cast off 2 sts in each side of piece until piece measures 59 cm in all sizes, cast off 3 sts 1 time in each side and cast off the remaining sts. Sleeve measures approx. 60 cm in all sizes. Knit another sleeve the same way. ASSEMBLY: Sew the shoulder seams. Sew collar tog mid back (make sure that seam is not visible when collar is folded down). Sew collar to neckline in the back of neck. Sew in sleeves. Sew the buttons on to the right band. |
|||||||||||||||||||
Diagram explanations |
|||||||||||||||||||
|
|||||||||||||||||||
 |
|||||||||||||||||||
 |
|||||||||||||||||||
 |
|||||||||||||||||||
Have you finished this pattern?Tag your pictures with #dropspattern #jacksoncardigan or submit them to the #dropsfan gallery. Do you need help with this pattern?You'll find 26 tutorial videos, a Comments/Questions area and more by visiting the pattern on garnstudio.com. © 1982-2026 DROPS Design A/S. We reserve all rights. This document, including all its sub-sections, has copyrights. Read more about what you can do with our patterns at the bottom of each pattern on our site. |
|||||||||||||||||||


With over 40 years in knitting and crochet design, DROPS Design offers one of the most extensive collections of free patterns on the internet - translated to 17 languages. As of today we count 324 catalogues and 12245 patterns translated into English (UK/cm). 12245
We work hard to bring you the best knitting and crochet have to offer, inspiration and advice as well as great quality yarns at incredible prices! Would you like to use our patterns for other than personal use? You can read what you are allowed to do in the Copyright text at the bottom of all our patterns. Happy crafting!
Post a comment to pattern DROPS 174-1
We would love to hear what you have to say about this pattern!
If you want to leave a question, please make sure you select the correct category in the form below, to speed up the answering process. Required fields are marked *.