
Popular categories
Looking for a yarn?


Comments / Questions (239)
![]() DEVAUCHELLE wrote:
DEVAUCHELLE wrote:
Tout d'abord merci de vos réponses claires et rapides. Je bloque au niveau des rangs raccourcis, je ne comprends pas comment faire, car si on tricote d'abord 10 mailles, le raccourci se fait donc sur la première maille du premier diagramme du début de rang. Y at'il une vidéo qui pourrait aussi m'éclairer? merci d'avance
31.05.2019 - 09:55DROPS Design answered:
Bonjour Mme Devauchelle, vous tricotez les rangs raccourcis sur les mailles des bordures des devants seulement: *tricotez les 10 premières m du rang (= celles de la bordure devant), tournez, glissez la 1ère de ces 10 m en serrant un peu le fil pour éviter un trou, tricotez les 9 m suivantes, tournez, tricotez 1 rang comme avant sur toutes les mailles*, tournez, et répétez encore 1 fois de *-* pour faire les rangs raccourcis sur la bordure de l'autre devant. Bon tricot!
31.05.2019 - 10:06
![]() Myriam DEVAUCHELLE wrote:
Myriam DEVAUCHELLE wrote:
Si j'ai bien compris les 8 cm de côtes se font avec les diagrammes AA1 et AA2. au retour, je suis le diagramme comme indiqué, mais pour les autres mailles, faut il les tricoter comme elles viennent ? merci d'avance
30.05.2019 - 17:32DROPS Design answered:
Bonjour Myriam! Les 10 mailles de chaque cote (bordures devant) sont troicotees au point mousse (tous les rangs à l'endroit), les A.1A et A.2A sont tricotees selon les diagrammes et les autres mailles comme elles se presentent. Bon tricot!
30.05.2019 - 18:15
![]() Myriam DEVAUCHELLE wrote:
Myriam DEVAUCHELLE wrote:
Quand dans le diagramme vous écrivez, "pas de maille, sauter cette maille, est ce à dire que l'on tricote 2 mailles ensemble ou que l'on glisse cette maille sans la tricoter. je commence ce modèle. Merci d'avance
28.05.2019 - 09:58DROPS Design answered:
Bonjour Mme Devauchelle, la maille en noir est une maille qui n'existe plus sur ce rang car elle a été diminuée au rang précédent, par ex au 1er rang de A.1B, on tricote au début: 3 m end, 2 m env, 2 m ens à l'env, etc.. au rang suivant, on va tricoter: 3 m end, 3 m env (la 4ème m env a été diminuée au rang précédent), ainsi, il reste par ex 25 m dans A.1B (au lieu des 28 dans A.1A). Bon tricot!
28.05.2019 - 10:09
![]() Marn-Anne Brattgjerd wrote:
Marn-Anne Brattgjerd wrote:
Hei. Jeg holder på med denne jakken, str L. Har kommet til Bolen og skiftet til pinne 4. Så står det 96 m og 16 rapporter? Skal ikke det være 15? Det står 15 rapporter på vrborden.? Får det ikke til å stemme med 16, da må de 5 m bak forskyves?
09.01.2019 - 00:43DROPS Design answered:
Hei Marn-Anne. Du strikker A.3a over 96 masker. A.3a går over 6 masker. 96 / 6 = 16. Du må derfor strikke 16 rapporter av A.3a for å srtikke over 96 masker. God fornøyelse.
15.01.2019 - 14:02
![]() Elsebeth Hjort-Hansen wrote:
Elsebeth Hjort-Hansen wrote:
Hvad er brystmål i str L og XL
05.01.2019 - 14:18DROPS Design answered:
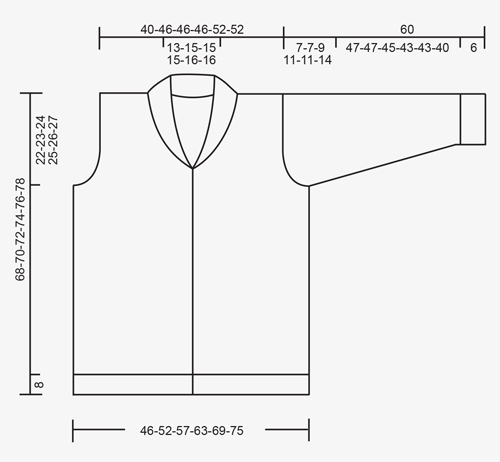
Hei Elsebeth. Nederst på siden finner du en målskisse med alle plaggets mål i de forskjellige størrelsene. De nederste målene, under jakken = brystvidden. L: 57 og XL: 63. God fornøyelse.
07.01.2019 - 09:18
![]() Monique wrote:
Monique wrote:
Diagramme a.3a pour la manche est-ce-que je fais seulement les 6 premières mailles et je continue comme avant en suivant 3 end 3 envers merci ou si je fais tout le rang avec les 6 mailles
11.11.2018 - 12:56DROPS Design answered:
Bonjour Monique, vous répétez A.3A en largeur et en hauteur, soit au 1er tour: 6 m end, au 2ème tour: 5 m end, 1 m env. Bon tricot!
12.11.2018 - 10:08
![]() GIDEL wrote:
GIDEL wrote:
Bonjour, j'en suis au col après diminutions augmentations du devant. Mais de quel côté (épaules ou encolure) dois-je faire les "18 premières mailles" "Il reste 28-28-28-30-30-30 m pour le col. Tricoter ces mailles en allers et retours au point mousse ainsi: *1 côte mousse sur toutes les mailles, 1 côte mousse les 18 premières mailles"
26.10.2018 - 11:33DROPS Design answered:
Bonjour Mme Gidel, les rangs raccourcis commencent côté encolure: pour le devant gauche, après avoir rabattu les mailles de l'épaule, tricotez les mailles restantes du rang (= col). Tournez et commencez les rangs raccourcis sur l'envers (= 2 rangs sur toutes les mailles, 2 rangs sur les 18 premières mailles). Bon tricot!
26.10.2018 - 13:08
![]() Charlotte Kristiansen wrote:
Charlotte Kristiansen wrote:
Hej - jeg strikker modellen i str L Når man har lavet 12 indtag på forstykkerne, skal man tage yderligere 4 m ind på hver 4 p, mennu er indtagningerne inde i snoningsmaskerne, hvad gør man så med snoningerne?
03.10.2018 - 09:52DROPS Design answered:
Hej Charlotte, de masker som du ikke kan få til at gå op i snoningen når du tager ind, strikker du som tidligere, det vil sige ret over ret og vrang over vrang. God fornøjelse!
03.10.2018 - 15:55
![]() Cartier wrote:
Cartier wrote:
Merci beaucoup de votre aide !
12.09.2018 - 14:09
![]() Cartier wrote:
Cartier wrote:
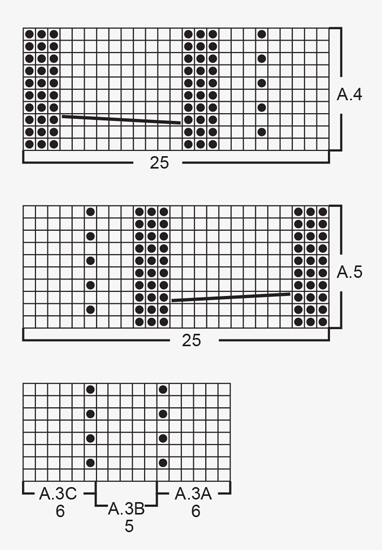
Bonjour, Sur les plans A4 et A5, je vois bien qu'il faut mettre 10 maills de côté pour les torsades, mais je ne comprends pas à quel moment on les tricotes; Combien faut-il tricoter de mailles avant de reprendre les 10 de la torsade ? Merci !
10.09.2018 - 17:13DROPS Design answered:
Bonjour Mme Cartier, les torsades de A.4 et A.5 se tricotent au 3ème rang des diagrammes - les diagrammes se lisent de droite à gauche sur l'endroit (et de gauche à droite sur l'envers). Dans A.4, tricotez 9 m end, 3 m env, puis faites la torsade: glissez les 5 premières m suivantes devant l'ouvrage, tricotez les 5 m suivantes et tricotez les 5 m en attente (= 5ème symbole), terminez par 3 m env. Dans A.5, tricotez 3 m env, glissez les 5 m suivantes derrière l'ouvrage, tricotez les 5 m suivantes et tricotez les 5 m en attente, terminez le diagramme comme indiqué. Bon tricot!
11.09.2018 - 09:01
|
|||||||||||||||||||
Jackson#jacksoncardigan |
|||||||||||||||||||
 |
 |
||||||||||||||||||
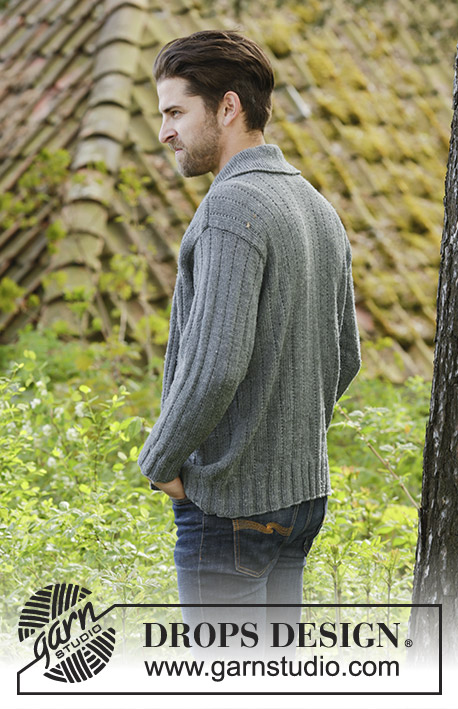
Knitted DROPS men’s jacket with simple cable, textured pattern and shawl collar in Karisma. Size: XS - XXXL.
DROPS 174-1 |
|||||||||||||||||||
|
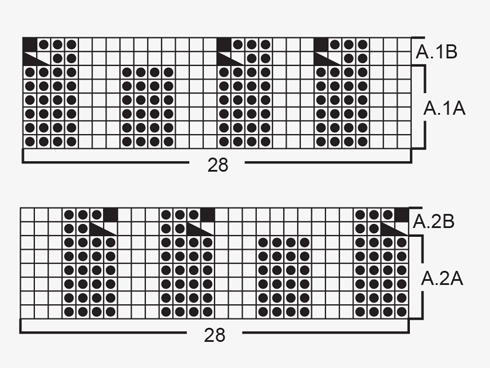
GARTER ST (back and forth): K all rows. 1 ridge = 2 rows K. PATTERN: See diagrams A.1 to A.5. The diagrams show all rows in pattern seen from RS. KNITTING TIP (applies to bands): To keep the bands from contracting vertically work short rows over bands as follows: * Beg mid front and K the outermost 10 sts (= band), turn piece, slip 1st st as if to K, tighten yarn and K the rest of row *, repeat from *-* after approx. every 10 rows in piece. INCREASE TIP-1 (applies to shawl collar): Inc 1 st in next to last st towards mid front by K in front and back loop of same st. INCREASE TIP-2 (applies to mid under sleeve): Inc 1 st on each side of st with marker mid under sleeve. Inc 1 st by making 1 YO, on next round work YO twisted to avoid holes. Work the inc sts in the pattern A.3. DECREASE TIP (applies to neckline): Dec inside 10 band sts in garter st + inc sts for shawl collar. All dec are done from RS! Dec as follows before band + collar: K 2 tog. Dec as follows after collar + band: Slip 1 st as if to K, K 1, psso. BUTTONHOLES: Dec for buttonholes from RS on left band (when garment is worn). 1 buttonhole = work 6 band sts as before, slip next to last st on right needle over outermost st on right needle, K 1, slip next to last st on right needle over outermost st on right needle (2 sts cast off), K the last 3 sts. On next row cast on 2 new sts over the cast off sts. Dec for buttonholes when piece measures: SIZE XS/S: 2, 12, 21, 31, 40 and 50 cm. SIZE M: 2, 12, 21, 31, 41 and 51 cm. Size L: 2, 12, 22, 32, 42 and 52 cm. SIZE XL: 3, 13, 23, 33, 43 and 53 cm. Size XXL: 3, 13, 23, 33, 43 and 54 cm. SIZE XXXL: 3, 13, 24, 34, 45 and 55 cm. ---------------------------------------------------------- JACKET: Worked back and forth on circular needle from mid front. BODY: Cast on 243-271-299-327-355-383 sts (incl 10 band sts in each side towards mid front) on circular needle size 3 mm with Karisma. P 1 row from WS. Work next row as follows from RS: 10 band sts in GARTER ST – see explanation above, A.1A (= 28 sts), * K 3, P 4 *, repeat from *-* 11-13-15-17-19-21 times in total, K 3, P 7 (= mid back), * K 3, P 4 *, repeat from *-* 11-13-15-17-19-21 times in total, K 3, A.2A (= 28 sts) and 10 band sts in garter st. Work back from WS with garter st over garter st, P over P, K over K. Continue rib until piece measures 8 cm, remember BUTTONHOLES on left band – see explanation above and KNITTING TIP. Work next row as follows from RS: 10 band sts as before, A.1B (= 28 sts dec to 25 sts), * K 3, P 2, P 2 tog *, repeat from *-* 11-13-15-17-19-21 times in total, K 3, P 2 tog, P 3, P 2 tog, * K 3, P 2, P 2 tog *, repeat from *-* 11-13-15-17-19-21 times in total, K 3, A.2B (= 28 sts dec to 25 sts) and 10 band sts as before = 213-237-261-285-309-333 sts. Work back from WS with garter st over garter st, P over P, K over K, (work A.1B and A.2B as shown in diagram). Switch to circular needle size 4 mm and work next row from RS as follows: 10 band sts as before, A.4 (= 25 sts), work A.3A over the next 72-84-96-108-120-132 sts (= 12-14-16-18-20-22 repetitions of 6 sts), work A.3B (= 5 sts), work A.3C over the next 66-78-90-102-114-126 sts (= 11-13-15-17-19-21 repetitions of 6 sts), work A.5 (= 25 sts) and finish with 10 band sts as before. Insert 1 marker in the 59th-65th-71st-77th-83rd-89th st in from each side (markers are in a st in garter st in the sides on body). Continue the pattern like this and move the markers upwards when working. REMEMBER THE KNITTING TENSION When piece measures 46-47-48-49-50-51 cm, cast off 7 sts in each side for armholes (i.e. cast off st with marker + 3 sts on each side of this). Then finish front and back piece separately. BACK PIECE: = 89-101-113-125-137-149 sts. Continue A.3 on back piece as before and cast off for armholes at beg of every row in each side as follows: Cast off 2 sts 0-0-2-5-5-7 times and 1 st 2-2-4-4-4-6 times = 85-97-97-97-109-109 sts. Continue to work until piece measures 66-68-70-72-74-76 cm. Now cast off the middle 23-27-27-27-29-29 sts for neck and finish each shoulder separately. Cast off 2 st on next row from neck = 29-33-33-33-38-38 sts remain on the shoulder. Continue to work until piece measures 68-70-72-74-76-78 cm and loosely cast off. Repeat on the other shoulder. LEFT FRONT PIECE: = 55-61-67-73-79-85 sts. Continue the pattern as before and cast off for armhole at beg of every row from the side as on back piece. AT THE SAME TIME when 2 rows have been worked after last buttonhole on band work 1 ridge (i.e. 2 rows K) over only the outermost 10 band sts towards mid front (do not work the other sts on row). Then work over all sts on row as before. AT THE SAME TIME inc 1 st for shawl collar towards mid front – READ INCREASE TIP-1. Inc like this every other row 18-18-18-20-20-20 times in total. AT THE SAME TIME when piece measures 52-53-54-55-56-57 cm (2 cm should now be worked after last buttonhole), dec 1 st for neckline towards mid front - READ DECREASE TIP. Dec like this every other row (i.e. every row from RS) a total of 10-12-12-12-13-13 times and then every 4th row (i.e. every other row from RS) 4 times in total in all sizes. After all inc and dec, there are 57-61-61-63-68-68 sts on needle. When piece measures 68-70-72-74-76-78 cm, cast off the outermost 29-33-33-33-38-38 sts on shoulder = 28-28-28-30-30-30 sts remain for collar. Continue back and forth in garter st over these sts as follows: * 1 ridge over all sts, 1 ridge over only the outermost 18-18-18-20-20-20 sts *, repeat from *-* until collar measures approx. 9-9-9-10-10-10 cm inside on the most narrow (collar measures approx. 18-18-18-20-20-20 cm at the edge on the widest). Cast off. RIGHT FRONT PIECE: Work as left but reversed. NOTE: Do not dec for buttonholes on right band. When working 1 ridge over only the outermost 10 sts towards mid front, adjust according to left front piece. SLEEVE: Cast on 56-56-63-63-63-70 sts on double pointed needles size 3 mm with Karisma. K 1 round. Work next round as follows: * K 3, P 4 *, repeat from *-* the entire round. When piece measures 6 cm, work next round as follows: * K 3, P 2, P 2 tog *, repeat from *-* the entire round = 48-48-54-54-54-60 sts. Switch to double pointed needles size 4 mm and work pattern in the round according to diagram A.3A. Insert 1 marker in last st on round (i.e. in st in garter st = mid under sleeve) and move the marker upwards. When piece measures 8 cm, inc 2 sts mid under sleeve - READ INCREASE TIP-2. Inc a total of 18-20-20-22-25-25 times in Size S: On every 7th round, in size M + L: On every 6th round, in size XL: On every 5th round, in size XXL: Alternately on every 4th and 5th round and size XXXL: On every 4th round = 84-88-94-98-104-110 sts. When piece measures 53-53-51-49-49-46 cm (NOTE: Shorter measurements in the larger sizes because of longer sleeve cap and wider shoulders) cast off the middle 7 sts under sleeve (cast off st with marker + 3 sts on each side of this). Now work sleeve cap back and forth on circular needle. Continue with the pattern while AT THE SAME TIME casting off at beg of every row in each side as follows: Cast off 3 sts 1 time, 2 sts 1-1-2-3-3-4 time and 1 st 2-2-3-3-3-6 times. Continue to cast off 2 sts in each side of piece until piece measures 59 cm in all sizes, cast off 3 sts 1 time in each side and cast off the remaining sts. Sleeve measures approx. 60 cm in all sizes. Knit another sleeve the same way. ASSEMBLY: Sew the shoulder seams. Sew collar tog mid back (make sure that seam is not visible when collar is folded down). Sew collar to neckline in the back of neck. Sew in sleeves. Sew the buttons on to the right band. |
|||||||||||||||||||
Diagram explanations |
|||||||||||||||||||
|
|||||||||||||||||||
 |
|||||||||||||||||||
 |
|||||||||||||||||||
 |
|||||||||||||||||||
Have you finished this pattern?Tag your pictures with #dropspattern #jacksoncardigan or submit them to the #dropsfan gallery. Do you need help with this pattern?You'll find 26 tutorial videos, a Comments/Questions area and more by visiting the pattern on garnstudio.com. © 1982-2026 DROPS Design A/S. We reserve all rights. This document, including all its sub-sections, has copyrights. Read more about what you can do with our patterns at the bottom of each pattern on our site. |
|||||||||||||||||||


With over 40 years in knitting and crochet design, DROPS Design offers one of the most extensive collections of free patterns on the internet - translated to 17 languages. As of today we count 324 catalogues and 12245 patterns translated into English (UK/cm). 12245
We work hard to bring you the best knitting and crochet have to offer, inspiration and advice as well as great quality yarns at incredible prices! Would you like to use our patterns for other than personal use? You can read what you are allowed to do in the Copyright text at the bottom of all our patterns. Happy crafting!
Post a comment to pattern DROPS 174-1
We would love to hear what you have to say about this pattern!
If you want to leave a question, please make sure you select the correct category in the form below, to speed up the answering process. Required fields are marked *.