
Popular categories
Looking for a yarn?


Comments / Questions (239)
![]() Myriam DEVAUCHELLE wrote:
Myriam DEVAUCHELLE wrote:
Merci de votre réponse. Je pense faire une erreur quelque part mais où? en effet avant de commencer les augmentations j'avais bien des séquences 5 jersey - 1 point mousse, mais si je fais une augmentation avant et après le marqueur (sur un point mousse) je me retrouve avec une maille jersey en plus à chaque séquence puis 2 de plus à l'augmentation suivante etc.. merci de m'aider.
18.11.2019 - 14:58DROPS Design answered:
Bonjour Mme Devauchelle, en taille M, vous commencez par 1 m point mousse, vous allez augmenter 1 m avant cette maille + 1 m après cette maille, ces deux nouvelles mailles vont se tricoter en point fantaisie: ces 2 nouvelles mailles vont se tricoter au point mousse. Les 6 augmentations suivantes (= 12 m au total) vont se tricoter en jersey, la 8ème augmentation va se tricoter au point mousse, et les 6 suivantes en jersey de nouveau et ainsi de suite. Vous aurez toujours quelques tours où le motif ne tombera pas juste au milieu sous la manche, mais il doit continuer en hauteur au fur et à mesure des augmentations. Bon tricot!
18.11.2019 - 15:35
![]() Myriam DEVAUCHELLE wrote:
Myriam DEVAUCHELLE wrote:
Bonjour, je reprends le tricot après de gros soucis familiaux. au niveau des augmentations des manches, j'ai 54 mailles (tailleM) ,je fais un jeté de chaque côté du marqueur et au tour suivant je me retrouve avec 6 points de jersey et un mousse alors que selon le diagramme je dois avoir 5 jersey et un point mousse. or cela va aller en empirant à chaque augmentations, est ce normal? merci d'avance de votre réponse
17.11.2019 - 14:43DROPS Design answered:
Bonjour Mme Devauchelle, quand vous augmentez pour les manches, vous devez tricoter les augmentations de sorte de bien conserver la séquence du point fantaisie, soit *1 m point mousse, 5 m jersey* ou *5 m jersey, 1 m point mousse*. Bon tricot!
18.11.2019 - 10:26
![]() Corrie Heijke wrote:
Corrie Heijke wrote:
Vraag: als je verder gaat in patroon met nld 4 , houd ik aan weerskanten van de middelste 5 steken drie steken over, wat moet ik daar mee?( herenvest jackson ) - Groeten corrie
15.11.2019 - 17:34DROPS Design answered:
Dag Corrie,
Het totaal aantal steken dat je moet breien in patroon als je verder gaat met naald 4 komt overeen met het totaal aantal steken dat je dan op de naald hebt. Controleer even goed of je niet iets over het hoofd hebt gezien.
23.11.2019 - 15:15
![]() Ladouceur wrote:
Ladouceur wrote:
Après les cotes,sur l’endroit,je fais 10 m.bordure-A4-A3A-A3B-A3C-A5-10m.bordure mais sur l’envers est-ce que je fais pareil ou plutôt 10m.bordure-A5-A3C-A3B-A3A-A4-10m.bordure? Est-ce vraiment nécessaire de mettre un marqueur après les cotes et de le faire suivre à chaque rangs ou on peut attendre d’être rendu aux emmanchures? Merci
14.11.2019 - 05:17DROPS Design answered:
Bonjour Mme Ladouceur, vous tricotez en rangs, vous devez donc suivre les diagrammes dans l'autre sens sur l'envers: bordure devant, A.5, A.3c, A.3B, A.3A, A.4, bordure devant (en lisant cette fois ces diagrammes de gauche à droite) - cf diagrammes tricot. Vous pouvez à priori placer vos 2 marqueurs juste avant de rabattre les mailles des emmanchures. Bon tricot!
14.11.2019 - 10:12
![]() Carole Ladouceur wrote:
Carole Ladouceur wrote:
Je voudrais faire ce modèle mais je ne comprends pas comment le partir.Monter 299 mailles et tricoter 10 mailles bordure puis (3 m.end,4 m. env.) fois 15 (=105 m) puis 3 m. End,7 m.env.(=125 m)au milieu dos puis( 3 m. End,4 m. ) fois 15(=105 m) puis 3 m.end et 10 m.bordure. Donc 125+105+3+10=240 m. Il me manque 59 m.. C’est quoi mon erreur? Merci
04.11.2019 - 19:55DROPS Design answered:
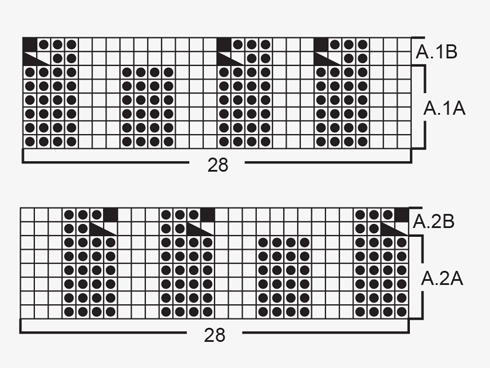
Bonjour Mme Ladouceur, vous tricotez les 299 m ainsi: 10 m point mousse, A.1A (= 28 m), (3 m end, 4 m env) x 15 (= 105 m), 3 m end, 7 m env, (3 m end, 4 m env) x 15 (= 105 m), 3 m end, A.2A (= 28 m), 10 m point mousse soit: 10+28+105+3+7+105+3+28+10= 299m. Bon tricot!
05.11.2019 - 08:49
![]() Marcia wrote:
Marcia wrote:
Hi. Is this sweater designed to be buttoned up? In the photo, it looks like it won't fit all the way across the chest.
16.10.2019 - 03:47DROPS Design answered:
Dear Marcia, ys, the sweater is designed to be used buttoned up. There is ample space in the chest area for that. You can find a number of cardigans knitted from this pattern on ravelry.com. Happy Knitting!
16.10.2019 - 05:24
![]() Yu Ting wrote:
Yu Ting wrote:
I don't understand what "KNITTING TIP" means, particularly "turn piece, slip 1st st as if to K, tighten yarn and K the rest of row".
11.10.2019 - 16:28DROPS Design answered:
Dear Yu Ting, it means you knit short rows, in other words you turn the piece in mid row, and continue with the next row knitted back. THIS video might help you undertsnad how it is done. Happy knitting!
12.10.2019 - 01:13
![]() Ulla Børre Eriksen wrote:
Ulla Børre Eriksen wrote:
Jeg er nået til sjalskravens begyndelse. Skal jeg fortsætte med de forkortede pinde på hver tiende pind på resten af arbejdet også?
08.10.2019 - 12:53DROPS Design answered:
Hej Ulla, nej du stopper når du begynder at tage ud til sjalskraven, og så begynder du igen når du har taget alle masker ud. Således: ..... = 28-28-28-30-30-30 m tilbage på p til krave. Fortsæt frem og tilbage med retstrik over disse m således: * 2 p retstrik over alle m, 2 p retstrik over kun de yderste 18-18-18-20-20-20 m *, gentag fra *-* til kraven måler ca 9-9-9-10-10-10 cm inderst på det smalleste (kraven måler ca 18-18-18-20-20-20 cm yderst på det bredeste). Luk af. God fornøjelse!
08.10.2019 - 13:26
![]() Martine Gidon wrote:
Martine Gidon wrote:
Merci beaucoup pour vos conseils je dois y arriver maintenant
06.09.2019 - 16:44
![]() Martine GIDON wrote:
Martine GIDON wrote:
Je suis arrivée au col. Le côté de plus étroit est-il celui où je ne tricote que 18 mailles ?
04.09.2019 - 23:14DROPS Design answered:
Bonjour Mme Gidon, le côté du col le plus étroit est le côté épaules quand vous tricotez toutes les mailles. Le côté le plus long sera le côté où vous tricotez les rangs raccourcis sur les 18 premières mailles (= extérieur du col, c'est la partie que l'on va retourner sur l'endroit par la suite pour former le col châle). Bon tricot!
05.09.2019 - 09:26
|
|||||||||||||||||||
Jackson#jacksoncardigan |
|||||||||||||||||||
 |
 |
||||||||||||||||||
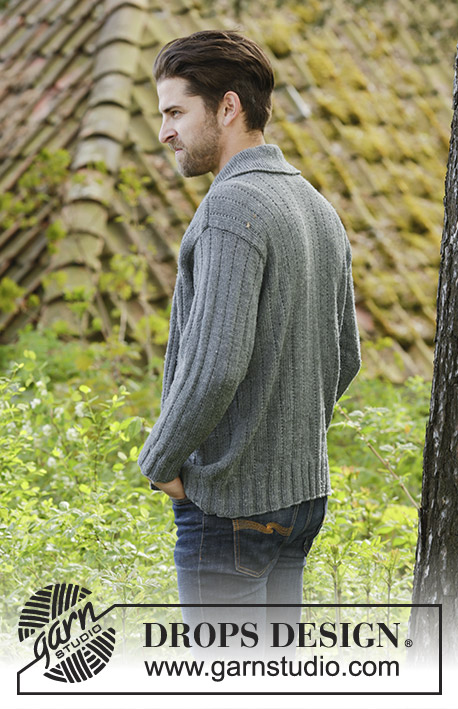
Knitted DROPS men’s jacket with simple cable, textured pattern and shawl collar in Karisma. Size: XS - XXXL.
DROPS 174-1 |
|||||||||||||||||||
|
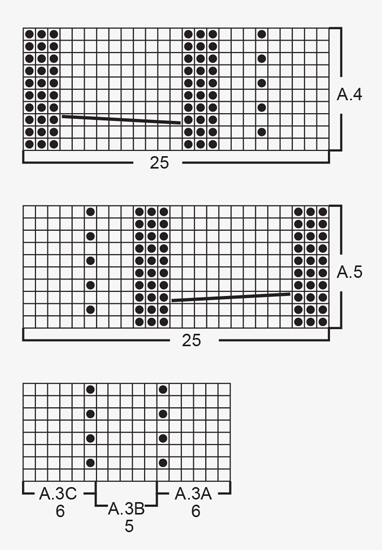
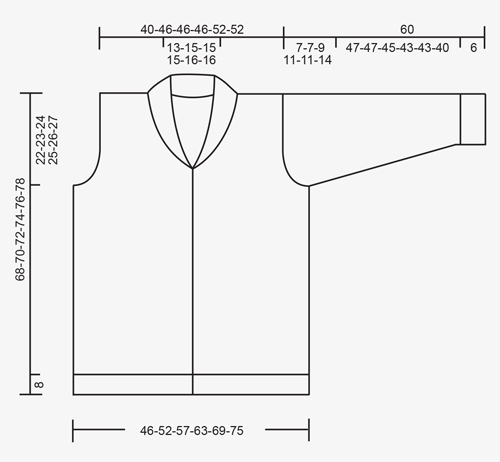
GARTER ST (back and forth): K all rows. 1 ridge = 2 rows K. PATTERN: See diagrams A.1 to A.5. The diagrams show all rows in pattern seen from RS. KNITTING TIP (applies to bands): To keep the bands from contracting vertically work short rows over bands as follows: * Beg mid front and K the outermost 10 sts (= band), turn piece, slip 1st st as if to K, tighten yarn and K the rest of row *, repeat from *-* after approx. every 10 rows in piece. INCREASE TIP-1 (applies to shawl collar): Inc 1 st in next to last st towards mid front by K in front and back loop of same st. INCREASE TIP-2 (applies to mid under sleeve): Inc 1 st on each side of st with marker mid under sleeve. Inc 1 st by making 1 YO, on next round work YO twisted to avoid holes. Work the inc sts in the pattern A.3. DECREASE TIP (applies to neckline): Dec inside 10 band sts in garter st + inc sts for shawl collar. All dec are done from RS! Dec as follows before band + collar: K 2 tog. Dec as follows after collar + band: Slip 1 st as if to K, K 1, psso. BUTTONHOLES: Dec for buttonholes from RS on left band (when garment is worn). 1 buttonhole = work 6 band sts as before, slip next to last st on right needle over outermost st on right needle, K 1, slip next to last st on right needle over outermost st on right needle (2 sts cast off), K the last 3 sts. On next row cast on 2 new sts over the cast off sts. Dec for buttonholes when piece measures: SIZE XS/S: 2, 12, 21, 31, 40 and 50 cm. SIZE M: 2, 12, 21, 31, 41 and 51 cm. Size L: 2, 12, 22, 32, 42 and 52 cm. SIZE XL: 3, 13, 23, 33, 43 and 53 cm. Size XXL: 3, 13, 23, 33, 43 and 54 cm. SIZE XXXL: 3, 13, 24, 34, 45 and 55 cm. ---------------------------------------------------------- JACKET: Worked back and forth on circular needle from mid front. BODY: Cast on 243-271-299-327-355-383 sts (incl 10 band sts in each side towards mid front) on circular needle size 3 mm with Karisma. P 1 row from WS. Work next row as follows from RS: 10 band sts in GARTER ST – see explanation above, A.1A (= 28 sts), * K 3, P 4 *, repeat from *-* 11-13-15-17-19-21 times in total, K 3, P 7 (= mid back), * K 3, P 4 *, repeat from *-* 11-13-15-17-19-21 times in total, K 3, A.2A (= 28 sts) and 10 band sts in garter st. Work back from WS with garter st over garter st, P over P, K over K. Continue rib until piece measures 8 cm, remember BUTTONHOLES on left band – see explanation above and KNITTING TIP. Work next row as follows from RS: 10 band sts as before, A.1B (= 28 sts dec to 25 sts), * K 3, P 2, P 2 tog *, repeat from *-* 11-13-15-17-19-21 times in total, K 3, P 2 tog, P 3, P 2 tog, * K 3, P 2, P 2 tog *, repeat from *-* 11-13-15-17-19-21 times in total, K 3, A.2B (= 28 sts dec to 25 sts) and 10 band sts as before = 213-237-261-285-309-333 sts. Work back from WS with garter st over garter st, P over P, K over K, (work A.1B and A.2B as shown in diagram). Switch to circular needle size 4 mm and work next row from RS as follows: 10 band sts as before, A.4 (= 25 sts), work A.3A over the next 72-84-96-108-120-132 sts (= 12-14-16-18-20-22 repetitions of 6 sts), work A.3B (= 5 sts), work A.3C over the next 66-78-90-102-114-126 sts (= 11-13-15-17-19-21 repetitions of 6 sts), work A.5 (= 25 sts) and finish with 10 band sts as before. Insert 1 marker in the 59th-65th-71st-77th-83rd-89th st in from each side (markers are in a st in garter st in the sides on body). Continue the pattern like this and move the markers upwards when working. REMEMBER THE KNITTING TENSION When piece measures 46-47-48-49-50-51 cm, cast off 7 sts in each side for armholes (i.e. cast off st with marker + 3 sts on each side of this). Then finish front and back piece separately. BACK PIECE: = 89-101-113-125-137-149 sts. Continue A.3 on back piece as before and cast off for armholes at beg of every row in each side as follows: Cast off 2 sts 0-0-2-5-5-7 times and 1 st 2-2-4-4-4-6 times = 85-97-97-97-109-109 sts. Continue to work until piece measures 66-68-70-72-74-76 cm. Now cast off the middle 23-27-27-27-29-29 sts for neck and finish each shoulder separately. Cast off 2 st on next row from neck = 29-33-33-33-38-38 sts remain on the shoulder. Continue to work until piece measures 68-70-72-74-76-78 cm and loosely cast off. Repeat on the other shoulder. LEFT FRONT PIECE: = 55-61-67-73-79-85 sts. Continue the pattern as before and cast off for armhole at beg of every row from the side as on back piece. AT THE SAME TIME when 2 rows have been worked after last buttonhole on band work 1 ridge (i.e. 2 rows K) over only the outermost 10 band sts towards mid front (do not work the other sts on row). Then work over all sts on row as before. AT THE SAME TIME inc 1 st for shawl collar towards mid front – READ INCREASE TIP-1. Inc like this every other row 18-18-18-20-20-20 times in total. AT THE SAME TIME when piece measures 52-53-54-55-56-57 cm (2 cm should now be worked after last buttonhole), dec 1 st for neckline towards mid front - READ DECREASE TIP. Dec like this every other row (i.e. every row from RS) a total of 10-12-12-12-13-13 times and then every 4th row (i.e. every other row from RS) 4 times in total in all sizes. After all inc and dec, there are 57-61-61-63-68-68 sts on needle. When piece measures 68-70-72-74-76-78 cm, cast off the outermost 29-33-33-33-38-38 sts on shoulder = 28-28-28-30-30-30 sts remain for collar. Continue back and forth in garter st over these sts as follows: * 1 ridge over all sts, 1 ridge over only the outermost 18-18-18-20-20-20 sts *, repeat from *-* until collar measures approx. 9-9-9-10-10-10 cm inside on the most narrow (collar measures approx. 18-18-18-20-20-20 cm at the edge on the widest). Cast off. RIGHT FRONT PIECE: Work as left but reversed. NOTE: Do not dec for buttonholes on right band. When working 1 ridge over only the outermost 10 sts towards mid front, adjust according to left front piece. SLEEVE: Cast on 56-56-63-63-63-70 sts on double pointed needles size 3 mm with Karisma. K 1 round. Work next round as follows: * K 3, P 4 *, repeat from *-* the entire round. When piece measures 6 cm, work next round as follows: * K 3, P 2, P 2 tog *, repeat from *-* the entire round = 48-48-54-54-54-60 sts. Switch to double pointed needles size 4 mm and work pattern in the round according to diagram A.3A. Insert 1 marker in last st on round (i.e. in st in garter st = mid under sleeve) and move the marker upwards. When piece measures 8 cm, inc 2 sts mid under sleeve - READ INCREASE TIP-2. Inc a total of 18-20-20-22-25-25 times in Size S: On every 7th round, in size M + L: On every 6th round, in size XL: On every 5th round, in size XXL: Alternately on every 4th and 5th round and size XXXL: On every 4th round = 84-88-94-98-104-110 sts. When piece measures 53-53-51-49-49-46 cm (NOTE: Shorter measurements in the larger sizes because of longer sleeve cap and wider shoulders) cast off the middle 7 sts under sleeve (cast off st with marker + 3 sts on each side of this). Now work sleeve cap back and forth on circular needle. Continue with the pattern while AT THE SAME TIME casting off at beg of every row in each side as follows: Cast off 3 sts 1 time, 2 sts 1-1-2-3-3-4 time and 1 st 2-2-3-3-3-6 times. Continue to cast off 2 sts in each side of piece until piece measures 59 cm in all sizes, cast off 3 sts 1 time in each side and cast off the remaining sts. Sleeve measures approx. 60 cm in all sizes. Knit another sleeve the same way. ASSEMBLY: Sew the shoulder seams. Sew collar tog mid back (make sure that seam is not visible when collar is folded down). Sew collar to neckline in the back of neck. Sew in sleeves. Sew the buttons on to the right band. |
|||||||||||||||||||
Diagram explanations |
|||||||||||||||||||
|
|||||||||||||||||||
 |
|||||||||||||||||||
 |
|||||||||||||||||||
 |
|||||||||||||||||||
Have you finished this pattern?Tag your pictures with #dropspattern #jacksoncardigan or submit them to the #dropsfan gallery. Do you need help with this pattern?You'll find 26 tutorial videos, a Comments/Questions area and more by visiting the pattern on garnstudio.com. © 1982-2026 DROPS Design A/S. We reserve all rights. This document, including all its sub-sections, has copyrights. Read more about what you can do with our patterns at the bottom of each pattern on our site. |
|||||||||||||||||||


With over 40 years in knitting and crochet design, DROPS Design offers one of the most extensive collections of free patterns on the internet - translated to 17 languages. As of today we count 324 catalogues and 12245 patterns translated into English (UK/cm). 12245
We work hard to bring you the best knitting and crochet have to offer, inspiration and advice as well as great quality yarns at incredible prices! Would you like to use our patterns for other than personal use? You can read what you are allowed to do in the Copyright text at the bottom of all our patterns. Happy crafting!
Post a comment to pattern DROPS 174-1
We would love to hear what you have to say about this pattern!
If you want to leave a question, please make sure you select the correct category in the form below, to speed up the answering process. Required fields are marked *.