
Popular categories
Looking for a yarn?


Comments / Questions (30)
![]() Barbara Straatsma wrote:
Barbara Straatsma wrote:
Ik heb de boord en de verhoging achter klaar. Als ik het patroon ga breien, moet ik de av naald dan ook volgens patroon breien? Is dat de volgende toer volgens het patroon? Of is dat dezelfde kleur als de r naald? Groetjes Barbara
24.04.2021 - 15:35DROPS Design answered:
Dag Barbara,
Ja, de averechtse naald brei je ook volgens patroon, dus op de verkeerde kant. In het telpatroon zijn alle naalden aangegeven, dus zowel de naalden aan de goede kant als aan de verkeerde kant. De heengaande naalden zijn steeds de oneven naalden in het patroon en de teruggaande naalden zijn de even naalden in het patroon.
25.04.2021 - 17:58
![]() Anne wrote:
Anne wrote:
Jeg søker med valg «nedenfra opp». Hvorfor vises disse som er ovenfra ned ?
07.12.2019 - 20:00DROPS Design answered:
Hei Anne! Dessverre er vår søkemotor ikke perfekt, sannsynligvis får du opp plagg som strikkes ovenfra og ned fordi ordet "opp" er inkludert i ditt søk. Du kan prøve å bare søke på nedenfra, ellers har Ravelry.com en mer avansert søkemotor der det er mulig å spesifisere ditt søk enda mer. Alle våre mønstre finnes på Ravelry.com, bare søk på Garnstudio. Lykke til!
09.12.2019 - 10:36
![]() Ricci wrote:
Ricci wrote:
Bonjour je craque littéralement pour ce gilet , les couleurs sont superbe! Mais voilà je n' ai jamais tricoté de jacquard. Me le conseillez vous pour une débutante d' autant que j' ai découvert la technique du steek et j' aimerai également me lancer car tricoter un gilet à plat je n' aime pas trop. Qu' en pensez vous? Je vous remercie pour tous vos conseils qui sont toujours très bons ! Si vous avez des modèles pour debutantes je veux bien aussi
23.11.2019 - 16:25
![]() Judith Butler wrote:
Judith Butler wrote:
This website won't allow me to download the free pdf. Please advise
25.10.2019 - 07:43DROPS Design answered:
Dear Mrs Butler, our patterns can only be printed (by clicking on the icon button "Print", but choosing a virtual printer will allow you to save them as a .PDF file. Happy knitting!
25.10.2019 - 09:58
![]() Graziella wrote:
Graziella wrote:
Ora vedo il simbolo su questo schema in inglese. Sullo schema in italiano c’è un quadrato vuoto, probabilmente un errore di trascrizione e quindi non capivo. Grazie molte
15.01.2019 - 21:36
![]() Graziella wrote:
Graziella wrote:
Non riesco a capire il simbolo del quadrato con la X cosa sia. Grazie
15.01.2019 - 20:39DROPS Design answered:
Buonasera Graziella. Il quadrato con la X indica che deve lavorare quella maglia con il colore rosa scuro. Buon lavoro!
15.01.2019 - 21:28
![]() Caroline M wrote:
Caroline M wrote:
Ma mère m'a tricoté ce magnifique gilet. La laine est incroyablement chaude et douce ! Elle a préféré le tricoter de bas en haut, et sur aiguilles droites, à son habitude. J'adore mon gilet !
11.08.2018 - 11:10
![]() Kim wrote:
Kim wrote:
I would like to make this in cotton. Can it be made with Safran and if so what would be the corresponding colors?
06.06.2018 - 07:52DROPS Design answered:
Dear Kim, DROPS Safran is a good alternative. Propositions of colours: Alpaca (A) 2923>Safran (S) 11, A 2925>S28, A 3770>S 02, A 6309>S 51, A7233>S31, A 9020 >S 17 or 18?, A 9022>S 12. But the decision is yours :) Happy knitting!
06.06.2018 - 08:40
![]() Anna wrote:
Anna wrote:
Hallo, ich habe Probleme mit der Symetrie in A1. Sie schreiben ja in der Anleitung, dass man am Ende der rechts- Reihe noch die erste Masche von A1 stricken muss, damit das Muster an beiden Seiten symetrisc h wird. Heit das dann, dass ich in der folgenden Rückreihe links die erste Masche von A1 quasi zweimal stricken muss? Meine Maschengesamtzahl stimmt genau, dennoch liegen die einzelnen Muster der verschiedenen Farben nicht so übereinander wie auf der Abbildung...
27.04.2018 - 21:16DROPS Design answered:
Liebe Anna, bei der Hin-Reihe wiederholen Sie die 5 M in A.1 von rechts nach links, dann stricken Sie die 1. Masche an der rechten Seite. Bei der Hin-Reihe stricken Sie die 1. M an der rechten Seiten, dann wiederholen Sie die 5 M in A.1 von links nach rechts. Viel Spaß beim stricken!
30.04.2018 - 09:45
![]() Jacqueline wrote:
Jacqueline wrote:
Hallo wo finde ich denn die zunehmen im Diagramm ?
16.11.2016 - 14:56DROPS Design answered:
Liebe Jacqueline, die Zunahmen im Diagram sind mit 1 Umschlag gezeichnet - siehe 10. Symbol - in der nächsten Reihe stricken Sie den Umschlag verschränkt (= kein Loch). Viel Spaß beim stricken!
17.11.2016 - 08:58
|
|||||||||||||||||||||||||||||||||||||
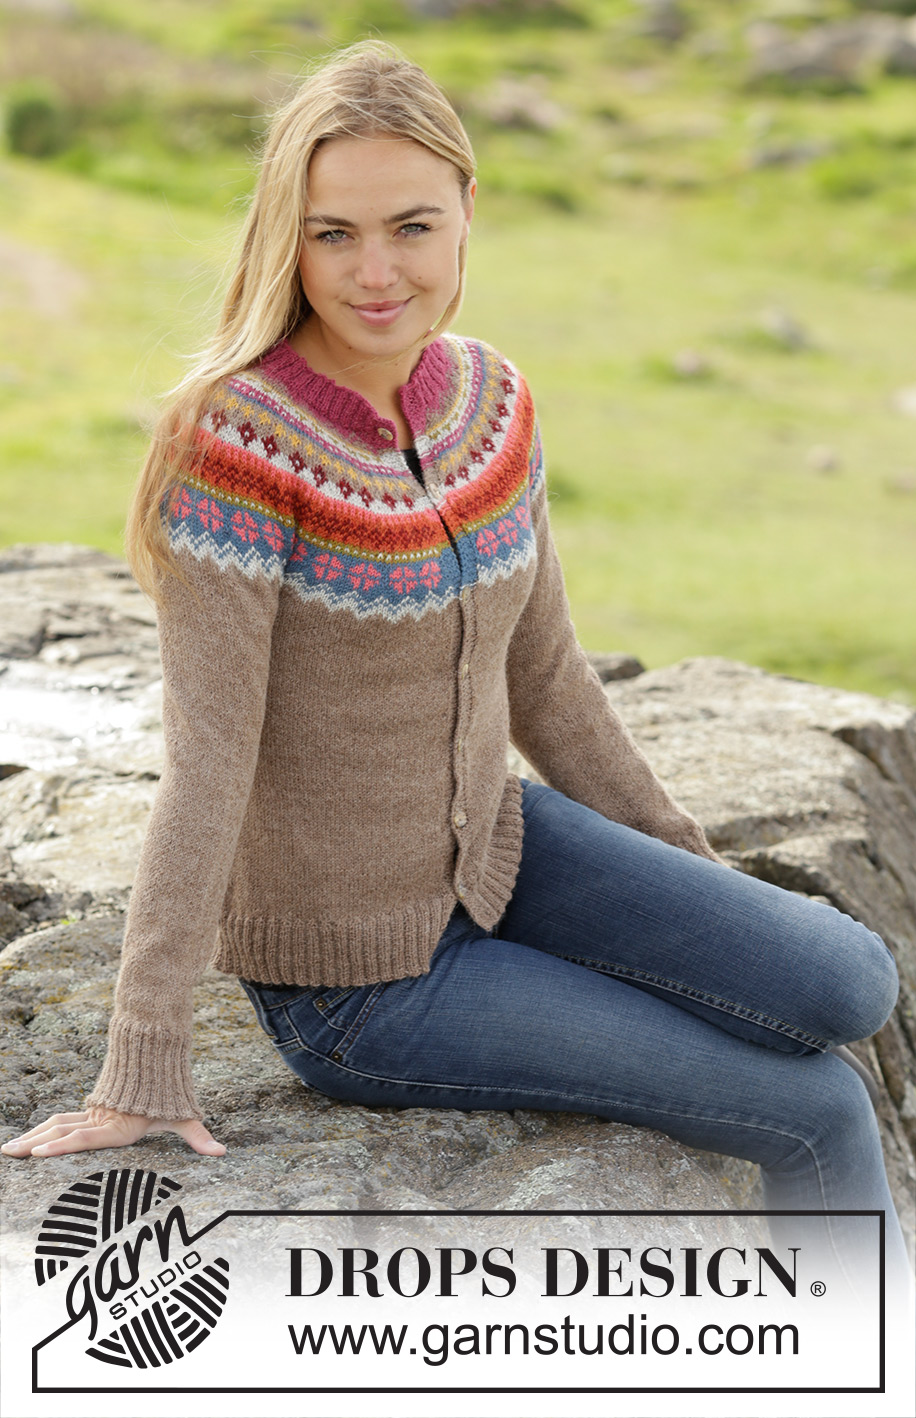
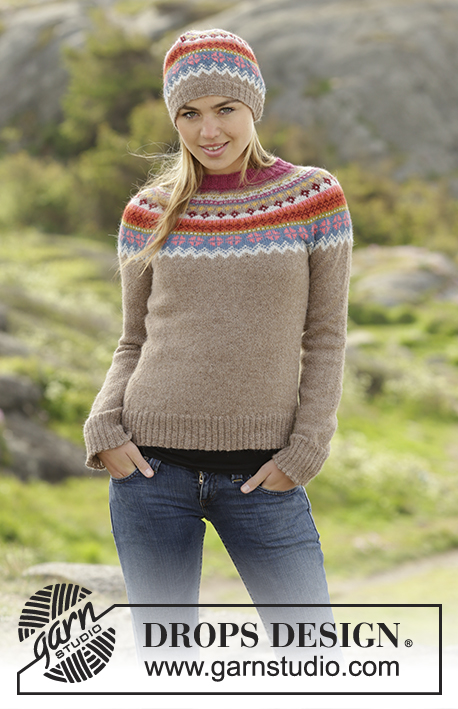
Stavanger Cardigan#stavangercardigancardigan |
|||||||||||||||||||||||||||||||||||||
|
|
|||||||||||||||||||||||||||||||||||||
Knitted DROPS jacket worked top down with round yoke and multi-coloured pattern on yoke in ”Alpaca”. Size: S - XXXL.
DROPS 173-50 |
|||||||||||||||||||||||||||||||||||||
|
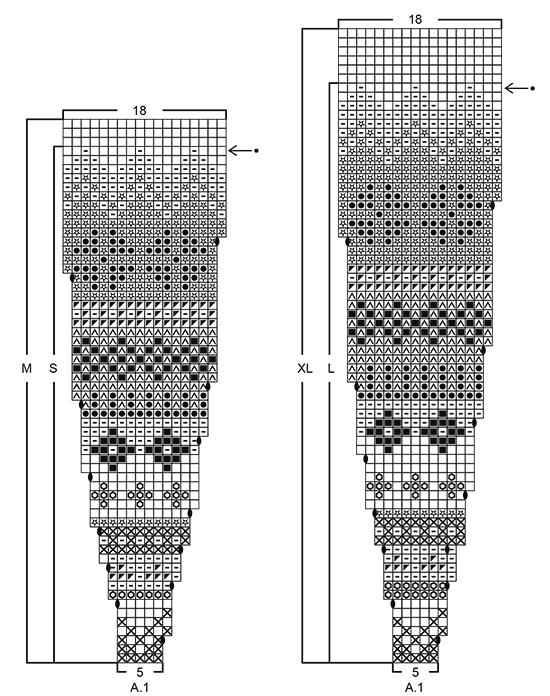
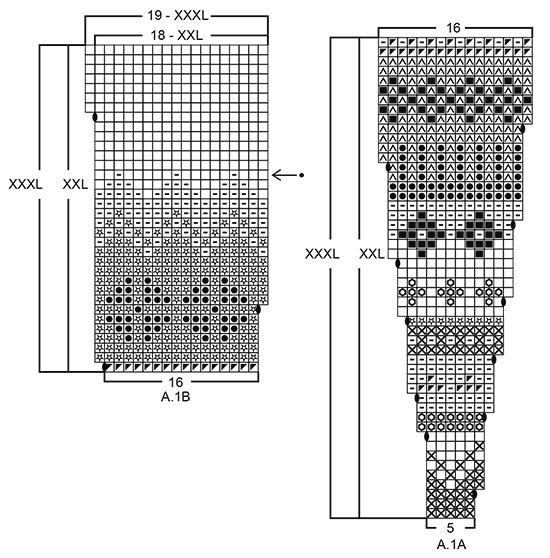
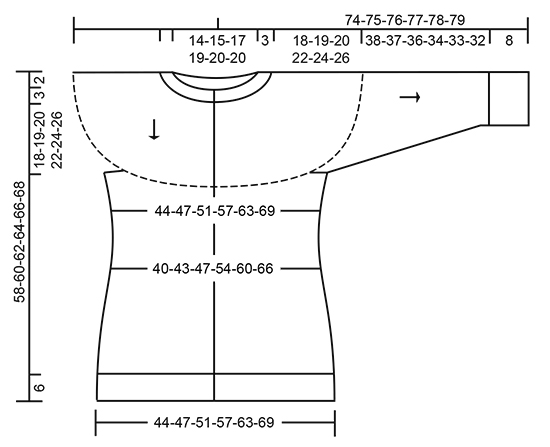
GARTER ST (back and forth): K all rows. 1 ridge = 2 rows K. DECREASE/INCREASE TIP: To calculate how to dec/inc evenly, use the total no of sts on row (e.g. 132 sts), minus bands (e.g. 10 sts) and divide the remaining sts by no of dec/inc to be done (e.g. 26) = 4.7. I.e. in this example K alternately approx. every 3rd and 4th st and every 4th and 5th st tog when dec (do not dec over bands). If inc is done, this is done alternately approx. every 4th and 5th st. PATTERN: See diagram A.1 (choose diagram for correct size). Work entire pattern in stocking st. KNITTING TIP-1 (applies to bands): On the rows where there are pattern border, work base colour in pattern border also over the 5 band sts in each side. KNITTING TIP-2: To avoid the knitting tension to tighten when working pattern, it is important not to tighten the strands on back side of piece. Switch to a higher needle no when working pattern if the pattern is somewhat tight. DECREASE TIP-1 (applies to sides on body and mid under sleeve): All dec are done from RS! Beg 4 sts before marker and K 2 tog, K 4 (marker is between these 4 sts), slip 1 st as if to K, K 1, psso (= 2 sts dec). INCREASE TIP-1 (applies to sides of body): Work until 2 sts remain before marker: Make 1 YO, K 4 (marker is in the middle of these 4 sts), make 1 YO (= 2 sts inc). On next row work YOs twisted to avoid holes. BUTTONHOLES: Dec for buttonholes on right band (when garment is worn). Dec from RS when 3 sts remain on row as follows: Make 1 YO, K the next 2 sts tog, K last st. On next round K the YO to make a hole. Dec first buttonhole when rib in neck measures approx. 1½-2 cm. Then dec the next 6-6-7-7-7-7 buttonholes, approx. 8-8-7½-7½-7-7 cm between each. ---------------------------------------------------------- JACKET: Work back and forth on circular needle from mid front, work top down. YOKE: Cast on 132-140-148-156-160-160 sts (incl 5 band sts in each side towards mid front) on circular needle size 2.5 mm with dark pink. P 1 row from WS. Work next row as follows from RS: 5 band sts in GARTER ST - see explanation above - * K 2, P 2 *, repeat from *-* until 7 sts remain on needle, finish with K 2 and 5 bands sts in garter st. Continue rib like this – remember BUTTONHOLES on right band – see explanation above. When rib measures 3 cm, K 1 row from RS while at the same time dec 26-29-27-25-24-24 sts evenly - READ DECREASE/INCREASE TIP = 106-111-121-131-136-136 sts. Switch to circular needle size 3 mm. For better shape work an elevation in the back of neck as follows: Insert 1 marker mid back. Beg from WS with dark pink and P until 9-10-11-11-12-12 sts have been worked past marker (K band), turn, tighten yarn and K 18-20-22-22-24-24. Turn, tighten yarn and P 27-30-33-33-36-36 sts, turn, tighten yarn and K 36-40-44-44-48-48 sts back. Turn, tighten yarn and P 45-50-55-55-60-60 sts, turn, tighten yarn and K 54-60-66-66-72-72 sts back. Turn, tighten yarn and P 63-70-77-77-84-84 sts, turn, tighten yarn and K 72-80-88-88-96-96 sts back. turn and P the rest of row (K band). Work next row as follows from RS: 5 band sts in garter st, work pattern according to diagram A.1 until 6 sts remain on row (= 19-20-22-24-25-25 repetitions of 5 sts. NOTE: choose diagram for correct size – in size XXL + XXXL: work first A.1A then A.1B over A.1A), work first st in A.1 (so that pattern beg and ends the same in each side towards mid front - NOTE: Do not inc in this st) and finish with 5 band sts in garter st. Continue pattern like this and inc as shown in diagram. REMEMBER THE KNITTING TENSION On row marked with arrow in diagram inc 1-3-0-0-9-11 sts evenly (inc in the sections with light beige and do not inc over bands). When diagram A.1 has been worked, there are 354-374-407-443-470-497 sts on needle and piece measures approx. 18-19-20-22-24-26 cm (measured mid front without rib in neck). Work next row as follows from WS: Work as before with light beige over the first 55-57-61-68-74-80 sts (= right front piece), slip the next 72-78-86-90-92-94 sts on a stitch holder (= sleeve), cast on 6-8-10-10-14-16 new sts (= in the side under sleeve), work as before over the next 100-104-113-127-138-149 sts (= back piece), slip the next 72-78-86-90-92-94 sts on a stitch holder (= sleeve), cast on 6-8-10-10-14-16 sts (= in the side under sleeve), work as before over the remaining 55-57-61-68-74-80 sts (= left front piece). Finish body and sleeves separately. BODY: = 222-234-255-283-314-341 sts. Insert 1 marker 58-61-66-73-81-88 sts in from each side (= 106-112-123-137-152-165 sts between markers on back piece). NOW MEASURE PIECE FROM HERE! Continue back and forth with light beige and stocking st with 5 band sts in garter st in each side towards mid front. When piece measures 2-2-2-3-3-4 cm, dec 1 st on each side of both markers – READ DECREASE TIP-1 (= 4 sts dec). Dec like this every 2½-2½-2½-3-3-4 cm a total of 5-5-5-4-4-3 times in each side = 202-214-235-267-298-329 sts. When piece measures 16-17-18-18-18-18 cm, inc 1 st on each side of both markers – READ INCREASE TIP-1 (= 4 sts inc). Inc like this every 3-3-3-4-4-5 cm a total of 5-5-5-4-4-3 times in each side = 222-234-255-283-314-341 sts. Continue until piece measures 29-30-31-31-31-31 cm (jacket measures 52-54-56-58-60-62 cm from shoulder). K 1 row from RS while inc 62-74-77-81-82-87 sts evenly - READ DECREASE/INCREASE TIP = 284-308-332-364-396-428 sts. Switch to circular needle size 2.5 mm and work next row from WS as follows: 5 band sts in garter st, * P 2, K 2 *, repeat from *-* until 7 sts remain and finish with P 2 and 5 band sts in garter st. Continue rib like this. When rib measures 6 cm (jacket measures approx. 58-60-62-64-66-68 cm from shoulder) inc 1 st in every transition between K 2 and P 2 by making 1 YO (= 68-74-80-88-96-104 sts inc) = 352-382-412-452-492-532 sts on needle (this inc is done to avoid a tight cast-off edge). On next row cast off with garter st over garter st, K over K and P over P (work YOs twisted before casting them off as regular sts). SLEEVE: Worked in the round on a short circular needle from top down. Switch to double pointed needles when needed. Slip the 72-78-86-90-92-94 sts from stitch holder in one side of piece on a short circular needle size 3 mm and pick in addition 1 st in each of the 6-8-10-10-14-16 sts cast on under sleeve = 78-86-96-100-106-110 sts. Insert 1 marker in the middle of the 6-8-10-10-14-16 sts under sleeve (= beg of round). NOW MEASURE PIECE FROM HERE! Work in stocking st in the round with light beige. When sleeve measures 1-1-3-3-1-3 cm, dec 2 sts mid under sleeve - READ DECREASE TIP-1. Dec like this every 3-2½-1½-1½-1½-1 cm 13-15-19-20-22-23 times in total = 52-56-58-60-62-64 sts. When piece measures 38-37-36-34-33-32 cm (NOTE: Shorter measurements in the larger sizes because of wider shoulders), K 1 round while inc 16-16-18-20-22-24 sts evenly = 68-72-76-80-84-88 sts. Switch to double pointed needles size 2.5 mm and work rib in the round = K 2/P 2. When rib measures 8 cm (or desired length) inc 1 st in every transition between K 2 and P 2 by making 1 YO (= 17-18-19-20-21-22 sts inc) = 85-90-95-100-105-110 sts. On next round cast off sts with K over K and P over P (work YOs twisted before casting them off as regular sts). Sleeve measures approx. 46-45-44-42-41-40 cm. Work the other sleeve the same way. ASSEMBLY: Sew the buttons on to the left band. |
|||||||||||||||||||||||||||||||||||||
Diagram explanations |
|||||||||||||||||||||||||||||||||||||
|
|||||||||||||||||||||||||||||||||||||
 |
|||||||||||||||||||||||||||||||||||||
 |
|||||||||||||||||||||||||||||||||||||
 |
|||||||||||||||||||||||||||||||||||||
Have you finished this pattern?Tag your pictures with #dropspattern #stavangercardigancardigan or submit them to the #dropsfan gallery. Do you need help with this pattern?You'll find 28 tutorial videos, a Comments/Questions area and more by visiting the pattern on garnstudio.com. © 1982-2026 DROPS Design A/S. We reserve all rights. This document, including all its sub-sections, has copyrights. Read more about what you can do with our patterns at the bottom of each pattern on our site. |
|||||||||||||||||||||||||||||||||||||


With over 40 years in knitting and crochet design, DROPS Design offers one of the most extensive collections of free patterns on the internet - translated to 17 languages. As of today we count 324 catalogues and 12267 patterns translated into English (UK/cm). 12267
We work hard to bring you the best knitting and crochet have to offer, inspiration and advice as well as great quality yarns at incredible prices! Would you like to use our patterns for other than personal use? You can read what you are allowed to do in the Copyright text at the bottom of all our patterns. Happy crafting!
Post a comment to pattern DROPS 173-50
We would love to hear what you have to say about this pattern!
If you want to leave a question, please make sure you select the correct category in the form below, to speed up the answering process. Required fields are marked *.